Various types of tiles are used to make countertops. They all differ in their technical and operational characteristics, but have one common property - high mechanical strength. Countertops can be made from ceramic, porcelain stoneware and natural stone tiles. Not only kitchen countertops are covered with such materials; there are options for making elements of coffee tables and dining tables.
Tile countertop
Advantages and disadvantages of the material
Traditionally, countertops are made from ceramic tiles or porcelain tiles, which are considered an improved and more durable version.
Ceramics are quite easy to install, even if you have virtually no experience in carrying out this type of repair work.
Main advantages of the material:
- Nice appearance. The design and color can be chosen to suit your taste. For a kitchen countertop, it is better to choose a matte surface, since cracks, chips, and scratches from knives and other utensils are less visible on it.
- High level of strength. Ceramic tiles do not lose their quality even after several years. If installation technologies are followed, the degree of susceptibility to mechanical damage will be very low.
- Resistance to moisture, making the tile suitable for tiling kitchen countertops, where moisture is an essential companion.
- Thermal resistance. Such a tabletop will not be damaged by a hot kettle or pan placed on it; no marks will remain on the surface.
- Ceramic tiles do not require special care; simply wipe them with a damp sponge and a small amount of detergent.
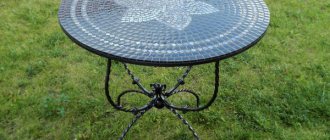
Mosaic table
There is no need to be upset if you accidentally break your favorite cup or plate. Don't worry and don't rush to throw it away. It’s better to take the opportunity to perpetuate the color and original design of your favorite dishes by making a table from ceramic tiles with your own hands. True, for this you will have to break something else...
When decorating a table or any other item with pieces of broken ceramic, first of all think about the combination of patterns and colors. In this project, bright, saturated colors and a black background were chosen as companion colors that can set off the black and white pattern of the plates. Perhaps if the plate were with delicate pink flowers, it would be better to combine them with pastel colors: beige, light green, lilac. And make the background light. To imagine what the product will look like, draw it with colored pencils.
Preparing for work
Think about the fact that broken glass, tiles, and ceramics can be dangerous—you can get hurt when working with them. Be sure to use protective equipment: gloves (fabric, rubber) and goggles. When chopping material, wrap it in a cloth or rag to prevent the fragments from scattering.
To work, you will need a stable old table made of metal or wood. You can make a table from an old stool or small bedside table, installing a tabletop-lid on them using self-tapping screws. Also prepare:
- Several ceramic tiles or a sufficient number of their fragments.
- Coarse and fine grain sandpaper.
- Tile adhesive.
- Cement.
- Dye for cement.
- Hammer.
- An ordinary saw.
- Paint.
- A brush.
- Grout in a color that suits your design.
- Spatula for glue and grout.
- Tile nippers.
- Sponge, rags.
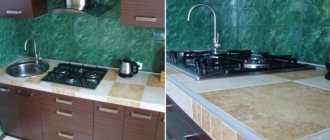
Choosing tiles for countertops
When choosing materials for a kitchen countertop, special attention should be paid to such parameters as strength, moisture resistance, temperature resistance and reliability. The most suitable material is porcelain stoneware, which is not inferior in strength to natural stone.
The main advantage of porcelain stoneware over the same stone is its pleasant appearance, smooth surface and the ability to neatly fit it into the design. Natural stone looks rougher and more inconspicuous.
The increased strength of porcelain stoneware protects it from cracks and chips that can appear from impacts with dishes, a kettle, or a knife. The material practically does not absorb water and is suitable for covering countertops in the area of the sink and water filter.
Porcelain tiles are practically not affected by various types of acids and detergents with a high content of chemicals.
When choosing a detergent, you can safely choose any one - it is unlikely that any of them can cause significant harm to the porcelain stoneware.
The process of making a table from tiles with your own hands
All work can be divided into several stages, each of which is implemented only after the completion of the previous stages. Let's consider the case when a new tabletop is made. If using an old countertop, the first three steps can be omitted. We list the main stages:
- Making a new countertop. First you need to determine the exact size of the future countertop and its shape. To do this, the slab is placed on a flat surface, and tiles are laid on it, imitating the final pattern. The tiles can be laid seamlessly, or you can leave seams. Plastic crosses are used for this. The tiles are laid out from the center towards the edges. In this way, you can calculate the required number of tiles without making cuts. The tabletop is marked according to the existing dimensions and cut using a jigsaw. If the countertop initially has a fixed size, then the tiles will subsequently have to be trimmed.
- The tabletop is screwed to the frame with self-tapping screws in several places. It is necessary to ensure the strength and stability of the structure. During work, the horizontal level of the slab surface is controlled using a tool of the same name.
- If a regular chipboard is used, then it is impregnated with a water-repellent composition. Further work is resumed after the slab has dried.
- The tiles are glued to the countertop using tile adhesive diluted with water. The laying process is carried out in the same order as during marking. If you need to trim tiles during work, use a grinder. With its help, not only straight, but also rounded sections of tiles can be easily cut.
- The seams between the tiles and the ends of the tabletop are sealed with grout using a rubber spatula. It is recommended to use only epoxy resin-based grout, which is not washed away by water and is resistant to mechanical and chemical influences.
- After the tiles have hardened and grouted, the ends of the tabletop are finished to give them a presentable appearance and protect them from moisture. The finishing material can be decorative wooden planks, which are screwed to the slab with self-tapping screws or glued with waterproof “Dragon” glue. You can also glue pieces of tiles, mosaics or special corner elements onto the silicone at the ends.
Some craftsmen recommend laying ceramic tiles not with cement glue, but with silicone sealant. The quality and durability of the countertop do not suffer from this. Silicone is applied around the perimeter and diagonally of each tile, after which the tile is simply glued to the countertop.
DIY table with tiles
Kinds
When choosing, it is important to pay attention to its size. The standard one is easier to install, and it won’t look too massive. In some cases, preference can be given to small materials (for example, mosaics), but in this case, it is unlikely to be possible to cover the surface without prior experience.
Traditionally, 15x15 ceramics are used to lay the countertop, if this does not contradict the features of the interior. Typically, small details are used for small-sized kitchens, where too large tiles will simply look out of place.
Much depends on the choice of surface. It should be level enough so as not to interfere with cooking or make cleaning difficult. The main types of kitchen surfaces are presented in the table below.
| Surface option | pros | Minuses |
| Embossed | Unusual appearance, the ability to create a unique design | Dirt quickly accumulates in the folds, which is quite difficult to remove. |
| Polished | Does not require special care, easy and quick to clean, can be used as a decorative element | Over time, the shine of the surface disappears; without the use of special products, it becomes dull and inconspicuous |
The larger the tile, the easier the installation process. However, materials should be selected not only for convenience, but also correspond to the design idea and look neat.
Ceramic
Standard option for covering kitchen countertops. The main pros and cons can be considered below.
| Advantages | Flaws |
| Easy to install, this type of repair work can be done even by beginners | Over time the shine is lost |
| Repels moisture well | All cracks and scratches are clearly visible on the glossy surface. |
| Resistance to thermal effects, high temperatures | Not as durable as porcelain tiles or natural stone |
| Ceramic tiles are easy to care for | May crack under heavy objects or impact |
Mosaic
Mosaic tiles are usually made from appropriately sized ceramic tiles. It looks bright and original, but only an experienced craftsman can install it. A beginner will have to give preference to another material. For example, standard ceramic tiles.
Particular attention should be paid to the seams. If handled incorrectly, dirt will accumulate in them, which will not be easy to remove.
Mosaic tiles must be the same shape and size so that the picture looks holistic.
Granite
The material is not found very often. Granite tiles are very durable, but are rarely used for countertops. The surface requires special care, otherwise its shine and smoothness will disappear over time. In addition, granite tiles are quite heavy, which is reflected in their appearance and the complexity of laying the material.
Porcelain tiles
It is best to finish a kitchen countertop made of tiles with porcelain stoneware. The material has excellent strength, resistance to moisture, mechanical damage and heat. A wide variety of textures and shades, as well as availability. Porcelain tiles do not look as sophisticated as ceramic tiles, but they do not pose any particular problems during installation.
Ready to serve for many years. Resistant to various types of damage.
Rules for making countertops from ceramic tiles
Since you are making a kitchen countertop from tiles with your own hands, it is necessary to immediately note that the strength of the surface is determined by the thickness of the base. Therefore, for this case, for example, plywood with a thickness of 22 mm is used, no less. If the material is not of such thickness, then you can glue two or three thin sheets. The plywood itself is attached to the floor cabinets with self-tapping screws on metal corners. Like, in principle, any other tabletop. Be sure to apply silicone sealant to the ends of the furniture under the tabletop.
Everything is ready, you can move on to the main process - creating a tile countertop for the kitchen with your own hands.
- The base of the tabletop is treated with antiseptic solutions. It is necessary to process not only the front side, but also the back, as well as the ends of the slab.
- Notches are applied to the plywood sheet. This can be done with an ordinary construction knife. The more notches, the better.
- Now, using a stapler and metal staples, the plaster mesh is attached to the plywood.
- After which the surface must be treated with a waterproofing compound. For this, it is best to use polymer-based mastics. Bituminous mastic cannot be used here.
- Now you need to wait for the entire surface to dry thoroughly. After which you can proceed to laying the tiles.
Read also: How to cover a wooden countertop in the kitchen
Laying ceramic tiles
In principle, this is a normal finishing process, as is the case with walls or floors. But it should be noted that it is better not to lay tiles on a wooden surface; the adhesion coefficient is too low, even if a reinforcing frame is laid on the wood. Therefore, you must first create a base on which you can lay ceramic tiles for the countertop.
- Therefore, first of all, a metal profile is installed on the outer end of the tabletop, which will determine the evenness of the edge, as shown in the photo above. It will also determine the thickness of the base layer.
- After that, cement mortar is poured onto the countertop, which will create the very surface on which the tile itself can be laid.
- The solution is leveled horizontally, evenly distributed throughout the entire site.
- Now you need to give time for the new layer to dry.
- Then you need to check the surface to ensure that it is completely horizontal. To do this, you can use a level and a long rule.
- If the plane difference is less than 2 mm per linear meter of length, then there is nothing wrong with that. Ceramic tiles themselves are a leveling coating, so they can cope with such differences. If the difference is greater than this value, then you will have to sand the high areas with either sandpaper or a grinder.
- The surface is cleared of dust.
So, the surface of the tabletop is ready, you can move on to covering it. You need to start laying tiles from the outer corner. It is recommended to first lay out the ceramics dry to make sure whether the entire tile will fit in its entirety or whether it will have to be partially trimmed. After which you can proceed to the cladding process itself.
An adhesive composition is prepared, which is applied to the countertop with a wide spatula, and then spread over a small area with a notched spatula. The tiles are installed using plastic crosses, which will determine the size of the seam. In this case, the smaller the seam, the better, so choose the right crosses.
Attention! It is better to lay the cut tiles against the wall. Their cut edge can later be covered with a table plinth.
And one more important point - all tile laying is done strictly horizontally. Therefore, do not let go of the level during the process. Each element and several elements at once are checked. As for cladding the outer end of the tabletop, you can also use tiles, which are cut to the required size and shape. But it is better to use a ceramic frieze for this. It must be matched to the color of the tile and exactly to the size of the end of the countertop.
Read also: Pros and cons of materials for different types of kitchen countertops
Now you need to wait for the adhesive to dry, this can usually take one day. After which the joints between the ceramic finishing elements are grouted. You can choose the color of the grout at your discretion; here its quality component is more important. The countertop in the kitchen is an actively used surface, so it is very important that the grout can withstand various loads for a long time. Although we must pay tribute that repairing the seams is very simple. So, after spending a few hours, you can make the surface of the countertop almost new.
By the way, the grout joint is applied with a rubber spatula, which must be held at a right angle to the surface. After the material has dried, it is removed from the tiles with a slightly damp cloth or sponge. Then wipe dry until the tiles are completely clean.
https://www.youtube.com/watch?v=vUrLdadwNPM
Required tools and materials
To create a tile countertop for the kitchen you will need the following materials:
- Tiles of suitable size and shape.
- Plywood/chipboard board.
- Adhesive for laying ceramic tiles/porcelain tiles.
- Materials for grouting joints.
- Silicone sealant for sealing cracks and seams.
Basic tools that will be required for work:
- A building level is necessary to measure and adjust the position of the tiles.
- Roulette.
- Pencil, ruler.
- Tile cutter for cutting tiles.
- Rubber and notched spatula for applying materials.
- Hacksaw for wood/chipboard.
- Hammer.
- Screwdriver for securing plywood.
Laconic minimalism
Simple and practical style will appeal to dynamic people. The kitchen is not forced with many decorative elements. Therefore, the room always looks spacious and clean. Distinctive features of the interior:
- the color scheme can be any. But most often the style is associated with monochrome. Surfaces made of modern materials are welcome: glass, plastic, metal;
- the surface of the furniture should be smooth. Any textured items will violate the design style;
- gloss is the most popular option for kitchen facades. The contours of the furniture are always strict, with clear lines.
The main thing is that everything suits your taste
This style is ideal for small spaces . Since glossy surfaces reflect light well, the room visually looks more spacious and free.
Glazed ceramic tiles or smooth porcelain stoneware are suitable for finishing the table. As a rule, no more than three shades are combined in the interior. And the tabletop is usually made white or black.
Most often, materials of the same color range are chosen for the apron and table surface.
Tiles with a glossy surface will add sophistication to the interior. Products with inscriptions have become a new trend. This type of countertop will give the kitchen a stylish, creative look. The original inscriptions look unusual. This decor will unobtrusively decorate the room.
As an option, for a small kitchen in a studio apartment: a kitchen with white plastic glossy facades, a matte dark blue wall. The surface of the table is decorated with shiny porcelain tiles in a rich dark gray color.
Advice To make the work surface and the wall look almost like a single whole, a compound for grouting the joints is selected to match the color of the finish.
Combined with wood
If you want to “hide” the kitchen in a small apartment, then choose furniture fronts to match the walls. A white kitchen with a shiny white porcelain stoneware countertop literally “dissolves” into the surroundings. To soften the sterile look of the environment, the room has a dark purple sofa. A small rug made from elements of simple geometric shapes in different colors (black, gray, white, dirty yellow) will give the room a stylish look.
VIDEO: How to make a countertop beautiful and practical?
Tile countertop
Pronounced and practical
Making a tile base for a kitchen countertop
Typically, a tile countertop is applied to a ready-made kitchen unit. In order for it to withstand the load without problems and not deteriorate under the influence of heavy materials, some adjustments will have to be made to its design:
- Add additional legs to the cabinets in case they cannot support the weight of the porcelain tiles. The legs should be evenly spaced from the center so that the load is evenly distributed.
- Before you start laying the tiles, it is recommended to fasten the cabinets together at the same level so that the countertop is level.
- A sheet of plywood or chipboard is laid on top as a base for the tiles. The board must be strictly adjusted to the dimensions of the cabinet. Initially, it should extend beyond the cabinet by 1-2 cm on each side.
- Impregnate the top of the wood with special products to increase its resistance to humidity and temperatures - otherwise the wood will begin to rot and the entire structure will have to be redone.
It is important to carefully coat each section of plywood so that over time the wood does not begin to rot or dry out. Additionally, you can treat it with an antiseptic solution.
Table top base made of two layers of plywood
If the countertop area is very large, you may need two sheets of plywood to create the base.
To begin with, one sheet is laid and strictly adjusted to the size of the kitchen cabinets. Use a second board to cover the free areas.
Secure the plywood tightly using a screwdriver. Cover everything on top with a moisture-repellent compound and antiseptic.
Assembling the base for a tile countertop
Assembling the base is the basis of all work, on which the service life and appearance of the future countertop depend. Main stages of base assembly:
- Level the cabinets. For additional fixation, you can attach them to the back wall using self-tapping screws.
- Place the first sheet of plywood on top, the caps should hide inside. It is attached to the cabinet with wood glue, which ensures reliable adhesion of the materials. It is better to apply the glue in different directions to firmly attach the materials.
- Secure the plywood around the perimeter using self-tapping screws, since glue will provide the necessary adhesion in the center.
- The drilling site and location of the screws must be treated with moisture-repellent impregnation.
How to make a tabletop with your own hands
You can order the work of tiling the tabletop from master tilers, but if necessary, you can do the tiling yourself. The old countertop will need to be dismantled and the surfaces measured. You will need to calculate the total height from the worktop to the floor. To the indicator you need to add the thickness of the tile and the height of the adhesive composition. Using a template, you need to outline the shape of the corner cuts, mark the holes for the hob and sink. To make a tile countertop yourself, you will need a set of technical devices.
Tools and materials for work
To cover the countertop you will need tiles and special tools. The master will need measuring instruments: square, ruler, building levels, tape measure. The list also includes a tile cutter, a jigsaw, various types of spatulas - serrated or rubber, chipboard or plywood, glue (carpentry or PVA), silicone sealant, grout, ceramic tiles.
Surface preparation
The reliability of the tabletop depends on the quality of preparation of the base, for which metal, wood, plastic, and concrete are suitable. It is easier to apply cladding to concrete, since the tiles are simply laid on the surface after being treated with glue. It is worth considering the heavy weight of the concrete base.
Before applying the cladding, MDF or chipboard boards must be installed on the working area of plastic countertops. The structures are strong enough to install heavy tiles on top. Due to exposure to humidity and temperature changes, a wooden tabletop must be firmly fixed. The wood must be treated with impregnations to protect it from fungi, mold, and rot. Before applying the glue, grind the tabletop.
Applying glue
Apply glue (carpentry or PVA) to the surface using a spatula. Temperature conditions for such work: 18…24°C. The drying time for tile adhesive is 12 hours. The recommended layer thickness is less than 2.5 millimeters for adhesion.
The composition is distributed with the even edge of a spatula with pressure at an angle of 30°, which helps fill small holes and pores. For hand-made tiles (ceramic and stone), you will need to apply glue to the back side to ensure a reliable connection to the base.
Laying the material
The technique and order of cladding are available for independent implementation. You can lay the tiles after installing beacon slats along the perimeter of the base in one level for precise distribution of the fastening solution.
As soon as the preparatory layer has dried, it is necessary to make markings. Laying porcelain tiles begins from the outer corner of the countertop surface. It is important to control the width of the seams using plastic crosses.
For mosaic masonry, you will need to apply a design to the tabletop. Then rectangular and square ornamental elements are laid out and secured with glue. Laying tiles on the countertop is possible from the same material as the design of the set and interior items. The ends are lined last.
Options for laying end surfaces
There are several options for designing the ends and attaching corners to the tabletop. Tiles can be laid out from the edge, keeping an indentation of 1 centimeter outwards, then the end elements are mounted end-to-end under it. The next method is to lay end tiles with the lip at the top to cover the edges of the surface tiles.
A simpler option is to decorate the end surfaces with special cornices and borders, which make it easy to level the tabletop to the desired size. The ends can be refined with aluminum furniture profiles or wooden slats treated with oil paint. The upper edge of the profile should be selected 2-3 mm above the surface of the tile. The rail is also necessary to secure each corner of the table. This will help prevent the edges from chipping and spilling liquid on the floor.
Grouting joints and using sealant
After facing work, it is necessary to grout the joints between the tiles. The treatment will help make the countertop aesthetic and provide protection from dirt and moisture. The shade of the grouting material must be selected to match the tile. It is possible to use neutral colors, such as white.
The grout composition must be resistant to moisture, fats, chemicals, and temperature changes. For operating conditions with high humidity, a mixture with an epoxy resin base is suitable. Two-component grouts that are mixed before use are universal.
Apply the mixture evenly, paying attention to the seam joints. When mosaic laying, the mass is carefully distributed, and the excess is removed with a sponge. During the process, it is necessary to ensure that the grout does not form voids, does not protrude above the countertop, and evenly fills the seams.
Surface cleaning
The final stage is cleaning the countertop. Excess adhesive can be removed with masking tape or solvents. Chemical solutions are removed from the surface immediately to prevent streaks from appearing.
Cleaning when using sealant in installation is more difficult. The chemical composition, after drying, becomes an elastic mass, resistant to deformation and firmly attached to the base. You can wipe off silicone sealant from the countertop mechanically, chemically, or in a combination way.
The work is easier to complete if the mixture is not dry. In this case, the surface is cleaned with gasoline, then wiped with a rag. It is recommended to first clean off dried sealant with a blade, then soften it with detergent and remove it with a wooden scraper. The sealant can also be removed with chemical solvents.
Laying tiles on the base
You can proceed to installation only after the base has dried thoroughly and been saturated with protective solutions. First, prepare a cement pad, which provides the future tabletop with strength and securely secures the structure. Acts as a screed.
Making a cement pad
The cement pad is laid as follows:
- A cement mixture is being prepared; it can be replaced with tile adhesive. Dilute the composition with water according to the instructions.
- Install beacons on the surface of the tabletop, which can be used to measure the distance. One is attached to the wall, the second - to the end of the future tabletop.
The tiles are carefully laid on the resulting pillow. Excess material is removed using a spatula. It is important that the pillow does not touch the walls.
Laying
The process of decorating with tiles is quite simple.
In order for the working plane to be level, special beacons must be placed on the surface.
The marking is done as follows:
- The middle of the future tabletop is measured. Two perpendicular lines are drawn - along the length and along the width.
- Apply the adhesive solution to the screed after it has completely dried. It is better to start from a visible corner so that the tile there is intact. Use a notched trowel.
- Place the tiles in even rows, following the markings. Correct the position using a building level.
- Leave cuts for edges and hidden areas.
How to cover the end of a countertop
The end should look aesthetically pleasing. The edge of the tile should protrude slightly beyond the edge of the cabinet, the remains of the product are cut and secured to the sides.
Grouting joints
Grouting is the final stage, necessary to finish the seams. It is better to choose a transparent material or grout that matches the color so that it is not visible on the surface.
The grout is applied using a rubber spatula and distributed evenly over the surface. The second way to remove excess is to apply masking tape and carefully tear it off the surface. This should be done no earlier than every other day.
We also recommend looking at - Epoxy grout Litokol
Necessary tools and materials for tiling a kitchen countertop with your own hands
To cover the table surface with tiles you need:
- Material of the required format;
- Plywood;
- Special adhesive composition for laying out ceramics;
- Devices for filling gaps: rubber spatula, brush, non-rigid material, etc.;
- Level for construction (they use it to measure and change the arrangement of tiles);
- Roulette, pen;
- Apparatus for creating cuts on material;
- Wood saw;
- Hammer;
- Electric screwdriver.
Installation nuances
Professionals advise paying attention to the following nuances:
- When adjusting the dimensions of plywood for tiles, you should leave an overlap of 1-2 cm on each side.
- The ends and corners of the countertop should be processed at least twice, especially when it comes to the cut for the sink. A large amount of moisture will cause the wood to rot, so the entire structure will have to be redone.
- Near the hob, the tiles will need to be treated additionally so that they do not crack under the influence of high temperatures.
- To make the cement pad waterproof, add a little tile adhesive to the solution when stirring.