Having a universal assistant that does not depend on electrical power is what a laptop was once designed for. Thanks to its functions and options, each of us can work calmly, conduct a conversation on a social network and watch video content at the same time and in any position.
After all, how nice it is after a hard day at work not to sit in a cold chair, but to lie down on the bed and enjoy your favorite movie.
Proper operation of the device implies that it will stand on a flat and solid surface.
Why then, in this case, not make some kind of cooling table for a laptop, which would at the same time look beautiful, and at the same time maintain the desired temperature regime inside the mechanism.
Moreover, you can find a huge number of different ideas that are not so difficult to implement (and this does not require special skills).
In addition, a folding laptop table is a great gift for a friend that he will truly appreciate.
Popular types
If you don’t look too closely, you won’t immediately notice that things of this type are somehow different from each other (well, perhaps IKEA models of laptop tables are more or less popular).
Therefore, in order to understand which type is more suitable for home use, you need to get to know them better.
So, all models can be divided into the following types:
Monolithic table, made in a classic style. It consists of a thick board (minimum 2-4 cm), which is planed in the form of a shield and four legs, which are attached to the base with wood screws.
Read here - Do-it-yourself rack - step-by-step instructions on how to make a rack with your own hands. Tips for choosing a type and basic construction options (75 photos)
It is a universal item that can also be used as a stand for reading books, eating, etc.
The table is a transformer for a laptop. It can be made not only of wood, but also of plastic or metal. It has a rounded shape, which gives the product a special grace. Has two thrust bearings that can be adjusted.
The moving part is fixed using a steel rod, which is located in a special recess on the back side of the table. The parts are fastened with screws and a piano hinge.
Option with built-in armrests. In this case, the size of the shield is much larger than the standard one. This is due to the fact that special recesses are made in the tabletop to accommodate hands (the recesses are boomerang-shaped). This is the best model, as it provides a person with maximum comfort.
Laptop stands made of plastic pipes
Cuttings of water and sewer pipes after repair or construction work can be useful for making an original stand.
It will take very little time to make a laptop stand with your own hands from PVC plastic pipes. First, the pieces are cut according to the size of the laptop, and then they are connected using corners when heated, as shown in the video. The finished product is coated with spray paint. The color is chosen to match the interior or personal preference.
The result is a neat and convenient stand at a very low cost.
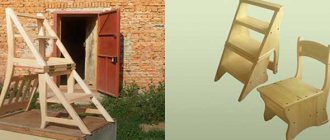
No less practical is the following version of the table, which is convenient to use while sitting on the sofa or bed.
The advantage of this option is that such a table-stand can be moved close to the sofa and take up minimal space, and its height allows you to work comfortably in a sitting position.
Materials and tools for work
Photos of a laptop table show us that when creating it, you can use completely different materials and it doesn’t have to be wood.
Although, of course, this component has many excellent advantages, for example, it is not subject to heat and does not allow electrical current to pass through. In addition, such a product can be given a beautiful decorative effect.
In any case, to make such a table yourself, you need to have on hand:
- Do-it-yourself shoe racks: a review of the best ideas and a step-by-step description of how to build a shoe rack (85 photos and videos)
Do-it-yourself bag chair - a detailed master class on how to sew a properly comfortable chair (75 photos)
DIY chest - how to make a beautiful and stylish craft from a box, paper and wood (80 photos)
- A large piece of board made of strong wood;
- Drill;
- Sanding paper;
- Self-tapping screws, screws, etc.;
- Wood hacksaw;
- Stain;
- Dye;
- A pair of screwdrivers.
If you apply a little diligence, you can make a beautiful computer table for your laptop on your own.
In addition, you can add other useful functions to it, for example, cutting out a recess for a cup to enjoy hot coffee in the morning.
Stages of work
If a person decides not to buy a table for a laptop, but to make it with his own hands, then, first of all, it is necessary to understand in what order this work should be done. Everything is very simple here:
- You should start by assembling the supporting structure;
- Next, start making the base, that is, the tabletop;
- After we start, we plan out the legs, then assemble them and attach them to a wooden base;
- Well, at the end, carry out the final installation of the rest of the structure.
After all the work is done, you can start decorating the item. To do this, the table should be varnished, painted, or a high-quality image applied (for example, a laptop model).
Dimensions and drawing
An important aspect of creating a reliable device for working at a computer is preparing a drawing. Before this, you need to decide on the dimensions of the workpiece. It takes into account what dimensions the table will have - standard or individual.
The most common option is a device with dimensions of 30 x 60 cm. These are the initial data for a standard product. It is better to adjust the sizes to your own preferences. If you need to make a laptop table with armrests with your own hands, then the only option is to increase the size.
Many drawings involve making straight legs. However, such products are not reliable. Installing supports in a Z shape will help achieve greater stability.
Useful tips
When reading reviews about laptop tables, you can often come across useful advice left by people who have already done similar work.
DIY bread box - step-by-step master class on making and tips on how to decorate a wooden model (105 photos + video)DIY high chair - interesting drawings and projects on how to make a comfortable and functional high chair (120 photo ideas)
DIY built-in wardrobe: 115 photos of original ideas and video tips for building built-in wardrobe models
For the most part, they leave recommendations that will help a person use his wooden friend for as long as possible.
Here are some of them:
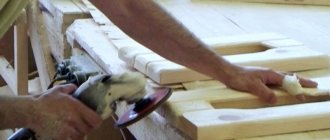
Before assembling the product, it is necessary to sand the edges of the table as best as possible with sandpaper. After all, if such an operation is not carried out, then in the future the thing will lose its original appearance, and the person risks getting injured.
For good strength, as well as to add shine, it is better to cover the table with two or three layers of varnish.
Instead of a hole for a mug, it is better to use a wooden saucer, which is simply glued using special glue.
Why is that? Because the drilled hole is a very fragile place, if you press hard on it, it is likely that the structure will not hold up and will simply break. This will never happen when using a saucer.
- DIY corner cabinet: 80 photo ideas and video description of how and what to make a cabinet from. Main manufacturing stages and best design projects
Do-it-yourself wardrobe for the balcony - 80 photos of how to make a balcony wardrobe from various materials with your own hands
Do-it-yourself wardrobe - a detailed description of how to make and assemble a wardrobe with your own hands at home (110 photos + video)
Use paint to give an item a more aesthetic appearance. Using paint and varnish products, a person can easily apply the desired print to the surface of the table.
In order for the design to last as long as possible, it must be opened with several layers of glossy or matte varnish.
A laptop table is an original and interesting thing with which you can do whatever you want. And we can say with confidence that a person will not regret that he decided to take up this subject on his own. Because in the end the result will pay off many times over.
The most cost-effective laptop stands in minutes
If you need to solve the problem of cooling the device quickly and inexpensively, then you can use thick cardboard from old boxes of household appliances. Cardboard stands do their job well and take up little space on the desktop.
The idea shown in the photo consists of only three cutouts, which are connected using slots on the side supports. The advantage of this option is the simplicity of the design. To make the product fit better into the interior, the cardboard can be covered with wrapping paper or painted.
A slightly different design is proposed in the next photo.
A homemade laptop stand can also serve as an organizer, as in the photo below.
To make it, ventilation holes and holes for round legs are cut out of thick cardboard on the tabletop. The legs are made from cardboard cylinders of any available diameter. Inside the cylinders, a bottom is installed at the required height made of foam plastic or cardboard, which acts as a depth limiter for the stand leg. The legs are then screwed tightly into the holes on the tabletop.
Thus, using available materials, you can make high-quality and reliable laptop stands without additional financial costs.
Photos of laptop tables
Did you like the article?
0