Click to share
Herringbone parquet is one of the most popular ways of laying wooden boards in apartments and utility rooms. This interesting and original interior design element will allow you to emphasize the style of your home. How to lay the floor correctly and what you need to remember before starting work?
From the article you will learn:
- Herringbone flooring - which wood to choose?
- Christmas tree parquet - preparatory work.
- Laying herringbone parquet step by step.
The influence of the scheme on the interior
The layout scheme affects the impression of the interior. Indoor renovation work begins with the selection of flooring materials. In accordance with the tiles, skirting boards, borders and other design elements are chosen to create an original design.
The rules for laying out tiles affect the consumption of materials, since the schemes require different numbers of finishing products per 1 square meter. m. Direct laying is the most economical. Combined, chess and other complex compositions require greater consumption of materials. When designing non-traditional schemes, additional processing of elements and the purchase of auxiliary parts are required.
The placement method and texture of facing products visually change the size of the rooms. Horizontal installation with textured seams visually expands the room, but reduces its height. The use of vertical tiles in the bathroom optically narrows the space. The herringbone laying method will help in visually expanding the room if you select narrow elements. A scheme using massive square-shaped materials will visually make the spacious room smaller.
Using different shades will create bright accents when decorating the floor. The inclusion of elements of contrasting shades in the masonry will introduce elements of modernism style into the interior. Laying wood-effect tiles in a herringbone pattern will give the surface a resemblance to parquet flooring. Marble facing elements, laid out like parquet, can be the main covering or accent inserts.
Types of herringbone laminate
Manufacturers of laminate flooring use the same lamella laying schemes that were invented and have long been used for wooden parquet floors. This allows you to take advantage of the interest in parquet flooring, and at the same time, due to the lower price of laminate, make the herringbone floor more affordable.
For residential premises, the interior uses herringbone laminate in several laying patterns:
- Classic or English system with lamellas placed at right angles;
- French herringbone, laminate can be laid at any angle, but more often it is 60o or 45o to the installation direction;
- Hungarian scheme. It is often classified as one of the previous two, but most experts still classify it as a separate group.
French styling scheme
In addition to the options listed, there are many new mosaic floors that use the herringbone pattern as part of the pattern. The quality and style of such a design largely depend on the skill of the designer, so they are not classified as purely Christmas tree coverings.
English version of laminate flooring
The most common option for forming a Christmas tree pattern. The principle is to lay the lamellas with their ends at right angles to the side surface of the adjacent dies.
English version of laying a Christmas tree
The result of the set is a row of two laminate tracks, as if intertwined. Small laminate panels, as a rule, alternate in the design with light and dark areas.
The classic version of building a Christmas tree
The result is a slightly chaotic set of colors and tones, like real piece parquet. This method of forming colors from laminate dies of different colors is used quite rarely due to difficulties in selecting colors.
More often you can find, for example, in offices and public places, a plain herringbone laminate with a wide chamfer. Thanks to the presence of a chamfer, the herringbone pattern is clearly visible on a shaded surface.
Laminate with wide bevel
For the living room, alternating Christmas trees of two different shades is often used. This coating option is easier and cheaper to install than multi-color and multi-tone designs. For example, you can use herringbone vinyl laminate in two colors. And this will be enough to create a composition.
Vinyl Christmas tree
Hungarian scheme
The technology for installing laminate flooring is no different from the previous classic installation method; the main difference is in how the colors are combined. In the Hungarian version, which, by the way, has been known for more than a hundred years, the laminate is laid in threes or fours of the same color.
Zig-zag of lamellas of two colors
The result is very interesting checkerboard and cascade patterns of colored lamellas.
French version of the Christmas tree layout
Unlike previous options, in this case the laminate is laid in a herringbone pattern at an angle of 30-60°. The result is an unusually “sharp” and beautiful path.
Furniture must match the floor covering
For the French version, light-colored material is usually used, for example, boxwood or walnut.
If you choose the right texture and pattern of the laminate surface, it is quite possible to achieve a volumetric effect. Thanks to the herringbone, the texture of the floor appears embossed.
Laying and joining strips of laminate is quite difficult, so often the paths are separated by inserts of ordinary lamellas.
The tiles are scattered
The staggered pattern is an installation of rectangular elements with every second row offset by half the width of the tile. The result will be a beautiful pattern, similar to brickwork. For original design solutions, the square shape of the elements can be used, which will create an unusual visual effect.
Laying tiles in staggered patterns is recommended for high-traffic areas of the apartment - kitchens and hallways. With this method, tiles are laid out only horizontally. The pattern with imitation brickwork creates a special atmosphere in the interiors. Glossy rectangular elements laid out staggered are suitable for rooms decorated in retro style. Brown tiles with scuffs are used in country style designs.
Pros and cons of herringbone laminate
When choosing a rather specific flooring layout, you need to remember that the herringbone pattern of laying lamellas can create quite big problems for residents.
What to pay attention to first
The list of main negative points includes the following:
- The short base of the lamella, the width and length of the board are smaller than those of a conventional laminate, so the board can be easily deformed;
- Limitations on applied load. For the legs of herringbone floor furniture, it is recommended to use special heels;
- Due to laying on glue and an additional board, the degree of shock absorption of the surface is less, and thermal conductivity and susceptibility to moisture are greater.
Laminate laid in a herringbone pattern is similar in characteristics and appearance to stacked parquet. Therefore, you have to pay more attention to polishing and treating joints with mastics, otherwise the laminate flooring may swell at the edges of the panels. The reason is simple - a smaller lamella size means more seams and connection lines through which water can get under the floor covering. It seems like nonsense, but a lot of dirt always gets packed into the seams, especially with a chamfer, especially in a situation where a white herringbone laminate is chosen for installation, and even with a wide chamfer.
Light laminate laid in Hungarian herringbone pattern
What are the advantages of Christmas tree design?
However, flooring with a characteristic parquet laying pattern is becoming increasingly popular. There are many reasons for the increased interest; only two of the most important can be mentioned.
Firstly, the herringbone pattern of installation makes it possible to get away from the already boring laminate flooring pattern with an imitation of a wooden plank floor. No matter how beautiful the texture of the floorboards is, the herringbone parquet laminate looks more attractive and rich. The interior of the apartment, even with the simplest furniture, looks more comfortable.
The herringbone adds optimism to the interior of the room
Secondly, herringbone based on laminate is in some ways even superior to wooden parquet. Photo printing and special textured stamping make it possible to reproduce any pattern of wood fibers. It is almost impossible to create such decor on veneered parquet.
In addition, with the correct installation of the laminate in a herringbone pattern, photo, you can easily make the floor an element of the interior, highlighting the design and style of the room.
Not parquet, but also very beautiful
Herringbone styling
The installation of herringbone elements is similar to parquet flooring. The method is difficult to implement, but quite original. The scheme assumes precision in the fitting of elements. This option for laying tiles is common when installing rectangular products. The technique involves joining the narrow side of the facing material with the wide one. The process creates 90° angles.
The most harmonious laying is in a herringbone pattern when using different shades of the same color, including the possibility of imitation of natural materials (wood, stone). The installation option is optimal for floor coverings in rooms of irregular shape, since the herringbone optically evens out the difference in size.
The herringbone laying pattern is single, when each subsequent tile is joined to the adjacent one. With a double herringbone pattern, there are two rectangular elements in each row. Triple laying resembles weaving, as three fragments are used to create each level.
Christmas tree with attachment
In addition to the classic herringbone style, there is also an option with an attachment. Contrasting inserts will enliven the floor covering. Ceramic tiles of a similar texture, but a fundamentally different color, are used.
Attachments can be purchased as part of the collection, or you can make them yourself. Using a grinder or glass cutter, cut the squares of the desired size, and then lay them together with the rectangular herringbone tiles. If the attachments are small, then all the remains will be used for this purpose.
Bottom Line There are different ways to install ceramic floor tiles. Each of them has its own advantages, the most original and difficult method is laying tiles in a herringbone pattern. To ensure that the joints are 90 degrees and the Christmas tree is beautiful, make the correct markings.
Diagonal
Laying diagonally (rhombus) repeats the classic straight layout in everything, except for the direction. Placement of materials is carried out at an angle of 45 degrees relative to the walls. With this pattern, square tiles look best. The cladding will have to be cut along the edges near the wall line.
Diagonal layout of tiles on the floor is popular. On walls, the same scheme is used less frequently - when creating small areas with a color or texture accent. Before laying the tiles in a diamond shape, it is necessary to prepare calculations and mark out a composition plan.
The scheme is suitable for small rooms, as it allows you to visually expand the room. The advantage of placing elements diagonally is that it helps disguise unevenness. It is necessary to take into account the high consumption of materials, since the cladding adjacent to the edge needs to be leveled.
Laying
- Before installation, the floor must be leveled and primed.
- Apply a thin layer of glue to the floor and remove it with a spatula. This is done to improve adhesion to the tiles. No glue is applied to the marking lines, otherwise they will not be visible. Please note that the mixture loses adhesion 10-20 minutes after application to the surface. If a white crust appears on it, the grip will be poor.
Laying tiles with glue
Laying the next row
Immediately remove excess glue from seams and glaze with a rag.
Use of multi-format products
Combined products can be used in installation: different formats, shades, colors. The herringbone pattern on the floor is combined with a diagonal tile pattern on the walls, large elements are mixed with small ones, etc.
The technology for laying tiles of different formats is difficult to implement and requires accurate calculations and drawings. When creating a scheme, it is necessary to take into account the dimensions of all elements, the width of the seams, and the color scheme.
An original combination of tiles of different shades of the same color; multi-color compositions with proper selection are also possible. For complex authoring solutions, it is recommended to seek advice from specialists. An easier option is to purchase ready-made combinations of facing elements.
Parquet laying patterns - advantages and pitfalls
The principle of drawing on parquet is the selection of geometric shapes and sizes of planks. The dies, folded in a certain sequence, are arranged into a pattern as a result of this selection. To give the floor individuality, in some cases special decorative inserts are used.
The main figures for laying a parquet pattern are a square, an equilateral triangle and a regular polygon.
Good to know: Since ancient times it has been known that it is quite easy to fill a plane with squares, regular triangles and hexagons. But in order to create an individual geometric parquet from irregular figures, you need to know the Penrose theory, which, in essence, boils down to the fact that the ratio of the number of figures in the ornament, as well as their corresponding sizes, should be equal to the golden ratio - 1.618...
Squares look especially impressive with contrasting inserts.
By and large, the main task of installation is to create a continuous canvas, monochrome or diluted with inserts, but it should be a complete picture, organically integrated into the overall interior, supporting or setting the tone for the rest of the decoration. Next, we will look at popular methods of laying block parquet.
Herringbone
Herringbone parquet can be called the most traditional layout of tiles. But even the long-familiar pattern of a wooden floor can be laid out in a new way today.
French Christmas tree, arrangement of large dies
As practice shows, there are many options for laying: a straight Christmas tree, a diagonal Christmas tree, a double straight and diagonal Christmas tree, a Christmas tree made from dies of different types of wood, a French Christmas tree, a Christmas tree with a transverse insert, etc., see some examples in the presented diagrams.
Basic patterns for laying parquet in a herringbone pattern
Laying a herringbone pattern is very simple and easy to do with your own hands, and at the same time, such a pattern looks presentable. It should be noted that with proper installation, in comparison with a deck, herringbone parquet is much stronger and less deformed under unfavorable operating conditions.
Installing French herringbone parquet will require skills and special tools. Using templates for cutting corners will make the job much easier. Laying with a French Christmas tree, thanks to the sawed-off corners, looks more elegant than a Christmas tree made from solid dies.
Deck
Deck pattern or “run-up” parquet is the easiest way to lay parquet. It would seem that in this method, what can be invented new? But here you can show your imagination.
Schemes for deck drawing
The deck is straight and diagonal, with different offsets of the dies, the deck is staggered, the deck is double, triple, etc.
Custom deck patterns
It is important to note that this method of installation significantly affects the geometry of the space; for example, in narrow and long rooms it is recommended to lay the tiles diagonally or along a narrow wall.
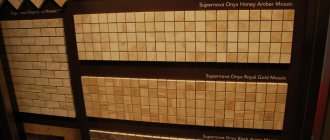
Squares
There are no fewer options for placing squares on the floor than with a Christmas tree or deck. But when choosing this pattern, you should wisely select the color and texture of the parquet, since squares are a graphic design that breaks the floor into clear segments.
The method of laying a framed square, as a rule, with this method, a contrasting color to the main color of the coating is chosen for the frame dies
If you want to combine space, then for installation you should use dies with a monochrome and unexpressed texture, preferably a radial cut.
Examples of laying parquet in squares
But for zoning, or if necessary, to make the floor brighter, more dominant, it is better to use a dense texture pattern: tangential cut dies, can be made of different types of wood. Decorative inserts look especially impressive in a square pattern.
Types of parquet installation, the photo shows an example of how to lay squares with decorative accents
Network
Based on the square, many ways to lay parquet have been invented. Braid is a variation on the theme...a slightly modified, more elegant square. The massiveness of the pattern depends on the number of dies in one segment; the smaller the parquet flooring, the more delicate the pattern.
The braided method allows you to lay out a simple, but at the same time openwork, light and very effective pattern.
It should be noted that the pattern looks complex, but despite this, the technology for laying the braid is simple and does not require special skills. This ornament necessarily involves decorative elements with a separate pattern, in tone or in contrast to the main color; this technique gives the parquet sophistication and high cost.
The pattern is wicker, for greater expressiveness, experts recommend using 2-3 types of wood in one flooring
Chess at an angle and without
Checkerboard masonry is popular when decorating floors, walls, and objects. The point of the method is to use elements of two contrasting colors to create a composition.
When laying in a checkerboard pattern, you can alternate the size and texture of the facing products and their location. Tile layout options are possible using elements of the same color, but in different shades. The color perception of the composition will be softer.
Checkerboard laying can be diagonal, in which case the elements are located at an angle. This design option looks good on the bathroom floor. Both square and rectangular cladding are acceptable.
TOP 3 best parquet manufacturers
| Photo | Name | Rating | Price | |
| #1 | Kahrs | ⭐ 99 / 100 | More details | |
| #2 | Haro | ⭐ 98 / 100 | More details | |
| #3 | Tarkett | ⭐ 97 / 100 | More details |
Tarkett
The Swedish company Tarkett has long occupied a leading position in the Russian market. The manufacturer offers a wide range of floor coverings.
Tarket
pros
- a wide range of;
- variety of collections;
- good price/quality ratio;
- environmental friendliness;
- long service life.
Minuses
- sometimes marriage occurs.
Tarkett parquet
Haro
One of the largest parquet production companies in Europe. In its work, the company uses popular and very beautiful types of wood: oak, maple, beech, ash, solid American cherry and white acacia.
Haro
pros
- a wide range of;
- excellent quality;
- environmental friendliness;
- service life more than 30 years.
Minuses
- difficult to find in stock in Russian stores;
- high price.
Haro parquet
Kahrs
The Swedish company Kahrs is rightfully considered the world leader in the production of parquet boards.
Karhs
pros
- wide range in different price categories;
- made from environmentally friendly wood species;
- wear resistance;
- easy installation.
Minuses
- not detected.
Kahrs parquet
Our entire further story will be devoted only to piece parquet.
Linen carpet
Masonry in the style of “canvas carpet” is the design of part of the room using color schemes and a combination of elements. This creates an accent in the desired part of the house. The scheme will look impressive in spacious halls.
The laying pattern involves a combination of cladding of different sizes and colors. For a linen carpet, elements with a pattern are also used. A very important stage in the implementation of technology is creating a project on paper. Then the finished diagram is transferred to the surface using markings. For complex compositions, it is better to consult a designer. You can also use ready-made kits, which come with instructions and drawings.
Some general information
Laminate is an MDF board on which several layers of different materials are applied using the lamination method:
- adhesive composition;
- a thin layer of resin (melamine) or paper onto which a design is applied using various methods. Usually this is an imitation of wood or natural materials;
- durable protective film, the task of which is not only to prevent the appearance of scratches and gouges on the artistic layer, but also to protect it from ultraviolet radiation, chemicals, and dirt.
Various additional coatings are permitted. For example, to create a laminate to look like varnished wood, the surface is treated for a special shine; varieties with improved wear resistance often have another protection zone of increased strength.
The bottom of the laminate board is coated with wax to protect it from moisture. Today, this board structure is accepted as the de facto minimum standard. Some manufacturers resort to applying additional layers, but such material is considered an exception to the rule.
Kaleidoscope
Laying in the “kaleidoscope” style involves combining elements of different shades randomly or in a given order (radial, horizontal). The color palette of the cladding is contrasting or monochromatic. For masonry, a transition of shades is also used, when dark shades are placed in the center of the composition, and light shades are placed at the edge. Small tiles look good in the kaleidoscope pattern. Laying involves a combination of elements not only of different colors, but also patterns when decorating interiors in the patchwork style.
DIY installation of herringbone parquet
Tools and materials
Whatever parquet pattern is chosen, before proceeding with the installation of the covering, it is necessary to make preparations. Preparatory activities also include the acquisition of necessary materials and tools.
Tools for laying parquet
Tools for work you will need:
- Electric jigsaw and wood saw.
- Mallet - a rubber hammer for hammering boards in masonry.
Pneumatic nail gun
- If the chosen technology requires this, that is, double fastening of the parquet is planned - an electric or pneumatic nailer (nail gun) or a screwdriver
- Tape measure and construction square.
- Painting cord.
- A goniometer tool – it’s most convenient to use a small tool..
- Notched trowel for applying glue.
- Roller for applying primer, color and varnish.
- Tamper block and tension bracket.
- Wedges for forming a gap between the wall and the covering.
- Vacuum cleaner.
- Grinding and scraping machine.
From materials other than the parquet itself and skirting boards for framing the covering, you should prepare:
- Adhesive composition.
- Primer.
- Toning composition (if necessary).
- Finishing varnish.
Preparing the subfloor for laying parquet
The most important condition for the quality of the floor is a fully completed process of preparing the base for laying parquet. This directly determines how long the coating will last. Therefore, we should consider the nuances of this stage using one example.
| Illustration | Brief description of the operation performed |
| If the concrete screed has cracks, potholes, or is contaminated with putty, glue or cement mortar, then it should be put in order. Otherwise, the coating on such a surface will begin to peel off quickly and within a year and a half the parquet will begin to creak, and cracks will appear between the boards. | |
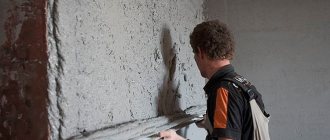
| The first step should be to try to sand the screed, clearing it of various fragile layers and contaminants. This is best done with a professional machine (you can look for rental options), but if this is not possible, you can also do it with a hand-held grinder with a special cup for concrete. True, the work in this case may take longer. | |
| The sanded screed should be very thoroughly cleaned of cement dust and small debris using a powerful vacuum cleaner. | |
| To increase the strength of the screed, it should be primed by applying several layers of primer. The primer will penetrate the upper layers of concrete, binding particles of remaining cement dust and increasing the adhesive properties of the material. | |
| Next, everything necessary for mixing and pouring the self-leveling self-leveling floor is prepared. This layer is necessary for ideal evenness and horizontality of the base for laying parquet. | |
| We will omit the filling - it is not included in the topic of consideration. Different mixtures for self-leveling floors have their own drying times. But it is important not only to wait for the opportunity to move on the floor - this is not enough. | |
| Normal base moisture for laying parquet should not exceed 3%, so you will still have to wait. If the base is completely level (which can be checked with a building level) and dry, the parquet can be laid directly on it. | |
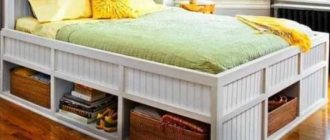
| But it’s better to lay one or two layers of plywood - this way the floor will be both smoother and, importantly, warmer. In our example, plywood squares measuring 350x350 mm were used for the covering, which were fixed to the base with glue without additional fasteners. Thanks to this technology, the screed is not broken and communications are not affected if they are laid in the base. | |
| When the glue is completely dry, the plywood covering should be scraped until it is perfectly even. | |
| After sanding, the surface should be checked for evenness using a long rule and a level. Differences in the coating should not be more than 3 mm per 2000 mm of floor length - in any direction. | |
| If you plan to lay parquet directly on a concrete base, it should be thoroughly primed before starting work. The primer will increase the adhesion of the surface to the parquet adhesive. |
Laying parquet with English herringbone pattern - step by step
During work, the temperature in the room must be maintained at least 18÷20 degrees, and the relative humidity must not exceed 60%. Installation is carried out on a previously prepared surface, the humidity of which should be no more than 3%.
The simplest image of the principle of laying parquet with the “English herringbone” pattern
Before moving on to the description of the parquet installation process, you should once again pay attention to how parquet flooring is stacked together in this type of herringbone.
| Illustration | Brief description of the operation performed |
| New parquet in packages must be brought into the room where it will be installed and left for adaptation for at least two days. It is advisable to place the packages in the room so that they do not interfere with the layout of the room. The seal of the packages is broken - they are cut, but not removed. | |
| Next, the room is marked. The room must be divided exactly in half lengthwise. Having set aside the required distance from the walls, it is most convenient to mark the line using a paint cord, and then “fix” it with a marker. | |
| The next step, starting from the beaten line, is laid out the first row of parquet along the far wall “dry”, that is, without fixing it with glue. | |
| To determine the size and cutting angle of the outermost parquet flooring of the row that will complete it, a protractor is used - craftsmen call it a small one. The angle is “copied” with the small strips, and the screw is tightened. | |
| Marking the parquet flooring for cutting the required fragment from it is done first along the long side of the future part - according to the measured distance, minus 10 mm to create a deformation gap along the wall. | |
| Then, a small piece with a certain angle saved on it is applied to the point marked on the board using a tape measure. At the intersection of the protractor bar with the edge of the board, there will be a lower cut point. Then the two points are connected by a line. | |
| The parquet flooring is cut along the drawn line using a hacksaw or jigsaw. | |
| Next comes the fitting of the cut fragment at the installation site. The 10 mm deformation gap left is clearly visible. Such additional parts will have to be made for each row - both front and right. If the outermost whole parquet flooring rests against the wall, then the excess part is simply sawed off from it at the desired angle, “copied” with a small saw. | |
| Four to five rows of parquet are laid out in the same way. | |
| Next comes a very important stage of work, so it must be done with the utmost care and precision. A long ruler (rule) is placed exactly along the vertices of the internal corners formed by the first row of parquet. Then, using a marker, a line is drawn along it, along which cuts will be made for each of the parquet floors that will be adjacent to the far wall. This line, after sawing the boards and laying them back into the general covering, will become the starting line. | |
| The next step is to move the rows of the laid structure apart, but you can leave them disassembled on the surface. | |
| Next, each of the boards, which has received its “portion” of the starting line, is sawed along it with a hacksaw or jigsaw. As a result, the fragments returned to their place will form an even line along the wall, and the trimmings can be used to complete the rows during further installation. To avoid mistakes in the layout, parquet flooring can be numbered and stacked. | |
| A straight line is laid out from the cut parquet flooring, which will be adjacent to the wall. | |
| Result of re-test assembly. Do not forget that there should also be a gap of 10 mm between the parquet and the wall. | |
| The next step is to apply glue to the area of the floor for which the parquet has been prepared and fitted using a notched trowel. | |
| Then spacer wedges are placed along the wall, with the help of which the gap between the wall and the installed covering will be maintained. | |
| The laying of parquet boards begins from the dividing line, as shown in the illustration. Next, the masonry is made along the entire wall, alternately in rows in one direction and the other. | |
| After this, glue is again applied to the surface of the next section of flooring and the next prepared boards are laid. | |
| Each of the parquet floors, when connected to the laid covering, is beaten with a mallet, for which a wooden block is placed against the board. The ridge of the board being installed must fit tightly into the grooves of the parquet flooring fixed to the floors so that there are no gaps left. | |
| The illustration shows the process of tamping the next installed parquet flooring to already laid boards. | |
| The masonry is carried out in a similar manner to the opposite wall. At the same time, we must not forget to install spacer wedges along the walls when adjusting the cut fragments along the walls. | |
| The laying of whole boards continues until the moment when the parquet flooring, forming the outer corners, rests against the wall opposite from the beginning of the laying. | |
| You can often bring the covering into an even line using the parquet fragments that were cut off at the beginning of the laying. After the installation adhesive has dried, the spacer wedges are removed along the entire perimeter of the parquet. | |
| The finished coating is left to dry the glue for the time specified by its manufacturer on the packaging of the composition. | |
| The next step is rough sanding of the parquet. The main surface of the floors is processed with a professional sanding machine, and the areas along the walls are processed with a manual sanding machine with a special attachment. | |
| Next, the surface is polished. The main surface is also processed with a professional grinder, and the edges of the parquet are processed with a manual machine with an appropriate attachment. | |
| The sanded surface is covered with a putty composition of a fairly liquid consistency. The putty should fill narrow gaps between the parquet boards, as well as microcracks in the wood. | |
| After the putty has completely dried, the surface is finely sanded. This will remove excess putty. Then - thorough cleaning using a powerful vacuum cleaner - dust must be completely eliminated before working with paints and varnishes. | |
| If it is planned to give the parquet a darker shade, then at this stage it is tinted. The color is applied using a velor roller. | |
| Next, after the tinting solution has completely dried, the first layer of varnish is applied to the parquet. In total, it is recommended to apply at least three layers of this coating. | |
| Each of the varnish layers is sanded after drying. This sanding is done to remove wood lint that is raised during the varnish application process. | |
| The third layer of varnish is the final one, after which the coating is left until completely dry. | |
| The final stage is framing the parquet flooring with skirting boards - they will close the deformation gaps. The method of fastening the skirting boards depends on their design. But in any case, they are attached exclusively to the wall - never to the floor. | |
| When finished, parquet floors with a herringbone pattern look like the one shown in the last illustration. |
* * * * * * *
If you want to try your hand at laying herringbone parquet flooring yourself, you should experiment first. For example, lay parquet flooring without glue on the table, carefully connecting their locks. Practice working with a small tool when adjusting cut fragments. With such simple training you can gain at least minimal experience and understand the principle of performing work. And, in the end, soberly assess your capabilities. If the installation seems too complicated or an impossible task, then in this case it is better to entrust the installation to an invited master.
At the end of the publication, look at a slightly different approach to laying parquet with an English herringbone pattern. This way it seems easier for this master. It’s hard to argue – there would be quality.
Laying tiles on the floor in a herringbone pattern: step by step
The entire installation process consists of three large stages:
- Preliminary floor marking, calculations and error correction;
- Laying the tiles themselves;
- Grouting joints.
Floor marking
Marking must be done from the center of the room. Find the center and draw a line across the room. Next, we calculate at what distance from each other the tiles should lie. To do this, divide its length by 1.414. The last number is a generally accepted constant. It allows you to find out at what distance the next piece will lie. The resulting number is the same distance. Next, we retreat as many centimeters as possible and draw a second line. The material on the other side will lie at a slightly greater distance, because diagonal seams are slightly wider. With this layout, first of all, you need to pay attention to how the fragment lies in the corner of the room. If a narrow trim is needed there, move the material towards the wall to avoid this problem.
Laying tiles
First, evaluate your work surface. Is there dust and dirt there? Is the surface well primed? Are there any cracks in the screed and is the surface flat for laying? Only after this can the material be placed. Apply glue, depending on the drawn markings, to the base, then remove it almost completely with a spatula. Using a notched trowel, apply the adhesive to the tile itself and remove any excess. Place the tiles in the desired area. Thus, you need to put 3 fragments. Then we move to the next lane. The entire installation of porcelain tiles takes place in rows. Do not forget to insert crosses so that the distance between the seams is the same.
Rules for laying tiles on the floor in a herringbone pattern
This installation method is usually chosen for rectangular-shaped ceramic coatings imitating a wood pattern. In this option, the finished result will look whiter and aesthetically pleasing. This installation method is suitable for rooms where it is necessary to expand the space and smooth out uneven corners.
Advice! In order to expand the room as much as possible, choose narrow tiles. Of course, it will take enough time to install it. But the result will exceed all expectations. Also, in order, on the contrary, to narrow the space, or simply to fill a large area with such a pattern, choose a larger material.
Designers also often use two contrasting shades of material. This technique can enliven even a gray-black interior and will look very bright and stylish.
The installation rules themselves are very simple. The tiles are joined from the narrow side to the wider side, thus creating 90 degree angles. Next, we will look at the installation technique step by step. The same technique will be used for laying a contrasting look, only instead of one fragment, two fragments are joined at once with the narrow side.