The need to update tiles in the bathroom or kitchen does not arise very often, because this coating is durable and durable. If, during use, chips and cracks appear on the surface of the tile, the seams become dirty, or other defects appear, it will be easier and more economical to restore the old surface.
What can be done?
There are many ways to improve the appearance of a ceramic coating. It depends on the degree of damage and the area covered.
If the tile is peeling and cracked over the entire surface, it would be more advisable to completely replace it.
If the damage is minor, it will be cheaper and faster to partially restore the surface.
Don’t forget to also see: How to remove grease from kitchen tiles
Is it possible to change the apron in the kitchen?
Replacing the apron allows you to change the interior of the room, refresh the design, and get rid of stubborn dirt. If you do not plan to change the screen size, replacing the coating is easy.
It is easy to do this operation with MDF sheets, plastic panels, and glass coating. They are attached to the walls using a profile or self-tapping screws and can be quickly dismantled. It is enough to remove the panels from the L-profile clamps or unscrew the screws, after which the cladding can easily be separated from the wall.
It is much more difficult to update a tiled apron or artificial stone cladding. It is attached to the wall with glue. Such a coating can be disguised using skinali - glass panels with a printed pattern. The elements are quite expensive, but they are simply attached (with self-tapping screws) and reliably hide the old apron from view without dismantling.
Renewing seams
The seams between tiles often accumulate dirt faster than ceramics, become unsightly and can cause the spread of fungus in the room. This should be avoided at all costs, so it is not recommended to delay when renewing seams.
Rules for cleaning damaged seams
Regular care will help with minor damage. For this purpose, special detergents are used to restore the surface.
It is convenient to clean the space between the tiles with an old toothbrush; homemade recipes are also used for this: a paste with soda, vinegar and ammonia.
If the contaminants are absorbed too deeply, this procedure will not give a noticeable result. In this case, it is better to completely renew the grout.
Complete seam replacement
In order for the new layer of grout to stick properly, you must first remove the old one completely or partially. To do this, it is convenient to use a stationery or construction knife, sharply sharpened and with a narrow blade.
First you need to “cut” the seam in the middle, then cut out the old grout at an angle on each side.
Important: the whole process must be carried out slowly, so as not to accidentally scratch or damage the ceramic surface.
If necessary, unusable or weakly holding squares are also removed, which still need to be replaced (fixed) during the repair work.
After the entire space between the tiles has been cleaned, it is necessary to treat the surface with an antifungal compound. This will not only ensure the durability of the coating, but is also necessary for the further safe use of the premises.
The procedure for applying the grout joint:
- The surface to be treated must be thoroughly cleaned and dried.
- Dilute the grout for joints in the required proportions (according to the manufacturer’s recommendations); you can use ready-made paste.
- Using a wide spatula, apply the mixture to the space between the tiles, pressing slightly into the surface.
- Use a narrow rubber spatula to smooth out the seams.
- Wash off any remaining grout from the tiles with a damp sponge.
The seams should dry well under natural conditions. This usually takes from one to five days, after which the missing areas are corrected and the excess layer is removed with rolled sandpaper.
Read more about replacing seams in the article - Removing grout from tile seams at home
Required materials and tools
To perform painting you will need the following tools and materials:
- stencils and templates;
- varnish;
- white spirit or solvent;
- sandpaper;
- a solution of alcohol-containing liquid or vinegar;
- textile;
- polyethylene film;
- scotch;
- container, metal sponge, detergent;
- brushes, roller, bath, mask, gloves, safety glasses;
- tile paint;
- primer;
- ceramic or enameled tiles.
Replacing tiles
If areas with severe damage or chipped slabs are identified on the surface, it is wiser to perform a partial replacement. To do this, it is necessary to select products that are suitable in size and structure and carry out installation.
You should not try to choose products of a similar color. Fundamentally new shades or designs will look much more attractive and organic.
Replacing individual tiles
Partial restoration of the tile layer is much cheaper and easier to perform. Also among the advantages is the possibility of bright accents in the interior, because it is almost impossible to choose tone-on-tone tiles.
Features of the work:
- It is better to combine the replacement of individual tiles with updates to the tile joint; in this case, it will be much easier to remove worn-out tiles, and also to strengthen, if necessary, the squares extending from the surface.
- Small cracks and chips can be covered with cement mortar. After drying, all that remains is to remove the unevenness with sandpaper, and then carefully paint it to match the tile.
- Instead of cement, you can use alabaster or other building mixtures.
The main condition is the strength of the base and the possibility of adjustment after the solution dries.
Modern tile wax will help restore damaged areas as accurately as possible. To do this, the surface is thoroughly cleaned and dried, additionally degreasing for better adhesion of materials.
The wax is applied using a special melter, which heats the mass to a plastic state.
Filling of chips and cracks occurs with a small margin, since the material shrinks after hardening.
After drying, the layer is protected and covered with a protective coating. If necessary, apply varnish to give a glossy shine to the surface.
You might also be interested in watching - How to lay tiles in the kitchen?
Gentle removal of unwanted tiles
When replacing a small number of tiles, it is more advisable to decorate the renovation in an unusual style, highlighting it with a bright accent. To do this, the new tiles are placed in a pre-designed order, which may require removing entire tiles.
It is easier to do this by removing the grout joint using the method described above, after which it is easy to pry the ceramic surface with a blade and carefully remove it.
It is not recommended to break or gouge out ceramics, as undamaged tiles can be used in another area.
Stage one: measure, plan, draw up a sketch
The first thing that needs to be done during budget repairs is to determine the procedure and identify areas that need reconstruction. Of course, you will need to take measurements and draw a sketch of the future appearance of the kitchen.
A sketch is not necessary, but if you have one, it is much easier to carry out repairs. Of course, the sketch should contain not only a drawing, but also dimensions. An important point is the hanging cabinets in the area where the panels will be mounted. Will they be removed or not? If the cabinets remain in the same places, then when covering them they should be bypassed, that is, less material will be required. In other words, you need to take into account every nuance.
What did the Roman fishermen's boat look like? Scientists have created a 3D model
Tor sandwich with salmon, cheese and chicken: a great alternative to dessert
The smart car system from MTS is already at the development stage
Painting tiles
Another successfully used method of restoring ceramic surfaces is painting tiles. To do this, be sure to clean the surface of possible contaminants, thoroughly degrease and wipe.
Partial restoration of the coating is carried out with any building mixtures (a simple and budget option is cement laitance).
Basic rules for painting tiles
A seemingly simple process has many nuances. First of all, you need to choose a paint that is resistant to moisture and abrasion, suitable for interior work.
Application of the coating also requires preliminary preparation: cleaning, leveling and degreasing the surface. After this, you can start painting using a special tool - a spray gun, or a regular paint brush or roller.
It is equally important to insulate adjacent surfaces, paint corners and hard-to-reach places before finally applying the coating over the entire area.
Depending on the type of paint, it is necessary to allow the first layer to dry, and then apply the second.
On kitchen splashbacks, it is recommended to use a protective varnish over the paint, so the coating will last longer and withstand extreme operating conditions.
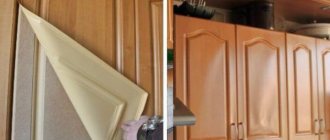
Decorating with film
A special film with an adhesive base and a protective coating is perfect for a kitchen apron.
Before application, the surface should be thoroughly leveled and degreased, and cleaned of possible dirt and greasy inclusions.
The gluing process is simple, the main thing is to prevent “bubbles” on the surface, so the glued segment must be ironed and fixed.
If voids are found, they should be pierced with a thin needle and smoothed well.
With proper care, such a coating will last for many years, and it can be replaced at any time, following the described algorithm.
Stage two: cutting panels and fitting
After purchasing the panels, you need to cut them according to the required dimensions.
You need to do the following:
- apply markings to the sheets that correspond to the drawn up sketch and the dimensions of the areas to be covered;
- cut the material;
- attach the parts to the wall, placing them in the places where they will be glued;
- Double-sided tape is perfect for temporary fixation.
This “fitting” is called a dry fit. It is needed in order to prevent mistakes when installing the panels.
An important point: for ease of installation on the wall, you need to make markings, namely, circle the panels during dry fitting. When removing parts, you need to number the sections of the wall and the panels themselves, of course, on the reverse side. This will avoid confusion when fixing them.
The story of an Indian girl who spent two years cleaning a lake is included in the textbook.
Soviet Aladdin had unearthly beauty. How did his son grow up (photo)
“The Naked Gun” is excellent: 5 best and 5 worst foreign comedies of the 90s
Changing the design of tiles
An affordable and most uncomplicated way to transform a ceramic surface can be called “masking” defects.
In addition to hiding possible damage from prying eyes, this will also allow you to change the usual interior of the room, highlighting your taste and creative abilities.
Vinyl stickers
The range of modern interior stickers will allow you to choose the right option. Before pasting, the surface is thoroughly washed and degreased, and wiped with a clean rag.
The sticker is applied gradually, leveling and pressing down each area to avoid the formation of air voids.
Over time, stickers will lose their appearance and will need to be replaced, but this method is popular, especially if you're on a budget.
Painting patterns on tiles
Plain ceramic tiles can also be refreshed by painting them with paints. If you have even minimal artistic skills, this is not difficult to do.
The main rule will be the compatibility of the design with the overall style of the interior.
To do this, it is advisable to “try on” the selected composition on paper, and only after that start working.
Pre-cut stencils will be of great help in decorating, with which interior decoration will become easier and faster.
Helpful advice: to make the drawing last longer, it is better to varnish it after drying.
Overlapping tiles with another material
If it is not possible to purchase ceramics, the areas freed from tiles can be covered with other suitable materials. Typically, plywood or chipboard of appropriate thickness is used for this.
After installation, the surface will have to be painted over, because the usual structure and color will clearly contrast with the rest of the part.
Stage three: installation of panels and decoration
This stage of work is not as simple as it seems at first glance. It seems that what could be difficult when gluing the panels to the surface in accordance with the markings? But the wall is not perfectly flat. Old tiles rarely have a completely smooth surface. Such defects are invisible when looking at the tiles, but when installing the panels they become obvious.
The voids must be filled with putty. If the surface has strong, pronounced defects, then the putty should be applied to the entire area initially, thereby leveling the wall. The putty needs to be mixed with glue, this will strengthen its adhesion to the surface and prevent cracks from appearing when it dries out.
It is also necessary to putty the joints between the panels and the top line - the distance between the wall and the panel. If fastening is carried out not with glue, but with self-tapping screws, then the heads of the hardware also need to be covered with putty.
As soon as the putty dries, the surface needs to be painted. It is best to do this with a roller, so the paint will lie evenly. But you can’t do without a brush; it will be needed when processing the top line and areas near cabinets and countertops.
Found a violation? Report content
Unusual examples
A fashionable trend in kitchen interior design is the placement of inscriptions and original miniature drawings. To do this, you don’t have to be a professional artist, because on the Internet you can find and print many suitable and easy-to-make pictures.
Have ceramic tiles in your kitchen or bathroom become unusable? Complete replacement and professional installation of new squares is a serious blow to the budget.
Our article has collected simple and budget-friendly ways to update old ceramic tiles in the kitchen with your own hands quickly and without extra expenses.