Why paint the kitchen furniture
Painting your kitchen cabinets yourself is an interesting option for updating furniture. This method has advantages:
- the kitchen will be transformed, while the costs will be minimal;
- painting can be done without any help;
- the prospect will open up for original design solutions and the manifestation of your own imagination.
If we are talking about restoring kitchen facades made of MDF (in a situation where the PVC film has peeled off), then this can be easily done with paint. You just need to choose the type of coating and skillfully find the color.
Over time, the PVC film begins to peel off
Paint for chipboard facades
The most economical option is furniture made entirely from chipboard. Here all the parts are made of the same material; no cutters or roundings can be made, so these are always straight parts. Due to the simplicity of the entire design, preference is often given to a cheaper type of paintwork. The selection of material is often carried out according to the desired tone. The peculiarity of updating such interior items is that attention should be paid not only to painting, but also to transforming the edges.
What paint should I use?
To paint a kitchen set with your own hands, you need to choose a paint. What coloring materials can be used in the kitchen, and which ones should you avoid? You should not give preference to emulsion, oil or acrylic paint. The water-based emulsion does not fit well on chipboard and MDF, it spreads, and does not provide the necessary saturation to the facades and cabinets of kitchen furniture. It is difficult to achieve uniform distribution of oil paint over the surface; drips will remain on the furniture. Difficulties will arise in the process of caring for the set - along with grease and dirt, the paint coating will peel off over time. Acrylic-based compositions do not tolerate moisture well and are afraid of chemical cleaning agents. It is better to give preference to alkyd paint in the form of an aerosol, since it is a washable composition. Automotive enamel is suitable for painting cabinets and facades of kitchen units, because it:
- resistant to cleaning agents and moisture;
- easy to apply to the surface;
- copes with temperature changes;
- does not leave streaks;
- has a rich color;
- does not lose properties under mechanical stress.
A variety of colors allows you to choose an option for a specific kitchen. The kitchen set can later be repainted in a different color; you just need to prepare the surface for painting.
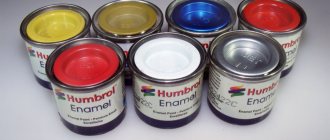
Alkyd auto enamel
How and with what to paint kitchen facades with your own hands? Painting the kitchen at home
Rating 4.16 (48 Votes)
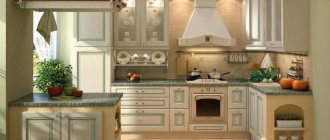
| We can safely say that the kitchen and dining room are the main place in any home, the place where the whole family meets, has breakfast, lunch, dinner, welcomes guests and discusses family matters. And, of course, this place should be cozy and beautiful, pleasing to the eye and soothing, because sometimes you have to look at the surrounding interior for many years. Updating your kitchen set without investing enormous amounts of money and effort is quite simple and you don’t have to immediately run to the store to purchase new expensive furniture. |
There are many other ways to change a kitchen, ranging from complete or partial replacement of individual modules, ending with the application of a special self-adhesive film, varnish and veneer finishing, but the most popular and least expensive way of transformation is to paint the kitchen facade yourself. This will transform the family's favorite meeting place and create a warm atmosphere throughout the entire home. The issue of updating the panels of a kitchen unit is especially relevant if its surface has become dull, worn out, has lost the aesthetics of its original appearance, does not fit into the new renovation, or the owners simply wanted to diversify the decor. By spending a minimum of money, you will achieve impressive results. Let's figure out how and what to paint the kitchen facade at home with minimal effort and in the shortest possible time.
How to paint kitchen facades at home? Choice of paint.
First you need to decide what you will use to paint the kitchen facade. Today the market offers many varieties of paint and varnish materials, but not all can be used equally well for painting kitchen facades. For example, it is almost impossible to achieve a perfectly flat surface with oil paint and a brush, and water-based paints, in principle, are not intended for this kind of work.
| The best option for painting the kitchen facade at home is considered to be aerosol paint in cans, for example, acrylic or auto enamel due to its heat and moisture resistance. Aerosol acrylic paint is durable, resistant to damage and comes in many shades. Aerosol paint in cans is used in a variety of areas, including household and repair work for painting furniture. Low cost, ease of spraying and the ability to create a perfectly smooth coating make you choose this paint and varnish material and make it indispensable for repairs and decoration. |
However, perhaps it is more convenient and familiar for some to paint facades in the traditional way using a brush or roller, so in this article we will look at both methods - painting a kitchen facade with spray paint and painting the facade with a roller and brush.
Painting a kitchen unit with your own hands, as one of the most affordable ways to update a room, will not require special skill from you and many years of experience working with paints and varnishes. The procedure for painting a kitchen facade at home is so simple that a person who has never even encountered this kind of work can successfully cope. The most important thing is to have patience, as well as the necessary tools and materials. So, in order to properly paint the kitchen facade yourself, you will need the following equipment.
What do you need to paint kitchen facades with your own hands?
— aerosol enamel in sufficient quantities
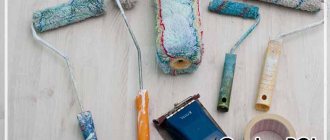
- when using regular paint - roller, brushes, paint trays
- gloves and mask or goggles for protection
- newspaper or covering film, as well as paper tape (painting tape)
- a bowl of water, detergent and sponges
- solvent or white spirit for degreasing the surface
- fine sandpaper
- primer
- if it is necessary to repair deep scratches or chips, then putty and a spatula
- aerosol acrylic varnish
— Additionally: if you plan to apply patterns or designs to the kitchen façade, you
you will need stencils
Step-by-step instructions for painting a kitchen facade with spray paints
Step_1 Preparing the workplace. When painting with an aerosol can, the paint can scatter quite widely around the room, so prepare the area for painting in advance, cover the surrounding objects and the floor with a covering film, prepare personal protective equipment, tools and materials.
| Step_2 Preparing the kitchen for painting. Dismantling of facade elements. It is more convenient to carry out painting work in a horizontal position, so you need to remove all the doors and unscrew the fittings. If possible, remove glass inserts from structures or cover them with protective film. If desired, you can replace the old fittings with new ones. Also, cover areas that do not require paint with mounting tape and covering film. |
Step_3 Cleaning surfaces. If the facades are dirty, wash them well with detergent and warm water, wipe dry and degrease with solvent. Remove the film from the facades, if any, with an industrial hair dryer. To achieve the highest quality coating of the facade with paint at home, sand the surfaces with fine-grained sandpaper, then rinse again with warm water and dry.
Step_4 OPTIONAL. Puttying. If there are deep scratches or chips on the surface of kitchen facades, smooth them out using putty and a spatula. It is best to use automotive putty. After filling, it is necessary to sand the surface with a fine primer and clean it.
Step_5 Applying primer. There are different types of primers: for plastic, wood, etc. Choose the one that suits your façade. You can use both regular primer and aerosol cans. Cover the surface with primer in 1 - 2 layers.
Step_6 Painting. As we have already said, in order to paint the kitchen facade with your own hands, it is best to use aerosol paint. Shake the can thoroughly for 20-30 seconds to thoroughly mix the paint. Slowly, with sweeping movements, spray the paint over the surface from a distance of 20 - 30 cm. It is recommended to apply at least 2-3 layers of paint, observing the rule: the next layer is applied no earlier than the previous one has dried. Drying time is indicated in the instructions for the paint.
Step_7 Varnish coating. After painting and final drying of the facades, we recommend that you apply a varnish coating. It is best to use spray acrylic varnish, glossy or matte, depending on the effect you want to achieve on the coating. It will add depth to the color and create a protective coating that protects the new painted surface from damage.
Step_8 Final drying and installation. The painted and varnished facade should be completely dried for 3 - 4 hours, then the hinges, handles and other fittings that we removed should be replaced, after which the facade panels can be installed in place.
How to paint a kitchen façade with a brush and roller?
The general technology and sequence of steps when painting kitchen facades with a brush and roller is the same as when painting with aerosol paints. Let us draw your attention to several important points:
| The brush for painting the kitchen facade at home must be new. With its help it is easy to paint recesses, joints, corners, small parts, in general, all those hard-to-reach places where it would be difficult or impossible to reach with a roller. To apply paint evenly, purchase a foam roller, and a special paint tray will make the work more convenient and will prevent a lot of paint and varnish material from being absorbed into the brush or roller. |
To paint the kitchen facade yourself with high quality, to avoid drips and any other marks, it is recommended not to take too much paint with a brush and roller, but to move it over the surface with smooth, even movements.
In conclusion, I would like to note that by changing only the color of the kitchen facade, you will make the entire room look different. This method will help you make a new kitchen set from old and worn furniture, fit it into the color scheme of the room after renovation, or simply create a new cozy environment around you. For greater effect, you can decorate the facades with drawings or special decorative elements.
As you can see, painting a kitchen is not only about renovation, but also about creativity. Now that you know how and with what to paint the kitchen facade with your own hands, you can safely get to work. We promise that the renovated room will not only be pleasant to stay in, but also to cook, wash dishes, meet and communicate.
If you found this article useful, please rate it (at the top of the page). Thank you!
/p>
Visitors to this page most often choose from the online store:
Universal spray paint 42 colors
|
Choice of colors
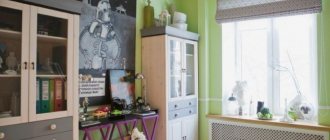
The question of how to repaint a kitchen set comes down to the task of choosing a color. If a kitchen renovation is planned, the walls and ceiling should be painted in neutral colors. Subsequently, it will be easier to combine furniture with such a background; it will contrast and stand out. If the walls are already painted in bright colors, a neutral option for the headset will be appropriate. Beige, coffee, gray and white colors are suitable here. When using several colors at once, do not overdo it - a maximum of three options. Neutral colors are easier to combine, the main thing is to achieve a balance of dark and light tones. Work tables are usually painted in dark colors, cabinets - in light colors. Monochrome is also not an option, since the kitchen will look original if there are contrasting bright splashes (red, orange, green accents). The kitchen interior will gain originality if you use contrasting colors at the same time (for example, blue and orange, yellow and lilac, blue and red). An interesting option is a combination of two bright and two neutral colors. Bold decisions in the design of work tables and kitchen wall cabinets will push for other interior changes. Repainting cabinet doors and completely redesigning the kitchen is a bold decision. There may be a desire to change dishes, curtains, oilcloths, upholstery, etc. If the selection task causes difficulties, you can safely contact an experienced designer. A cleverly updated kitchen will delight you for many years.
Pay attention to: How to paint a wooden floor in a house: the advantages of a painted floor, the choice of material and the procedure for work
Required Tools
Old kitchen furniture needs preparation before painting. It is not recommended to apply coloring compounds to a poorly treated surface, as this will reduce the life of the headset and make it unsightly. For preparation you will need the following tools and materials:
- fine sandpaper (to remove surface defects);
- solvent (to remove the old layer of paint);
- primer (to improve adhesion);
- putty (to repair cracks and chips);
- masking tape (it will protect surfaces that do not require painting);
- plastic corner to match the paintwork used;
- spare fittings (hinges, handles, shelf supports, etc.).
For work, you may also need a hair dryer, a grinder (grinder with a grinding attachment), spatulas, rags, containers, scissors, and a screwdriver for removing old fittings.
Sandpaper
Solvent
Masking tape
Materials and accessories
Not many materials are required to transform the interior:
- Glizal to create an additional decorative effect.
- Painting tape.
- Brushes together with rollers.
- Screwdrivers. It's better to take a screwdriver.
- A special hair dryer used in construction.
- Gloves.
- Primer for wood.
- Sandpaper or hand sander.
Preparing the headset
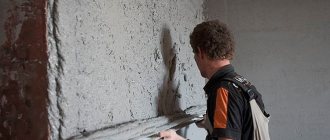
This stage involves freeing the upper and lower modules from dishes, food and other kitchen utensils. The structures are dismantled, the facades are separated from the buildings, the parts are separated, and the fittings are removed. Painting is carried out in a well-ventilated area; it would be even better to do the work outdoors. Cabinets and doors are thoroughly washed to remove typical kitchen dirt - grease, soot, traces of dried water drops. Achieving good adhesion is important because the paint layer applied to a clean surface will last longer. If the PVC film peels off, MDF facades require treatment. Using a hair dryer, the film can be heated and removed completely. The gluing technology involves carefully treating only the corners of the parts with glue, since the abundance of the composition on the front side will affect the evenness of the surface. Therefore, by heating the corners, you can achieve rapid peeling of the film. The surface will need to be sanded to level and remove any remaining adhesive. Solvent, rags, a sander or sandpaper may come in handy here. Dust after processing must also be removed. A dry cloth or large brush is suitable for this. Another option is a vacuum cleaner set to air blowing mode. The wooden surface that will be painted needs to be degreased (a solvent will do). After treatment, the surface must dry so that any remaining product does not come into contact with the paint. Primer treatment is a mandatory stage of surface preparation. The applied composition must dry, and you need to refer to the manufacturer's instructions. Putty is used to seal cracks, deep scratches, and chips. If they are absent, the puttying step can be skipped. The treated surface must be smooth, so the dried layer of putty is sanded. The final touch is to seal the areas that do not require painting with tape.
Before painting it is necessary to prepare the surface
Second preparatory stage
To paint the kitchen facade, it is removed from the wall cabinet, all fittings are removed, and free of mirror or glass inserts. The surface is cleaned of old finish using the methods described above.
- Grinding is a mandatory element of preparation. This way you get a flat, but not smooth surface, which forms good adhesion to the paint. MDF and wood are sanded with a sander. Chipboard is best processed by hand.
- The surface is cleaned of dust and degreased with acetone and white alcohol.
- If there are deep chips, scratches, or depressions on the surface, they are repaired with automotive putty.
- The facade is overprimed with a composition corresponding to the type of paint. In this case, wood or MDF is treated with a wood primer, and plastic or metal parts are treated with a plastic or metal primer, respectively.
Leave the furniture to dry for a day.
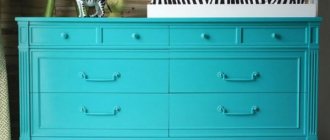
Painting the kitchen unit
Painting is carried out with a brush, roller or using an aerosol can. Paint is drawn from the container carefully and in small quantities. Movements on the surface are carried out in one direction, they must be smooth. If there are small parts, use a small brush. Painting in one layer is not sufficient for the kitchen due to persistent humidity and temperature changes in the room. The application of the second and subsequent layers begins only after the previous one has dried. The decor of the facades can be painted with paint of a different color. To do this, areas are protected with tape. You need to work slowly to avoid subsequent rework. Repainting incorrectly treated furniture is more difficult, since the preliminary stage will have to be completed again. It’s easier to paint a kitchen set from a can; you just need to practice a little in handling this type of paintwork. The can of paint is shaken, the layer is applied with sweeping movements while the spray button is held down. The distance to the treated surface is 20-30 cm. Repeated painting is carried out after the applied layer has dried. Painting errors can be eliminated using a solvent. Complete drying of automotive enamel occurs within a day, but it is better to check the paint manufacturer’s instructions.
Painting a kitchen unit with a spray gun
Care after coloring
A painted kitchen set requires care to ensure its appearance is preserved for a long time. Temperature changes, high humidity levels, grease and other contaminants are factors that affect the attractiveness of kitchen furniture. Facades and buildings are sensitive to moisture (even if painted with washable paint), ultraviolet radiation, and chemicals. Abrasive materials and rough cleaning agents can damage the paint layer. Overheating also affects the lifespan of your renovated kitchen. Painted surfaces must be wiped daily with dry wipes to prevent prolonged exposure to water (mainly from splashes). If there are minor defects in the design, moisture will “find a loophole” and gradually begin to destroy laminated chipboard and MDF (this is the material used in furniture production). Prolonged exposure to ultraviolet radiation can be avoided with proper placement of kitchen modules; curtains also solve this problem. The sun's rays damage the structure of some types of paintwork materials and lead to color fading. It is better not to use concentrates; soft (diluted) formulations are suitable. Before washing the headset, it is important to read the manufacturer's instructions. Abrasive powders and hard sponges are not allowed in painted kitchens. The hood and protective structures will preserve the integrity of the paint layer and increase the durability of the painted kitchen set.
Caring for your headset
Solid wood facade paint
Solid wood always has a beautiful appearance and good wear-resistant properties. Old products were often made from pine wood. Paint and varnish coatings are selected based on:
- the size of the wooden furniture set (sometimes painting can be very expensive);
- style and execution of facial elements. It is better to apply auto enamel to straight parts.
This coating is optimal because it will better protect the wood from drying out, temperature changes, and humidity, and it will also help decorate the kitchen set.