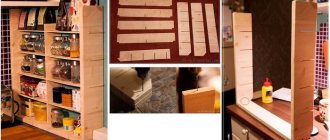
Recently, Monster High dolls have become especially popular, complete with all kinds of wardrobe items, furniture, and cosmetics. Little girls dream of a doll house that will be equipped with furniture. Even if it is not possible to give your baby a house, you can make furniture for Monster High dolls with your own hands. The simplest option is a sofa. There are many options for turning your plans into reality. This applies to making the base and decorating.
How to sew toy upholstered furniture - a bed for dolls, with your own hands: master class, diagram, photo
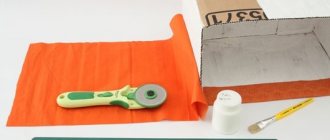
In this small master class we will tell you how to sew a bed for dolls with your own hands. For this we need:
- Remains of multi-colored or bright fabric;
- foam rubber or sponge for washing dishes;
- 4 plastic bottle caps;
- Some cardboard;
- Remains of padding polyester;
- Hot glue gun;
- Ribbons, lace, beads and other decor as desired.
We draw a template for the head of the bed, ours is 8 cm wide and 7 cm high, but you can choose a different size depending on the size of the doll.
How to sew toy upholstered furniture - a bed for dolls, with your own hands: step 1
We cut out the headboard of the bed from cardboard, as well as two parts from padding polyester.
How to sew toy upholstered furniture - a bed for dolls, with your own hands: step 2
Now we cut out two parts from the fabric with an allowance of 1 centimeter.
How to sew toy upholstered furniture - a bed for dolls, with your own hands: step 3
We fold the fabric facing each other and sew with a 5 mm allowance around the entire perimeter, with the exception of the lower part of the headboard. In the corners we cut the fabric slightly so that it does not pull when it is turned inside out. If the fabric is elastic (for example, supplex), then there is no need to make cuts. After this, turn it inside out and iron it.
How to sew toy upholstered furniture - a bed for dolls, with your own hands: step 4
We lay down a layer of padding polyester, cardboard and cover it with a layer of padding polyester on top, sewing it together as in the photo on all sides.
How to sew toy upholstered furniture - a bed for dolls, with your own hands: step 5
We stretch a fabric cover over the padding polyester, which we have already ironed beforehand. We adjust the seams as necessary so that nothing bulges. Please note that at this stage we are not sewing the bottom yet.
How to sew toy upholstered furniture - a bed for dolls, with your own hands: step 6
How to sew toy upholstered furniture - a bed for dolls, with your own hands: step 7
Now it's time for decoration! We lay a cord of artificial pearls around it, but depending on the style you choose, you can lay any decorative cord or ribbon.
How to sew toy upholstered furniture - a bed for dolls, with your own hands: step 8
How to sew toy upholstered furniture - a bed for dolls, with your own hands: step 9
We also place cabochons, buttons, rhinestones or whatever your imagination comes up with on the headboard.
How to sew toy upholstered furniture - a bed for dolls, with your own hands: step 10
The headboard is ready, so we put it aside and move on to the bed. We calculate the length and width of the crib, for us it is a sponge 8*11 cm. Using this sponge we cut out the padding polyester, and also add rectangles on all sides to close the sides. To help you understand how to cut, look at the photo below.
How to sew toy upholstered furniture - a bed for dolls, with your own hands: step 11
Now we put the cut synthetic padding on the fabric and cut out the fabric with a gap of 1 cm. We are putting it aside for now. We fold and sew synthetic padding around the foam rubber.
How to sew toy upholstered furniture - a bed for dolls, with your own hands: step 12
How to sew toy upholstered furniture - a bed for dolls, with your own hands: step 13
If you haven't cut out the fabric yet, cut out and cover the crib as in the photo.
How to sew toy upholstered furniture - a bed for dolls, with your own hands: step 14
How to sew toy upholstered furniture - a bed for dolls, with your own hands: step 15
We sew the corners on a machine so that they cover the bed tightly and efficiently.
How to sew toy upholstered furniture - a bed for dolls, with your own hands: step 16
Now, after the cover is well stretched over the crib, we grab the fabric on all sides with hot glue, or if there is no hot glue.
How to sew toy upholstered furniture - a bed for dolls, with your own hands: step 17
How to sew toy upholstered furniture - a bed for dolls, with your own hands: step 18
How to sew toy upholstered furniture - a bed for dolls, with your own hands: step 19
We also glue 4 cover legs; if desired, they can also be covered with fabric, but in fact they will not be visible anyway.
How to sew toy upholstered furniture - a bed for dolls, with your own hands: step 20
We sew a frill from a satin ribbon (you can also use guipure or grosgrain). It can be gathered or stitched with folds.
How to sew toy upholstered furniture - a bed for dolls, with your own hands: step 21
Hot glue the headboard of the bed to the main part of the bed and press down firmly so that there is no space left between the bed and the headboard. All that remains is to glue our ruffles to the bottom of the crib covering, as well as around the headboard.
How to sew toy upholstered furniture - a bed for dolls, with your own hands: step 22
How to sew toy upholstered furniture - a bed for dolls, with your own hands: step 23
We decided that there was not enough decor and added an additional openwork ribbon. We think it's even cuter!
How to sew toy upholstered furniture - a bed for dolls, with your own hands: ready
We added two pads: they are sewn simply, filled with ball holofiber or several layers of thin synthetic padding.
Decoration
To decorate furniture for the house, you will need a variety of props: fabric scraps, unnecessary cream boxes, pieces of cardboard, broken pencils, empty pen pastes, jewelry torn from elastic bands, unpaired socks, torn buttons, and many more seemingly unnecessary little things.
- The soft parts of beds, sofas and armchairs are made from padding polyester. This is a cheap and accessible material. You can even find it at home if you rip open an unnecessary jacket;
- The pillows are stuffed with the same padding polyester. They can be sewn on a machine, but you will have to sew up the remaining hole for stuffing by hand, this makes the product much neater;
- Accessories and furniture are made from paper. This is where a set of colored paper can come in handy. It is better to use a double-sided option, this will help make the elements completely painted in one color;
- Buttons are needed to create handles on bedside tables and chests of drawers. Small buttons are used to create beautiful pillows, blankets, and tablecloths;
- All elements must be in the same style. This is ensured by using the same materials. Usually people do not store very small scraps of fabric at home, so this point will not cause difficulties;
- The adhesive film will help to imitate a wooden surface and will make it easy to turn cardboard furniture into almost wooden furniture. Beautiful tape with a pattern or lace saves time on decoration and helps not only to fasten elements, but also to decorate them. Using these tools at the same time, you can effortlessly create a beautiful element, especially if the lace tape is a contrasting color to the film.
To make
furniture for Barbie with your own hands, it will be convenient to purchase several meters of beautiful tape in advance.
It will cover unsightly joints, distract attention from glue smudges, and disguise the tape. All materials for decoration are prepared in advance, selected to match and stored for future use.
Probably every little girl has a dream to have a dollhouse with toy furniture. Of course, nowadays you can purchase ready-made furniture for a dollhouse in children's toy stores without any problems. But parents do not always have this opportunity. In addition, you can make doll interior items yourself without spending money on it. Moreover, for this you can use the simplest materials at hand.
Let's take a closer look at how to make a sofa for dolls with your own hands. Moreover, you can make such a sofa for Barbie together with your child.
How to sew a soft doll sofa with your own hands from scrap materials: templates, stencils, photos
To begin with, we will show you how to “sew” a sofa from eco-leather and pressed cardboard. First, we make the base of the sofa: we glue together several layers of cardboard (our cardboard is thick, so three layers are enough), and we also attach the back and sides to it with glue.
We glue a thin layer of foam rubber along the entire inner side as in the photo and move on to covering the sofa.
We calculate the height of the piece of material: the height of the sofa plus the back of the sofa and leave a tolerance of 1 cm on each side. Now the length of the segment: the perimeter from the joint of the back with the sides of the sofa in a circle to the second joint. Now we mark the middle on the material and on the back of the sofa, apply glue all over the material, connect the two centers and pull it first to one side of the sofa, then to the other. We connect as in the photo.
We also glue a strip at the bottom of our sofa so that the foam rubber and cardboard are not visible.
How to sew a soft doll sofa with your own hands from scrap materials
Now we need to make 6 identical pillows for the inside of the sofa. To do this, we need to measure the inside of the sofa and divide it by three. The height of the pillows is equal to the depth of the sofa. We take one layer of cardboard, if it is thick, or several layers; if it is thin, we cut out the necessary squares, lay a layer of thin foam rubber on one side for visual “softness” and cover it with eco-leather as in the photo. Secure the ends with hot glue or torque.
We glue the cushions to the sofa; for beauty, you can additionally make several small sofa cushions. Our sofa is ready!
And another option for a sofa for your favorite doll’s country house. To work, we will need improvised materials that any needlewoman can find! We cut out a back template from thick cardboard (3 mm or wider) or thin plywood.
How to sew a soft doll sofa with your own hands from scrap materials: step 1
We duplicate the same template on foam rubber. We connect it to a rigid base using hot glue.
How to sew a soft doll sofa with your own hands from scrap materials: step 2
We cover it with fabric, secure it with thread and additionally hot glue.
How to sew a soft doll sofa with your own hands from scrap materials: step 3
We take nine identical small buttons, tighten them, mark them on a dream basis for a tie (as in the photo) and sew them under tension so that a beautiful relief is formed on the front side.
How to sew a soft doll sofa with your own hands from scrap materials: step 4
How to sew a soft doll sofa with your own hands from scrap materials: step 5
How to sew a soft doll sofa with your own hands from scrap materials: step 6
Now we need a frame made of beams or plywood, which we have at home. We assemble an even rectangle and cover the front side with fabric as in the photo. Fix with hot glue.
How to sew a soft doll sofa with your own hands from scrap materials: step 7
We put a sheet of plywood or thick cardboard on top and glue two layers of foam rubber to make the sofa seem soft and cozy.
How to sew a soft doll sofa with your own hands from scrap materials: step 8
How to sew a soft doll sofa with your own hands from scrap materials: step 9
Now we make the armrests as in the photo. If you have thick cardboard, then you can glue it layer by layer and get armrests of the same strength.
How to sew a soft doll sofa with your own hands from scrap materials: step 10
We cover it with foam rubber as in the photo. We cover the top with fabric. We connect all parts of the sofa using hot glue; if necessary, we additionally fix the back of the sofa with screws to the base.
How to sew a soft doll sofa with your own hands from scrap materials: step 11
How to sew a soft doll sofa with your own hands from scrap materials: step 12
How to sew a soft doll sofa with your own hands from scrap materials: step 13
How to sew a soft doll sofa with your own hands from scrap materials: step 14
How to sew a soft doll sofa with your own hands from scrap materials: step 15
How to sew a soft doll sofa with your own hands from scrap materials: step 16
We decorate the top with decorative cord and decor to taste. The sofa is ready!
How to sew a soft doll sofa with your own hands from scrap materials: ready
Materials for making doll sofas
Making furniture for dolls is not only a significant saving on the family budget, but also an excellent reason to spend time with children and plunge into the wonderful world of fantasy. At the same time, special materials are not required for work. Doll sofas can be made from:
- cardboard boxes (for shoes, juice, equipment, toys, etc.);
- foam sponges for washing dishes;
- polymer clay;
- old wooden boxes, etc.
The easiest way to make comfortable furniture for a doll is to use the box in which the shoes were sold.
Materials:
- shoe box;
- a piece of foam rubber or padding polyester;
- fabric (upholstery);
- furniture stapler;
- stationery scissors;
- colored threads for sewing;
- needle.
Instructions:
- Cut off the narrow part of the shoe box.
- We cut the upholstery fabric to the size of the base of the sofa, making a 1.5 cm allowance for sewing the covers of the back, base and side parts.
- We sew the cover. We put it on the sofa.
- We cut out rectangles from foam rubber that correspond to the dimensions of the base and side parts of the sofa.
- We put foam rubber under the cover and fasten it with a stapler at the bottom.
- We make decorative pillows for the sofa. The craft is ready.
How to sew a soft doll chair with your own hands from scrap materials: templates, stencils, photos
To make a delightful chair we will need:
- Several types of cardboard: foam cardboard, thin and thick (thicker than 1.5 mm);
- Wooden pin or plastic tube of the same diameter;
- Fleece or thin foam;
- Covering fabric;
- PVA and/or hot glue;
According to the drawing below, we cut out all the necessary parts. In order to understand what size you want to make the chair on the drawing there is a mark of 1 inch (2.54 centimeters).
How to sew a doll's soft chair with your own hands from scrap materials: template
We connect the foam board and glue it along the top with thick cardboard as in the photo. Before moving on to the next step, the entire chair must be covered with thick cardboard and dried for at least 6 hours.
How to sew a soft doll chair with your own hands from scrap materials: step 1
Now we paste foam rubber over the back, seat and armrests.
How to sew a soft doll chair with your own hands from scrap materials: step 2
Let's move on to the covering, as in the photo. We glue thin cardboard to each piece of their fabric for rigidity. Do not forget to step by step as in the photo, so that you do not have to peel off pieces of fabric at the joints.
How to sew a doll's soft chair with your own hands from scrap materials: step 3
How to sew a doll's soft chair with your own hands from scrap materials: step 4
Now let's move on to the back of the chair. We glue hard cardboard onto the foam board, and foam rubber on top of it. The last layer is covered with fabric.
How to sew a soft doll chair with your own hands from scrap materials: step 5
How to sew a soft doll chair with your own hands from scrap materials: step 6
How to sew a doll's soft chair with your own hands from scrap materials: step 7
How to sew a soft doll chair with your own hands from scrap materials: step 8
How to sew a doll's soft chair with your own hands from scrap materials: step 9
How to sew a soft doll chair with your own hands from scrap materials: step 10
Glue the backrest to the main part of the chair. We additionally lay cardboard covered with fabric along the top of the back so that the chair looks neat on all sides.
How to sew a soft doll chair with your own hands from scrap materials: step 11
How to sew a soft doll chair with your own hands from scrap materials: step 12
How to sew a soft doll chair with your own hands from scrap materials: step 13
How to sew a soft doll chair with your own hands from scrap materials: step 14
How to sew a soft doll chair with your own hands from scrap materials: step 15
How to sew a soft doll chair with your own hands from scrap materials: step 16
How to sew a soft doll chair with your own hands from scrap materials: step 17
There is a pillow left and it is the simplest in this master class. Just repeat the sequence according to the photo and at the end fix the pillow on the chair with glue.
How to sew a soft doll chair with your own hands from scrap materials: step 18
How to sew a doll's soft chair with your own hands from scrap materials: step 19
And just a little more: we cover the bottom with double-sided fabric decor. We did not cut it in advance, since its height is selected individually.
How to sew a soft doll chair with your own hands from scrap materials: step 20
The painstaking work is done - the chair is ready!
How to sew a soft doll chair with your own hands from scrap materials: the work is ready!
Step-by-step making of a sofa
For the first time, it is better to make a sofa from cardboard. A minimum of skills is required, the product will be the most reliable. To make a sofa for Barbie with your own hands, you need to follow the instructions:
1. Take a shoebox and cut it in half lengthwise. One of the halves will serve as a seat, that is, the upper body, and the second will serve as the lower part, which forms the height of the sofa.
2. One of the parts should be cut so that half of the bottom of the box fits into the other, and the side part will form the height of the sofa. This part needs to be cut to the required size.
3. From the scraps you need to make additional supports for the bottom of the sofa. They should be attached around the entire perimeter of the bottom using glue or a stapler. When the workpiece is fixed, you can cut out the shape of the back and side handles.
4. When the cardboard is dry from the glue, the next step is finishing with fabric. Each part is covered with fabric separately, so you need to take measurements. The fabric is glued to the cardboard and fastened with a stapler. Sometimes it is sewn on with thread, but this process is complex and long. All seams must be closed inward so that a child cannot tear the upholstery.
5. The next stage is decoration. You can sew mini pillows for the sofa or decorate the bottom of the sofa with tassels and pom-poms.
This product is manufactured within 1-2 hours. Decorative finishing will take approximately the same time. It is possible to make a realistic model using additional materials, such as cotton wool or foam rubber. It is initially placed under the fabric, which is secured using a stapler. Using this sample, you can make a doll sofa of any size and for any doll.
On video:
sofa for a doll from a cardboard box.
How to sew a soft doll ottoman with your own hands from scrap materials: templates, stencils, photos
And now we will make not just an ottoman for a doll, but a real masterpiece!
We take plastic decorative elements and saw off several ends of the same height - the legs of our pouf.
How to sew a soft doll ottoman with your own hands from scrap materials: step 1
Now we take a round base, it could even be a reel of large adhesive tape, but for us it is a perfume cap.
How to sew a soft doll ottoman with your own hands from scrap materials: step 2
We insert the wire - it will fix the doll on the pouf later.
How to sew a soft doll ottoman with your own hands from scrap materials: step 3
On top we put two layers of foam rubber or one layer, but a thick one, we didn’t have one.
How to sew a soft doll ottoman with your own hands from scrap materials: step 4
Now let's move on to the elements. We sand the elements a little to add texture.
How to sew a soft doll ottoman with your own hands from scrap materials: step 5
And cover it with brown paint, optionally with varnish on top of the paint.
How to sew a soft doll ottoman with your own hands from scrap materials: step 6
We cover the base with velvet fabric and make a screed using glue.
How to sew a soft doll ottoman with your own hands from scrap materials: step 7
Now we glue the decorative tape to decorate the pouf and at the same time hide the imperfections of the screed.
How to sew a soft doll ottoman with your own hands from scrap materials: step 8
In the meantime, the elements have dried and can be treated with acrylic gold paint.
How to sew a soft doll ottoman with your own hands from scrap materials: step 9
You can also decorate with gold foil. This is done simply: apply the varnish and carefully press the foil over it, wait 20 minutes and sharply tear it off. Ready!
How to sew a soft doll ottoman with your own hands from scrap materials: step 10
How to sew a soft doll ottoman with your own hands from scrap materials: step 11
We glue the legs to the base (since we have a beautiful black base-lid, we do not cover it with decorative fabric, but leave it to shine). And our ottoman for cat dolls!
How to sew a soft doll ottoman with your own hands from scrap materials: done!
Let's learn the basics of working with polymer clay
Those who have the skills to work with polymer clay can make an excellent sofa for a doll out of it.
Materials:
- clay (preferably 2 colors);
- gold leaf (matching color);
- stationery knife;
- rolling pin or bottle for rolling out clay; toothpicks;
- rhinestones (used for manicure);
Instructions:
- Mix clay with gold leaf.
- We roll out the material for the seat and back of the future sofa.
- We fold the parts at right angles.
- Roll 2 thin sausages from clay and twist them into a rope.
- We lay the harness around the perimeter of the sofa seat.
- We make a single-color sausage, place it on the upper part of the back, slightly twisting the ends to create an imitation of carving.
- We make small ovals from 2 colors, put them together, slightly round them and apply them to the side parts - these are the armrests of the sofa.
- You can place a monogram on the bottom of the sofa, decorating it with rhinestones.
- Making the legs of the sofa. We form cylinders from pieces of clay of 2 colors and use a toothpick to make vertical and horizontal decorative lines.
- Attach the legs to the base.
- Place the finished sofa on foil and put it in the oven to bake.
- We coat the finished cooled product with varnish. The sofa for the doll is ready.
Another option for making a beautiful sofa for a doll is to use an old wooden box. Even a child can handle this model, and the canape sofa turns out to be very stylish.
Materials:
- wooden box;
- foam;
- glue;
- textile;
- thread, needle.
Instructions:
- We drape the open box with a piece of fabric.
- To prevent the fabric from sagging on the seat, we put several layers of foam rubber.
- We secure the fabric with threads, gluing it along the side ribs.
- We make small pillows and decorate them with beads. The sofa is ready.
The range of toys for children is so large that even special furniture is produced for dolls. The products are expensive, the quality does not always correspond to the price. It’s easier and more economical, and in some cases even safer, to make furniture yourself. Instructions on how to make a sofa for dolls with your own hands will become a clear example for any parent so that they can start producing furniture on a large scale.
In order for a child to enjoy using this piece of furniture in playing with dolls, the baby needs to be involved in the manufacturing process itself. The child will be able to show his creative talents and will be interested in the result by making a sofa for a doll with his own hands.
The work proceeds according to a given algorithm, but first you should decide on several nuances. They are preparatory in nature:
- Select the material for the base of the future product. The body of this furniture can be made from many things: sponges for washing dishes, boards, fabric rollers, cardboard shoe boxes.
- Prepare the material that will serve as upholstery for the body. You should also consider decorative finishing to decorate the product. The intricate shape of the sofa and elements will do just fine.
- Select the parameters of the sofa in accordance with the size of the doll. Think over the very shape of upholstered furniture, design features.
- Select the assembly method and materials with which production will be carried out. Most often it is glue, a needle and thread, a construction or office stapler.
- Auxiliary tools for technical operations.
A doll sofa must be strong and safe. The baby should enjoy playing with such a toy. You need to think over the most striking design for finishing children's furniture: use sequins, beads, ruffles, lace. Using permanent markers, you can create a design directly on the fabric.
Crib for doll baby
Barbie or Monster High are grown-up girls, so it makes sense that they could have a small child. It also requires some furniture. For example, a crib.
There is a very simple option for making a cradle for little Baby - a crib made from matchboxes. You can use popsicle sticks for the backs. Glue two boxes together at the ends and cover them with colored paper. Glue the sticks and paint them. The crib is ready.
Matchboxes are an excellent building material for doll furniture. These are ready-made drawers. You can make an entire kitchen set out of them.
- Take 9 boxes and fold them in three rows, gluing them together.
- Cover the perimeter with colored paper tape.
- Use a stapler to make staples at the ends of the “boxes”. These will be the handles.
- Make wall cabinets from three boxes.
- Glue two parts of each box together.
- Paint or cover them with colored paper.
- Cut the top of the box down the middle. These will be the doors. Handles on them can be drawn with a felt-tip pen or glued onto a grain of rice.
You can construct a wonderful chest of drawers from matchboxes. For this we need:
- 4 matchboxes;
- 4 beads for legs and 4 for arms;
- thin fabric or colored paper;
- beautiful braid;
- glue, paints.
Paint all boxes inside and out with a single color paint. Glue them together and wrap them in cloth or paper. Glue the braid along the contour, 4 bead legs on the bottom, and bead handles on each drawer.
Just 4 matchboxes, three beads, thick cardboard and colored paper are needed to make a stationery table or desk. Take 3 boxes and glue them together with their flat sides. Cover them around the perimeter with colored paper.
Cover the fourth box with the same paper, which will serve as a second support for the tabletop. The width of a matchbox is exactly equal to the height of a stack of three identical boxes. Decorate drawers by sewing beads as handles.
Every girl has a dream - a dollhouse with all the accompanying furniture. Today, you can purchase one, as well as individual interior items for a small house for a doll, in any children's store. However, parents do not always have such an opportunity. But you can make interior items with your own hands, using completely ordinary available materials. In this article we will talk about how to make a toy sofa together with your child.
DIY sofa for dolls
The principle of making toy sofas is simple. It does not require any special skills. In the master classes we will offer two options for sofas for dolls. Both options can be improved and modified according to your own taste and discretion. So, by changing their base, you can play with shape and size.
Cardboard boxes from shoes, toys or equipment, or washed and dried juice boxes are suitable as a base.
To upholster a toy sofa, you can also use different materials: cotton wool, foam rubber, synthetic padding, plastic film with bubbles, or simply soft fabric folded several times.
Upholstery fabric can be different: from a ripped bathrobe to material for upholstering real furniture. This fabric is secured in several ways: by hand sewing or machine sewing the sofa cover according to hand-made patterns, or by securing measured pieces of fabric with a regular paper stapler.
Children's toy sofa
To make a toy sofa we will need:
- cardboard shoe box;
- foam;
- textile;
- stapler;
- scissors;
- threads;
- needle.
- Cut off one of the long sides from the cardboard box. This will be the base of our sofa.
- We try on the lining fabric, wrapping a strip of it around the “back” and bottom of the box. We cut off the excess and sew the fabric together, making it a cover. We do the same with the fabric for the sides of the sofa.
- We put the central and side covers on the corresponding sides of the box. We stuff the back of the sofa with foam rubber and then, bending the fabric, secure it with staples using a stapler.
- We measure the dimensions of the base of the resulting sofa, add the desired height and measure the required size of fabric for sewing the sofa cushion.
- We stuff the sofa cushion with foam rubber, sew it together and place it in the base of the box. Our toy sofa is ready! If desired, you can sew several small pillows for decoration.
More complex products
A more complex model to manufacture is transformable furniture, namely a sofa bed for dolls. The instructions for the work are more complex, and the material used is completely different. This is necessary so that during the transformation process the product simply does not break.
Making a sofa from plywood
This sofa will become a real work of art. An analogue can be made from dishwashing sponges. Mom herself will make it. The main thing is to think about the method of transformation. It can be seen in models of real sofas.
You can also make other furniture elements to go with the sofa: poufs, armchairs. The principle of assembly and operation is the same as the main product. You can decorate an entire room for your baby doll.