Ever since water-based paint went on sale, painting it has become the most easily accessible, fastest and most economical option for a surface. The variety of shades and high-quality results, ease of application combined with an affordable price determine the success of painting with water-based paint.
The use of a water-based paint and varnish composition allows you to obtain high-quality results in a short period of time, and the technology for its application is so simple that even an untrained person can handle it. Subject to strict adherence to the process technology, the painted surface looks very aesthetically pleasing and adds zest to the entire design of a modern interior.
Painting walls with water-based paint compared to other finishing methods has a number of undeniable advantages:
- dries quickly. Only 2 hours are enough for complete drying;
- the composition is non-toxic and absolutely safe for human health and life;
- there is no specific smell. For comparison: the use of other compositions leads to a 2-3 week pungent odor in the room;
- a variety of shades - from pastel to bright and saturated. You can not only choose, but also independently obtain the color you need by mixing colorless paint and special coloring pigments;
- The application technology is incredibly simple, and the tools are quite easy to clean after use.
Composition of water-based paint and main technical characteristics
The choice of a particular composition should be based on technical and operational characteristics, including:
- compound. The main components include filler, latex, thickener, antiseptic;
- viscosity. An indicator that determines the degree of required dilution of paint with purified water. When using a regular brush, the viscosity should vary between 40-45, and if you have a spray gun - 20-25;
- specific gravity is 1.35 kg/l;
- consumption. The approximate water emulsion for 1 layer is 180-200 ml/m2;
- best before date;
- storage conditions.
Types of water-based compositions
The polymer included in the paint composition divides water-based paint into 4 main types:
- Acrylic, made on the basis of acrylic resins. Thanks to the additional inclusion of latex, the paint applies evenly to the surface, perfectly masks small cracks, and the painted surface becomes more resistant to water. This composition is intended for finishing surfaces made of natural wood and glass, brick, etc. Photos of such walls to be painted and the finished results of painting can be shown to you by companies specializing in repair work.
- Silicone, made on the basis of silicone resins. Despite the high cost, the use of silicone paint will provide excellent, uniform results when painting mineral coatings. 1 layer of coating can eliminate cracks whose width reaches 2 mm.
- Silicate, which is a mixture of liquid glass, water and colored pigments. Good performance characteristics, vapor and air permeability, and uniform painting results determine the success of silicate paint among consumers.
- Mineral, which contains slaked lime or cement, is intended for painting work on concrete or cement surfaces. You can see in the photo what prepared walls look like for painting.
texture on water-based paint using a hard brush
texture on water-based paint using a sponge
Work technology
Stages of work:
- To begin, mix the water emulsion thoroughly. If the composition is thick, add water. Bring the mixture to a creamy consistency.
- Add pigment, then mix thoroughly. To do this, take a construction mixer or improvised means, for example, a wooden stick of suitable length.
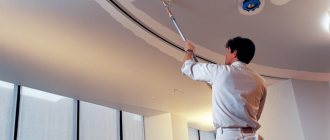
- If you paint with a roller, first paint all the corners and joints with a brush. Then treat the rest of the surface. If using a paint sprayer, skip this step.
- Pour the water emulsion into the tray and roll it out with a roller along the embossed side.
- Apply water-based paint to the whitewash, roll the roller with forward and backward movements. It is important to ensure that the paint is applied in a thin layer and no smudges form. Therefore, carefully stretch the water coating along the wall or ceiling.
- For a high-quality result, paint the wall twice. Each painted layer must dry well, so apply the second layer the next day.
- After completing the work, install the ceiling plinth.
Frequent mistakes of inexperienced craftsmen:
- Painting unprepared walls. The old coating and unevenness will make themselves felt by poor-quality results and repetition of the first stage of work.
- Uneven distribution of the emulsion over the surface. To avoid this, use a long-nap roller. Dip its surface completely into the paint, squeeze out the excess using the relief surface of the pallet.
- Stripes when covering. To fix it, roll the roller an equal number of times in one direction.
- When painting the ceiling over whitewash, be sure to bring the water emulsion until it is as thick as kefir. Then the applied layer will not be thick.
On a note! Water-based paint is a quick-drying paint. Therefore, from time to time it is worth stepping aside to see shortcomings in the work and correct them in a timely manner.
Water-based paint: color choice
The initial color of the water emulsion is white. To obtain the desired shade, you will need a water emulsion and a bottle of color. To dilute the composition at home, you need to mix the color with a small amount of paint, stir thoroughly and gradually pour the remaining color composition into this mixture, constantly stirring with a mixer.
Once the desired shade is achieved, you can immediately begin painting the walls with water-based paint. You can see the options for decorating walls for painting in the photo.
Tool for painting work
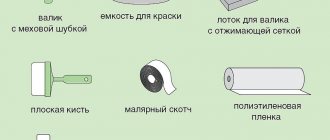
To paint walls with water-based paint yourself, you will need:
- ladder;
- brushes and rollers (possible replacement - spray gun);
- electric drill with mixer for stirring;
- masking tape;
- paint cuvette.
If you do not have a spray gun, then it is best to paint the main area of the walls with a roller, and use a brush only in hard-to-reach places. The working part of the roller can be made of foam rubber, velor or fur. What is the best roller to paint walls with water-based paint?
Foam paint rollers are the cheapest tool and can absorb large amounts of paint. This may seem convenient because it speeds up the work, but any increased pressure will result in the formation of drips and air bubbles on the surface.
The peculiarity of velor rollers is their dense structure, which does not cause splashing, but you will have to dip the tool into the ditch very often to collect a new portion of material.
Rollers made of natural and artificial fur are the most expensive, but the painting will be of high quality. When choosing this tool, pay attention to the length of the pile. Short fibers are prone to material splashing. Hairs that are too long may come out of the base and remain on the wall. Choose a fur roller with a medium length of pile.
Technology of painting walls with water-based paint
Preparatory activities: preparing the walls for painting and choosing the best painting option based on the photo
painting walls with stripes
painting walls with water-based paint - stages of work
Before painting the surface, you should carry out a number of preparatory work: in addition to traditional plastering and putty work, you need to prime the walls.
If the final option is to finish it for painting, then it is quite possible to apply another layer of paint as a primer. Three layers of water-based emulsion will provide a perfectly smooth and even surface without any flaws.
If the walls are decorated with wallpaper for painting, then you will need two layers of water-based emulsion.
Painting walls: following all stages
⇔
Painting walls with water-based paint should be approached with all responsibility and care. To prime the walls you will need 4 hours, and the drying time for each subsequent layer will be 5 hours.
⇔
Painting tape is pre-glued to the plinth, door jambs and ceiling joints to protect against possible contamination. The water emulsion is diluted with purified water in a container. Thickness – the consistency of milk. After diluting with the color, you should wait a little until the foam settles, and then fill the painting tray with a small amount of paint.
⇔
Start painting from the corners. To paint such hard-to-reach areas, use a brush, painting an additional 5 cm in different directions from the corner. The surface near door jambs, frames and behind is worked out in the same way.
⇔
To paint the remaining surface of the wall with water-based paint, feel free to use a paint roller with fur bristles up to 18 mm long. To carry out painting work, saturate the roller well in the tray, and to remove excess, roll the roller several times over the ribbed surface of the paint tray or unnecessary wallpaper. These actions will allow you to avoid smudges on the wall and splashes on the floor.
⇔
The paint is applied in vertical stripes so that each subsequent strip overlaps the previous one by 5-7 cm. Painting is carried out from top to bottom to eliminate stains in a timely manner. For convenience, use a stepladder. The result of the work done directly depends on the illumination of the room, so pay special attention to the lighting of the work area.
A wide range of building materials for decorative surface finishing allows you to create a unique room design. Painting walls with water-based paint is a traditional design technique. Original ideas for applying finishing materials can add novelty to the interior. Having studied the options for using water-based paint with photo examples, it will be easier to choose an interesting sample for painting your own walls.
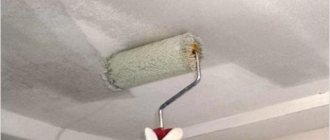
How to paint with water-based paint over whitewash
If the necessary parameters for whitewashing have been identified, then a verification test should also be carried out. Before painting the ceiling with water-based whitewash paint, you need to coat it with a deep penetration primer. When the surface is completely dry, you need to scratch the finish; if it starts to crumble, it is better to start eliminating the previous layer. If it holds well, then you can paint the surface, the test has been passed.
Before painting the ceiling with water-based whitewash paint, you need to coat it with a deep penetration primer.
Types of water-based paints
Before purchasing water-based paint, you should understand the characteristics of its various types. Depending on the polymer included in the composition, the material is divided into the following samples:
- The most popular when painting walls is an acrylic composition, the production of which involves acrylic resins. The addition of latex facilitates easy application of paint and the formation of a smooth wall surface with the elimination of minor defects in the form of cracks. Optimal use is for finishing plastered and brick walls, glass and wood surfaces.
- Silicone resin is an essential element of silicone water-based paint. The high cost is explained by the ability to hide cracks up to 2 mm and the possibility of painting mineral coatings.
- Liquid glass, colored pigments and water are the composition of silicate water-based paint. A high degree of vapor and air permeability are the distinctive features of the material.
- Water-based mineral paint contains cement or slaked lime. The main segment of its application is painting cement and concrete walls.
Types and characteristics of water-based paint
Among the varieties of this type of finishing it is worth highlighting:
- acrylic;
- silicone;
- silicate;
- polyvinyl acetate.
Water-based mixtures on the walls quickly become ready. This usually takes about a day. Paints dry in 20 hours, sometimes in less than 10, in some cases in more than 48 hours. Compositions that meet GOST do not emit a pungent odor, are easily amenable to the movements of tools, acquire any shades and maintain an intact surface for a long time. The viscosity of solutions is adjusted depending on the application method: with a brush, materials with an indicator of 40-45 units are used, and with a spray gun - 20-25. The paint is applied in one or several layers, and an average of 250 grams is used per 1 m².
Polyvinyl acetate solutions are considered the “weakest” option. Although they are cheap and are better suited than others for wooden and porous coatings, they do not tolerate moisture well and are inferior to other varieties in terms of durability. Acrylic mixtures are an expensive and high-quality version of water-based paints; silicone compositions claim to be the “golden mean”, but silicate ones, if properly selected, will be an ideal solution in rooms with normal conditions.
Acrylic water-based paint
This is what is used most often. Solutions are made from acrylic resins with additives as inclusions. For example, a latex additive allows paint to be used in areas exposed to water. Painted surfaces can be washed without fear that the quality of the coating will deteriorate.
Acrylic water-based mixtures are also applied to walls with a difference of up to 1 mm and randomly located roughness. As for surface types, acrylic options are the most versatile and are compatible with plastic, wood, concrete and even glass. Among all types of water-based compositions, acrylic is best suited for metal coatings, not least because it has anti-corrosion properties. It also dries better than others. Just a few hours are enough to begin subsequent manipulations. Due to the high price of conventional mixtures, manufacturers also produce paints with acrylic copolymers.
Silicone water-based paint
The material is used in damp rooms, as well as in rooms where moisture forms. The listed uses are suitable for these solutions due to the fact that the silicone base gives them high vapor permeability. Mold and mildew do not grow on surfaces painted with silicone paint. The reappearance of these microorganisms will also not threaten walls and ceilings. At the same time, in terms of resistance to water, the mixtures are inferior to acrylic ones.
Among the positive qualities are plasticity, strength and ease of use. The cost of silicone mixtures is difficult to count as an advantage, but the price-quality ratio has contributed to its spread on the market. Water-based paint with silicone-based components hides cracks and depressions up to 2 mm in diameter. Silicone solutions are considered a cross between acrylic and silicate.
Silicate water-based paint
The emulsion is made from liquid glass and coloring additives. Raw materials have low cost and long service life. Silicate paint withstands temperature changes well. Mixtures that are resistant to natural phenomena can last 2 decades without updating. There are modifications for sale for interior and exterior decoration, as well as universal solutions - they are classified depending on the severity of their properties.
The coating painted with a silicate mixture absorbs air in which there is excess moisture. In rooms that are too dry, the surface will release moisture. With all this, raw materials cannot be compared with silicone, because the latter is used in places where the walls and ceiling are constantly exposed to moist air. The glass-based variety is suitable for the facades of houses near which there are high groundwater levels.
Surface preparation
Preliminary surface preparation is a mandatory process before painting walls with a water-based composition. The procedure consists of several steps:
- removal of old coating;
- elimination of defects and putty;
- applying a primer composition.
Depending on the type of previous decorative coating, its removal takes a different amount of time and effort, but is an inevitable step. Removing wallpaper is less labor-intensive; with a layer of oil paint you will have to suffer.
Having cleaned the walls to the base, they move on to eliminating defects. Applying water-based paint cannot hide surface imperfections, so sealing cracks and gouges is a must. Highlights of the process:
- repairing cracks and removing unstable fragments of plaster;
- primer coating;
- leveling with putty.
Advice ! If there are significant depressions, a sand-cement mixture is used to eliminate them. To avoid cracking, it is prohibited to use forced drying of the mortar on the wall.
Before filling the walls for subsequent painting with a water-based composition, they are treated with a primer in order to improve the adhesion of materials. The second reason is to reduce the consumption of finishing coatings by clogging pores and reducing the absorbency of the walls. The type of primer is selected in accordance with the water-based composition.
Some whitewash removers
- Paste. This method allows you to rid the walls or ceiling not only of whitewash, but also of dust and dirt;
- Soapy water. The solution is prepared as follows: for 10 liters of water, take 2 tablespoons of grated soap and 5 tablespoons of soda. It is necessary to wipe the whitewash layer with this solution until it completely disappears;
- Wallpaper remover. Apply the remover to the whitewash surface and leave for a while. After this, you can work with a spatula and clean the wall.
Rollers for painting
The following types of rollers are suitable for painting surfaces with water-based materials:
- Fleecy. They are the optimal choice; the thickness of the paint layer varies depending on the length of the pile. An excessively shaggy roller can cause unsightly splashes on a uniformly painted surface. The use of natural fur or felt provides the roller with durability; quality is accompanied by a high price. Artificial rollers are cheaper, but wear out at an accelerated rate. Polyamide pile is a practical choice for water-based painting.
- Foam rubber. By absorbing a lot of paint, they provoke the formation of microscopic bubbles on the surface of the walls. The exception is high-density foam, which is rarely found.
- Velor. You can find this type of roller in a specialty store. Dense material is characterized by a high degree of absorption of water-based paint; you often have to dip the roller into the solution. But as a result, painting will give a smooth surface to the walls.
What are the advantages of water-based emulsion compared to other paints?
Water-based paints contain, in addition to water, varnish, drying oil, various resins and much more. They differ from acrylic, oil and other types of coloring agents, but are superior to them in many ways.
The main advantages of painting with water-based emulsion:
- It is easily applied to surfaces when painting and can also be easily removed;
- Does not cause harm to health, as it is absolutely non-toxic;
- It tightens cracks, hides uneven walls and ceilings and is not afraid of water (depending on the type of paint, it can be washed or not);
- Has a wide range of textures and colors;
- It is known for its hypoallergenicity, and can last a very long time (of course, this depends on whether the paint is applied correctly).
Thus, whitewashing with water-based lime paint is possible, but it is still better to clean it, because you cannot be one hundred percent sure that even a very thin and strong layer will not fall off after some time. Be that as it may, with the help of this option you can completely improve your home in a short time and with small investments and enjoy the result of the work done. Comfort and warmth of home to you!
Eight ways to combine shades
Having dealt with the preparatory procedures, you can move on to considering ideas on how to create an original design when painting walls with water-based paint with your own hands.
Applying vertical stripes allows you to visually raise the ceiling. The color palette is formed in different ways: it can be a contrasting combination or alternation of similar shades. Painting is carried out over the entire height of the walls or only half, where the second part is represented by a plain surface. Application principle:
- first, markings are made using a laser level;
- one color of water-based paint is applied;
- after drying, the demarcation lines are covered with masking tape;
- the second color is being painted;
- the adhesive tape is removed.
An example of work is shown in the photo below:
The second way to paint walls is horizontal stripes. This technique helps expand the space. If you plan to apply stripes of water-based paint over the entire height of the surface, then this should be done on one wall. More often they resort to the decoration option in the form of one accent horizontal strip, on which paintings, photos or children's drawings are subsequently placed.
The third approach - the lower part is painted in a darker color, the upper part has a light shade. A non-standard approach will help to avoid association with a hospital or other government institution: choosing current colors, moving the demarcation zone from the middle of the wall much higher or lower.
Note! The transition between two shades of water-based paint is covered with a decorative border, molding or wooden strip. This technique skillfully masks all the shortcomings on the line of contact.
The fourth technique is to paint the accent wall with a water-based composition of a bright color; the remaining surfaces are decorated with a calmer shade. Attention is usually focused on the wall located opposite the doorway.
Color inserts are the fifth way to create an original wall design using water-based paint. There are several options - after painting the main background, a rectangle or square is marked on the surface, which is painted in a darker shade. The boundaries of the lines are also decorated with moldings or other types of decorative strips. Decorative items are usually placed on this section of the wall - clocks, paintings, sconces or photos. Solutions look good when a wall with a ledge or niche is decorated with two shades of water-based paint.
Several more ways to paint walls will help you create an original design:
- Decorating the accent surface with identical rhombuses.
- Make a vertical gradient on one wall or paint four walls with water-based paint with slight shades (a kind of horizontal gradient).
- Apply two or three horizontal stripes of different colors, randomly intertwining with each other.
Important ! When choosing a color palette for water-based paint, you need to choose a combination of exclusively warm or cool shades.
Is it possible to paint a whitewashed surface with water-based paint?
Surely, when renovating an apartment or any other room, many people wonder whether it is possible to paint a whitewashed surface with water-based paint. Recently, lime finishing is becoming less and less common, because the fashion for this type of whitewash has long passed. In addition, the process of removing it is accompanied by a lot of dirt and debris. Therefore, there is often a desire not to remove the old coating from the walls, but to immediately paint it with water-based emulsion. We don’t argue that this option is possible, but only if:
- The surface of the ceiling or walls is not covered with defects in the form of pits, since the paint will only help to emphasize them;
- There is no fungus or mold on the old coating, because soon after painting these “guests” will make themselves felt again, and then it will not only be necessary to wash off the whitewashed walls, but also treat them with a special antiseptic solution;
- Traces of rust or water stains are visible on the whitewash, since the painting will not be perfect, and in those places covered with lime the color will again become darker (those who apply three or more layers are trying in vain);
- Lime, applied in a very thin layer, lies perfectly on the wall, while the painting over the entire surface is even and has no cracks or bumps;
- It holds tightly and is not prone to sagging or falling off, so painting will not be in vain.
Otherwise, if you pass water-based paint at least once over a whitewash that has the above-mentioned errors, it will simply get wet, become sticky, and during painting some particles of the wall will begin to attach to the roller, which will not only spoil the aesthetic appearance of the finish, but also your mood.
do not forget to prime the ceiling with a deep penetration primer
In order to avoid this, it is necessary to prepare the surface for repair work. First you need to use a spatula or scraper to remove all those places of whitewash that can be removed without any effort. Next, you should loosen the lime coating by soaking it with warm water, and then easily scrape off all the remaining fragments.
The next step in this process should be to completely clean the walls (ceiling). This can be done using a wrung out damp towel or a vacuum cleaner. And finally, the surface must be covered with a layer of primer, because then the water-based emulsion adheres more firmly to the whitewash. Only after doing all of the above is a positive result of the repair possible. Now apply water-based paints and don’t be afraid that soon all this will need to be redone.
Drawing
Having creative abilities allows you to create your own individual drawing on the wall. In the absence of artistic talent, stencils will come to the rescue. They can be purchased ready-made or created with your own hands. There are simple stencils, where one shade of paint is used, or combined ones, when walls are painted using several colors. There are templates with a solid surface, with the help of which a kind of halo of the pattern is formed.
Before painting, the stencil is fixed on the wall, the finished product has a sticky base, and the homemade copy is secured with adhesive tape.
Applying large peas in a systematic order or chaotically, as shown in the photo below, will help you create a room design in a retro style:
It is difficult to decorate a wall with a Scottish pattern using water-based paint. Basic actions:
- A base layer of water-based paint is applied to the prepared wall with a roller. Adding a small amount of thickener helps create a velvety, pile-like surface.
- The ornament is marked using a laser level. Vertical stripes are marked with adhesive tape and painted with a darker shade.
- Horizontal lines are drawn similarly.
- The intersections of the stripes are colored darker.
- To fully imitate the Scottish pattern, there should be wide and narrow stripes on the wall.
A successful example of work is shown in the photo below:
Forming texture with tools and paint
There are two types of painting walls with textured patterns: using special devices or directly through the peculiar application of water-based paint.
The simplest technique is to create splashes:
- Initially, the background is applied;
- after the base layer has completely dried, paint of a darker or lighter shade is applied to a brush or brush, and when it hits the stick, the splashes are distributed over the wall;
- For uniform application, it is recommended to first practice on a separate surface;
- The simultaneous combination of two or three shades of splashes looks interesting.
Painting walls using a textured roller does not require any special professional skills. In the absence of a ready-made tool, an ordinary roller can easily be converted into a textured one. To do this, wrap it in polyethylene and cut it in a chaotic disorder. The following video will help you verify this:
When applying texture to walls using water-based paint, surface defects are successfully masked, which is an advantage of the method. Disadvantages are the difficulty of cleaning the surface with this type of painting and the high cost of the material. Manufacturers offer several types of textures to choose from:
- Velvet water-based paint creates the effect of soft velor due to the solid particles included in the composition.
- Nacre. The wall, which was painted with a mother-of-pearl coating, resembles silk fabric. Lighting and viewing angle affect the perception of shade. The use of such water-based paint helps to visually expand the space.
- The granite composition contains bubbles of acrylic paint. When painting walls with a spray bottle, the bubbles burst and spread, forming a surface that imitates granite.
As you can see, there are many options for original wall design when painting with a water-based composition. Choose the technique you like, practice in a small area and go for it. Creating an individual interior is in your hands.
- Preparatory work
- Preparing the Paint
- Applying paint
- Video: instructions for painting walls with your own hands
In modern construction, many new materials for interior decoration have appeared. And yet, painting the walls in the apartment does not yield its position. Using water-based paint allows you to choose the ideal color and even texture for a room. Various application methods, as well as textured rollers, will help you display incomparable design variations. The main thing is to adhere to the basic rules and technology required for painting walls with water-based paint.
How to prepare walls for painting is already a separate topic and has a number of its own features and nuances of execution. We will assume that the walls are already ready, and are either a flat surface with finishing putty, or lined with one of the materials that is designed for further painting, for example, wallpaper, ceramic tiles, cork slabs, etc.
Preparatory work
The entire surface to be painted is cleared. A space of at least 1.5 meters near it is also cleared. It is best to glue the strip on the ceiling and on the adjacent walls at the junction with the surface to be painted and cover the floor. In this case, it is advisable to close the floor a full meter from the wall.
The first layer to be applied will be the primer. It is necessary to ensure reliable adhesion of paint and surface. In addition, the absorbency of the entire surface is equalized, and due to this, the paint applies more evenly without staining. The primer must dry sufficiently to form a protective film. This is approximately 4-6 hours. You can check the drying time by checking the instructions for use of the primer, as well as by touch.
Preparing the Paint
Water-based paint is sold with a fairly thick consistency. To obtain a uniform matte finish over the entire wall, dilute it with water and mix thoroughly.
A low-speed drill with a special mixer attachment is best for mixing. If you intend to paint textured designs based on water-based paints on the walls, you naturally can not dilute the paint with water and use it in a thick form.
The paint can be prepared in advance before work, but it should be mixed again immediately before painting the walls yourself. Once the required consistency is achieved, you can give the paint the desired color. For this, various colors are used, combining which and adding certain portions to the paint, you can select the desired shade. It is best to entrust this to the masters. Most stores selling water-based paints have a special installation for computer selection of paint and its production. The main thing is that automatic selection takes into account that the color will change as the paint dries. Moreover, it is especially important to prepare a sufficient amount of paint with one shade for painting the walls in one room, otherwise it will not be possible to obtain an identical shade manually. In extreme cases, dilute the paint enough to paint the entirety of one wall, then the difference in shade on other walls can be attributed to lighting or to give a special effect. However, these are already too high decorative materials.
Water-based paint for whitewash
In order to evenly paint surfaces over old whitewash, it is recommended to treat the ceiling and walls with a primer before applying the base layer. This can be ceiling paint diluted in water at least 5 times. If high quality work is required, then it is advisable to purchase a special primer mixture that will ensure normal adhesion of whitewash and water-based paint.
For this purpose, compositions such as ST17 are used. Such primers prevent delamination of whitewash and eliminate its cracking.
After this work, water-based paint will adhere well to the whitewash. Any type of dye of this class that is non-toxic is suitable. To ensure that the new coating does not stand out, it is advisable to consult a specialist when choosing a paint color. Most often they purchase the option with a matte tint. This allows you to better hide minor coating defects.
Applying paint
Among the tools, the technology for painting walls involves the use of the following: rollers, brushes, sponges. Select the one suitable to create the desired effect. You can evenly distribute the paint using a roller. A brush is most convenient for painting small areas and edges of walls at the joints with other surfaces. You can decorate a wall with a sponge, using a thick paint solution and creating a slight texture. The use of rollers with different pile lengths and stiffness also allows you to achieve different paint distribution effects. The best option is a roller with soft, medium-length bristles.
How many coats of paint will be required?
In order for the paint to be distributed evenly on a wall coated with finishing putty and the color of the entire wall to be correct, it is necessary that the walls of the room be painted at least twice, and preferably three.
This is due not so much to the thickness of the paint layer, but to the fact that the subsequent layer will not be absorbed into the putty, even covered with primer, but will complement the first layer of paint. So you can qualitatively grind the optimal amount of paint in each layer and get a normal result at a lower cost. Master painters know that even using a large amount of paint in the first layer will not lead to a normal result, unless smudges appear, which are then difficult to get rid of.
Subsequent layers of paint are applied after the previous one has partially dried, or preferably completely. The entire time allocated for drying the helmet must be isolated from drafts. Also, contamination of previous layers of paint should not be allowed.
Different ways to paint walls
Textured surfaces
Often, when painting textured types of cladding, such as decorative plaster, with water-based paint, the base color of the base is applied first. In this case, a roller with medium, stiffer bristles is used to fill all the recesses, or a sprayer (spray). After this, using a bald roller or sponge, carefully cover the protruding parts of the surface texture with paint of a different shade. This gives volume and the necessary visual effects.
Adding texture with paint
You can also add texture to the paint itself. To do this, do not dilute it with water and leave it thick. In the simple version, when applied with a roller, the result is an uneven, rough surface dotted with pimples. The thinner the paint you choose, the blurrier the drawing will be. In addition, rollers with a textured surface or with flaps of material, such as leather, are used, which can be used to combine colors and create a variety of patterns. One has only to take into account that when obtaining textured coloring, the material consumption increases significantly.
In addition to rollers for creating texture, plain walls in your interior can be perfectly diversified by rollers for appliqués.
Painting the kitchen
When painting kitchen walls, it is very important to choose a suitable paint that will not wear out too much under constant cooking conditions. To improve the properties of the paint, it is better to open it additionally with a special varnish, also water-based. Naturally, it is advisable not to paint the entire kitchen, because it is better to lay the areas near the working surface of the stove and sink with tiles.
Painting the walls in the bathroom
The walls in the bathroom can be painted with water-based paint only if there is sufficient forced ventilation, because few paints can withstand a high-humidity environment without consequences. During the painting process and during the drying period, the bathroom should be closed from drafts and not filled with steam or moisture.
However, the issue with the absence of drafts applies to absolutely all surface painting options. This will affect the quality of the coating itself, and in the case of painting wallpaper, it can lead to their peeling along the edges of the strips.
Painting your walls with water-based paint is a great way to make them more attractive, and is less likely to leave streaks.
The technology for making paint allows you to experiment not only with its color, but also with its texture: the ideas here can be very different.
This article describes how to paint walls, how to do it with your own hands, and also presents photos of the finished coating.
Preparation
Water-based paint is a modern, convenient material for decorative decoration of walls and ceilings. In the process of renovation work, they often look for a middle ground between practicality and beauty. The material meets these requirements. It is easy to work with, it does not cause an allergic reaction, and the product line has a wide color palette.
Before applying water-based paint over whitewash, assess the condition of the surfaces. If the whitewash layer is thick and the lime is already crumbling, then clean the coating first. Level the base for painting with defects in the form of “patches”. Otherwise, the result of the work done will turn out to be unaesthetic.
Water-based emulsion is a mixture of water-based polymers, so it is not necessary to pre-treat the surface with a primer. A water-based coloring emulsion itself will do an excellent job of this role and hold together the particles of spreading lime. If, during the process of painting a whitewashed ceiling, the chalk coating does not adhere to the roller or brush. As a result, you will get an even coating without defects. If you still use a primer before painting, then the consumption of water-based emulsion is significantly reduced.
Preparatory work
Painting is not the most popular way to decorate walls in Russia; many are more accustomed to standard wallpapering. Designs with this material can be found much more often than paint.
Meanwhile, it is much easier to apply dyes - with a roller, brush or spray gun, but ideas can be different. Moreover, they often look much better than paper wallpaper.
In addition, you can choose any paint; stores offer a whole range of materials, thanks to which you can create your own design quickly and easily.
If you use a spray gun and do the painting yourself correctly, then this method undoubtedly wins.
In the photos in construction magazines you can see what kind of design can be made in an apartment using this paint.
However, the technology for applying dyes in an apartment has its own nuances. Firstly, the surface must be prepared accordingly - sanded and covered with a primer solution.
To prevent paint from staining the floor and ceiling, you can attach paper or old wallpaper to them.
When the surface is covered with a primer solution, you need to wait until it dries. This usually takes up to six hours.
If the primer is selected and applied correctly, then after some time a protective film will appear on it.
To see clearly what it looks like, you can refer to the photo in the instructions, which are sometimes included with the paint.
After the preparation is completed, you can begin the coloring itself. But before this, you usually need to dilute the paint, because by itself it is very thick.
Otherwise, it will be inconvenient to apply, and it will lie unevenly. It does not matter what instrument the painting is carried out - a roller or a spray gun.
The base is stirred with a low-speed drill with a mixer attachment. It is better to do this just before starting work, otherwise you will have to stir longer and more thoroughly.
When these steps are completed, you can add color (color pigment).
There are a variety of ideas for adding these substances - they can be mixed, added in different proportions and quantities.
The main thing is to get the right color to make a beautiful design. However, sometimes it doesn’t hurt to have instructions with a photo for mixing, since the shade of the paint depends on how correctly the technology was followed.
Before preparing the walls, you need to choose which tool will be used for painting. This will determine which paint is best suited so that there are no streaks left.
Painting ceilings needs to be approached more seriously, because it is important that the coloring agent does not splash too much.
In general, preparation for painting with water-based paint is not particularly difficult.
Is it possible to paint the ceiling surface after whitewashing?
Until recently, all problems with finishing ceilings were solved quite simply. They were whitened using chalk or lime mortar. This operation was performed without any problems, and in a fairly short time. A little later it became fashionable to paint ceiling tiles with water-based paint. This finishing option remains quite in demand today. At the same time, many home craftsmen are literally perplexed by the question of whether or not it is possible to paint a previously whitewashed ceiling. There is one answer to this. The ceiling can be painted after whitewashing. But subject to certain conditions.
Painting the ceiling after whitewashing
Painting with water-based emulsion is allowed when the whitewash layer is thin and adheres well to the ceiling.
In this situation, you can safely paint the surface without removing the old finishing layer. If the whitewash does not hold firmly, regularly crumbles, water streaks and traces of rust are clearly visible on it, it is not recommended to use paint to decorate the ceiling. You must first thoroughly clean the surface of the old coating and only then use water-based emulsion. In cases where the whitewash lies in an even and beautiful layer that is thick, experts advise removing this coating. If this is not done, some time after painting with water-based paint, the beautiful layer of whitewash will begin to crumble and peel off. As a result, all the finishing will become unusable. And you will have to decorate the ceiling again.
Applying paint
Water-based paint stands out among others with a number of advantages.
For example, it dries quickly (in 2-3 hours), does not contain harmful substances (not dangerous to humans and the environment) and does not have a strong odor. In addition, it is easy to work with, because it can be easily washed off the tool.
However, its main advantage is that the color can be easily changed.
To deal with this yourself, there are special instructions and catalogs that are included with the paint upon purchase, in which you can find photos of the most popular shades.
However, water-based paint also has disadvantages. The most significant of them is that coating can only be carried out at +5 degrees.
It does not matter what tool is used for application - a spray gun, a roller or a brush - the temperature must still be maintained.
When choosing paint, consider the following points:
- compound;
- thickness;
- best before date;
- recommended storage conditions.
Due to the variety of different brands, it is sometimes quite difficult to choose the right paint, but if you are guided by the characteristics, you can easily and quickly choose the right one.
When choosing, you also need to take into account what design the room will have and how the application will be carried out - with a brush, roller or spray gun.
Water-based paint consists of latex, filler, thickener and antiseptic. Its consumption usually varies from 150 to 200 ml per layer.
Their quantity must be calculated taking into account the moisture resistance of the surface to be painted.
The initial thickness of the paint is indicated to determine how much water is required to dilute it in the required proportion.
The dye is always applied in several layers. This is due to the fact that the plaster absorbs some of the paint, causing the tone to become uneven.
To ensure an even shade, at least two coats are needed, but professionals usually apply three.
Some people are mistaken in thinking that if you make the first layer thick, you can do without re-painting.
Firstly, some of the dye will still be absorbed by the plaster, i.e., uneven spots will remain.
Secondly, if you try to paint over these spots, you can touch the part of the wall where the color applied well and create stains in this place.
There are often cases when you can’t calculate the amount at all, in which case the paint will simply flow down the wall. Then getting rid of smudges will be more difficult than simply applying another layer.
It is important to remember that you need to wait until the first coat has dried before repainting.
Drying time depends on the brand of dye. While it dries, the room should be isolated from drafts; contamination should not be allowed in the apartment.
If the room is residential, then it is better to leave it temporarily, since the substances contained in the paint are harmful to the human body. If you follow all the rules, the design will be done efficiently and correctly.
The choice of paint directly depends on what surface needs to be covered. If these are walls in the kitchen, then the substance should be as moisture and heat resistant as possible.
In addition, it is better to cover it with a special varnish. The main thing is to remember that it is better to cover the sections of the wall near the cooking area and sink with tiles, so not the entire kitchen will be painted.
This should be taken into account when calculating the amount of materials to be coated with paint.
Painting technology
When painting walls, the following rules must be observed:
- paint is always applied only to a dry surface;
- the sun's rays should not fall on a freshly painted wall;
- the presence of drafts is unacceptable;
- one wall should be painted in one go without interruption;
- It is advisable to have a new roller for each layer of paint;
- First of all, corners and areas near windows are painted;
- The paint for the first layer should be more liquid.
Paint can be applied with a brush, roller or spray gun.
Paint brushes
It should immediately be noted that this method is characterized by high labor intensity, increased paint consumption and poorer quality. Initially, brushes should be soaked in water for 2-3 hours so that the bristles do not fall out during use.
The brush is dipped into the paint about 1/3, after which it needs to be hit against the edge to remove excess material. The first layer of water-based emulsion is applied from top to bottom, starting from the top corner of the wall. Press the brush lightly, holding it perpendicular to the wall. The second layer is applied perpendicular to the first, also starting from the top corner.
Roller
- pour paint into the cuvette;
- lower the roller and, rolling it, wet the entire surface until the fur is completely saturated;
- you should start painting from any upper corner, moving the roller along the pattern in the shape of the letter W;
- make an upward and downward movement with an overlap of 5-10 cm;
- Apply the second layer only after the first has completely dried.
Spray gun
Using a spray gun gives the best quality of painting, reduces material consumption and greatly simplifies the process:
- add water to the paint so that the composition becomes slightly thinner than for a brush;
- strain the material through cheesecloth;
- apply paint from a distance of 30-50 cm;
- Apply the first layer horizontally, starting from the top corner, at a speed of no more than 1 m in 5 seconds;
- Place the second layer vertically from top to bottom;
- The third layer is applied in small sections only after the previous one has completely dried.
Three-layer paint application is due to the lower density of the composition and thinner coating.