Features of painted walls
Wall paint has been used for a long time. For quite a long period, paper wallpaper was used instead for decoration, considering it the best option. However, these judgments are relevant when talking about Russia. And even with the widespread use of wallpaper for a long time, it is impossible to call paint “old and uninteresting” and wallpaper “progressive” materials. The fact is that in the USA and a number of European countries, wallpaper has never been considered particularly chic, and the walls in houses abroad are always painted. And in Russia, despite the emergence of a large number of different finishing materials, paint is now considered interesting and relevant. Looking at the portfolio of any designer, you can see all sorts of finishing options, including painting the walls.
Preparing walls for painting - work order
Why does paint still remain relevant and is used for interior decoration? It's simple - it has too many advantages that you can't turn a blind eye to.
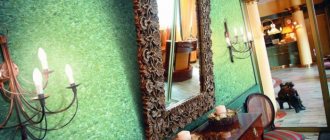
Painting walls in the interior gives room for creativity and imagination
Our people are wary of the idea of using paint instead of wallpaper, although in European countries it is much more common to see painted walls in houses
Table. Advantages of paint as a finishing material.
| Dignity | Characteristic |
| Opportunity to customize the space | You can decorate the walls with paint in any color you want, give them any shade and, as an option, even paint them with paint to order or yourself. Wallpaper involves applying a certain pattern that is already on it. Of course, we are not talking about paintable wallpaper or plain options. But as for the latter, it is the paint that offers much more shades of color. Plus, using colors, you can choose the desired shade yourself. |
| Easy to care for walls | Despite the emergence of washable wallpaper and other materials that can be cleaned using water, paint is still much easier to clean from any contaminants. Also, the paint is almost not destroyed under the influence of a number of cleaning agents, unlike the same wallpaper or some other materials. So for those for whom cleanliness in the house is important, but at the same time children and pets live in the home, paint can be the best solution for wall decoration. |
| Easy to change wall color | Painted walls can be easily repainted in a different color if desired. If we talk about wallpaper, then they will have to be re-glued, and this requires a large number of works. With paint, everything is simpler - you can apply a new color over the old one. |
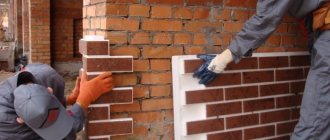
| Possibility of finishing any surfaces | The paint can be applied to any materials - concrete, wood, drywall, etc. Even a log house can be easily repainted using it in the desired shade. But you can’t put wallpaper on it anymore. |
Wall painting
Of course, paint is far from an ideal material. It also has its drawbacks. So, with frequent exposure to it, it will no longer look neat - it will become worn out, scratched. However, this minus also applies to wallpaper. Also, paint, contrary to popular belief, is far from the cheapest finishing option. Thus, it will require certain preparatory work, which sometimes turns out to be quite costly and troublesome.
What is cheaper - wallpapering or painting the walls?
Important! It is not always recommended to paint walls in a new building. The fact is that a new house is subject to shrinkage, and the paint will quickly become covered with a network of cracks. Typically, painting is done a couple of years after the construction of the structure. For the first time, it is better to put up wallpaper - the resulting defects on the walls will be less noticeable.
In a new building it is better to put up wallpaper first
Preparatory work by leveling
Most often, after removing the old decorative layer, it is impossible to carry out further work unless the walls are leveled for painting. Currently, there are several basic options that help to do this most correctly. This is applying a layer of plaster, putty or mounting plasterboard slabs. Each method is suitable for a specific situation.
Plastering
In most cases, plastering walls for painting is the optimal solution, because it is possible to obtain an excellent surface at minimal cost. It is applied directly to the wall in the amount necessary to smooth out all imperfections.
If the walls have many imperfections, then plaster is used to level the surface
If the layers are expected to be thick, then they are laid along the beacons in several stages. This is the main option when preparing concrete walls for painting.
Procedure:
- Before plastering the walls for painting, preliminary marking of the walls is carried out. Every 60 cm, marks are attached to the gypsum mortar; they will serve as a guide for installing the profiles.
- When the beacons are securely fixed, each part of the concrete wall or other base is treated with a primer, this will provide excellent adhesion of the materials.
- The prepared solution is applied to the surface by pouring. The layer should be thicker than the width of the installed beacons.
- The rule is set from below and raised to the top. You need to press hard enough for the tool to move along the profiles.
- If empty areas remain, they are filled with solution and the procedure is repeated.
- After drying, the beacons are removed and the defects are covered.
It is important to consider that the plaster layer should not be thicker than 30 mm. If this value is exceeded, it is necessary to lay a reinforcing mesh, which is also mandatory when working with brick surfaces.
On a note! There is no need to make perfectly level areas; if putty is used, it will smooth out any remaining unevenness.
putty
How to level walls for painting with putty? The technology almost completely repeats the algorithm for working with the previous version. The difference is that application does not require the installation of beacons; the layer must be thin. The mixture only needs to be distributed over the surface, filling the existing unevenness.
General information on preparing walls for painting
Preparing walls for painting is a must. Otherwise, you shouldn’t expect a beautiful and neat result. Moreover, the order of work must be strictly observed. Applying the paint itself is sometimes not as difficult as properly preparing the walls, especially those that need leveling and other additional work.
Wall painting technology
Main stages of wall preparation:
- cleaning the walls from old coatings, if any. It is important to remove old wallpaper, peeling paint and other materials that, by their presence under the final coat of paint, can ruin the entire work;
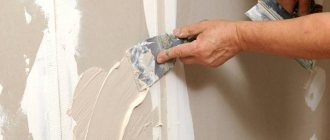
- puttying, which will get rid of all irregularities and minor surface defects. The putty is applied in 1-2 layers, the second is the final one;
- priming makes it possible to ensure a more even application of paint in the future. The primer also increases adhesion and is applied under the putty;
- It may be necessary to treat the walls with antiseptics, anti-fungus, mold, and to prevent other negative consequences.
In each individual case, you need to prepare the walls for painting differently.
Important! Each stage of preparation is performed sequentially; it is important to wait until the layer of one material has completely dried before applying another.
Procedure for cleaning walls before painting
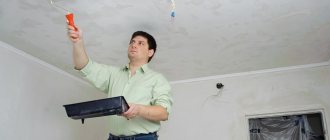
Initially, you should carefully examine the surfaces. This will help you choose the right general algorithm of work and save time on preparing unnecessary tools. Many craftsmen rightly recommend starting any work by removing shelves, light sources and other interfering decorative details.
Free access to all areas will be required, so furniture will need to be moved or removed. To prevent it from getting dirty, you should cover it with plastic wrap.
The technology for preparing any walls for painting involves the presence of dust, so it is better to carry out work in special protective equipment that will help protect the eyes and respiratory tract from negative effects.
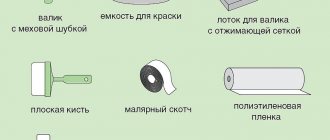
What tools are needed?
The set of tools required for preparatory work for painting may vary depending on what work needs to be done. However, in general, we can name the main tools that will be needed for these purposes.
Drill with chain attachment
- A drill equipped with a special attachment will allow you to get rid of old plaster.
- Sandpaper with a block or a grinding machine will make it possible to properly level the walls and remove minor irregularities.
- A vacuum cleaner will help get rid of dust generated during the cleaning and sanding of walls.
- To remove old paint, you need to use special compounds, as well as a spatula, a hair dryer and a drill with an attachment made in the form of a metal brush.
- Water in a spray bottle and a wide spatula will help remove old wallpaper.
- Also, for preparatory work you will need a roller or brushes for applying the primer, spatulas that will help apply the putty.
Paint remover
Do not neglect preparing the walls for painting. If this work is not carried out, then the paint will not lie smoothly or will not adhere as firmly as we would like, and will soon peel off.
Sanding and priming
The final stage of work is sanding the last layer with 240-grit sandpaper. A portable light source will help you control the quality of sanding. During work, a lot of dust is generated, so you should wear a respirator and special glasses. This will protect your lungs and eyes. After sanding, carefully inspect the wall and mark any defects found with pieces of masking tape. Do not use a pencil for this purpose, as it will be difficult to paint over.
Before applying paint, it is necessary to prime the surface again with a special compound. If this is not done, you may end up with poor adhesion of the paint to the wall.
Removing old coatings
First, you should inspect the surfaces that need painting. Depending on the condition they are in, the order of preparation work will depend. If you plan to paint walls that already have finishing, then it is important to first remove all old coatings, as well as all protruding elements that interfere with the work - lighting fixtures, decorative elements, shelves, etc. It is better to remove the furniture from the room if possible, or at least carefully wrap it up into the covering film.
Features of using covering film
Advice! It is better to carry out work on preparing walls using a respirator to avoid inhaling dust.
Old wallpaper is much easier to remove than old paint. Those with a paper backing are the easiest to remove. Sometimes they come off very easily - you just need to pull one edge of the wallpaper sheet. In some cases, the wallpaper may not come off so easily, and then it is better to first moisten it with water, and then, using a spatula, remove it in layers. It is recommended to use warm water for these purposes.
It’s not difficult to remove regular paper wallpaper from walls.
Advice! It is recommended to damage vinyl and non-woven wallpapers well before spraying with water using a serrated roller or a stationery knife. You can also use a steamer to remove them faster.
Whitewash is the most difficult to remove - it must be carefully removed from the entire surface of the walls, and this is not an easy task. If the whitewash is poorly removed, the paint will not lie smoothly. You can remove this material using water, as in the wallpaper method. The simplest option for whitewashing can be simply washed off with plenty of water. In some cases, you will need to use spatulas, sanders and other devices to get rid of the material. They say that the following composition works well for whitewashing: 10 liters of water, 2 tbsp. l. laundry soap, 5 tbsp. l. soda
You can wash off whitewash from walls using a regular sponge and water.
Old paint can be removed using special compounds. Sometimes you don’t have to remove it, but only if the previously applied layer is smooth and without defects.
If you need to remove ceramic tiles, it is important to remove them along with the adhesive that holds them in place. After this, the walls must be carefully leveled to perfect condition. The ceramics themselves can be removed using a hammer drill with a chisel.
Removing old tiles
Frameless method
This method is suitable for leveling walls only when the surface has minor differences and unevenness. It involves gluing sheets directly to the wall using special glue. Depending on the degree of unevenness, several methods are used:
- For differences and unevenness of up to 4 mm, plasterboard sheets are glued to the walls using gypsum putty, applying it in longitudinal rows along the entire sheet.
- For unevenness up to 2 cm, use drywall adhesive. Apply glue in piles, maintaining a distance of 30–35 cm.
- Surface differences of up to 4 cm require more complex work. Strips of drywall are attached to the wall using glue, and sheets are glued onto them.
USEFUL INFORMATION: Plastic skirting boards for ceilings: mounting methods
When using the frameless method, dirt, dust and greasy stains are removed from the surface. If there are damp areas, additional drying is carried out.
Important! Large projections on the walls must be knocked down. This will greatly facilitate the leveling process and reduce material consumption.
If the surface absorbs moisture well, then it is coated with a primer. The primer also increases the adhesion of concrete walls.
[smartcontrol_youtube_shortcode key=”gluing drywall” cnt=”4" col=”2" shls=”true”]
Leveling walls with plasterboard using the frameless method is carried out in the following order:
- Detection of differences and irregularities using a building level or plumb line.
- Choosing a method for gluing drywall sheets.
- Marking the leveled surface.
- Trying and cutting drywall with parallel cutting of holes for communications.
Glue or putty is applied to the back of the sheet using a spatula. Glue the sheets, leaving a gap from the ceiling and from the floor of at least 10 mm.
Elimination of serious defects
After the old coating has been removed from the walls, you can begin further preparation of the walls, that is, puttying and priming. However, if there are serious defects on the walls, such as deep cracks, then it is important to repair them first.
Prices for popular types of putty
Putties
So, any large crack that cannot be filled with a small amount of putty must first be widened and deepened, no matter how strange it may sound. Next, the gap should be thoroughly cleaned of debris and dust and the cavity should be well treated with a primer.
Such places on the wall must be sealed with plaster.
Once the primer layer has dried, you can seal the gap with regular putty. The composition should fill the crack well so that cavities do not form and maximum adhesion of the composition to the surface is achieved. Also, you need to glue a reinforcing tape to the front part of the sealed gap - you need to press it into the layer of putty that has not yet hardened, coat it well with it and then dry the putty and sand it.
What to do if the walls have slight flaws?
Preparing a surface for painting does not always involve complete removal of the old layer; sometimes it is enough to carry out a series of restoration procedures. But you need to be completely sure that the base will serve for a long time, otherwise there is a high probability that the new decorative layer will quickly become unusable.
The main problem is always cracks, so they should be properly sealed.
- All work begins with jointing: the crack is widened and deepened. This is done using a spatula, chisel and hammer. It is necessary to thoroughly clean the area from dirt and dust. A simple brush comes to the rescue, allowing you to penetrate deep enough.
- The existing defect can be treated well with a primer. It is necessary to use compositions that allow you to achieve the most thorough impregnation.
- Further preparation of the walls for painting with your own hands is carried out using putty and a spatula. It is necessary to cover the damaged area well so that the composition completely fills it.
- A reinforcing tape is applied to the front side; it will help avoid possible troubles. It is pressed into the uncured solution and coated. The resulting area is well sanded.
Step-by-step preparation of a wall with minor defects (cracks)
Important! Spot finishing of walls for painting allows you to achieve the desired quality only when the base is a very reliable canvas. Damaged areas should not exceed 15–25%.
Alignment of walls
After large irregularities have been repaired, you can begin to level the entire surface of the walls. If this stage is neglected, then during the final application of paint you will be able to see wall defects that were previously invisible. The walls can be leveled by sanding, plastering or installing plasterboard sheets.
Leveling walls with plasterboard
Grinding is used to level concrete walls and prepare them for painting. The main thing is that the surface itself is durable and does not crumble, and also does not have serious defects. You can sand with a special machine or even sandpaper. This procedure will remove all minor defects and irregularities.
Wall and ceiling sander Aspro-C3 (no vacuum cleaner required)
Prices for sanding machines for walls and ceilings
Sanding machine for walls and ceilings
You can also use stripping and plastering to remove small defects. After completion of work, level differences on the wall should not be more than 2 mm per 1 linear meter. If everything is good, then you can start plastering and priming.
Plastering allows you to get a perfectly smooth wall surface. The composition must be applied in such quantity that it is sufficient to completely level the walls. Thus, thick layers of plaster can be applied along the beacons - this is how concrete walls are usually prepared. Before applying the putty, the walls must be primed to increase adhesion. The primer layer takes several hours to dry.
Plastering a wall
Important! The layer of plaster cannot be made more than 3 cm. If it is planned to be thicker, then you will have to lay a reinforcing mesh, which, by the way, must be laid if you plan to paint brick walls.
After plastering, it is important to apply a thin finishing layer of putty to the walls. Only after it has dried can you proceed directly to priming and painting the walls. Before applying the finishing layer, the starting layer of putty also needs to be sanded, just like the walls. The main thing is not to get carried away and sand off the entire finishing layer. It is better to remove the resulting dust with a dry cloth so as not to spoil the putty layer. After applying the putty, the wall must be primed again.
Primer for walls
Prices for deep penetration primer
Deep penetration primer
Priming wall surfaces
Once the old cladding is removed, you can begin priming. The work is performed before leveling the surface. It is enough to apply a special solution to the surface of the wall. You can cover the base with several layers. The primer allows you to make further cladding better, ensuring reliable adhesion of the base and paint.
It is recommended to apply the composition with a roller equipped with a fluffy nozzle or a wide brush. This will allow you to apply the composition generously and cover a larger area of the surface. Start at the top, gradually moving down to the floor.
The primer allows you to make further cladding better, ensuring reliable adhesion of the base and paint.
The process of preparing walls for painting
Step 1. The first step is to inspect the surface of the walls that you plan to paint and assess its condition. This procedure will help you understand what work will need to be done to prepare the walls.
First the walls are inspected
Step 2. Using a spatula, you can remove some of the debris from the wall, including pieces of cement.
Everything unnecessary is removed
Step 3. Using a rule or a straight line, you need to evaluate the evenness of the wall. The rule needs to be applied to the wall and see if there is a gap between it and the wall, which will indicate the unevenness of the wall. It is especially important to check the corners carefully.
The rule is applied to the wall
Step 4. All large irregularities, especially in the corners, can be knocked down with a hammer drill.
Irregularities are removed using a hammer drill
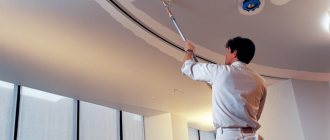
Step 5. Next you need to apply the primer using a regular roller. You can also use a brush, but the work in this case will take longer.
Applying primer
Step 6. Now you can use plaster to tighten the corners and seal large irregularities with it.
The corners are tightened with plaster
Step 7. After applying the putty in the area of the corners, it needs to be stretched using the rule.
The mixture is stretched by the rule
The result of the work done
Step 8. Now it is recommended to glue corner-forming tape in the corners, which will allow you to beautifully form the corners in the room and prevent the corners from cracking in this place. Gluing it is simple - you need to apply putty to both sides of the corner of the room, then take a piece of tape, bend it in the middle and paste it into the corner.
Angle forming tape
Forming corners indoors
Step 9. Next, running a spatula along the tape, you need to remove all excess putty.
Excess putty is removed
This is what the formed angle looks like
Step 10. Now you need to mix the finishing putty according to the instructions.
Finishing putty is mixed
Construction mixer price
Construction mixer
Step 11. The finished putty must be applied to the entire surface of the walls in one even layer.
The putty is applied in an even layer
Another photo of the process
Step 12. After the first layer of putty has dried, before applying the second, you need to remove with a clean spatula the small tubercles that formed when the first layer of putty was applied.
Use a clean spatula to remove small bumps
Step 13. Now you can apply the second layer of putty. It is important to illuminate the wall from the side - this measure will allow you to see whether the layer is applied evenly. Application is also done with a spatula.
Wall lighting
The second layer is applied
Step 14. When the second layer of putty has dried, you need to sand the surface well using fine-grain sandpaper.
Sanding a wall with sandpaper
Step 15. Now you should prime the walls again. The primer can also be applied by roller or spray.
The primer is applied with a spray gun
Step 16. Next you need to glue the fiberglass. It is glued using an airless painting machine. It can also be glued with a roller. First, the adhesive is applied, then the fiberglass itself is glued and leveled with a spatula. It is important to glue fiberglass using glue with dye. Then, when applying the last layer of putty, it will be clear whether it has been applied in a sufficient layer.
First, the adhesive is applied
Next, the fiberglass itself is glued
Step 17. After the layer of fiberglass has dried, you can apply the so-called superfinish putty, which has a very fine fraction.
Superfinish putty is applied
Step 18. Superfinish putty is also applied under lighting from the side. It must be applied after the previous layer has dried.
The wall also needs to be lit from the side
Step 19. The final stage is sanding the wall with all layers with fine sandpaper. The wall is ready for painting.
At the end the wall is sanded again
Video - Preparation for painting
Tools
When doing the work yourself, you will need the following tools:
- it is better to purchase several spatulas of different sizes for work, they will help in applying the composition;
- a marker is required for initial preparation and marking;
- a portable lamp, it will provide complete lighting;
- small axe, hammer and chisel;
- abrasives: mesh, sandpaper, bars.
For puttying with your own hands, you may need: spatulas, a lamp, sandpaper and other tools.
When performing processing, all tools should be in the direct access area so that it is convenient for you to use them.
Finishing putty
Finishing putty allows you to get a smooth finishing layer for painting, as it does not contain large inclusions.
The method of applying the finishing putty is similar to applying the starting putty, with the only difference being that the layer of finishing putty should not exceed 1-2 mm in thickness. Otherwise, the putty will crack. After the material has dried, you will need to sand the surface with sandpaper with a grain size of P100. When sanding, it is important not to erase the layer of finishing putty.
How to level the walls?
Having dealt with large unevenness, begin leveling all the walls. Without leveling, during the final painting you will see all the flaws that were previously invisible. To level the walls, you can sand them, plaster them or trim them with sheets of plasterboard.
Leveling walls with plasterboard
Grinding is used to level concrete walls. It is only necessary that the base does not crumble, is strong enough and without serious defects. For grinding, you can use sandpaper or a special machine. After sanding, all minor irregularities/defects will disappear.
Sanding machine for walls and ceilings
In addition, minor defects can be dealt with by stripping and plastering. As a result, the differences should be no more than 2 m per 1 linear line. m, only in this case can plastering and priming begin. Thanks to the first, the walls will be perfectly smooth; the composition is applied in the amount required for complete leveling. If the layer is too thick, it can be applied along beacons - this is how mostly concrete walls are prepared. All surfaces must be primed before puttying to increase adhesion.
Plastering a wall
On a note! It is necessary that the thickness of the plaster layer be no more than 30 mm, otherwise a reinforcing mesh must be laid (by the way, it is laid in any case if brick walls are being prepared for painting).
The next step is to apply a thin finishing layer of putty. Then, when the surface is dry, it is primed and painted. By the way, the starting putty layer must be sanded before applying the finishing layer, but be careful: if you overdo it, you can sand off the entire layer. To remove any dust that appears, it is better to use a dry cloth, otherwise you can ruin the putty layer. After applying the putty, the walls are primed again.
Primer for walls
Preparation for painting other surfaces
Often there is a need to paint walls that are already covered with other finishing materials. In this case, the specifics of the preparatory work depend on the characteristics of the surface being treated.
If you need to paint tiles, then the main task will be to give the smooth surface a rough structure, for which an adhesive primer is used. It is applied to the tiles with a roller or brush for two or three layers, after which you can begin painting the wall.
Before painting walls covered with special wallpaper intended for painting, special preparation is usually not required. Simply wipe them with a damp cloth to remove dust from the surface. True, some manufacturers in the instructions for use recommend pre-coating them with special primer compositions.
Surfaces covered with wooden panels or slats should first of all be cleaned using sandpaper or a sander. Then the wooden base is coated with special wood primers or drying oil. They reduce paint consumption and increase the resistance of wood to fungus and woodworms.
Small defects should be puttied with special compounds designed for finishing wooden parts and surfaces.
Plastering
Gypsum plaster
Application of plaster involves preliminary preparation of the load-bearing surface. Depending on the material, it may vary slightly in nuances.
Step by step process
Before preparing the walls for painting, you should familiarize yourself in detail with all stages of the work. In a new house with untreated walls, it is necessary to determine how smooth they are. To do this, use a long building level or plumb line. By measuring the entire wall area with a tool in both vertical and horizontal directions, you can get a complete picture of all deviations from the norm.
According to the SNiP regulations, the permissible value of the “blockage” of the wall is no more than 0.5 cm for every 3 m. If the deviation is larger, it is necessary to level it using plaster mortar.
For ease of work, beacons are installed along the entire wall - marks made of smooth metal tubes or wooden slats. They are installed on mortar patches as follows:
- 2 starting beacons are placed in the corners of the wall.
- Twine is stretched between them in the upper and lower parts.
- The remaining beacons are placed along it every 0.8 - 1 m.
When installing intermediate beacons, they should not be pressed tightly against the stretched twine. Otherwise, there is a possibility of its gradual deviation outward. There should be a gap of 1-2 mm between the beacons and the thread.
Installation of beacons
Types of plaster mortars for different walls
Then plaster mortar is applied to the wall and left for 0.5-1 hour. After it has dried slightly, it should be pulled out using a rule or a wide spatula, and the beacons should be removed. After 12 hours, when the plaster has set, final leveling is carried out with metal grout or a wooden polisher. Plaster mortar can be purchased at a hardware store in the form of a dry mixture, or you can make it yourself - the proportions of various solutions are given in the table.
Increased adhesion
It is easiest to plaster a brick wall, thanks to its relief structure, to which the mortar clings well. In this case, the plaster can be applied directly to the wall, only by cleaning it from dirt and treating it with a primer. The need and method of priming when preparing walls for painting with your own hands will be discussed below.
For high-quality plastering of walls made of monolithic reinforced concrete, it may be necessary to increase its adhesion. Modern technology for pouring a monolith involves the use of collapsible formwork made of sheet steel or laminated panels. This makes it easier to install and dismantle the formwork, as well as obtain a more even surface.
But an overly flat concrete surface also has its disadvantages. The wall, smooth to a glossy shine, has a very low adhesion rate with any finishing compounds. As a result, coating with any solution will not be durable.
The building is a concrete monolith.
To increase adhesion, the concrete wall is pre-treated with various abrasive or impact tools: a grinder, a mason's pick, a hatchet, a chisel, etc. As a result, the surface becomes covered with notches or acquires a rough structure.
Another option for increasing adhesion is plaster mesh. It is attached to the concrete using dowel nails and serves as a strong base for the plaster mortar.
Wooden surfaces have poor adhesion to plaster mortars. This is due to the physical characteristics of wood, as a result of which any mixtures will not stick to it.
The wooden wall must be additionally prepared for plastering. For this purpose, a plaster metal or fiberglass mesh is also used, or shingles - thin wooden slats - are criss-crossed onto the surface.
The mesh can vary in cell diameter: the thicker the layer of plaster, the larger the mesh must be used.
Leveling with plaster
To plaster the walls, it is necessary to set up beacons, which can be used as slats or profiles. You can level the walls with plaster yourself, following a clear plan:
- A solution is prepared from a dry construction mixture.
- Using a spatula or trowel, apply the plaster onto the wall between adjacent beacons.
- Using a long level, level the plaster from bottom to top, pressing the level against the beacons.
- Excess mixture is removed, and the resulting depressions are filled with solution and smoothed with a spatula.
- After waiting for some time, similar actions are carried out between other beacons.
- At the end of the work, the beacons are removed, filling the depressions and leveling them.
- The applied plaster must dry well, this will take about two weeks.
The procedure for applying the starting putty layer
Scheme of applying plaster to the wall.
You cannot apply paint directly to drywall or cement-sand plaster. The fact is that these materials either absorb water too much or are too porous, which will prevent the paint from spreading evenly on the surface. Ultimately, very noticeable changes in color will occur and unevenness and roughness, down to the smallest, will become visible.
To avoid this, the entire surface is covered with putty. Before you begin, you need to select a suitable starting putty. It should contain fine sand, thanks to which it will be possible to apply it in a fairly thick layer of up to 3-4 mm and not be afraid that it will crack.
Related article: DIY cat house
You will need a wide and a small spatula. One will be used to distribute the solution, and with the help of the other you can eliminate minor unevenness. Before preparing the solution, carefully read the instructions and do everything exactly as it says. Typically, the setting time of the solution is about 45 minutes.
Reinforcement is recommended. To do this, you need to make or buy a ready-made nylon mesh with a 2 mm mesh. Apply a strip of putty mixture about 2 mm thick to the wall. The width of this strip should not exceed the width of the selected reinforcing mesh. After applying the mortar, place the reinforcement against the wall and press it into the mortar using a putty knife. Apply a layer of finishing putty on top of the mesh.
Tools for applying plaster.
Quite often, beginners make a typical mistake, trying to immediately make the surface as smooth as possible. To do this, they smooth out the protruding stripes that form along the edges of the spatula. In reality, you don't have to pay much attention to them. The most important thing is that there are no places left without mortar or large depressions. Just pass over the surface several times, trying to smooth out the transitions between the strips, and it is better not to touch those thin tubercles that remain after this, but remove them later, before applying the finishing putty. Some home craftsmen, in order to get rid of this phenomenon, decide to apply the putty solution in very small portions. This will also negatively affect the final result. After some time, when you have gained some experience, you will be able to do the job without all these disadvantages.
The putty dries in about 6-8 hours. Only then can you start sanding. To do this, prepare a coarse abrasive mesh. Experts recommend using a 120-grit mesh. Eliminate protruding bumps and other imperfections. But even after this, the surface will remain grainy and cannot be painted. That is why it is important to perform the next step correctly, i.e. apply finishing putty.
Related article: Interior hidden doors for painting
Return to contents