Handmade is always creative, modern and innovative. The beauty of a homemade product is that no matter how you look at it, you won’t be able to replicate your unique design . Whether it's a rug made from old T-shirts or a rug made from unused terry towels. Have you long wanted to diversify your interior handmade rug
In this article we will tell you 15 original ways to do it yourself quickly and beautifully.
Idea 1 – Braided carpet from old T-shirts “Pigtail”
The simplest method of creating a rug from unnecessary things is braiding .
Suitable even for those who have never done needlework.
You can decorate your living room or bedroom with this knitted decoration. The beauty of wicker is that you can create a product of any shape. Circle, square, whatever your heart desires.
Materials for creating a rug:
- old T-shirts;
- dense threads;
- scissors;
- sewing machine (can be sewn by hand);
Step by step instructions:
- Cut off the neck and sleeves of the T-shirt to create an even fabric.
- Start cutting strips along the entire length of the fabric. Choose elastic fabrics for braids. The thicker the fabric, the narrower the stripes. Stretch the resulting strips.
- Gather all the strips into a ball for convenience. Then the strips from different T-shirts need to be connected. There are two options: stitch using a sewing machine or join it yourself. To do this, make small holes at both ends of the ribbons and thread one into the other.
- At this stage we braid the braids. Secure the beginning of the braid with threads. Then start braiding a regular braid as you would with your hair.
- When the braid ends, carefully sew on the next one. For a square or rectangular carpet, you need to weave many identical braids.
This ball is made from 30 t-shirts!
Shaping the braid
Then there are two options for weaving : a circle and a rectangle.
How to weave an oval shaped :
- Roll the T-shirt braid into a spiral with your hands, pressing each circle tightly together.
- Sew the circles on the inside.
Square shaped rug:
For a square product, you will need a piece of fabric to attach the braids.
- Fold the fabric in half and stitch along the seams.
- Carefully sew each pigtail (with a machine or with your own hands) as shown in the photo.
Related material: How to make a table with your own hands
Rugs made from old things, what techniques can be used
Old things are an excellent material for creativity, which a thrifty housewife can always find. T-shirts, unusable towels, and any wardrobe items can always get a second life. But it is still very important to understand that in order to create new things from old ones, it is necessary to pay attention not only to the material for creativity, but also to the technique that we choose for this.
After all, rugs from old things can be:
- weave,
- to tie,
- sew.
And we will try to create a rug from old things with our own hands step by step, using detailed master classes and getting an excellent result.
Weaving
One of the oldest and most proven techniques for creating carpets is weaving. After all, this does not require a lot of knowledge or skills. And sometimes the simplest tools are required, easily replaced with something that is always at hand. And therefore, it’s worth starting to create your first rug with weaving or weaving.
Weaving according to the principle of macrame
If you think that macrame is only suitable for creating baubles and small decorative elements from cords and ropes, then now we will dispel this belief. After all, if instead of a thin lace you take something more voluminous and dense, then the result will be completely different.
There are no difficulties or tricks in weaving rugs from old things that are inaccessible to novice craftswomen. As in any technique, the main role here is played by the sense of taste and the desire to create. Therefore, any set of old clothes can easily be turned into a charming bedside rug with a little effort.
Basic knots and pattern combinations are great for weaving. But it is worth considering several factors:
- The rug is used actively and therefore needs to be washed from time to time,
- they will not only trample on it, but can sit, lie or use it as a bedding on a chair,
- it must fit into the overall interior.
That is why when choosing knots, do not forget that the rug should:
- look like a new, not well-worn rug,
- have a dense structure so as not to crumble in your hands and not turn into a string bag,
- not be easily soiled or bulky, for ease of cleaning.
And therefore, the most common way of weaving at present is to use the principle of French bracelet knitting.
Such a charming rug will definitely not go unnoticed in the house and will highlight the interior and taste of the owner. And to create it you won’t need much:
- wide strips of old things,
- adhesive tape,
- scissors,
- thread and needle.
To begin, arrange the 5 strips in the order you like best. Next, fold 5 more strips, but in a mirror image.
It is most convenient to fasten all the ends from the beginning side with adhesive tape. This will allow you not to be distracted during the weaving process, and also clearly define the sequence.
So, when all the ribbons are laid out, we take the leftmost one, take it to the side and fold it so that it lies on top of all the others, creating the number “4”. We place the working tape behind the adjacent one and tie the first knot.
We continue to tie the same knots on the next 3 ribbons, and then move to the opposite side, starting to weave towards the first series of knots.
When both working strips meet in the middle, tie them and continue weaving from the edge. Once you've reached your desired length, simply tie the last knots with a strong thread and trim off the rest to create a cute fringe.
The original master class from Lena Vorontsova will clearly and in more detail show how to weave a rug with such an interesting zigzag pattern.
Weaving on frame and hoop
However, if you want to get a denser rug from old things, and you don’t have enough work space to weave it, then you can weave it, as they did many hundreds of years before we were born.
And for this you do not need a special loom, threads or special tools. You just need to arm yourself:
- a strong frame (a frame for large photographs is quite suitable for a small rug),
- carnations (you can even use stationery ones),
- narrow strips of fabric from old things.
First we need to make an improvised machine. To do this, nail nails at equal distances from each other on two opposite sides of the frame. Stretch the threads between them to form a base, and then stretch the working strip of fabric under and over the base until you reach the desired width of your future rug. The result will be a very simple pattern, similar to chess weaving.
If you don’t like the fact that the warp threads are visible in the rug, then try following the advice of Melania Ars, which she shares in her video master class:
But the most interesting thing about weaving rugs with your own hands is that they don’t have to be straight. You can even create a round rug without much effort. You just need to find a suitable hoop or a large, strong ring.
The principle of weaving a round rug will not differ much from a rectangular one. You just have to note that you won’t need any nails, because you just wrap the hoop with the main thread. And then weave strips of fabric, starting from the center to the edge, alternating them under and above the base.
Once you have reached the desired rug size, simply cut the warp threads from the hoop and tie them tightly. And for greater reliability, you can run a needle and thread along the last strips to carefully sew them and fix them with each other and with the base.
To create such a rug, do not forget that it is best to use material with less elastane content. After all, after being removed from the hoop, it can become greatly deformed and become much smaller.
Depending on the choice of color and materials, you can create bright rugs that look more like mandalas, or calm rugs that are perfect for living rooms, country houses or bedrooms.
Braiding
Yet weaving on a loom also requires space and time. After all, we need to stretch everything well, place our frame somewhere, and even hide it from household members so that they don’t accidentally drop anything. And everyone knows how to braid hair.
It would seem, how can you compare braids and a whole rug? But there is a connection here. After all, a long and thick braid of fabric can turn into an excellent thick rug that you can place in your home.
What will it take? Nothing supernatural:
- old things that you don’t mind cutting into ribbons,
- pins,
- thread and needle.
So, first, we secure three strips of fabric with a pin so that they stick together well, and weave a tight braid. And then we twist the resulting braid into a spiral, grabbing it with threads around the perimeter so that it holds well.
You can sew the rug along the entire length of the spiral using a sewing machine and a zigzag stitch. This way you will give it rigidity and be sure of its durability.
You can understand in more detail how to fold and then sew a braid to make a rug out of old things with your own hands, thanks to the step-by-step master class from BurdaStyle.
These rugs are very easy to create, they are durable, bright and suitable for most modern interior styles. But an important question that arises when weaving them is how to prepare the longest braid ?
Since we are weaving from old things, and not fabric purchased by the meter, the strands will run out much earlier than we achieve the desired length. Of course, you can sew the ribbons together or tie them with a tight knot, but in these places the braid will become thicker and this will spoil the appearance of the future rug.
How then to solve such a problem? It’s very simple - when the tape begins to come to an end, but weaving is still in full swing, make a cut in the middle of the working strip and exactly the same on the new one that you want to attach. Insert the working tape into the slot of the new one, stretch it a little, and then insert the new one into the hole of the working tape. Pull both strips in different directions. Now you can continue braiding. This method of joining ribbons is presented more clearly by the Free Painter master, who talks in detail about how to join ribbons without seams or knots.
Don't forget that you don't have to twist the braid, you can fold it like a snake or lay it parallel to one another to get a charming rectangular rug with fringe.
Knitting rugs from old things
It is not necessary to weave rugs from old things; knitting is considered a more common solution for creating them.
Even if this is your first time picking up a hook, you will be able to create a charming and practical decorative element. After all, it is the large knitting that will help you quickly understand the intricacies of crocheting. And a pattern made from the simplest single crochets can look very bright and original if you choose the right yarn.
Moreover, yarn is also made from old things. This is how things can go:
- old T-shirts,
- jeans belts,
- just thin strips of fabric left over after sewing outfits.
It is enough to know and be able to knit increases, and then it’s a matter of technique.
If the yarn taken for the rug seems loose or thin to you, you can use an excellent trick - at the beginning of knitting, insert a strong cord into the stitches and continue tying it. This way your spiral will keep its shape perfectly.
To get a more openwork rug, knit with double crochets, increasing their number in each row. But keep in mind that although such knitting will be beautiful, it will be less dense.
Openwork rug
Thick cord rug
It is worth noting that you can knit a rug from old things without a hook - an interesting technique of knitting from rings on your fingers will help you cope with the disposal of small pieces without spending extra effort and without forcing you to buy any special tools.
You can learn how to knit from rings from Olga Popsueva. In her video master class, she explains in detail how to weave a braid and then form it into a rug.
Patchwork
When talking about using old things to create rugs, it is difficult to ignore sewing. After all, sewing from scraps began a long time ago and independently of each other in different countries.
As now, women did not throw away old clothes, children’s dresses or their husband’s worn-out shirts, preferring to collect them and then sew blankets, bedspreads, curtains and, of course, rugs. It’s no longer a shame to trample such rags, cut them and assemble them into various intricate patterns.
Over time, patchwork turned into a separate direction and began to occupy its rightful place in the field of needlework.
Shred garden rug
Magic patterns
But do not forget that despite the evolution of such sewing, its main task was initially to use old things for a second time. That is why many craftswomen are appearing again, using old clothes, towels and even umbrellas in patchwork. The main thing is to skillfully put into use something that has long ceased to be used for its intended purpose.
Carpet technology
But let's return to more classic ways of creating rugs. For example, to carpet technology, which creates interesting, soft and even fluffy rugs.
Fluffy rugs on mesh
In the last few years, fluffy rugs have become very popular, making it so much fun for children to play and crawl in them. And it’s just nice to immerse your feet.
The high pile and soft texture have won the hearts of craftswomen and housewives, and the bright colors attract the attention of household members. But what’s most pleasing is the fact that you can make such a rug without using any special tools.
A fluffy rug can be created in different ways:
- tying the cuts in knots,
- using a carpet hook,
- using the simplest crochet hook.
Our basis will be a mesh from a hardware store with a large mesh or a bath mat with holes.
In addition to the basics, we also need:
- fabric ribbons,
- scissors,
- hook (optional).
To begin with, cut short ribbons, but do not skimp on their length, because you need to take into account that they will be folded in half, and even tied or otherwise fixed to the mesh. Therefore, it is better to make them longer, and then cut them as you want.
When everything is ready, you will be left with the most important task - thread the strip of fabric into the cell so that both ends remain on the front side, and then you can tie them together with a simple knot, or pass them through a loop using a hook.
When the flaps completely cover the mesh, all you have to do is cut them to the desired length and the rug made from old things is ready to delight you and your feet.
Fluffy rugs using a sewing machine
If you don’t want to waste your time tying each individual ribbon, or you haven’t found a suitable mesh, then you can go in a simpler way, for which we will need:
- an old pillowcase or piece of fabric that will become the base,
- all the same ribbons from old things,
- scissors,
- sewing machine.
Knitted fabric is best suited for such rugs, as it is more elastic and soft. In addition, it is easy to sew on without fear of breaking the needle.
Bright carpet made from old knitwear
Heart shaped rug
After you cut the required number of ribbons, pull them lengthwise so that they curl a little, and then simply apply them to our base and sew them in the middle, row by row.
Don’t worry if the strip doesn’t lie flat, you can always trim the entire pile, leveling it to the desired length.
Idea 2 – Rug made from scraps of fabric without a sewing machine
A bedside rug made from scraps of fabric using the patchwork is far from being an old-fashioned “grandmother’s” product. Modern craftswomen skillfully decorate their homes with patchwork blankets, rugs and other decorations. Many complex methods require a sewing machine. But not everyone has this unit.
Materials for a rug made from fabric scraps:
- clean uniform pieces of fabric or remnants of rags;
- fabric base (piece of fabric the size of the desired rug ) or construction mesh;
- thick multi-colored threads, needle;
- pins for basting;
How to make a rug:
- Place all the pieces of fabric on the base, secure with pins (see photo below).
- Carefully quilt all the patches, starting from the edges. The closer the stitches, the stronger the rug will hold.
That's all! A simple but very beautiful carpet for the floor is ready!
There are a lot of ideas for creating rugs with your own hands from scraps!
Materials and tools for manufacturing
The basis
To make a soft, warm and comfortable rug you will need carpet canvas or fillet mesh . Such materials are often used in practice, but it makes no difference which of them is used. If you have other materials at hand: canvas/tarpaulin mesh, burlap/matting, then you can take them.
Attention! It is better not to use synthetics, wool and silk for the base. They can slide on the floor, causing inconvenience for you and your guests.
Carpet canvas can be purchased at the store. Usually it is cut off in 1 m sections.
As an option, you can also use construction mesh , it is strong and durable.
Other materials
For decoration you will need threads . Leftover yarn of different colors will do, it will be even brighter and sunnier.
The equipment you need is a hook with a foot
. If it is not there, then you can work as a regular knitter.
Idea 3 – Carpet made from old wine corks
An original rug will be made from old wine corks.
This is an ideal option for a bathroom, as the material is moisture-resistant and long-lasting. There is no need to wash such a product, and it is very easy to care for.
Materials for making a rug:
- about 150-200 plugs (depending on the desired sizes);
- base (old rubber mat , rubberized fabric, thin layer of plastic);
- sandpaper or knife;
- waterproof glue;
- kitchen board (thick);
Technique:
- Wash the plugs with detergent. If wine stains remain, leave the corks in a container of bleach overnight, then dry.
- Cut the corks lengthwise. It is better to cut the cork vertically rather than on its side.
- Come up with a pattern. Various pattern options.
- Start gluing the corks to the base. Remove any remaining glue immediately.
To make the product waterproof, its surface must be treated with a sealant!
The product is ready! Perfect for a bathroom or patio.
T-shirt rugs
The technology for creating the coating for their T-shirts is a little more complex, so it takes perseverance to complete the job.
You will need:
- T-shirts cut into shreds (25 cm wide and 3 m long). To obtain the desired length, sew the flaps together;
- scissors;
- needle;
- self-adhesive tape;
- a thread.
Step-by-step instruction:
- We take five stripes and lay them out lengthwise, and put five more next to each other, mirror-type.
- We fix the edges of all strips on one tape using a thread and a needle.
- We take the first strip and tie it to each subsequent one until it reaches the middle.
- We repeat too, starting from the opposite side.
- We connect those that meet in the center of the ribbon.
- Then we do the same with the opposite strip and so on until the end of the product.
- After completing one rug, start knitting the second one.
- We connect the finished parts.
- The size of the finished carpet depends on the number of parts. It can be either small or large, depending on its purpose.
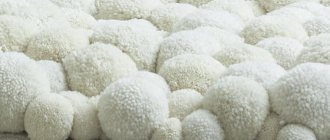
Idea 4 – Soft pompom rug
Many housewives still have a stock of woolen threads from Soviet times. Why should they gather dust in the closet if you can create excellent decor for a child’s room - delicate rugs made of multi-colored pompoms.
Kids especially like this product: it is soft and interesting , and mom can safely let her children play on the floor.
Materials for production:
- wool threads;
- construction mesh or rubber carpet with holes;
- scissors;
Technique:
- Wind the thread tightly around your palm or a toilet paper roll. Create several layers so that your fingers are not visible. The more layers, the more magnificent the pompom will be.
- Prepare a long thread for dressing. Then carefully remove the threads from your hand so that they retain their shape. Tie them with prepared thread. Make a strong knot so that the threads do not come apart.
- Cut the ends of the skein on both sides.
- When the pompoms are ready, start attaching them to the holes in the base.
- Trim off any excess threads when the design is complete. For strength, you can glue it with glue from below.
The new toy is ready, start your fidget!
Sock rug
Such floor coverings look very original. They are suitable for any room and even for children's games.
Necessary materials:
- socks;
- hoop;
- scissors;
Execution technique
- Cut the socks into shreds.
- We put the stripes on the hoop, dividing it into four parts with socks.
- The lines taken as a basis intersect in the center of the hoop.
- We take a new strip and fix it on the base, threading it from below and above the remaining lines.
- If the strip comes to an end, we attach a new one to it and continue the same actions.
- Press the circles tightly, cut them off and tie them in knots.
If desired, you can knit braids from socks, and then shape them into any shape and sew them together. Such carpets are very comfortable and soft, especially if they are made from woolen socks.
As you can see, making a rug yourself is not difficult. If you want, you can decorate your home and make its interior original. And you can find the materials to create it at hand. After all, you probably have unnecessary jeans, T-shirts or socks at home. Well, if you decide to make a large covering, then you can collect the necessary material in advance and when everything is ready, start creating the carpet.
Idea 5 – Do-it-yourself crocheted rug from old things
Don't know what to do with old T-shirts? The entire closet is littered with rags, and at the dacha the closet is torn from clothes that it’s a pity to throw away? There is a more original way to breathe life into unnecessary things: weave them into a bright rug !
Materials for the rug:
- remnants of T-shirts (from which we will braid our own hair);
- Crochet hook;
- fabric glue.
Technique:
- Cut strips 1.5-2.5 cm wide from old clothes.
- Prepare yarn from the resulting scraps (see idea 1), roll into a ball.
- Crochet a circular piece using a crochet hook. Cast on a chain of chain stitches of the desired size, and then double crochets until you create a semicircle. Then tie the second chain, etc.
Don't despair if you don't know how to knit. Check out other homemade rug designs.
We knit a pentagonal rug according to the pattern
When knitting such a rug, it is better to use soft knitted items . You need to start by knitting a circle of 5 loops. In the 1st row - 3 air loops, 2 double crochets in the first loop of the bottom row, 2 in. p., *3 double crochets, 2 in. p.* Perform the pattern between the stars 5 times. In the 2nd row - the same as in the first row. But after 3 double crochets, knit 1 chain stitch and then follow the pattern below.
Related article: Plush fabric is not only for toys and furniture
Knitting the rug in the round is done to the required size. Each corner of the star is knitted separately.
Idea 6 – Door mat made from old belts
Do you have a huge amount of leather belts in your house that your grandfather wore? If they're not family heirlooms, feel free to turn them into stylish hallway decor .
Material for creating rectangular leather rug:
- 10-15 belts;
- awl;
- thick rope or twine;
Manufacturing technique:
- Remove all buckles from the belts. If necessary, cut it off. Make sure that all straps are the same length.
- Make holes along the edges of each belt at a distance of 2-3 cm.
- Sew them together using an awl and twine.
Here's an easy-to-make rug for the hallway with your own hands. Surprise all your guests with a fashionable item and display your handicrafts by the front door.
Idea 7 – Terry rug made from old towels
Unused towels will make a soft bedding on the bathroom floor. An excellent alternative to cork carpet, because the material from which towels are made also absorbs moisture first-class. Place this sheet next to the shower stall and forget about a wet floor forever!
Carpet material:
- several large towels (an old robe or blanket will do);
- ruler and scissors;
- thread and needle;
- sewing machine (optional);
Scheme on how to make a soft shower mat step by step:
- Cut strips 3 cm wide;
- Attach 3 strips of different colors to each other and sew them at the beginning (to better hold the braid).
- Make a braid. As soon as the strips come to an end, sew the product further. The end result should be a long braid.
- Wrap the fake in a spiral (like a snail’s house), sew each circle tightly.
Animals really like these rugs - they are very comfortable to lie on! Your pet will be happy too!
Enjoy your work!
Soft rugs
Products made from fabric, thread or fur are very useful in the nursery. After all, kids spend a lot of time playing on the floor, and they need to be warm. They won’t hurt either on the balcony or in the bathroom, so that when you get out of the shower you don’t step on cold tiles with your bare feet. And you can decorate kitchen stools with very small rugs.
Fleece rug
Fleece fabrics are convenient because they do not crumble or unravel when cut. They are soft but durable, easy to wash and dry quickly. Ideal material for rugs.
Fleece rug
If there are several such scarves, old blankets or sweatshirts accumulated in the house, they need to be cut into strips 15-20 cm wide. These will become the main working material. In addition to them, you will need a base for a rug made of denim or other dense fabric, scissors and a needle and thread.
Mat material: old fleece scarves, 6 pieces
Step 1. Cut out the shape for the future product from the base. It can be a circle, square, heart.
Base for the rug
Step 2. Fold the cut fleece strips in half along the long side and crease the edges so that the fabric does not move apart when working.
The fabric is folded in half, basting is made
Step 3. Turn the strips with the fold towards you and cut the fringe about one centimeter wide, cutting them only to the basting line.
Cutting fringe
Step 4. On the base with chalk or soap, draw a line parallel to the edge, stepping back from it by 2-2.5 cm.
A strip of fleece needs to be basted to the base. You can use a sewing machine
Step 5. We apply a fringed strip to this line and first baste it, and then sew it on a machine or by hand, but with a stronger seam.
Fixing the fringe
Step 6. We repeat the process and sew on the second strip, and then all the others, stepping back from the seam to such a distance that it is covered by the fringe of the next row. For each of them you will need a strip shorter than the previous one, so you need to distribute the material in advance not only by color and intended pattern, but also by length.
Making a rug
Video - DIY fluffy rug made from old scarves
Rug made of pompoms
Knitting enthusiasts always accumulate a huge amount of leftover yarn. From these you can only knit a striped baby hat or sweater. Or you can use it to make a bright fluffy rug, very warm and pleasant to the touch.
Rug made of pompoms
In addition to wool or acrylic yarn, you need to prepare a synthetic construction mesh, scissors - and you can start.
Step 1. We wind the thread on the palm or on a rectangular piece of thick cardboard. The wider it is, the larger the pompoms will be. You can take several different blanks and make pompoms large and small.
Winding yarn
Step 2. We tie the resulting winding tightly in the middle with a short piece of the same thread.
The skein is tied with thread in the middle
Step 3. Cut the loops with scissors and straighten the pompom.
The threads need to be cut with scissors
Step 4. Trim it, cutting off the long protruding ends.
Trimming a pompom with scissors
Step 5. Using the same method, we make the required number of pom-poms, so that when they are laid tightly, there will be enough for the entire rug.
Step 6. We insert the ends of the thread with which the pompom is connected through the holes of the mesh on both sides of the jumper and tie a knot on the back side of the mesh. We attach the remaining pompoms in the same way, tying them close to each other and alternating in color and size according to our design idea.
Attaching pompoms
Advice. If you use a silicone anti-slip bath mat instead of a construction mesh, the product can be used in the bathroom on smooth tiles.
Silicone mat can be the basis
By the way, in a similar way, but much faster, you can make a rug from old knitted T-shirts and T-shirts. They are cut into strips of the required length and also tied to a mesh base. But the knot is already made on the front side of the canvas.
Getting started with weaving a rug on a mesh
Rug made of patches
Video - How to make a fluffy rug
Rugs made from terry towels and sheets
In this case, you can’t do without scissors and thread and a needle. no more tools are needed. The material for production will be old bath towels. They can be the same color or several different ones. The variegation of the product will depend on the number of shades.
Rug made of towels
In this example, three towels in beige-brown shades are used. This is exactly how many stripes are needed to weave a regular braid.
| Step by step photos | Description |
Step 1 | Cut the towels into strips of equal width (3-4 cm). |
| Step 2 | We take strips of different colors, sew the ends together and braid them. |
Step 3 | As we weave, we sew the following strips to the ending strips. Or you can sew them together right away - it’s more convenient. |
Step 4 | We fasten the ends of the finished long braid with threads so that it does not unravel. And we roll it up into a spiral, sewing all the rows together. |
For greater strength, you can sew lining fabric to the back of the rug.
A similar rectangular rug can be made from other worn-out textiles.
Rectangular braid rug
To make it, bundles of three strips are temporarily fixed with tape, departing from the edge by 5-6 cm. And the braids themselves are not braided to the end, so that fringe remains on both sides.
Then all the prepared braids are glued to a base made of thick fabric, and the edges are sewn on a sewing machine.
Mat making process
Glue gun prices
Glue gun
Idea 8 – Floor mat made from denim pockets
Many people feel sorry for throwing away or giving away branded jeans. It all seems that the moment will come when they will come into fashion again. But for some reason this moment has not come for several decades. It is better to repurpose old things into a new piece of furniture.
Materials to make a rug from old jeans and pockets (you can also cut the jeans into shreds):
- base for bedding (old rug, etc.);
- all the old jeans you can find;
- sewing machine;
Manufacturing process:
- Cut out the back pockets from each pair of jeans. Ideally, if the patch is preserved. This will make our product look even cooler. If you don’t have that many pockets, you can cut shreds from old jeans.
- Place all the pockets on the mat so that there are no gaps between them.
- When you have done everything to your liking, sew the pockets on a sewing machine.
There are hundreds of options for such a product. For example, you can arrange the pockets from darkest to lightest. Or create a chaotic pattern. It all depends on your imagination!
What can you make from old T-shirts with your own hands? Rug!
What kind of rugs can be made, and, most importantly, from what? The main material that is easy and pleasant to work with is old T-shirts.
If you cut T-shirts into shreds, you get this furry thing
Craftsmen have gotten the hang of crocheting a rug from old T-shirts using a hula hoop as a base, using a base mesh. It's a small matter: collect more T-shirts in the desired color. This is not difficult to do, since there will always be a few things that are no longer worn. Or maybe your friends will have a warehouse of old T-shirts.
Idea 9 – Woven doormat from old threads and laces
The easiest rug to make with a unique design. Making such a carpet is a creative process that does not require special skills or effort. It will appeal to all creative and not so creative people.
What materials are needed:
- cardboard circle, waist circle, hula hoop;
- scissors;
- multi-colored balls of yarn/thread and laces, yarn from T-shirts;
Manufacturing process
How to make a bright bedside rug with your own hands:
- Prepare a cardboard base. Make markings as in the photo:
- Alternately thread the threads through the cardboard:
- Once all the threads have been threaded, begin threading circles of thicker threads and laces. And so on until the very end, until the masterpiece is ready:
Such a bright product is suitable not only for the floor. You can decorate a wall with a fake, it will turn out very bright and unusual.
Yarn crochet
This knitting is more complex, so it is suitable for experienced needlewomen. First of all, decide what kind of pattern you want to see on the finished product. There are many options here: flowers, nature, animals, abstraction or simple geometric patterns. You can look for embroidery patterns and transfer them to canvas.
What you will need:
- mesh with square cells or special canvas for carpets;
- hook with foot;
- bright thick yarn.
Please note that the yarn depends on what room you are going to knit the rug for. For the bathroom it is better to use more moisture-resistant synthetics. For the bedroom or living room, choose wool or cotton.
You can use either hard or silicone as a base. In the first case, the product will be more durable, in the second - soft.
How to do it?
At the beginning, it is important to calculate the dimensions of the grid. Take into account the material that will go into the hem and calculate the length and width of the rug. The number of holes in the canvas should be the same as in the selected pattern. Otherwise, you will have to change the drawing yourself.
You can simply transfer the pattern to the grid to make the knitting process easier.
Insert the hook from top to bottom. On the wrong side, the thread should be pulled out and passed through the loop on the hook.
Start tying around the entire perimeter and gradually move to the center. Thanks to this method, you do not have to change the yarn often.
Vertical and horizontal rows are very convenient because you can combine several colors at once. Then you get beautiful and unusual shades in those areas where the threads intersect.
Look at the step-by-step photo description to understand how to make loops correctly.
Please note that the threads must be the same length. Also remember that the smaller the pile height, the clearer the image.
When you finish the rug, be sure to align all the threads. This can be done with ordinary scissors.
Idea 10 – Round rope rug “Sailor”
A handmade fake will help you decorate your room in a marine style.
A rope rug can be created in half an hour and used to decorate a room in a nautical or rustic style.
Materials needed for counterfeiting:
- rope 10 m or more in length;
- base (piece of linoleum, trimming an old rubber rug);
- scotch;
- sharp knife;
- liquid Nails;
Progress:
- Prepare the base (linoleum or rubber). Start twisting the rope from the center.
- Twist the mat tightly so that each new ring is adjacent to the previous one:
- Trim the outermost turn with a knife;
- Draw a “star” with liquid nails. Direct them from the center of the mat to the edges.
- Press firmly onto the linoleum.
After all the manipulations, you will get a nice “marine” carpet with your own hands.
Idea 11 – Braided rug made from old tights
Every girl wears nylon tights. It's a real disaster when they tear. It's a shame to throw it away, because it's wasted money. So dozens of torn tights accumulate on the shelves.
The recipe is simple, you only need caprons, scissors and thread with a needle.
Step-by-step manufacturing method:
- Wash the tights, cut off the top and socks. Leave only the “legs”.
- Fold the “legs” in half, cut into fragments 3-5 cm thick. Stretch them a little.
- Fold the strip of nylon into a ring. Wrap the number 8 around 4 fingers. Do the same with the second ring. Transfer the loops from the first ring to the back of your palm.
- When the product is ready, twist the braids in the shape of a spiral, pressing them tightly against each other.
- Sew the product with threads.
The result will be a delicate piece of furniture in beige tones. Below you can see how to knit a rug from old things.
Use of weave
Prepare a frame according to the size of the future carpet product, fill the nails on two opposite sides. Set the distance to 2.5-3 centimeters from each other.
The following instructions will help you learn how to weave a rug from old things with your own hands.
Pull the strips of material taut. It is advisable to take it in colorless shades. This will be the basis.
Pull the working strips first above the thread, then under it.
At the end of the row, pull the strip under the warp thread and work in the opposite direction.
Related article: Fabric basket using origami technique
When weaving a rug, sometimes move the finished rows towards the starting row. At the end of the work, hide all the knots on the wrong side. Now the finished product can be removed from the frame.
Idea 12 – Circular knitted rug from old T-shirts
Knitting is a hobby of girls with golden hands. Knitted items in the house reveal a hardworking housewife.
To knit a small knitted rug with your own hands, you just need to know how to knit double crochets and crochet chain stitches.
Materials:
- ribbons that we will create from old T-shirts or other things;
- hook;
- scissors;
How to do:
- Prepare the yarn. Cut the t-shirts into long strips and join them together (see idea 1). Tie the resulting yarn into a ball for convenience.
- Take some yarn. Start making the first ring. To do this, wrap the tape around your finger three times (Fig. 1).
- Remove the thread and thread the hook into the hole. Pull out the working thread. Pull the yarn through the loop again to create another “loose loop.”
- Make 11 double crochets.
- In the 2nd row, make twenty-four double crochets (knit two in each bottom stitch). In the 3rd row, increase the number of columns to 36.
- We do the fourth row a little differently: first, 1 double crochet, then 2 chain stitches, then skip the bottom stitch, again a double crochet, and so on in a circle.
- Rows 5 and 6 are like the first 3 rows, and row 7 is like 4. Rows 8, 9 are also double crochets. We do 10 using technique 4. And so on until the 18th row.
- Row 19 can be left as is, or you can make a “cloud” decoration. For this: 1 lifting loop, skipping two stitches (bottom) and 6 double crochets. To finish the wave, weave a half-column into the bottom. s., skipping a couple of columns.
Ready! Now you can put the product in a visible place and show off to your friends!
Knitted rugs from patches
From scraps joined into long ribbons, a rug can be crocheted, just as napkins are crocheted from ordinary yarn. True, for such work you need a large hook, 6-10 mm thick.
Begin work by tying a braid of 5-6 air loops, which are closed into a ring. Then the fabric is knitted in a spiral with double crochets, periodically knitting two stitches from one loop to increase the diameter. After each row, the work must be laid out on a flat surface to control the plane.
Crochet
Crocheting a rug
Video - Crocheting a round rug from cut fabric strips
Such a simple round rug does not require any special skill; even those who have picked up a crochet hook for the first time can knit it. If you have experience, you can create real masterpieces of any form.
Crochet rug
Handmade children's rug
Bright knitted rug
Multicolored rug
Idea 13 – Bright carpet “To the delight of the baby” from patchwork pom-poms
Another option for a carpet made from scraps of fabric and filling.
The end result will be a soft product that resembles a cloud. Place a carpet on the floor in the nursery, the child will be interested in crushing the pompoms, jumping on them and having fun in every possible way.
Carpet materials:
- old knitted items (preferably colorful or patterned so that the child likes them);
- base (thick fabric, cardboard);
- filler (sintepon, foam rubber or holofiber);
- scissors, needle and thread;
- glue gun;
Filling for pillows can also be taken from things. Old blankets and jackets will make excellent victims.
Technique:
- Cut circles from fabric several times larger than the size of the desired pompoms. Tip: prepare a stencil from paper or cardboard in advance.
- Using a thread, unfasten the workpieces in a circle.
- Place the filling in the middle and tighten the thread. Do the procedure with all the balls.
- When all the pompoms are ready, glue them to the base with a gun. You can sew it on, it will be more reliable.
Place the original rug next to the baby's crib. The child will be delighted!
Twine rug
These carpets are very easy to make. But their appearance can decorate any room. At the same time, they have orthopedic and massage effects.
You will need:
- glue gun;
- leg-split.
Technique:
- We begin to wrap the twine into a circle or square, gradually winding it in increasing sizes.
- We glue several parts together to the required size (the parts can be of different sizes and shapes).
Idea 14 – Wicker home decoration using a hoop
Skilled needlewomen find another use for gymnastics hoops - they weave colorful decorations for their apartments from it. Do you want to try to create your own?
Materials:
- hoop or large round frame;
- any threads, shreds, laces, etc.;
Technique:
- Stretch the main rings onto the hoop with a web.
- Start weaving from the center to the ends.
- Once the desired size is reached, cut the base and tie the ends into knots.
These are the rugs other craftswomen made with their own hands from scraps:
Idea 15 – The lightest carpet made from sea pebbles
If you are lucky enough to live near a beach with river pebbles, decorate your bathroom with a massage path made of sea stones.
Materials:
- beautiful pebbles;
- silicone glue;
- base with a water-repellent effect (rubber);
The technique is elementary:
- Place the pebbles side by side (so that there are no gaps).
- Apply glue to the pebbles and the carpet at once. Then apply the pebble and hold for 15 seconds.
- Let the fake dry thoroughly.
The product is ready! This concludes our selection.