Advantages and disadvantages
Pros of painting walls with a roller:
- Speed of work . You can quickly paint large areas of surfaces (how to paint walls quickly and professionally?).
- Ease of use . The tool does not require preparation or maintenance, and there is no need to follow complex rules when painting.
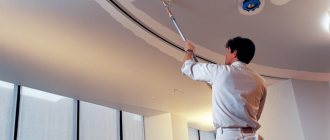
- The handle can be extended . By attaching an extension handle, you can reach high areas of the wall.
Minuses:
- It is impossible to paint corners and other complex reliefs and surfaces.
- The need to select a tool depending on the type of paint used.
Tip
You can use a roller to paint walls in any room: kitchen, living room, bedroom, bathroom or toilet.
Tips for using a roller
- Rollers belong to the category of rough painting methods if it is necessary to process small parts. Use them exclusively for flat surfaces of sufficient area;
- When painting walls or ceilings with a roller, be careful in the corner areas. If you move the roller unsuccessfully, you will leave traces of paint on the ceiling or whitewash on the wall. These problem areas are traditionally treated with a brush;
- Many people think that using a wide roller can process the surface faster. This is partly true, but with experience and strength. After all, wide models of rollers collect more paint, and they themselves are heavier. So manipulating such a tool can be quite difficult, as your hands will get tired. And it will be much more difficult to control movements.
Kinds
There is a wide variety of paint rollers on the shelves of hardware stores. Their types depend on different parameters.
Based on the principle of operation, they are distinguished:
- Submersible . This is a familiar tool; to apply paint it must be lowered into a tray.
- With piston color supply system. Its handle has a reservoir into which paint is poured (about 0.5 liters). When you press on the handle, the composition flows onto the work surface and evenly wets it.
- With automatic supply of coloring composition to the working surface of the cylinder. The tool is expensive, but justified for a large amount of work. Its advantages are high productivity and cost-effectiveness.
Depending on the location of work, the following are distinguished:
- For interior work (interior). They are small in size and a little softer.
- For external work (exterior). This tool is more rigid, with a reinforced design.
By purpose:
- For uniform surface painting. Used for uniform application of paint to the wall.
- Decorative and textured. With this tool you can apply a pattern, decor or texture to the wall.
According to the height of the fibers on the fur coat:
- High pile - 18-22 mm, needed for plaster, concrete or brickwork (read about how to paint a brick wall, as well as gypsum tiles and decorative stone here).
- Average pile – 11-12 mm. Painting drywall, wood, concrete or plaster, suitable for use in damp environments.
- Short pile – 5-6 mm. For painting wood and metal, with economical color consumption.
The width of the roller comes in three sizes:
- Short - 8-10 cm length, diameter - up to 15 mm. This tool is convenient for painting small areas and hard-to-reach places.
- Medium - 15-20 cm length, diameter - up to 90 mm. This makes it convenient to apply paint to floors, walls, and ceilings.
- Long – length from 25 cm; diameter - from 80 cm. For exterior work, it is used by professionals. Reinforced design, large selection of replaceable attachments.
One of the selection criteria is the type of fur coat. The following types are distinguished.
Foam rubber
A popular, inexpensive foam rubber option is used for painting smooth surfaces of small areas.
Of the minuses:
- fails quickly;
- does not cope well with uneven surfaces (how to paint uneven walls?);
- creates a lot of splashes when working.
Suitable for one-time use on a flat surface. The higher the density of the foam rubber, the better the performance.
Velor
Inexpensive, it is often chosen by professionals. The velor coat is suitable for applying oil, emulsion paint or varnish. The peculiarity is a very thin and uniform application of the composition on the wall. Good for painting wallpaper.
Among the disadvantages:
- inaccurate application (lots of splashes);
- poor absorption.
Fur
This option is universal; you can apply any type of paint.
The advantages include:
- economical paint consumption;
- good painting of irregularities and roughness;
- no splashing;
- no bubbles, application of uniform layers.
There is only one downside to a fur roller - the fallen fibers remain on the surface to be painted . Depending on the type of fur, rollers can be natural or synthetic. According to the length of the pile: the larger the surface to be painted, the longer the pile you need to choose. Long pile copes well with cracks and unevenness on the wall.
With polyamide thread
In appearance it resembles a terry towel with sloppily combed, protruding lint. Recommended for applying paint on any base, with the exception of polyacrylic coats. Only water-based paint is applied with it.
Its positive aspects include:
- ease of cleaning after use;
- high-quality application;
- good pile that does not fall out and does not remain on the surface;
- durability.
The disadvantage of a roller with polyamide thread is splashes during operation.
Roller selection
The whole variety of rollers is based on the difference in their purposes (use for different paints and varnishes, surfaces, areas of the surface to be painted).
Size
The rollers are divided into three types based on size.
- Mini - designed for local work in small areas, in corners, for stencils. Also, mini rollers with a rubberized base are used to strengthen seams, increasing the adhesion of the coating to the wall.
- Midi - medium-sized rollers, convenient for most painting tasks. They are used when painting walls, floors, ceilings, and the correct selection of a coat allows you to work with all types of paint.
- Maxi are large rollers, when using which it is difficult to monitor the uniformity of application and the absence of gaps. Maxi-rollers are used in priming work on large areas, as well as in creating a primary coating layer that will be covered by subsequent finishing.
A variety of roller sizes is also observed in the range of highly specialized rollers for uneven surfaces, aggressive paint compositions, structural paint or bitumen.
Foam rubber
It is highly absorbent and suitable for painting most surfaces.
The foam nozzle is chosen for water-based or adhesive-based paints and varnishes. You cannot use a foam roller with water-based or oil-based compositions, as during operation they will destroy the structure of the material, which will lead to the formation of lumps on the paint.
Velours
Gives a smooth surface, used for ceilings or as a finishing layer on walls. Velor is suitable for using water-based and oil-based paints, but it does not absorb solutions well, which is why you have to often draw paint from a tray.
Polyamide
Synthetic coats for rollers are universal: they are suitable for all types of paint and varnish compositions, are not afraid of aggressive solvents, and absorb and release paint. In addition, polyamide rollers are easy to clean after painting, so they last a long time.
Fur
Fur rollers vary in degree of fluffiness and give excellent results even on uneven walls due to the length of the pile. Fur coats (artificial or natural) are used for water-dispersion, oil, alkyd compounds, and are distinguished by the application of coatings without splashing. Fur rollers help create an even layer of paint even on surfaces with cracks, differences, or chips. Suitable for painting large areas.
How to choose?
When choosing a tool, you should follow the recommendations of the paint manufacturer and the advice of salespeople in a hardware store.
- A popular and cheap option is a foam roller. But it is not suitable for applying oil or alkyd paint, as it is not resistant to aggressive compounds. But it is suitable for water-based paint when working indoors.
- To apply oil, latex, silicate paint or enamel, you should purchase a fur roller.
The shorter the pile of the fur roller, the less it will crumble and the smoother the composition will lie. - A universal option is velor or with polyamide thread. All types of paints can be applied. This tool is optimal in terms of price and quality of work.
Attention
When choosing a tool, its quality is assessed. A good fur coat is stitched evenly, there are no threads sticking out of it. The roller itself has locking rings. A prerequisite for a quality instrument is the presence of markings and information about the manufacturer.
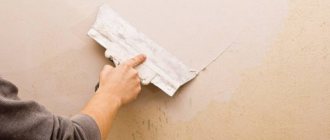
Preparing surfaces for painting with a roller
In order for the paint to lay evenly, without streaks, the surfaces must be thoroughly cleaned and coated with a primer before painting. The protective layer is applied several times.
Related article: Papercraft in the interior: stylish layout options
Attention: to protect plastered walls, choose only acrylic or water-based primer compositions.
How to do it yourself?
You can make the tool yourself . The step-by-step instructions look like this:
- An aluminum beer can is used as a working cylinder. Small holes are made at its ends for the yoke. It should be inserted into them with little effort.
- Glue is applied to the entire surface of the cylinder. Woolen fabric or thin foam rubber is placed on top. The recommended thickness of a homemade fur coat is about 1 cm.
- A rigid wire is suitable as a handle. It must be bent in the shape of the letter “L”.
- Next, the entire structure is assembled into a single whole.
What kind of work is a roller ideal for?
As we said above, this tool is suitable for painting large flat surfaces. In this case, we can make sweeping movements, in a small number of which we cover the surface with a layer of paint. In this case, both the wall and the ceiling act as such a surface. Or you can apply not paint at all, but glue to the same back side of the wallpaper. And the most convenient way to do this is with a roller. And for each of these operations a different type of roller is suitable, the choice of which we want to talk about next.
The process of performing work in the apartment
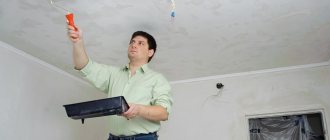
The paint application process looks like this:
- A small amount of paint must be poured into the pan.
- Dip the roller into the paint. This must be done carefully, without staining the handle and other parts of the tool. The paint should only be on the surface of the coat.
- Roll along the grid or relief located on the edge of the pallet. For uniform impregnation, it is necessary to roll several times, without pressing.
- Determine the section of the wall from which work will begin.
- Start applying with vertical or horizontal movements. When moving vertically, stripes are not formed; when moving horizontally, the coverage area increases. Often these methods are combined: applying one layer in one direction, and the second in another.
Important
It is better to start painting the wall from a window or corner.
When painting, it is important to know how to hold the tool correctly. The roller does not need to be pressed or pressed hard; all movements are smooth, even, without sudden movements. The tool is held with one hand, effortlessly, with uniform pressure. The angle of inclination is not important. Having reached the ceiling, it is worth increasing the pressure somewhat and pressing upward. Then reduce the force and process the rest of the wall with normal pressure.
How to apply paint without streaks and streaks?
To ensure that the wall is painted evenly without streaks, you need to follow a few simple recommendations:
- Roll the tool after each dip in paint, otherwise it will form a thick layer on the wall.
- All strips are laid with an overlap of 4-5 cm.
- Blend each layer well. Overlapping is achieved by applying multiple layers rather than by applying the thickness of a single layer.
- Complete application by rolling the roller in one direction. The surface is smooth and structured.
- A common cause of streaks is applying a second coat before the first has completely dried. When working, you should take into account the paint manufacturer's recommendations regarding complete drying time.
How to distribute evenly?
To apply paint evenly over a large surface, it is convenient to use the square method:
- Multiply the width of the roller by 5. The result obtained is the size of the side of the conditional squares into which the entire wall is divided.
- The starting point for work is the upper corner of the wall (left or right), one of the conditional squares.
- Mentally draw 5 vertical stripes inside the square. Start applying paint from the second stripe, then go straight to the fifth. Then apply to 4, 1 and 3 stripes.
- The second layer is applied in stripes in the reverse order: 3, 1, 4, 5, 2.
- All movements in the first layer are from bottom to top, in the second - from top to bottom.
Advice
At the end of the strip, the roller is sharply torn off the surface, then transferred to the beginning of the next line.
When one square is painted, you should start working on the second, under it, and so on. Pay special attention to the joints between the squares. When one vertical strip of squares is painted, you need to start working from the top corner of the next one.
Painting technique
To make the work go faster, you need to make a layout. The layout shows the overall picture; you can think through small details that are not immediately noticeable. It will be easier to understand where and with which tool it will be easier to work.
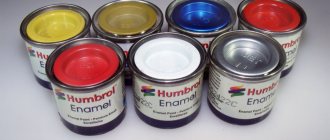
Then choose the paint:
- matte;
- glossy;
- textured.
Texture, color, tone - will create an atmosphere and flavor. In addition to selecting the necessary dyes, you need to choose a tool and use it correctly.
The roller has a knurled, smooth surface in one direction, and a rough surface in the opposite direction. This must be taken into account if the handle grip pattern is changed. Sometimes you can break away from tradition:
General recommendations
To obtain a high-quality result, you must follow the following recommendations:
- Do not press too hard on the tool.
- Apply the paint evenly, without visual gaps.
- All movements are smooth, so there will be less splashing.
- The minimum number of layers is two. The first is applied in a horizontal direction, the other in a vertical direction (or vice versa). Drying time is required between coats.
- The only way to paint corners properly is with a brush.
- You cannot completely immerse the instrument in the tray; to ensure uniform absorption, it must be rolled in the tray.
- When the fur coat becomes uneven, replace it with a new one.
A paint roller is an indispensable tool when painting walls. Thanks to the variety of its types, any composition can be applied efficiently and evenly. To obtain a good result, the correct technique for working with this tool is important.
How to put paint on a roller correctly
The paint is poured into a special tray in a layer that does not cover the axis of the roller wheel. The tool is dipped in paint and rolled over a pallet. This way the roller picks up a sufficient amount of paint.
You can avoid smudges, streaks and splashes if, before painting, roll the roller lightly over the pallet, and then several times over the clean surface of the board or drywall.
Secret: paint must be added as it is used, exactly at the level of the axis of the soft part of the roller. An excessively small amount of paint, as well as chaotic movements on the painted surface, are the most common cause of unsightly stripes on the wall.
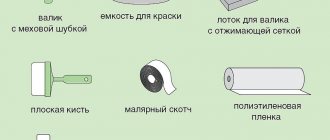
Tools and materials for work
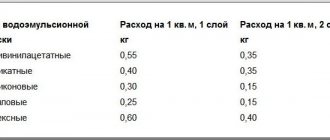
To facilitate repair work, it is better to stock up on the necessary tools and consumables in advance. It is worth remembering that the water-based emulsion dries quite quickly, which means that to obtain an even tone you need to work with it quickly. In the process from preparatory to finishing work you may need:
- a set of spatulas of different widths;
- hard and soft brush;
- scotch;
- sandpaper;
- roller with medium length pile;
- container for mixing paint;
- cuvette (bath);
- brush;
- level.
To make your hand less tired while painting, it is better to purchase removable 1 m and 1.5 m handles for the roller. This will allow you to avoid climbing onto a stepladder or table every 2-3 strokes to paint the middle part of the wall and areas under the ceiling.
Painting walls with water-based paint requires a certain preparation of the surface - puttying and priming. To do this, you need to purchase ready-made or dry putty, as well as an appropriate primer at the rate of 200 ml per square meter (average consumption).
“If, after thorough cleaning, the walls have minor defects, finishing putty will be sufficient. The presence of visually noticeable irregularities, deep chips and cracks require first treatment with starting putty.”
Instead of putty, you can use special wallpaper intended for subsequent painting. This will save on leveling with finishing putty. Wallpaper can also add texture to your walls.
If you are in doubt about the choice of tools and materials for preparing the surface, it is better to seek help from a consultant at a hardware store - he will select everything you need in the desired price category and recommend the best manufacturers.
How to Paint a Kitchen and Bathroom
Water-based bathroom paint should have good resistance to elevated temperatures and water-repellent properties. For the bathroom, it is better to use styrene acrylic paints or water-based paints with latex added. This option allows you to paint the bathroom in the same way as the walls of the hall, and at the same time get a surface that can withstand a fairly large number of washing cycles.
This paint is heavier and has a higher viscosity. Unlike the hall, first of all you need to paint the corners and the ceiling part of the walls, as well as areas and areas adjacent to the pipes, and only after that you can paint the part of the wall that is accessible for work with a roller.
The most difficult part of finishing an apartment is painting the walls in the kitchen with water-based paint. Water-based paint adheres very poorly to any surface on which a layer of fat and gas combustion products settles. Such a surface must be thoroughly prepared, all contaminants must be thoroughly removed, and it must be primed. Unlike a bathtub, it is better to paint the kitchen walls with regular water-based paint and, after thoroughly drying, cover them with colorless acrylic varnish.