Are you tired of your monotonous apartment interior? Do you want to transform it, refresh it and create something extraordinary? Luckily for you, there are many options for decorating a living space. One of them is quite effective - decorative painting of walls with your own hands. Thanks to it, you can change the design of your home beyond recognition. There are many techniques that can help you create a unique pattern and texture on your walls.
It is clear that it is difficult to call the process easy. But if you have the appropriate instructions, tools and materials, as well as the right attitude to work, then you can do without specialists. Let's find out how you can paint walls in a decorative way with your own hands.
Features of decorative painting for walls
What is the difference between regular wall painting and decorative painting? The differences are quite noticeable. Regular painting will simply transform your wall into a different color. And if we talk about decorative painting, then a unique pattern, structure and shape are created on the surface, along with coloring. Let's look at the benefits of decorative painting for walls.
Advantages of paint:
- Long service life. The minimum is approximately 10 years. But please note that during this period the paint will not fade or deteriorate. You won't have to repaint anything. As for expensive decorative wall paints from well-known manufacturers, they will last you 25 years!
- Paint resistance to various influences. The coating protects the wall and is not easily damaged. In addition, the composition will not fade in the sun and will not be erased. And you can completely forget about the appearance of mold, since the composition contains special protective agents.
- Solidity of the coating. No joints are formed, the surface looks beautiful and creates a wonderful atmosphere in the room.
- Easy to use. You can wash the wall without any problems, removing dirt and dust. In addition, stains will appear much less frequently on such a surface.
- Composition safety. Properly selected paint will not cause harm to residents, as it will not emit harmful substances. Moreover, the composition does not burn, which makes your stay in the room even safer.
- The antistatic nature of the paint ensures that the walls will not collect dust.
- Attractive and original appearance.
- You will need to carefully prepare the walls for painting yourself. Next we will take a closer look at what is included in such preparation;
- When compared with regular paint, the price for decorative compositions is slightly higher. Sometimes you will see a price tag of about 1000 rubles per 1 kg of material. Although there are cheap options, 300–400 rubles each, they are not of such quality.
As you can see, there are a lot of advantages of the material. But decorative paint also has its drawbacks. There are very few of them, but they are there:
If we understand the description of decorative paint, let's look at the technology of work to change your house or apartment beyond recognition.
Types of surface decoration
Due to the fact that natural, environmentally friendly paint costs a lot of money in the store, professional craftsmen and designers have learned to use several types of wall treatments using ordinary paint, which also give a good effect. Today there are several ways to make a universal drawing using ordinary cheap means.
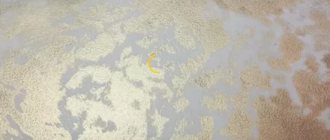
Using stippling
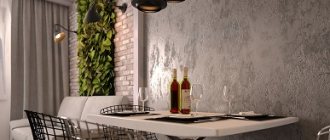
This type of wall painting is characterized by the appearance of an old and shabby surface. This kind of decor is very often used in themed catering establishments.
To create this effect you need:
- Completely cover the work area with regular paint.
- Apply acrylic paint with a second ball for contrast.
- Then you need to apply a colored glaze that will be combined with the overall picture, and after covering the entire working area with glaze, you need to apply point touches on the wall with the same brush for the effect of an old wall.
- You need to work with a brush in a chaotic manner, then the surface will be more realistic.
This method has one big disadvantage - all irregularities are very clearly visible in a lit room.
Skin effect
This effect is often used in private offices. But it can also be used in residential areas. Before decorating, the surface must also be treated according to the above scheme.
To create the illusion of skin:
- First, cover the walls with latex paint of the selected color.
- We make a tassel from suede.
- Mix glaze and latex paint, just a little darker than the main color of the wall.
- After this, this mixture should be applied to a small part of the wall, and a suede brush should be moistened in water and squeezed out. After this, use smooth touches to smear the mixture applied to the surface and partially remove it.
- We soak the resulting lines with a piece of wet suede to create a natural leather effect.
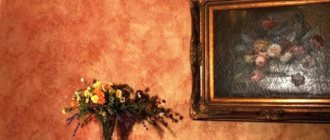
Venetian plaster effect
This type of decor is rightfully considered one of the most beautiful today. This color can be used both in offices and in residential buildings and corridors. She will look appropriate everywhere.
To recreate the effect of Venetian plaster using regular paint you need:
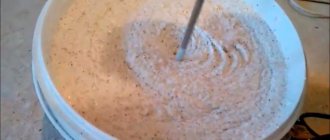
- Pour the selected latex paint into a large container. On one side of this container you need to pour pigment for paint and stir gently until a mixture is formed that is darker in color than in the other half of the same container.
- Then you need to take a little paint, the lighter one, on a spatula and apply it to the work area like regular plaster.
- The next step is to apply darker paint to a piece of the already coated wall with a spatula.
- When both light and dark spots appear on the wall, you need to start smearing them left and right, up and down to spread them evenly across the work surface, creating a natural look.
At the finish, you need to wipe the dry working area with sandpaper, and then cover the paint with a special wax mixture.
Wrinkled skin illusion
This effect can also be used in many types of premises, but it is more suitable for cafes, restaurants, etc. Creating such a coating does not require special skills or effort. The only difficulty is that the process itself is very long and requires a lot of patience.
For a wrinkled skin effect:
- Take a small piece of paper; you need to smear a piece of the wall according to its size.
- A sheet of paper needs to be crumpled and applied to the work surface.
- Smooth the sheet over the wall, thereby creating a wrinkled effect.
This way you need to treat the entire wall.
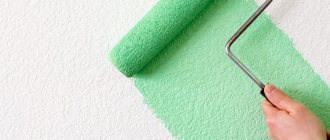
Using a cloth roller
In order to create a decorative surface, you can use not only tools that can be bought in the store, but also available equipment. Even a homemade rag roller will do, with which you can create a very beautiful effect. This type of decor is very popular, especially in children's rooms. The advantage of this type of finishing is that you don’t have to spend too long on the initial treatment of the walls, since this style of painting hides all the imperfections and damage.
To do this you need:
- First apply the first coat of paint, then wait for it to dry completely.
- Then we add another shade of the main color already used, but a little darker.
- The rag needs to be smeared with the resulting paint, twisted and wound onto a roller.
- You need to paint over the entire plane of the working surface in different directions to obtain a characteristic pattern.
Stage 1 – preparatory work
As you already understand, there is nowhere without this process. It is clear that any finishing requires high-quality preparation. Therefore, you should not think that you will do extra work. If you neglect this, the service life and quality of the finished surface will be low. What is included in preparing walls for painting?
First you need to assess the condition of the walls. How smooth are they? Are there any cracks, pits or other defects? Do they have old finishing material? All this will need to be fixed. Remove the old finish to the base, it will only get in the way. As for cracks and defects, they can be repaired. For this purpose you will need putty. It can hide all defects.
In the case where the differences in the wall are more than 20 mm, you need to putty the walls before painting to level the surface. Indeed, as a result, all irregularities will be clearly visible. All you need is to buy putty, stock up on spatulas, a rule and a level. Thanks to them you can achieve a perfectly flat surface. Learn more about how to putty walls for painting in this video.
Advice! Immediately before painting, you should treat the surface with a primer, which will ensure better adhesion.
If you are working indoors with all the decorative elements and furniture, protect them or even remove them while the work is being done.
Painting process
First of all, especially if you do everything yourself, it is important to paint in the warm season, to maintain a constant temperature and humidity in the room if possible; the latter should especially be taken into account when painting the ceiling.
Otherwise, the entire process of applying paint, no matter whether it is with a roller, brush or spray, remains standard, as for all other finishing materials. As a rule, decorative application of paints involves applying two layers, the first is the main color, and the second is the tone or pattern.
Preparatory work
Before starting work, you need to remove furniture or other interior parts to avoid damage; you can cover them with film, such as the floor. The same applies to the person involved in this business: since safety is paramount, it is worth preparing a protective suit, gloves and, of course, glasses in advance - all this can be purchased at a not very high price at the nearest construction supermarket.
The only tools you will need are a roller and/or brush to apply all layers, a container and a tool for applying texture or design.
The preparation process itself includes the following steps:
First of all, you need to clean the surface to be treated from previous applied layers; you need to take into account that even removing the wallpaper will not be enough, and you will need to remove all applied coatings. Putty that levels the surface, since without this stage all defects may become more noticeable. The final stage is a primer, which creates a stronger “adhesion” between the surface and the coloring composition, and is a kind of “base” for creating a future pattern. Separately, it is worth noting the penetrating primer, it will provide better adhesion and preserve the surface from the penetration of liquids such as water.
Before you start decorating the walls, it should be noted that concrete walls are the easiest to process. They are not capricious in operation and are easy to process at the initial stage. The same cannot be said about wooden walls, which will require more careful preparation: first they need to be checked for cracks, fungus or other pests. The wood must be completely cleaned and treated before painting.
Application methods
There are a large number of options for applying decorative painting.
Roller. It can be either textured for a pattern or regular for applying a base layer. Today there is a large abundance of rollers with different patterns in construction supermarkets, and in online stores, with special requests, it can even be made to order. A brush, which is necessary when applying the base coat, especially in hard-to-reach places. With a brush you can apply a special pattern in the form of stripes or apply strokes, which will also look impressive. Depending on the degree of brightness of your intended design, the brush can be moistened not very generously to show the main tone, but it can be moistened well to cover it completely. It is best to paint the surface at one time, otherwise you may end up with unevenly painted areas.
Stencils of various sizes and designs. For smaller stencils, you can only use a brush and not a roller. Even after using a stencil design, you can add details. It is important to remove the stencil before it dries to prevent it from tearing or sticking to the wall. Use of glass wallpaper. This is wallpaper that is woven from glass fibers like fabric. One of its biggest advantages is fire safety, that is, if a fire occurs, the material does not release toxic substances. Fiberglass wallpaper is easy to paint and lasts a very long time, and is almost not damaged by scratches and other mechanical impacts.
Using OSB, that is, oriented strand board, can be a good alternative to using wood in room design. But it is worth considering that it can only be used in rooms with low humidity, since this material consists of wooden shavings. The main advantage is its low price. Homemade tools. They can be made with your own hands from available materials, the most popular of which are a foam sponge and knots of fabric attached to a roller. Here your imagination and the result you expect from your design will help you.
Some examples of painting with a brush:
Splash effect. One of the simplest ways to design walls is by spraying with a brush. It is advisable to use no more than three colors for a more harmonious sensibility. The effect of marble, which is also achieved by manually applying the pattern with small brushes.
Ceiling treatment is unique mainly due to the abundance of ideas for its design and subsequent effect, since the ceiling can not only reduce or increase the size of the room, but also radically change the atmosphere and perception of the room.
Examples that completely change rooms include mirrored or mosaic ceilings. Ceiling decoration can complement the painting of your walls.
We recommend: How to glue foam rubber at home?
Stage 2 – apply a decorative layer of paint
All you need for the job is the selected paint and tools for creating texture and patterns. Rollers are very good for decorative painting of walls. Thanks to its shape and unusual roller, original drawings and patterns are obtained. But, you can use a brush, sponge, rag, or lint roller. It all depends on the application technique, of which there are quite a few. Let's look at the common options.
Dry brush method
First, apply the paint evenly to the wall using a regular roller. Please note that the paint tone should be lighter. Wait until the layer is completely dry. Next, with chaotic movements, using a brush, cover individual areas of the walls with paint of a different shade. For example, you can use metallic paint, gold, bronze or silver. The result of the work is visible in the photo below.
We imitate Venetian plaster
Here you need two shades of paint. Divide it into two parts, add dark dye to one of them. Everything is ready to go. Apply paint in layers, alternating tones. All that remains is to shade the finished coating to make everything more harmonious. Use a spatula to move along the wall from one side to the other.
Using a rag roller
Thanks to this method, you can not only get an interesting range and pattern, but also hide defects in the surface of the walls. The work is simple: apply decorative paint of a certain color to the wall. Take a rag, make a roll out of it, twisting it into a rope. Lightly dip a homemade roller into paint of a different color, and then begin to form patterns on the surface.
Note! To achieve a harmonious coloring, alternate the direction of movement and rotate the roller at different angles.
Based on an old tool
You will need a used but intact roller made of any material and any size. It is very important that the handle of the product is preserved. The remaining parts can be easily found in any home.
With a rope
To make a roller, you need to take a regular clothesline or any cord and wind it around the workpiece. The more often the cord is wound, the denser the pattern will be. You can use various winding methods, make intersections, and so on. The result is a relief pattern of depressions. Before using a homemade roller, it is recommended to test it on a small section of the wall or an unnecessary sheet of plywood.
Related article: Attaching the installation to a wall made of foam blocks
With a knife
If a foam roller remains in acceptable condition after finishing, then it can also be used. To do this, you need to take a stationery or sharply sharpened regular knife and cut out strips, squares or any other shapes of any size. The larger they are, the larger the texture of the drawing will be. You can process a foam roller in the same way. If there is an unnecessary new product made of foam rubber, then simply tighten it with thread so that wrinkles form.
With a plastic bag
This is the simplest and least expensive way to produce textured products. You need to take an old roller and secure the crumpled bag on it with tape. The folds create a complex, unique pattern of thin relief stripes. Instead of a bag, you can use hair bands, scraps of fabric, a net for storing vegetables, and thick paper.
- Thick foil. It is difficult to find such foil on sale, but you can use fragments of packaging for dairy or some other product.
- Acrylic putty.
- Crochet hook.
- Wooden rolling pin. This is the most suitable product. If the rolling pin is equipped with a handle, it must be cut down, leaving only an even cylinder. Then drill a through hole in the center into which you need to insert a metal rod or wire. You can use a handle from an old product.
Using textured rollers
One popular option is to use a textured roller. It has a rubber surface with a printed pattern. All you need to do is apply paint to the walls, and then treat it with one of these rollers. The pattern will be painted in a different color. These photos show what the finished result will look like.
At the same time, there are rollers that paint the design in a certain color, and there are also those that simply make a certain pattern on the surface. For clarity, pay attention to this photo.
Roll instead of wallpaper
Sunday, December 09, 2012 02:30 + to quote book
Knurling with patterned rollers.
I can saw, drill and much more, I can’t cross stitch by the way, but I can’t glue wallpaper without seams and even with two people I’ll ruin everything, quarrel and send it away. And it never turned out beautifully. That's why my best friends are paint and plaster. Although there was an experience with something seamless. One roller with glue passes along the wall, the other, like a sower, throws polymer mica.
And then again Buy HERE and on Etsy at affordable prices. And easier. The main thing is not to forget to keep the roller in an upright position.
Or
Decorative painting techniques allow you to achieve special effects on the surface of walls. Here you can show not only skill, but also imagination. In some cases, through the use of various techniques, a second color is applied to the main coating. In others, paint is used to give the surface the appearance of another material, such as wood or marble.
The design can be applied to the painted wall surface using embossed rubber rollers.
Knurling is performed as follows:
• having moistened a sponge roller with paint, roll out the design using a vertical movement of the machine from top to bottom;
• the machine must be moved in a uniform, smooth motion, making sure that there are no breaks or layers in the design.
To obtain multi-colored patterns, sequential rolling of the pattern with a roller of different colors is used.
Knurling with patterned rollers gives the surface a decorative and artistic appearance, hiding defects in plaster or concrete (voids, microcracks, unevenness, scratches and other similar defects).
Rice. 115. Decorating walls with strokes and spots using rollers; a - rollers with sponges, b - roller rollers, c - the process of finishing surfaces with rollers
Knurling is done with rollers with various patterns, which are used to roll up a fairly thick layer of textured putty or painting paste (paint with a high content of fine mineral filler, fraction up to 0.1 mm, and a large amount of pigments).
Patterned rollers are made by gluing soft leather, foam rubber, porous rubber, sponge onto a hard rubber or wooden cylinder (Fig. 115, a), on which various patterns are applied: linear (Fig. 115, c), geometric, lined (Fig. 116 , a), stylized (Fig. 117, a) or naturalistic motifs of the plant world, indefinitely structural (Fig. 118, a).
Rice. 116. Decorating walls with strokes and small patterns (a) with a double roller with spring ties (b)
Wooden cylinders are impregnated with drying oil, which protects them from swelling. The width of the rollers depends on the purpose: wide rollers (up to 20 cm) are used to finish large surfaces, small ones (3 cm) with the same pattern are used for places in the corners of the room, near door and window openings.
To apply lines, roller rollers are used (Fig. 115, b); they are detachable, which allows you to apply strokes in two colors (Fig. 115, c). Line finishing of surfaces is performed with a double roller (Fig. 116, b). One of the rollers, the nutrient roller, is made of microporous rubber. The patterned roller is pressed against the feed roller by springs.
The rollers used to make designs based on the plant world (Fig. 117, a) consist of a rubber cylinder on which a design is applied.
Related article: How to attach decorative stone to a wall
Rice. 117. Finishing surfaces with stylized patterns (a) and a set of rollers for finishing (b)
The pattern rolled with a roller can be one-, two-, or three-color. Designs in two or three colors are rolled using a set of rollers. This makes it possible to create a beautiful color combination on the surface being finished.
Fig. 118. Finishing surfaces with an indefinite structural pattern (a) and a set of rollers for finishing (b)
To improve the quality of work and labor productivity, a special tool TsNIIPS is used for rolling the pattern (Fig. 119, a), which consists of a reservoir 2 for paint, two metal feed rollers 1 that supply paint, a squeegee shield 4 that removes excess paint from the feed roller , and patterned roller 3. The design of the tool allows rolling surfaces only in the vertical direction. When using the tool, a clean and uniform pattern is created over the entire surface, as there is a continuous supply of the coloring composition to the pattern roller. The reservoir is filled with paint so that it does not fall directly on the pattern roller and does not overflow.
The device shown in Fig. 119, b, surfaces can be rolled in different directions. To obtain a pattern of equal saturation, monitor the saturation of the nutrient roller, lubricating it with the painting composition using a hand-bristled brush.
Rice. 119. Tool for rolling surfaces with rubber rollers: a - TsNIIPS apparatus, b - device for rolling with a roller made of microporous rubber; 1 — nutrient rollers, 2 — reservoir, 3 — patterned rollers, 4 — squeegee, 5 — microporous rubber roller
To apply the pattern, prepare a painting composition from aqueous chalk paste with pigments, which is sealed with a 10% solution of animal or vegetable glue, and 20-30 g of drying oil is added to a bucket of the finished composition. If the compositions are prepared using CMC glue, the chalk mixture with pigment is sealed with a 7-8% glue solution. Glue-wax or glue-oil-wax compositions, ENT emulsion and casein-wax emulsions, various synthetic putties (KLM, emulsin, latex-perlite) are also used. Pigment pastes of the required color are added to the putties.
The consistency of the paint or putty is determined by test painting. The consistency largely depends on the type of rubber from which the pattern is made: hard rubber requires thicker paint, soft rubber requires thinner paint.