Types of loops
There are several classifications of door hinges. The classifications can be based on:
Helpful information:
- Types of metal blades for hacksaws
- Types of hammers and their purpose
- Wooden fences: types and advantages
- What types of carpet are there?
- Construction levels: types and purpose
- Installation of aluminum interior thresholds
- material
- fastening method
- design
- mechanism features
- mounting location
If doors made of steel and plastic are supplied in a complete set, which includes canopies, then for doors made of MDF and wood you need to buy hinges yourself. Therefore, all the characteristics and tips below will apply exclusively to doors of this type.
Classification of door hinges
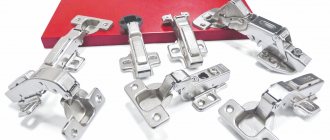
Modern door hinges, the types of which are widely represented on the construction market, are classified according to several defining characteristics:
- Installation location;
- Detachable mechanism;
- Method of attachment to the box;
- Material of manufacture;
- Construction type.
It should be clarified that the need to independently select door awnings affects entrance and interior doors made of wood or MDF. Doors made of other materials (steel, aluminum and plastic) are supplied already equipped with the appropriate fittings and hinges. Only for wooden door leaves there is a need and opportunity to independently assemble and install hinges at your own personal discretion. Therefore, the classifying characteristics of door hinges will be considered in terms of their use in wooden doors.
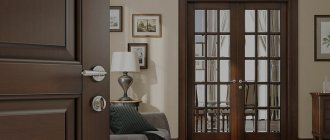
What are the different types of hinges depending on the installation location?
Since there are both entrance and interior doors, the types of door hinges for each case will vary.
For entrance groups, more massive hinges are produced; they are designed for use in conjunction with heavy entrance doors. Their difference is not only in size. Hinges for entrance doors have a special mechanism to resist the leaf; it eliminates the possibility of lifting the door leaf. This device consists of depressions and protrusions, which, when combined in the closed position, do not allow the canvas to move up/down after alignment with the box.
We are considering the installation of interior doors and the subsequent selection of hinges.
Other types of furniture hinges
Card, piano, and hinge hinges are rarely used for installing cabinet doors. They do not have three-level adjustment and do not lock the door in the open and closed position. An additional fastener is needed. Today they are more often used as an additional decorative element. For example, antique.
Mezzanine
For installation of horizontal overhead panels that open upwards.
Mezzanine
Secretaries
Used for hanging downward opening facades.
Secretary room
We have learned in our practice how proper installation and adjustment of hinges affects the operation of the cabinet as a whole. Some time after assembly, the door of the wardrobe or kitchen cabinet stopped closing - the upper part of the door rested on the frame.
To correct the misalignment and use the cabinet normally, I had to readjust all the hinges. Therefore, during installation, it is advisable to prevent any deviations; any gap can lead to deformation of the entire cabinet structure.
Features of detachable and universal hinges
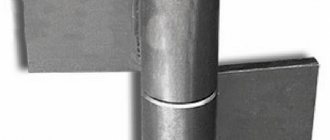
Removable hinges are sometimes called removable or canopy hinges. Their difference is that the canvas suspended in this way can be removed without dismantling the loop. From the picture you can get acquainted with how the detachable hinge mechanism works. Both elements of such a device have their own names, which were given to them by folk wisdom. Now the words “dad” and “mom” have become generally accepted, they are used by both ordinary people and professionals.
In the photo - 1. The wing of the loop, which is attached to the canvas (mother). 2. Fist. 3. Steel finger (reinforced). 4. Frame wing (male).
Universal hinges are one-piece. To remove the canvas secured with such a mechanism, the loop must be unscrewed. Universal models are used on doors that open both inward and outward. However, many consider the need to unscrew all fasteners when removing the canvas to be inconvenient.
Instructions for installing interior doors with your own hands
1. Frame wing, has three hinges; 2. Bushing; 3. The door wing has two hinges; 4. Self-tapping screws for fastening
Do-it-yourself insertion of hinges into interior doors
Installing hinges on the door: insertion technology of various models
Every man should know how to install door hinges. The hinge is one of the key elements of the entire door structure; it not only holds the leaf in the frame, but also ensures its movement. Therefore, how well the door will function depends on the correct installation. If installed incorrectly, squeaks, rubbing and jamming may occur, so knowing how to properly install hinges on a door is very important.
Correctly installed door hinges ensure proper functioning of the door.
Types of loops
First, you need to familiarize yourself with the varieties of these parts, this will help not only determine which hinges are best installed on interior and entrance doors, but also understand the specifics of the design, which is very important to take into account during installation.
In total, there are 5 most popular models of door hinges:
- Straight - standard samples with plates on the sides (card loops). The most common option for interior doors.
- Angled - differ from straight ones only in the shape of the plates; they are made in the form of corners. Used for pendulum models.
- Screw-in - a rotating axle with pins instead of plates. Suitable for lightweight doors only.
- Hidden - the hinge is recessed into the door structure. Such hinges are mainly installed on expensive models of entrance doors.
- Italian - differ in the design of the hinge, similar to furniture options. Used in expensive imported models.
- Overlays - attached on top of the door structure without prior preparation.
- Mortise - installed in pre-prepared recesses, forming a flat surface with the door.
- Screw-in - screwed into the door using pins, the presence of which is provided for by the design of the part.
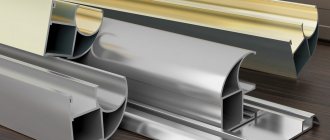
Main types of door hinges
According to the installation method, the following should be distinguished:
Hinge installation methods
Depending on the direction in which the door will open and the mounting sides are distinguished:
- left-handed,
- right-sided,
- universal.
Universal ones are convenient because they can be attached from any side, but this complicates the process of installing and dismantling the canvas itself.
Each of the described types has its own installation nuances. The simplest are card models. The most difficult thing to install is hidden hinges.
The first step in installing hinges with your own hands is marking. To do this, you need to retreat 20 cm from the bottom and top of the door leaf and mark the starting lines with a pencil. Next, depending on the direction of opening the door, attach the hinges to the marks made, outline the outline and mark the points at the attachment points. At the same time, to ensure free movement of the fittings, the rods should not touch the door leaf, but you should not push them too far either, this will worsen the strength of the fastening. You should also carefully inspect the insertion points for the presence of knots; screwing self-tapping screws into them can lead to distortion or split the door leaf, so the hinges must be moved 2-3 cm down or up from the problem area.
After this, it is necessary to assemble the door block and make markings on the frame in the same way, while maintaining a gap of 2-3 mm between the frame and the door leaf. It is most convenient to do this when the door has not yet been installed, otherwise the leaf is fixed in the opening using wedges.
Marking the door block for installing hinges
Depending on the size and weight of the door leaf, it may be necessary to install a third hinge. In this case, the insertion is not made in the middle, but with a slight offset to the top hinge in order to regulate the load exerted on the fittings by the weight of the door leaf. As a rule, for doors up to 80 cm wide, up to 2 m high and up to 50 mm thick, two hinges are sufficient.
Installing simple card loops
Installing card door hinges with your own hands is mainly done in two ways. First, let's look at the simplest one using overhead parts. To do this, you will need a drill and self-tapping screws, as well as hinges with a special structure; their peculiarity is that the halves have different shapes, and when the door is closed, they fit into each other, which is why they can be installed directly on the surface of the door. Use a pencil to mark the locations for the holes and drill them. If the door leaf is made of wood, MDF or plastic, you can immediately screw in the screws, without preliminary drilling.
Sequence of installation of overhead hinges
Traditionally, straight card hinges used in the home are installed slightly differently. So that they do not stop the mechanism when closing, they need to be recessed a little. The easiest way to insert card hinges into interior doors with your own hands is to use a chisel; to do this, a layer of material is cut off on the door and door to the depth of the part. Then the hinge halves are applied to the installation site and secured with self-tapping screws.
Sequence of installation of mortise card loops
Installation of corner card models
For doors with a rebate, it is better to choose corner hinges; in essence, these are the same samples as simple card hinges, but their halves have the shape of a corner. How to install corner hinges in a door? In exactly the same way as straight lines - one part is fixed on the loot, and the other at the end of the canvas.
Corner models have a design in the form of two corners and are mounted in a mortise manner
Insertion of hidden loops
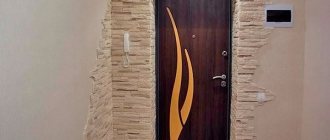
In modern homes, more advanced models of fittings are increasingly used. Hidden hinges do not burden the appearance of the doors, they are quite easy to care for, and the features of their design and installation increase the class of burglary resistance, which is an important factor for entrance doors.
Hidden hinge models
How to install hidden hinges on a door:
If desired, you can install decorative inserts over the fastenings.
Hidden hinges are inserted using an electric router
Other types
Not as often as the models described above use screw-in and Italian hinges. How to be in this case? Italian models are installed in the same way as card ones, the only difference is the location of the hinges; unlike standard ones, they are installed not at the ends of the door system, but at the top and bottom.
Screw-in hinges can be easily distinguished by their appearance; instead of plates on the sides, they have threaded pins, with their help the part is secured in the door frame and leaf, this is an ideal option for false models of structures. In addition, another advantage is the possibility of adjustment using a hexagon. To hide the metal part of the hinges, they can be disguised with decorative caps.
Screw-in model is only suitable for lightweight door panels
Simple metal doors are usually connected to the hinges by welding, but in order to weld the hinges onto the iron door. certain skills are required. It should also be taken into account that the hinge mechanism must initially be welded with the mounting plates. Work is carried out only with a continuous seam. Thanks to the mounting plates, it is possible to make the task easier and weld the parts into place without much difficulty. To ensure that the seams do not interfere with the movement of the canvas, they must be carefully cleaned, for example, with a grinder. If you doubt that you can do such work correctly, it is better to seek the help of a specialist.
Metal door hinges most often have a welded structure
Adjustment
So, let's look at how to adjust card hinges on an interior or metal door? If the structure is loose, it is necessary to tighten the screws. Modern products have a mechanism in their design that is adjusted using a hex key and allows you to tighten the door to the required level.
Now let's look at how to adjust hidden door hinges. This can only be done in the open position. You must first remove the decorative trims, then tighten the screw using a hex key. Thanks to the design features, the door position can be adjusted in three planes.
Inserting door hinges is a rather troublesome task, but nevertheless quite simple to do it yourself. By following our recommendations, each of you will be able to properly secure and adjust any type of door hinges.
Need a master? Professional craftsmen will perform any work Order repairs
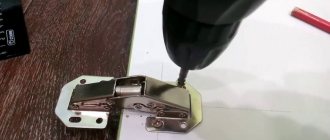
How to install hinges on an interior door. Cutting hinges with a router.
Rate this article: (votes – 4. average score: 6.00 out of 7)
Hi all. Today we’ll talk about the correct and simple installation of hinges with a router into the door leaf and door frame. Loops can be inserted in several ways; the most accessible is the manual method of inserting loops. but it takes the longest and the result will largely depend on the evenness of your hands and accuracy. Tapping with a router speeds up the process several times and the quality of each installed loop is the same, which is very good for serial tapping.
Personally, I install the hinges at a distance of 200 mm from the edge of the canvas; this, in my opinion, is the most optimal option.
Let's start marking, set aside 200 mm from the edges of the door leaf, this will be the edge of the hinge. Apply a loop to the mark and align it. In order to mark a loop on the door leaf, I recommend using a regular segment knife; simply cut the veneer of the door leaf with it and move the knife from the edge of the loop to the center.
If you move the knife differently, your hand may tremble and a scratch on the veneer will be outside the hinge, which in the end will not be very good. We mark the edges of the loops in this way.
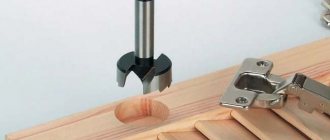
Now you need to prepare the router for work. I have a Makita RP0900 router, it’s quite a normal machine, but it has a significant drawback, as for me, it’s a sharp start, when you press the button it jerks, because of this you can mill in the wrong place. The principle of setting up a router is the same for all manufacturers. First, we install the cutter. To mill the hinges, I use a regular groove cutter 18 mm in diameter. Like this:
We align the cutter flush with the router platform and tighten the screw, which is responsible for fixing the platform.
There is a depth stop on the side of the router; on my router it looks like this:
We insert a loop between the bolt and the limiter rod and fix it to fix the thickness of the loop.
We set the width of the loop insertion; to do this, you need to attach the loop to the side stop of the router and turn the cutter so that the edge of the blade coincides with the edge of the loop; to adjust, move or move the side stop until the blade matches. When setting up a router, it must be de-energized, otherwise you risk becoming a man with nine fingers.
We check our depth settings on some piece of wood. Personally, I check immediately on the door leaf, just make a small approach in the middle of the hinge. I apply the hinge and see if it is flush with the door leaf or not. If it’s not level, I adjust the setting and try the depth again.
After setting, we mill the loop. Be very careful here so as not to mill too much.
We mill a little short of the scratches.
Using a chisel, we make the corners straight and remove the excess before scratches.
The result should be a rectangular groove into which the loop ideally fits.
We mark the places for the screws and drill holes of a slightly smaller diameter than the screws themselves.
Mark the hinges on the door frame. On the side post from the top we set aside the thickness of the part of the door frame that will be on top. In my example, the thickness of the door frame is 25 mm.
Add 3-4 mm to the gap from the door leaf to the frame and place the side post on the door leaf, aligning this mark with the edge of the door leaf.
We transfer the edges of the hinges from the door leaf to the side post of the door frame.
Then we perform all the same steps as with the door leaf. We mark with a knife, mill, and clean with a chisel. If the door frame has a quarter, then when milling you need to use a gasket whose thickness is equal to the height of this quarter.
After milling all the hinges, we screw them into place.
This is how hinges are installed using a hand router.
Inserting hinges: various methods of do-it-yourself installation in an interior door
The installation of doors in any case includes the installation of hinges. This fitting is a necessary element that ensures the mobility of the door leaf in the frame. Depending on the requirements, hinges can have different shapes and perform some additional functions, such as providing additional security.
During the door installation process, the insertion of locks and hinges occurs at approximately the same stage, since these two mechanisms are interconnected. For example, correct adjustment of hinges can help correct minor flaws in an installed lock or handle. However, incorrect installation of hinges will lead to the fact that the presence of a handle or lock will not be needed: a door without correctly installed hinges simply will not be able to function.
Classic door hinge
Many companies provide installation services for doors in wall openings, but installation or replacement of hinges on interior doors may be needed quite suddenly. No matter how durable the material is, such a moving part of the fittings is very susceptible to breakage. A non-functional part must be replaced immediately, otherwise the door will not perform its functions. Also, inserting hinges into interior doors is necessary when replacing the door leaf. For such cases, there is no need to call a specialist - you can quite easily cut the hinges into the doors yourself.
Before cutting the hinges, you need to purchase them. They are:
Very often confusion arises when determining which loops are needed. Determining this is quite simple: you need to stand near the opening on the side where the door will open. If, when opening towards you, the door leaf moves to the left, then left hinges are needed, and if it moves to the right, right hinges are needed. The difficulty is that many people confuse the sides and stand on the side from which the door will be opened. The main thing to remember is that the door leaf in such a situation should move away from the person (open), and not towards him (close).
How to choose a tie-in method?
Inserting hinges into an interior door is a rather troublesome, but not difficult task. The main requirement for the installer is extreme precision and care. First of all, you need to understand that there are three installation options:
Each type has its own disadvantages and advantages, and also requires certain tools. In most cases, it is necessary to install hinges in the classical way, since it does not require specific tools and is understandable to every person.
The professional method is only suitable if specialized equipment is available and in most cases requires calling a specialist. However, with due patience, anyone can handle specific tools.
The simplest and most unpretentious method is suitable for cases where installation must be urgent, or a person does not risk taking on work that involves cutting out nests for hinges.
Professional method
It is quite possible for an untrained person, provided he has the necessary tools, which can be rented or borrowed from friends:
A milling machine will allow you to create a recess without damaging the door trim. The most unfamiliar item to the average person is a cutting tool. Essentially, this is a special lining that protects the door leaf from damage.
Important! There are already devices that allow you to set the dimensions for cutting a hole, and even tools that can be used to simultaneously cut a groove both on the leaf and on the door frame.
Simple method
This method means that you can install the hinge directly on the door without cutting out a socket. This became possible thanks to a special design. The hinge seems to fold like a book, and in this state it takes up no more than 2 millimeters - slightly less than the generally accepted gap between the door leaf and the frame.
Hinge for easy installation
In order to install hinges, you don’t need many tools:
More details on how to choose the distance and install loops will be discussed in the section on the classic method.
Classic method
At the moment, this method is not used in modern professional construction, as it is not suitable for modern doors. It leaves unsightly chips and often spoils the appearance of the door end, which is completely unacceptable by modern standards. And this should be taken into account before installing hinges on an interior door in this way.
Installed hinge on the door leaf
For this method you will need the following tools:
Preparing the box with a chisel
A similar algorithm is followed for inserting into a door frame. The only exception is the height of the hinges on the interior door frame. Add 3 millimeters to each mark. The hinges are mounted in an already installed box; they should not be attached immediately after the nest is ready.
Types of loops
Having dealt with the question of how to embed loops, it is necessary to mention what types they can be. Each of them has its own appearance and purpose:
Screw-in hinges
Regardless of the type of hinges being installed, it is very important to take measurements responsibly. The slightest error can make the door impossible to install. The alteration will take a lot of time, and will also cause significant damage to the aesthetic indicators of the door leaf and its frame.
- Do-it-yourself doors. Making doors for outbuildings You can quickly make inexpensive doors using OSB boards and corrugated sheets. This door can be used for…
- How to install a door with your own hands? Video instructions for installing a door I would like to offer you several training videos on how to install doors yourself. Thanks to the video...
- Replacing an socket with your own hands Replacing an socket is necessary in cases when the old one stops performing its functions or is simply broken.…
- Installation of a split system with your own hands (instructions) Stages of installing a split system with your own hands Outdoor unit of the air conditioner
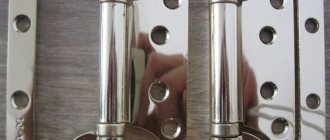
Overhead/mortise hinges
GOST 5088-2005 regulates the requirements for overhead and mortise hinges. In this document there are practically no fundamental differences between these two types of structures. The fact is that the main part of the mechanism is the same. This can be seen in the figure below.
Both of these types have card-type loops. One is attached to the canvas, the other to the box. However, the opening and canvas for each of these types is prepared in its own way.
- the overhead type is attached directly to the surface;
- For installation of the mortise type, recesses are made into which card loops are placed.
The history of overhead loops goes back more than one century. In ancient times, overhead door hinges were forged from steel strips. Symmetrical form was not the goal of the blacksmiths' work. They strived for variety, ornate forms and, of course, strength. The dimensions of those ancient hinges were much larger than modern ones. Each product was unique, bearing the imprint of the style of the master who forged it.
Today, when recreating the retro style, designers also design door hinges, repeating the bygone rules and traditions of manufacturing this part of the door structure. To produce these parts, designers turn to masters of artistic forging.
The popularity of overhead hinges is associated with the ease and high speed of their installation. The plates are screwed on with screws, after which the door is installed in the opening. Physical and time costs are minimized. In recent years, a type of overhead model called “butterfly” door hinges has been gaining popularity. The special shape of the cutout, similar in appearance to a butterfly wing, allows the mechanism to fold so that the thickness of the product corresponds to one half. No cuts are made for such a loop either on the box or on the canvas.
In terms of their properties, mortise models are in many ways similar to overhead ones. Only to install them you need to make a cutout for the hinge plate. Recesses are made both on the box and on the canvas, namely in its end part. This product is fastened with screws. When a door suspended on mortise hinges is in the closed position, only the pivot pin can be seen from the outside.
Each of the above types of loops is divided into detachable and universal.
If we compare overhead detachable models and universal ones, it should be noted that the universal door hinge has a more durable and rigid structure. Therefore, even with small sizes, these devices cope with fairly large loads. By choosing this type, you protect the door structure from subsequent sagging.
Replacing glass in an interior door
Overhead detachable hinges can be right-handed or left-handed. You need to be careful when purchasing so as not to make a mistake. In the case of universal models, there is no need to worry about this. There are no restrictions on the side of the door opening.
A few words about “butterflies”
If you decide to go with the easiest-to-install hinge option, it is advisable to purchase them in specialized stores. When purchasing, make sure that the sides of the structure fold correctly, otherwise unevenness will form during installation and the door will not fit well or begin to spring.
USEFUL INFORMATION: How to decorate a door in a room with your own hands: design and decor
Interior doors, according to their characteristics, must be suitable for installing overhead butterfly hinges on them. Installation of this type of canopy is carried out only on the places of the door leaf intended for this purpose, suitable for tightening screws.
Due to the overhead installation method and structural properties, butterfly awnings are intended primarily for lightweight interior doors. Thanks to their aesthetic shape and clean installation, which takes place without disturbing the decorative finish of the door leaf, they are excellent for hanging modern doors with an original design.
Screw-in (screw-in) hinges
Screw-in hinges are devices consisting of 2 parts shaped like a cylinder. The component parts are located symmetrically relative to each other. The product is equipped with holes for fastening. One “barrel” is mounted to the canvas, the other to the box. Screw-in hinges are considered universal because there are no right or left elements. The main property of screw-in hinges is the solidity of the fastening. There is no way to remove such a door from its hinges. Perhaps this is not only an advantage, but also a significant drawback. But many people acquire loops of a similar design precisely because of this property.
Advice! If you want to purchase screw-in hinges, you need to get a canvas with a quarter, which is usually called Euro-canvas. Otherwise, they simply won’t be able to be secured.
In the photo - Euro canvas (doors with a quarter).
Support loops
There are mechanisms in which bearings are installed. To adjust them, there is a special adjustment screw located at the top.
If you start tightening the screw, the door lifts. This adjustment is caused by a malfunction of the hinge system on a metal door. The metal wears out over time, causing the fabric to sag.
Before performing preventative adjustments, remove dirt from the surface of the product and lubricate it by completely removing all screws.
Corner hinges
The corner hinge can be distinguished from other analogues by the method of attaching the axial rod. There are no standard wings fixed near the rod, which occupies a central position. In this case, profile corners will be attached to it. In essence, these are the same card awnings, only in the shape of an angle. This shape gives them some advantages, such as the ability to mount hinges on rebated doors.
Corner door hinges for rebated doors are attached in the same way as mortise door hinges. One corner is recessed into the end of the door and secured with screws. The main disadvantage of this design is that the device is clearly visible and not hidden in any way.
Card loops
They come in two designs, and these are the easiest hinges to install.
Invoices
Their halves differ in size and configuration. When the door is closed, they are simply recessed into one another. When installing them, no wood sampling is done; The parts are fastened directly to the end of the leaf and the jamb. The gap between them is sufficient so that the hinges of this group do not interfere with the door in any position.
Recommendations for installing hinges on doors found in individual articles, which say that canopies of this type are attached without drilling, should be treated with skepticism. The length of the leg of the hardware is quite long (otherwise strength is not ensured), and even if the blade is made of soft material (plastic, MDF, wood), it is quite difficult to screw it in exactly in the given direction.
Direct
This type of card loops must be “recessed”, by analogy with mortise awnings. And the technology is the same - wood sampling and fixation.
Corner
The difference from overhead loops is only in the shape of the “petals”. And the method of attaching them is absolutely the same.
Hidden
These door hinges are more difficult to install than others. The point is not in the features of the technology, but in the extreme accuracy of marking and selection of base material. In addition, you will need an electric tool if you think about the quality of the fastening.
The procedure is as follows:
- Marking areas for installation of canopy components.
- Arrangement of “windows” for mechanism elements, but only by milling; no other tool will provide accuracy.
- Using a chisel, a sample is made to slightly “sink” the parts of the canopy.
- Drilling holes for fasteners.
- Disassembling the hinge (the manufacturer's instructions indicate how this is done in relation to a specific product).
- Fixing the halves in place. The larger part is installed on the jamb, the smaller part on the sash.
- Hanging the fabric, connecting the hinge parts and fastening them with a tightening screw.
There are other types of canopies on sale, but the term “inset” does not apply to them - they are attached somewhat differently.
The technology for inserting loops is not particularly complex. But taking into account the cost of doors, it is advisable, before starting to work with them, to practice on some kind of workpiece (board, beam). And if you are not confident in your abilities, then you should contact a specialist. Paying for his services will be much cheaper than restoring a door or purchasing a new one to replace a damaged one.
Secret hinges
Secret hinges are not afraid of picky looks. They are practically invisible when the door is in the closed position. This fact adds aesthetics to the entire appearance of the door, which is why this fastening is considered elite and is in great demand. Ease of use is facilitated by the absence of the need to distinguish between right and left hinges during installation.
Hidden door hinges have 3 rotary axes and are not easy to install. Therefore, not everyone can cope with such a matter on their own. If you decide to install hidden hinges, it is recommended to use the services of professionals.
Why do you adjust the hinges?
To determine whether the hinges need adjustment, study the operation of the door. The main factors are:
- the door moves smoothly on its hinges;
- the leaf is tightly adjacent to the door frame, no gaps are formed;
- the door position is always stable;
- the canvas does not rub against the surface of the box;
- The clamping mechanism works without failure.
If any of the above points are violated, the loops are debugged. By adjusting the system, you will extend the life of the canvas.
If you ignore noticeable malfunctions in the operation of the hinges, in the future the canvas will sag or shift relative to the box. Such repairs are more difficult and will require the services of a professional.
Small deviations are corrected on their own. To do this, remember how to adjust the loop mechanism and what technological steps it will perform.
Sagging of the door leaf when it is necessary to adjust the hinge mechanisms
Double-sided hinges
Double-sided hinges are essentially the same card canopies. The main property of these mechanisms is to ensure that the door leaf works in 2 directions. On these hinges the door leaf will move both forward and backward. This function is not in demand in living space. Therefore, double-sided hinges are not installed in apartments. But in public institutions - quite often, especially on the entrance doors.
Types of loops and their design
Modern door and furniture hinges are classified according to a number of characteristics: design features, location and method of fastening, as well as material of manufacture.
Furniture
The most popular are furniture hinges, overhead hinges, inset hinges (internal), secret hinges, cupless hinges, four-hinged hinges, and also for specially designed facades. They are presented in the assortment not only of construction stores, but also of ordinary hardware stores.
Cupless: piano, card, pin
Cupless hinges are rarely used in furniture production. They are designed for installation of interior doors. You can find cupless hinges in Soviet-style furniture. Nowadays they play more of a decorative role and are used in the installation of secretory sheets and folding covers of book-tables.
Quadruple joint
In most cases, the hinged doors of modern furniture are mounted on four-hinged hinges. This allows you to adjust the tightness of the canvas to the furniture body, adjust the location of the door vertically and horizontally relative to the frame.
The four-hinged part consists of two parts connected to each other:
- mounting plate;
- bowls with knee.
Overhead hinges that do not require drilling of the facade
Installed when installation of ordinary four-hinged hinges is impossible. For example, if the thickness of the facade panel is insignificant.
The only drawback of the model is that it is impossible to adjust the fit of the loop in all planes.
Hinges for fastening specific facades
They are used if the aluminum frames of the prefabricated façade fabric have different widths. Parts are divided into internal and overhead. They are installed in corner cabinets, the front doors of which open to 45°, 135° and 180°.