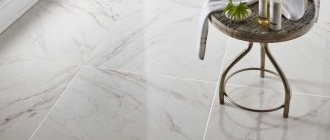
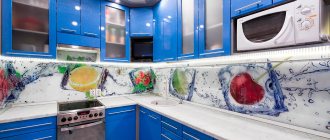
Scope of application and decoration options
The most common texture of gypsum tiles is brick and stone. In addition to apartments and country houses, decorative tiles can be found in restaurants, hotels, exhibition halls, and offices.
Decorating the walls on the balcony with white gypsum brick-like tiles.
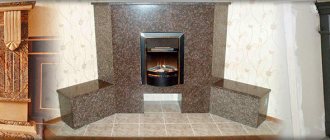
Trim around the fireplace.
Finishing a brick wall using gypsum tiles.
Speaking about the “stone-like” texture, it is very important to note the angle at which the light will fall on the tile. When laying the brick version, it is also reasonable to pay attention to this, but the uneven stone surface requires precision. Before cladding, we recommend testing the finishing material for dryness, so as not to reproach yourself later for thoughtless design.
Decorating the wall around the fireplace without lighting.
With the backlight on.
Concrete, brick, gypsum, plasterboard and plastered bases are suitable for laying decorative tiles. Cladding on a non-standard base requires a non-standard approach to preparation. In such situations, a layer is created that is in good contact with both types of surfaces. For example, laying tiles on tiles is possible provided that a layer of strong adhesive is applied to the old tiles, which will not peel off. The adhesive composition, in turn, is a good base for cladding with gypsum tiles.
Laying technology
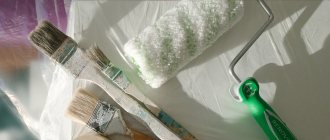
Tool
- Spatulas: regular and serrated;
- Level;
- Hacksaw or grinder;
- Miter box;
- Drill mixer;
- Foam sponges;
- Grouting spatula;
- A construction gun or a milk carton;
- A pair of brushes;
- Sandpaper and whetstone;
Materials
Installation with gypsum glue.
- Glue. You can use any tile or gypsum material, for example “Knauf Perlfix” or “VOLMA MONTAGE”. Can also be laid on liquid nails. Some have glue included.
- Water based varnish.
- Dyes for grout and tiles;
- Primer.
- Grout for seams.
Step 1: Marking
The technology for laying gypsum tiles, including markings, is similar to the technology for laying ceramic tiles. It is important to find the starting points, horizontal and vertical, based on considerations of smooth, accurate cladding and geometric aesthetics. Typically, decorative tiles begin to be laid from the corners, so the markings are tied to them.
Decorative stone-look tiles are often of different formats, so take this point into account so that there are no duplicates one after another. Gypsum brick tiles are simpler in this regard; if necessary, you can immediately mark the location of any element.
Mark each row to avoid cutting at the top and bottom. At the bottom of the wall, a groove was made in the plaster so that the laminate would go there for a beautiful connection.
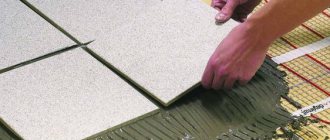
Step 2: Styling
To mix the glue, use a drill with a mixing attachment. The consistency of the composition should resemble thick sour cream. Apply the mixture with a spatula to a base that has been previously primed to enhance the surface and adhesion. To level the layer of glue, the residues are removed with a notched spatula - a comb. Next, lay the tiles, pressing them tightly to the base.
Applying glue with a spatula-comb.
Step 3: Trimming
Since gypsum is a soft material, it can be cut with a hacksaw. For convenience, they use an angle grinder, but it creates too much noise and dust. It is important to join the outer corners correctly. To make them look beautiful, the tiles are cut at an angle of 45 degrees. This is where a miter box comes in handy. Some areas may require additional treatment. In this case, the tiles are ground with a block and brought to condition with sandpaper.
Arches and similar places require figure cutting. In the case of tiles with torn edges, it is easiest to cut along the textured line. If you use an angle grinder, you can ignore this.
Step 4: Grouting
As a putty for joints, either a special grout mixture is used, which is used in a semi-dry form, or gypsum glue. Apply it into the gaps between the slabs using a special narrow spatula. It is also used to level the fugu. An alternative is a pistol or a milk carton. One side of it is cut in width, and a hole of 4–5 mm is made on the other. Fill the bag with a “sour cream” type mixture and squeeze it through the hole into the seams.
First, the mixture is applied from a gun or bag with a cut corner. When it becomes elastic, it needs to be smoothed with jointing.
If the color of the tile differs from the tone of the putty, and this is not included in the design plan, after grouting, after waiting for it to set, you need to paint the grouted spaces with dyes. A good manufacturer of slabs comes complete with facing material. Coloring is done using a narrow brush. Not only the seams are painted, but also possible chips that could have formed during the installation process or during production.
After completing the work, it is recommended to treat the tiles with water-based varnish to protect them from moisture that may enter accidentally or during wet cleaning. Since gypsum tiles are used for interior decoration, such treatment completely solves the “water-repellent” problem.
Self-production
If the volume of cladding is large, then it makes sense to purchase molds (or make them yourself) and make the tiles at home.
Video on how to make it at home: Decorative gypsum tiles have a wide range of applications. But do not forget about the disadvantages when choosing a facing material. Consider not only the relevance of gypsum in the context of the interior idea, but also the quality of the material. When planning to resurface your work fireplace, don't skimp on the time it takes to find a good manufacturer. Low-quality tiles at high temperatures simply will not withstand the heat and will peel off, or even crack. Sometimes it is useful to apply glue twice, including on the slab. This will increase adhesion and, subject to other requirements, guarantee the durability of the cladding.
- What are clinker tiles? Pros and cons, use and installation
- Seamless tiles: what are they, pros and cons, features of installation in the bathroom
- Kitchen tile design (19 photos)
Fireplace tiling
Stove tiles are a fairly inexpensive, but at the same time very high-quality option for covering the surface of the portal. Despite the fact that today you can buy it as a rather expensive coating. It’s also very budget-friendly; when choosing, you need to use certain rules.
Material selection criteria
The fireplace, the tiles of which will be used for facing work, will have a unique appearance, and many characteristics will be enhanced due to such cladding. Tiles for finishing fireplaces and stoves must be strictly intended for these purposes. When choosing and purchasing material, it is important to consider the following points and parameters:
- The material must have good heat capacity and the ability to accumulate generated thermal energy;
- The fire resistance of the material must be at the highest level. Choose a cladding that can withstand high temperatures and their sudden changes, and does not melt or deform;
- Choose the most durable coating possible. The strength of the tiles should be at least 25-30 t/sq.m;
- It is best to give preference to environmentally friendly and natural ingredients. When heated, such material will not release harmful or hazardous substances into the indoor air.
A ceramic fireplace stove selected according to all the points presented above will be beautiful and safe to use!
The choice of tiles should also be made visually. To do this, pay attention to the inner surface of the product. It should be perfectly smooth, without bends. Thus, when laid, it will lie perfectly evenly on the surface of the fireplace portal, without forming gaps or unevenness.
A stove that is lined with tiles with defects and cracks on the internal or external surface will not last long and, with regular exposure to high temperatures, will begin to crack and crumble even more. The ideal material is not only smooth, but also without any cracks!
The fireplace lining is carried out only after purchasing everything necessary for the work. You will need not only the coating itself, but also the adhesive composition. It must have a high degree of fire resistance and contain clay in its composition. Before purchasing, the number of tiles is calculated based on the dimensions and other features of the unit indicated in the plan or order. Buy 10-15 percent more cladding than necessary, as you will need to cut it and may not succeed the first time.
If you want to save money, you definitely shouldn't use tiles for tiling. It is not intended for these purposes and does not tolerate strong heat!
Decorating a fireplace with ceramics can be done using both large and fairly small elements. Large tiles are laid much faster, unlike small ones, which in turn are easier to align along ledges and niches.
A wood-burning fireplace can be faced with any type of tile; it can have a pattern, three-dimensional fragments, a glossy, matte, rough surface and even imitate the structure of natural stone!
Use of natural and artificial stone
The properties of natural stone fully comply with the requirements for materials for facing a fireplace. Among the advantages of finishing using natural stone, the following points can be noted:
- The fine-grained structure ensures good heat transfer.
- Environmental safety, durability and resistance to high temperatures.
- High strength allows you to withstand any mechanical loads.
- Aesthetics and attractive appearance.
- Processing in various ways allows you to give a unique shape.
The most popular finishing options are marble and granite. Marble is used only for fireplaces made of brick, foam concrete or aerated concrete. When choosing marble, attention is paid to the following criteria:
- Whole slab or chips. To produce slabs, not only natural marble is used, but also marble chips. The second option is much more economical, and natural products are much more durable.
- Material integrity. Each tile is carefully inspected for cracks or other defects.
- Color. Marble has different textures (polished, antique, etc.) and shades (from white and pink to gray and black).
Comment! It should be noted that dark marble is much easier to maintain due to less noticeable stains.
One of the most durable materials for facing a fireplace is granite. Its color palette includes the following shades:
- Pale beige and pearly white;
- yellow and green;
- red and purple;
- grey, brown and black.
Minor rare stains ensure easy maintenance of the fireplace surround made of granite, and the ability to use various finishing methods allows you to harmoniously fit your home into any interior. The labor-intensive mining process and the complexity of polishing create a high cost policy for granite.
Lately there has been an artificial excitement around soapstone. Its properties are no better than granite or basalt, and its price category is on par with elite marble.
For some fireplace owners, the cost of facing with natural stone will seem prohibitively high. In this case, you can use a worthy alternative in the form of artificial stone. In many respects it is not inferior to its natural counterpart. The production of artificial stone eliminates the labor-intensive process of cutting, grinding or polishing, and modern technologies make it possible to obtain elements that are complex in their shaped design and look as close as possible to natural stone.
Fireplace plaster
Plaster is one of the simple and practical options for decorating a brick fireplace. A few years ago, plastered surfaces were whitewashed or painted. Today it is possible to apply a decorative layer with different textures on top of ordinary plaster.
Finishing a fireplace with plaster can be fragmentary
Types of plaster for fireplaces
Finishing a fireplace with plaster is popular for the reason that any design can be developed. The second plus is that if everything is done correctly, you can achieve a smooth surface, the finish is beautiful and durable. For plastering fireplaces, the same compositions are used as for brick stoves. Although the heating temperatures of the surfaces differ, the plaster mixtures are made the same. There are two options: make the plaster composition yourself or buy a ready-made one. If you don’t have experience working with clay and determining its fat content, it’s better to buy one. Store-bought plasters for fireplaces and stoves contain additives and additives that make the surface more durable and cracks are less likely to appear in it.
Mixtures for fireplace plaster
As a rule, each manufacturer has two formulations with different properties. The first is basic, for rough finishing. It can be applied in a fairly thick layer - up to 10 mm. After drying, the second layer is laid - the finishing layer. It contains more finely ground substances, is applied in a thin layer - usually up to 3 mm, and the surface is smooth. Such a surface can already be painted if it has been plastered smoothly) or decorative plaster can be applied.
If you want to finish the fireplace at a minimal cost, you can make plaster compositions from clay, sand and lime yourself. But, let us repeat once again, without experience working with clay, it is difficult to ensure that homemade plaster does not crack. Compositions for plastering a fireplace for making them yourself are different, here are a few proven ones:
- Clay-lime: 1 part clay and slaked lime + 2 parts sand;
- based on slaked lime - 2 parts lime, one part gypsum and sand.
To make the fireplace plaster solution more durable, reinforcing fibers are added to it. Previously, it was finely chopped straw, later - asbestos fibers, and today glass or fiber fiber is mainly added. The fractional part of this additive is small - 0.1-0.2 parts. It is added to the dry components (cement and sand), and everything is mixed. The dry mixture is added to the clay and/or lime dough, mixed thoroughly again, and water is added if necessary.
It is better to take lime already slaked, in the form of lime paste. If you extinguish it at home, unreacted particles always remain, which are then extinguished during the operation of the fireplace, destroying the plastered surface. Regarding sand, its quantity is precisely selected depending on the fat content of the clay. The solution must be sufficiently plastic. The fat content of the solution is checked using a piece of wood. Dip it into the solution and remove it. If an even layer 2-3 mm thick remains on the surface, the solution is normal. If the layer is thick and lumpy, you need to add sand; if the stick is almost clean, add clay.
Normal fat solution
The clay is pre-soaked (2 days or until all the lumps are limp), then rubbed through a metal sieve with a mesh of 2 cm. The ground clay dough is once again pressed through the mesh, but with a fine mesh of 0.5-0.7 mm.
You need quarry sand, it must be clean and dry. It is also sifted before use.
For those who don’t want to deal with homemade compounds, here are several companies that produce plaster for fireplaces and stoves. The following compositions performed normally:
- Plitonite super fireplace refractory;
- Petromix KU;
- heat-resistant Terracotta plaster;
- Bossnab;
- RS Parade;
- rtner;
- Kiln plaster HEFNERPUTZ.
The list includes both domestic and European manufacturers. This is not to say that Russian compounds are worse, but working with imported ones is easier.
Features of plastering stoves and fireplaces
The technique of applying the solution itself is no different: a certain layer is applied (sprayed) with a spatula or a special ladle, then leveled (possibly using beacons). The main points are to prepare the fireplace surface for plastering:
- First, all old finishing, if any, is removed from the walls - paint, lime, remains of plaster, mortar, etc. Only clean brick should remain.
- For better adhesion of the plaster mortar to the surface, the seams are deepened by about 1-1.5 cm. Take jointing, a chisel or a screwdriver and scrape out the mortar in the seams.
- All existing cracks are sealed with a repair compound or heat-resistant sealant (which can withstand heating up to 800°C).
- When everything is prepared, take a brush with long bristles and clean the surface well. It must be clean.
- The following are the options: If the surface of the fireplace is relatively flat (the difference is less than 5 mm), you can wet the walls and begin to apply plaster.
- If, due to the curvature of the surface, the layer will have to be made more than 5 mm, reinforcement is necessary. A metal mesh with a fine mesh is stuffed onto the walls of the fireplace. It is secured with nails, which are driven into the seams (the seams can be left unstitched, or stitched, but not so deeply). To ensure that the caps hold the mesh, metal washers larger than the mesh size are put on. Plaster is applied over this stack. In this case, you can be sure that the plaster will not fall off.
Fireplace after plastering
Before you start plastering the fireplace, carefully read the instructions on the package. It usually describes under what conditions and how the plaster should be applied. But experts advise lighting the fireplace, heating the walls to 60°C, then moistening the surface and starting to plaster. The walls are heated so that the brick takes on its “working” dimensions. In this case, there is less chance that the plaster will tear when heated. Wetting with water is necessary to ensure that the solution is not too dry: brick is hygroscopic. If it is dry, it quickly draws water out of the plaster mortar and it becomes too dry and does not harden to its normal state. The result is cracks on the surface.
A few more points regarding drying. When plastering a fireplace, at least two layers are applied. The second can be applied only after the first has dried completely. To speed up drying, you can create a draft, but you cannot light the fireplace. The same applies to the second - finishing - layer.
For the technology of plastering stoves and fireplaces, see the following video.
Recommendations from professionals
A fireplace for which no stone was used and was replaced with porcelain stoneware will look no worse. However, in order to ensure that ceramic tiles are laid correctly and do not subsequently affect the quality of operation of the heating unit, we recommend that you adhere to the following recommendations and advice from professionals.
A decorative fireplace, finished with tiles, can be additionally equipped with an electric fireplace or bio-fireplace. An electric fireplace does not require fuel to operate; it is enough to have a grounded outlet in the house.
Biofireplaces, on the contrary, allow you to get a real flame. Bioethanol is used for kindling. The fuel is safe for health and environmentally friendly. When burned, it does not emit substances harmful to health or life-threatening. Installation of a biofireplace is possible in a home, office, or apartment. It doesn't require a chimney!
In order to cut tiles, there is no need to buy an expensive profile tool; you can use a standard grinder with a round disk attachment. To decorate the fireplace, choose tiles whose thickness is no more than 7 millimeters. Thus, the adhesion of each element to the surface will be as strong and reliable as possible.
To perform finishing work, we recommend using the following step-by-step guide as a basis:
- If the fireplace was previously lined with other materials, at the first stage you will need to completely remove them. Completely clean the surface; the seams between the bricks must be thoroughly cleaned and deepened;
- Next, the surface is leveled. For difficult cases where the brickwork is very uneven, it is recommended to use a grinding wheel. In a standard situation, the surface is leveled with fireproof mastic or clay mortar;
- Next, we apply a primer, which improves adhesion and reduces the amount of construction dust. The primer must dry completely. This will take about 60-120 minutes;
- We dilute the adhesive composition. It should be intended for surfaces heating up to 450-550 degrees. For dilution, use a mixer or drill, onto which a suitable attachment is attached;
- For masonry work, a notched trowel is used. Laying begins from the bottom and maintaining the distances between each element. To ensure evenness of the seams, the space between the tiles is fixed with special cross corners. It is important to periodically check the evenness of the masonry using a building level or plumb line;
- Next, the seams are unstitched. The seams between products can be either deep or voluminous, convex. We use a fugu and a special shaped spatula. Fugue can be either standard white or any other shade.
Lighting the fireplace is allowed only after the tiles and adhesive have completely dried. This may take several days.
Execution of cladding
Finishing a fireplace with granite - step by step guide:
Preparing the surface
- Clean the surface. We remove the old coating using a special metal brush;
- We deepen the seams to a distance of 1-2 centimeters for high-quality adhesion of the surface to porcelain stoneware;
- Apply the primer in one layer and install the mesh;
- We set up the beacons using a plumb level.
Choice of solution
To fix porcelain tiles, you can use one of the following solutions:
- Clay. It is the most affordable and popular. Tolerates high temperatures and temperature changes well;
- Cement. Has sufficient strength and density. Made from sand and cement;
- From a dry mixture. Specially designed for finishing decorative installations. It does not tolerate temperature changes well and is not distinguished by its durability and strength.
Execution of cladding
- We start laying out from the bottom corner, having previously made marks on the surface of the fireplace;
- Using crosses, we fix the tiles and adjust them to size;
- The thickest elements are located at the bottom of the structure;
- The solution is applied to the tile and surface using a construction spatula;
- After which the material is pressed tightly to the surface and held for several minutes;
- After partial drying, remove excess solution;
- At the last stage, we rub the seams and fill them with a special mixture.
Important: at each stage of work, use a plumb level. For additional convenience, it is recommended to use crosses.
Tip: in order for the surface to look well-groomed and smooth, after complete drying, it is necessary to apply a thin layer of a special wax coating. It allows you not only to look beautiful and neat, but also to carry out simple care and prevent dirt from getting into small pores.
You can learn more about the design options by watching the video in this article.
Interior with fireplace
Finishing the fireplace with decorative tiles allows you to turn almost any idea into reality. The elements fit perfectly with corner, island, wall, built-in and hanging models.
For a classic living room interior with a fireplace, a tile option such as tiles is suitable. A tiled fireplace will look expensive and elegant.
Porcelain stoneware with artificially created abrasions, or otherwise an aged surface, is suitable for retro design.
A fireplace, the surface of which is lined with mirror tiles or elements in silver, bronze, or metallic colors, will fit into a high-tech living room.
In the minimalist style, ceramics look good, the elements of which are quite large and do not contain any patterns and have a completely monochromatic surface.
You can also buy cladding for a fireplace or stove with various patterns, ornaments, inclusions, and designs. Using mosaics, you can create a unique pattern or design on the surface of the fireplace portal.
Combined models also look original. Forging, gypsum stucco, artificial and natural stone, decorative plaster, paint and wood go well with tiles.
In this video you can see one of the options for cladding the surface of a fireplace portal with gypsum tiles that imitate the structure and surface of living stone:
Maybe,
Types of porcelain stoneware
Today, there are the following types of ceramic granite used to decorate the façade of a fireplace:
- Glazed porcelain tiles are porcelain tiles on the surface of which glaze is applied and then fired. This material is more durable and resistant to temperature shock than, for example, tiles used as fireplace lining in budget versions of metal fireplace stoves. Also, glazed porcelain tiles are aesthetically more attractive than their simple technical counterpart.
- Polished porcelain tiles have a bright polished surface. Polishing it is carried out in two stages and should be performed only by experienced craftsmen using professional equipment. First, its surface is polished: with a special tool with diamond attachments, all irregularities and chips are removed, and then polished with rotary machines. This can open up the micropores of the material, so after polishing, porcelain tiles are usually painted and varnished.
- Matte porcelain tiles have an unpolished surface and the most affordable price. Strictly speaking, it is also polished with a rotary tool, but with coarser abrasives than polished, resulting in a non-glossy surface. In this case, the fireplace lining does not include the flood zone - it is lined with smooth ceramic plates or fireclay bricks. This is due to the fact that the matte surface of the material may darken over time from ash and soot when the door of the appliance is opened.
- Structured porcelain tiles have a relief surface imitating wood or, for example, natural stone. There is also a variety of it with drawings and subsequent application of heat-resistant paints and even gold leaf on them.
- Lapped porcelain tiles have a combined texture with areas of matte and polished surfaces, obtained using special tools. This material is more durable than polished material, since less material is removed during polishing. The technology was proposed by Italian masons and is currently widespread outside the republic.
Clinker tiles and porcelain tiles
This is a common option for finishing a stone structure. The thermal conductivity of these elements is at a high level. Experts have identified the following advantages of tiles:
- you can cover the structure with different shades and create your own design style;
- high temperature does not harm clinker;
- no special care required;
- various textures and colors of products;
- quick and easy installation.
From this video we will learn the process of facing a fireplace with gypsum stone:
Not every adhesive is suitable for attaching tiles: a heat-resistant type is required. Professionals always cover the hearth with small-sized elements, since the likelihood of defects appearing on the coating is minimized, therefore, it will last for many years. Tools and materials for decorating a fireplace with your own hands:
- rubber mallet;
- heat-resistant glue;
- rag or sponge;
- building level;
- pencil;
- To lay out the tiles evenly, you will need plastic crosses;
- metal spatula;
- a rubber spatula used to rub seams.
After purchasing everything you need, they begin to prepare the workplace. Unnecessary objects are removed from the perimeter of the fireplace and building materials are brought in to make it convenient to work.
Covering the portal includes wiping the brick, opening the seams between the masonry, treating the surface with water and wiping with a dry cloth until all the dust disappears. Finally, the structure is coated with two layers of primer. The further process of facing the fireplace with your own hands:
- If the product is made of old stone that is crumbling, then a metal mesh is installed: it will not only preserve the integrity of the structure, but will also not allow the coating to peel off.
- Multi-colored tiles are always laid on the floor in the correct order. This makes it easier to navigate and mount the elements in the right sequence.
- Heat-resistant glue comes in different varieties, so before purchasing it, carefully study the characteristics on the back of the package. It is usually produced in powder form. The dry mixture is mixed with water according to the instructions.
- Laying begins from the bottom edge of the firebox. Apply an adhesive solution to a small area of the fireplace and level it with a notched trowel. Don't make too thick layers.
The process of facing a fireplace is quite simple, so this work can be done with your own hands.
- The elements are applied to the mixture and pressed. Tapping the material with a rubber mallet checks the evenness.
- To make the rows even, use a thread that is installed from one edge of the portal to the other. The plane is adjusted by level.
- Designs for heating a room always have protrusions, corners and other difficult places. In this case, the ceramic tiles will have to be cut with a tile cutter.
- Plastic crosses are placed between the rows. They will help control the evenness of the rows.
- In this way, the entire surface of the structure is finished and left until the day the solution completely hardens and the coating is fixed.
To prevent soot and dirt from appearing on the tile, it is coated with two layers of heat-resistant varnish.
Fireplace trim with porcelain stoneware
The cladding process is complex and consists of several stages. First, the surface of the fireplace must be prepared, otherwise the hastily glued tiles will fall off over time. The second important step is the correct preparation of the working solution. The final third stage involves directly facing the fireplace with marble-like porcelain stoneware or an imitation of another natural stone.
Surface preparation
The surface preparation technology depends on what type of fireplace is being lined. If it is an old structure, the first step is to remove all plaster, paint or other type of finishing material present. As a result, bare brick walls should remain. If the fireplace is new and just built, this stage is not required.
For better adhesion of the new mortar to the surface, the seams between each brick are slightly deepened. They are cleaned with the edge of a trowel or other device. After dirty work, the brickwork is swept to remove dust. The surface of the fireplace is treated with a deep penetration primer. According to the instructions, allow time to dry completely.
Mesh reinforcement will increase the strength of the cladding
During heating and cooling of the fireplace, thermal expansion of the brickwork occurs. In some areas, porcelain tiles may fly off. To prevent this from happening, reinforcement is performed. A metal mesh is attached to the brickwork with nails or dowels. A hole is drilled for each fastener. If the masonry is made on clay, the nails are simply driven into the seams.
To make the cladding even, beacons are placed on the surface of the fireplace. First, using a plumb line and level, determine the evenness. Holes are drilled at a short distance and screws are screwed in. A small pile of solution is placed on each one. The tops of all beacons are adjusted in height so that a single plane is formed.
Preparation of the solution
If your budget allows you to purchase porcelain tiles, then it is better not to skimp on the adhesive. It is optimal to purchase a special dry mixture for cladding. If you still decide to save money, the solution can be prepared from clay or cement.
Clay mortar
Porcelain stoneware, like any tile, contains clay. For this reason, it is optimal to prepare a solution from such material. Clay best withstands strong heat and thermal expansion.
When independently preparing an adhesive composition, preference is given to clay.
To properly prepare the solution, first determine the fat content of the clay. The accuracy of the selection of proportions depends on this. In small containers, a small amount of clay is mixed with the addition of varying doses of sand. The proportions need to be written down so that you know what kind of solution you need to prepare in the future. Take a little mixture from each container, form balls, and leave until completely dry. When they are completely dry, a test is carried out. Each ball is thrown onto a hard surface from a height of 1 m. Using the technology of the element that is not cracked and remains without dents, the entire mortar for cladding is prepared.
When everything is clear with the proportions, the measured part of the clay is sifted through a sieve. It is poured into a trough, filled with water, and left for 1-2 days. After soaking, the clay becomes viscous. First, knead it with your hands, add the required proportion of sifted sand, and mix thoroughly into a homogeneous mass.
Advice! To increase the heat resistance of the solution, 10% fireclay clay is added to it.
Cement mortar
It is not recommended to glue porcelain tiles onto stoves and fireplaces with cement mortar, but this option is not excluded. The downside is that concrete tends to crack due to thermal expansion. If a tile falls off, it is difficult to remove the hardened piece of cement for reuse.
Cement mortar ranks second in quality among adhesive compositions for facing fireplaces
To prepare the solution, use cement grade M-300 and clean sifted sand. Proportions 3:1. First, the dry mixture is mixed in a trough. After this, water is added. Mixing is continued until a homogeneous mass is obtained.
Solution using dry mixture
Special adhesive compositions are sold in the form of a dry mixture. To prepare the solution, just combine the powder with water and knead with a construction mixer until smooth. The procedure is always described in the manufacturer's instructions.
The dry mixture must be selected correctly for an operating or inactive fireplace
Each dry mixture has a different composition. There are adhesive solutions for decorative fireplaces where there is no strong heat. This nuance must be taken into account. If the fireplace is operational and will be heated with wood, then choose a heat-resistant adhesive mixture.
Execution of cladding
After all the preparatory activities, the most important work begins. First, the prepared porcelain stoneware for facing the fireplace is laid out on the floor. They look at the coincidence of the pattern and select the optimal location of each tile.
Before tiling begins, porcelain tiles are laid out on the floor
Facing begins from the bottom corner. The display is in a row. If necessary, individual tiles can be adjusted to size. Porcelain tiles can be glued without seams, close to each other or with seams. The first option is easier. Here, the cladding only requires precise adjustment of the porcelain stoneware surfaces in height. When using the suture method, it is optimal to use plastic crosses. They will help you set the same seam width in all areas.
To ensure that the seams between the tiles are the same width, use plastic crosses
For aesthetics, when facing a fireplace, porcelain tile elements are used in different thicknesses. The thickest tiles are sent to the bottom rows. If they are heavy, special hooks are used for fastening, which cling to the mesh.
The adhesive is applied with a notched trowel. The tile is pressed against the fireplace wall. For better seating, perform several small rotating movements. The solution is applied in such an amount that no voids are formed under the porcelain tiles. It's good when the excess mixture comes out through the seam. After it hardens slightly, it is removed. It is not recommended to clean off excess immediately. The solution will spread across the porcelain tiles and may leave an unsightly mark.
Slightly frozen excess is removed with the corner of a spatula. When using the suture cladding method, a recess is made at each seam. It is filled with fresh mortar or special colored grout. When the cladding is finished, wait until the solution dries completely.
Brickwork processing
Some owners prefer not to hide a brick fireplace under cladding with other building materials. Specialists open the seams, create a more expressive color of the stone, and use other techniques that will help improve the appearance of the fireplace. How does this happen:
- Initially, the structure is laid out “empty,” when unfilled joints 6 mm deep are left on the outside of the structure.
- These voids are filled with a decorative mixture and rubbed, but only after the main solution has completely dried.
- The edges are chamfered and the coating is ground.
- Sulfuric acid or hydrochloric acid solutions will help enhance the brightness of the bricks. Apply at least 3 layers.
Not every stove maker will be able to do a high-quality job, so only a qualified specialist will perform this task. This design is suitable for country real estate, which was made in an old style.
Artificial and natural stone
Stones - natural or factory-made - are perfect for finishing the fireplace portal. They are used to decorate internal and external walls and are also used to decorate other areas of the room. The building material differs from others in the following characteristics:
- quick installation, since there is no need to create even seams;
- increased strength;
- the elements have a high cost and a lot of weight, but you can save money if there is an abandoned quarry near your place of residence, from where it will not be difficult to bring some wild stone.
The facing of the fireplace with stone is identical to the finishing of the hearth with tiles. Only in the second case the master spends time undoing the seams, and in the first option there is no need to do this. How to decorate a brick fireplace:
- There are approximately 10 varieties of sandstone and limestone. In this case, there will be no problems with choosing a design. The disadvantage is poor strength and porosity.
- You can buy shell rock for an affordable price. It is not only cheap, but also attractive in appearance. There are disadvantages of this mineral: porosity and softness, so during the installation process, if you hit the elements hard with a mallet, they can break. Also, after some time, the pores of the shell rock will become clogged with soot, and the structure will become unaesthetic.
- Another original cladding option is slate, a material with high strength. However, you won’t be able to use it everywhere: it only has one color and may not fit into the style of the room.
- Granite has a wider range of colors. The stone fits perfectly into almost any room interior, both polished and untreated. The additional beauty of the hearth is achieved through the glare of the fire. Caring for a fireplace does not require much time and effort. The stone is so durable that there are no chips or scratches on its surface.
- The most popular stone is marble. This is due to the low price and natural beauty of the mineral. A wide range of varieties allows the elements to harmoniously fit into any style of room.
The stone is placed in large pieces or cut into strips, creating a relief surface for the cladding. Attach the elements with heat-resistant glue.
How to veneer a fireplace with stone
Finishing a fireplace with stone is technologically not much different from laying tiles. The difference is in working with the material itself, but there are almost no technical features. The only thing is that when using natural flagstone, be sure to cover the fireplace with mesh. Without it it will fall off.
Finishing the fireplace with stone is one of the options
Features of working with artificial gypsum stone
This type of decorative stone is inexpensive and lightweight; it can be used to decorate fireplaces, especially without overloading the ceilings. There are only some nuances, without which you will not achieve a good result.
The technology for producing gypsum stone is such that each element has some irregularities, sagging, and protrusions. We grind them off with a knife, fortunately the plaster is cut without problems. We grind each cladding element so that at the back, around the perimeter, a frame is formed with an angle of 45° (or so).
Moreover, often the corner elements of the gypsum decorative stone are several millimeters higher than the ordinary ones from the same collection. In order for the cladding to look monolithic, this difference also has to be removed - grinded down. When all the cladding elements are adjusted, they can be glued into place. Heat-resistant glue is used for cladding fireplaces, although with the correct design it almost does not heat up.
Working with natural stone
Most often, fireplaces are faced with natural stone, sawn into plates. It is also called flagstone or stone tiles. The shape of all the fragments is different, you have to adjust it to make everything look beautiful. In this case, it is definitely better to first lay out the entire picture on some plane, select and process the elements. Only after the mosaic is complete can it be glued. The entire technology for installing a fireplace on the walls is described above and is practically no different. The whole process can be seen in the video.
Plastering the structure
This is a quick and cheap way to improve the portal. The work will take no more than one day. Plastering a fireplace does not require professional tools or special skills. The material is available to everyone. The mass of the cladding after drying will not weigh down the structure; this is a plus to the fact that the foundation will not have to be strengthened. The color can be changed at any time.
What is needed here is not the type that is used to decorate external and external walls with a facade, but a special dry mixture. First of all, the plaster must have good resistance to high temperatures; a fine-mesh metal mesh will be required.
If the owner is not satisfied with the color of the structure, then silicone paint will help. It is sold at any hardware store. It can withstand significant temperature changes from instant heating to rapid cooling.
The surface of the product is cleaned of dirt and dust. If there is an old layer of plaster, it is removed. It is advisable to go over the coating with a sanding machine. Wipe the surface of the fireplace with a wet cloth, and then remove the moisture and remaining dust with a dry cloth. Further process:
- The seams of the masonry are embroidered 1 cm deep. This is necessary for good adhesion of the plaster mixture to the portal.
- At the next step, the structure is additionally heated so that it dries completely, and the metal mesh is attached with screws and dowels.
- The heat-resistant solution is mixed with water according to the instructions, which can be found on the bag. Use a mixer to bring the mixture until smooth.
- The plaster is applied to the surface of the structure and rubbed until a smooth surface is obtained. It's hard to do this without experience. It is preferable to install beacons and work on them, then the cladding will turn out perfectly smooth. Hard-to-reach places are coated with a narrow rubber spatula.
- This finish takes about 3 days to dry and should not be heated by lighting a fire in the stove. Rapid hardening of the cladding will lead to cracking.
- Finally, a decorative layer of putty or paint is applied to the plaster. The original shade is obtained using water-soluble color.
If a special heat-resistant mixture for finishing fireplaces is not sold on the market, then it is made from improvised materials with your own hands. You will need fatty clay and sand in a ratio of 1 to 1. Bring the solution to the state of thick sour cream. The coating dries on average within a week.
Material properties
A granite fireplace is guaranteed to be of high quality, thanks to the following unique features of the material:
- It is distinguished by its wear resistance. It can be used not only to decorate the surface of the heating unit, but also walls and flooring;
- It has high strength and can withstand very heavy loads. Retains heat, is moisture resistant, does not change due to sudden temperature changes;
- Unlike ceramic tiles, various chips and cracks do not form on the surface over time;
- Water absorption is less than 2 percent, which allows it to be used in any environment, for indoor and outdoor installations. Such characteristics do not allow stains to appear on its surface. This same aspect allows for simple and effective care of the surface of products;
- Used to decorate any portals and combustion chambers, even in unheated rooms in summer cottages;
- It has many colors, with all kinds of textures and inclusions;
- With minimal skills, you can finish a fireplace with your own hands and in a minimal amount of time.
Sheathing with plasterboard sheets
Manufacturers produce special fire-resistant gypsum boards in red or pink shades. With this building material you can create a truly unusual shape of the product. The work takes place in 2 stages: constructing a profile frame and attaching sheets to it. There is a certain installation sequence that must be strictly followed:
- First, the starting guides are fixed to the floor, then the main ones, and the frame is formed. Magnesite slabs are attached to the inside of the profiles.
- Small ventilation holes are made on the sides of the fireplace. At the bottom of the fireplace, a couple more channels are created for air circulation. They will serve as an influx of oxygen into the firebox. The upper ones are intended for the release of hot air.
- If possible, basalt insulation is placed in the profile frame. It does not ignite and does not deform from heat.
- Marks are made on the outside of the sheet that will serve as beacons for screwing screws into the profile. Otherwise, you can tighten the screw without hitting the guides.
Finally, tiles, ceramic granite, natural or artificial stone are laid on the coating.
Wood cladding
Some inexperienced workers believe that wood fireplace trim is no good. This is a misconception. If you follow the rules, the hearth can be equipped with this material and give the structure a worthy and noble appearance. Operating procedure:
- The wood is treated with heat-resistant antiseptics in several layers until it is completely saturated. This will prevent the elements from catching fire. It is advisable to mount the wood not too close to the firebox, but at some distance.
- To prevent sparks from flying outside the combustion chamber, it is equipped with a protective screen.
- There are special tree species that are resistant to high temperatures. Ash and alder are not suitable for cladding. When exposed to high heat, they will curl and crack.
- To ensure that the combustion chamber does not overheat and the air circulation is at the proper level, during the construction of the fireplace, its lower part is made larger than the area for igniting wood, by 5-10 cm. In this case, the wood will not catch fire.
There are other fireplace finishing options that can be used to implement different ideas. Finishing the portal with tiles, plaster and natural stone is possible with your own hands, but it is advisable to entrust more complex options using wood as an example to specialists. Craftsmen with impressive experience will turn a nondescript design into a real masterpiece.
We improve the stove in the house: finishing it yourself, photos of finished projects
You are viewing the Finishing , located in the large Stove section.
The finishing of the stove gives it an aesthetic appearance , allows it to retain more heat , and serves as additional protection from external damage .
Various materials can be used as cladding: from plaster to artificial stone. The home owner makes a choice based on personal preferences and financial capabilities.
How to decorate stoves and fireplaces in a private home with your own hands? Finishing methods
A folded stove does not always look complete and in almost all cases requires additional intervention with the help of finishing materials. If for one owner the functionality of the device is enough, and he does not want to cover it with anything other than plaster, then for another, it is important that the guests of his house are amazed by the elegance of artificial stone or correctly selected tiles.
Plaster
This type of finishing involves covering the stove with the same mortar that was used for masonry .
It not only loses to other materials in terms of external components, but also reduces efficiency by 5-10% , reducing the thermal conductivity of the furnace.
The time for heating the walls increases by 20—30%.
Therefore, before applying plaster, you need to think about whether it is worth saving or whether additional investments are possible.
Reference. Plaster without the use of top material looks dull, but it will save significant money if the task is only the practical use of the stove, that is, heating the room.
Whitewash
Our ancestors also whitewashed the stove for each season, since expensive materials were not available to all people. In order to whitewash a stove, you do not need to have great skill. This is the simplest finishing method : lime or chalk mortar . It is important to remember that this type of coating requires a careful attitude on the part of the residents, since the white color is easily soiled.
Coloring
Modern manufacturers produce various heat-resistant paints . It is this type of material that is necessary when covering the surface of a folded stove, since its wall will often be exposed to thermal stress when ignited. If desired, the painted surface can be coated with a special varnish.
Photo 1. Painting the stove with white paint. When lining such products, it is necessary to choose heat-resistant materials.
Is it possible to coat it with clay?
The use of clay mortar to strengthen the stove is justified by the fact that it contains sand , which strengthens the surface of the walls and provides additional protection against chips and other cracks. This type of finishing is not original and is used mainly for practical purposes that do not involve giving the house individuality and implementing design ideas.
Decorative artificial stone: gypsum, acrylic. Photo
Many homeowners want to see their stove lined with stone. But not everyone can afford to buy expensive materials. For these purposes, artificial stone for decoration, which in many properties is not only not inferior to natural stone, but also has additional positive characteristics:
- simple masonry , which even a novice craftsman can handle;
- the laid out stove will not be bulky, because the material is light in structure ;
- saving money when choosing finishes;
- wide choice of shapes and colors ;
- the opportunity to realize various creative fantasies when decorating the interior.
In addition, the material differs in structural diversity:
- Gypsum dough. Externally it resembles natural sandstone and has good strength characteristics.
Photo 2. Finishing the fireplace and the walls next to it with artificial stone based on gypsum dough.
- Acrylic stone . Even more durable than the previous version.
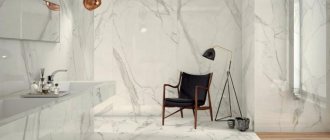
Photo 3. Fireplace with acrylic stone cladding, the color of which resembles natural marble.
- Artificial stone with the presence of natural stone chips.
- Porcelain tiles. It consists of several types of clay, mineral salts, marble chips and pigments. Great resistance to mechanical damage and high temperatures.
Photo 4. Fireplace covered with black porcelain stoneware tiles.
- Heat-resistant composite. The material is made based on concrete, quartz or minerals. In terms of strength it can be compared to granite.
Choosing porcelain tiles for finishing a fireplace
Giving preference to an expensive material, many people wonder whether the chosen type of porcelain stoneware will withstand strong heat on the walls of the fireplace. The answer is obvious and simple. Almost all brands of material can withstand temperatures above + 900 °C. Heating does not even distort the decorative design. To prevent the tiles from falling off the walls of the fireplace, the cladding is performed using special heat-resistant adhesives.
Attention! Gypsum-based adhesive cannot be used for gluing porcelain tiles to the walls of the fireplace. When choosing porcelain tiles, they look not only at its appearance, but also study its main characteristics
When choosing porcelain tiles for stoves and fireplaces, look at the following parameters:
- The indicator of wear resistance and impact strength affects the service life of porcelain stoneware.
- The fireplace can be located in a dry or damp room. For the second option, preference is given to porcelain stoneware with a high moisture resistance.
- If the fireplace is operational and is the only source of heating the room, large temperature changes cannot be avoided. The chosen brand of porcelain tile should withstand them.
- Thickness is important when choosing a material. You cannot purchase thin porcelain stoneware tiles for cladding. They may crack. The surface of the fireplace is finished with porcelain stoneware 7-8 mm thick. Thicker tiles can be glued to the adjacent floor surface.
- Porcelain tile is considered a monolithic material, but there is a certain percentage of porosity. The lower it is, the better.
- The marking of porcelain stoneware contains a letter designation. For cladding a fireplace, it is optimal to choose tiles of category “A”. They have precise dimensions. In addition, such porcelain tiles have a clear pattern, which allows you to create complex patterns during cladding.
When the material for cladding has been determined according to all important parameters, it is time to consider the design. The texture should fit into the style of the room where the fireplace is installed.
Almost all types of porcelain tiles are free from the disadvantages present in ordinary tiles and other finishing materials. However, it would not be superfluous to ask for a certificate and passport during the purchase, where all the parameters of the material will be displayed.
Advice! Properly selected cladding material will not only make the fireplace beautiful, but will also create a cozy atmosphere in the room.
In the video there is information about choosing tiles: