Decorating furniture can not only add personality to it, but can also give a second life to interior items that have served their purpose. One of the oldest, but no less popular ways to decorate and transform a table, wall, garden path, bench or other things is mosaic.
Anyone can make mosaic decor with their own hands. A little imagination and effort - and an original item, one of a kind, will appear. A table is probably the most functional piece of furniture. It can be for dining, coffee, tea, games, toilet, decorative, garden, or simply serve as a beautiful stand for a lamp, flowers, etc. Therefore, it is the countertops that are most often updated and decorated. What is mosaic made from? To create it on the table, they use both ready-made special material (decor, mosaic) and various raw materials that are at hand. These are broken tiles, glass, ceramics; eggshell; shells, pebbles, old CDs and much more.
Garden table
Dishes break for good luck! So why throw away the fragments? Collect them little by little - one day you will make a beautiful thing out of them with your own hands, which will become a reason for a good mood and a witness to your future happiness
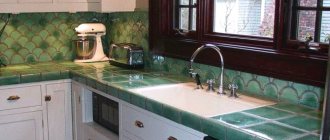
A table with a tabletop decorated with a mosaic of porcelain pieces and small ceramic tiles is an ideal solution for the garden. You can put a vase of flowers on it, have a family tea party, and have fun. This colorful ceramic beauty on the table is not afraid of wind, water, and will not fade in the sun.
What to make a mosaic from?
For mosaics, you can use both finished tiles and pieces left over after renovation.
The ideal raw material for creating mosaics is pieces of ceramic tiles left over after renovation. Often, owners specifically purchase a slightly larger quantity of tiles, because during the gluing process they can break or become damaged. Some stores sell broken ceramic tiles at the price of recycled materials or give away the remains of unclaimed collections at a reduced price. All these tiles are suitable for making mosaics.
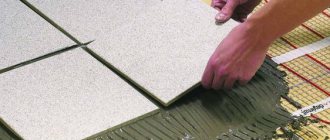
Before starting work, the material must be crushed with your own hands. The easiest way is to cut the elements into small pieces with a simple glass cutter. In this case, the pieces can have different shapes and sizes. To create pieces of equal size, a tile cutter is usually used. When cutting tiles, the pattern should be taken into account: if in one case the geometric correctness of the elements is important, then in another case the image will look more beautiful from chaotically cut pieces.
Related article: Mini kitchens for the home: cooking comfortably in a limited space (20 photos)
Materials and tools
To start working with your own hands, you must have the following ready:
- moisture-resistant plywood 25 mm thick,
- rope,
- pencil,
- hacksaw,
- sandpaper,
- drawing pin,
- wood primer,
- paint brush,
- fragments of broken porcelain dishes with and without patterns,
- mosaic ceramic tiles,
- tile nippers,
- knife with blade (flexible),
- tile grout,
- tile adhesive,
- cement pigment,
- sponge,
- a piece of soft cloth.
Necessary tools for manufacturing
For manufacturing you need the following tools:
- jigsaw for cutting out curved surfaces;
- saw for wood or metal;
- putty knife;
- brush;
- screws or self-tapping screws.
The process requires compliance with a certain sequence of work.
Sketch and marking
It is necessary to draw a sketch of the future tabletop on graph paper, observing the scale.
Before drawing a sketch, measurements are taken at the installation site. It is necessary to take into account that the countertop in a mosaic bathtub should fit harmoniously into the space without cluttering it. The height from the floor is designed to be at least 80 cm.
Marking is done as follows:
- at the installation site on the wall, draw a vertical line using a building level and draw horizontal lines along it along the boundaries of the future tabletop;
- mark the height of the tabletop and draw a horizontal line along the wall;
- determine the width based on the size of the sink;
- Mark the width on the floor, make marks at the places of the lintels and legs.
- if there are curved surfaces, they are also marked on the floor.
Material selection
The material is selected from those listed above, but some nuances must be taken into account:
- drywall must be moisture resistant, it will not warp from exposure to water;
- if curved surfaces are provided, then it is better to make them from plasterboard. It is easier to saw and the material can be shaped into different shapes;
- if there are no bends, chipboard can be used;
- The choice of cement block or drywall for side supports depends on personal preference. It is faster to make supports and partitions from blocks. But, plasterboard is more reliable, since the profiles are attached to the wall;
- glue, grout, primer and paint for internal surfaces must be waterproof;
- The mosaic can be glass or ceramic; this will not affect the durability of the coating.
Ceramic mosaic for making countertops
Manufacturing of frame and body
Making a countertop frame for a sink involves the following work:
- The supports are made from cement blocks or profiles. It's better to choose a profile. First, vertical supports are installed and secured to the wall with self-tapping screws.
- Next, assemble the frame according to the markings. If a rectangular table top is provided, the top frame is immediately mounted from the profile. The profiles are fastened together with self-tapping screws.
- If a curved surface is provided, only vertical posts are made and a horizontal profile is attached to the wall.
- Install profiles under one or two internal partitions. Connected to a common frame.
- If cement blocks are chosen for internal partitions, then after attaching them to the floor and to the wall (with aluminum or galvanized corners), you need to tiling them.
Sheathing
The frame is sheathed on the sides and along the outer contour only with plasterboard. They work in the following sequence:
- Drywall is cut to size.
- Attach drywall sheets to the profiles of external supports and partitions (if they are not made of blocks). The result is an open structure of vertical posts.
- Drywall sheets are also attached to blank walls.
- The door is cut to the specified dimensions. Fasten it to the wall with furniture hinges. The handle will be attached after finishing.
- Start making the table top. They cut out according to the external dimensions and use a jigsaw to make a hole the size of the sink. For the countertop you can use chipboard.
- Connect the tabletop to the frame.
- For decoration, you can make additional protrusions from bent plasterboard.
- Drywall sections are treated with nitro varnish, and all seams are sealed with silicone sealant
- The interior surfaces of the countertop must be painted with latex paint.
Preparing the base for laying mosaics
The base for laying the mosaic needs to be prepared, made waterproof and absolutely level. To do this, you need to perform the following operations:
- The surface of the future tabletop is covered with putty, inside and out, with a layer of 1 cm.
- After the putty has dried, it must be sanded smooth with sandpaper.
- The top of the tabletop is reinforced with reinforced mesh, which is cut to size and glued to PVA. The mesh will prevent the drywall from sagging.
- The mesh is puttied and sanded with sandpaper.
- For better adhesion to tile adhesive, the prepared surface should be primed and left to dry for a day.
Mosaic laying
Sequencing
- First you need to make the base of the table top out of plywood. In the place where the center will be, stick the button, securing the end of the rope to it. Measure the radius of the future table, make a loop at the other end of the rope where you should place a pencil. Moving the pencil around the center, draw a circle - the outline of the table.
- Using a hacksaw, cut out the circle you drew.
- Use a pencil on the string to draw several circles of different diameters. This will help to create a symmetrical surface decor scheme on the table.
- Sand the edges of the plywood circle with sandpaper.
- Cover the circle made of plywood on all sides and the end with a wood primer. The layer of special agent should be dense and even. Apply primer to each side one at a time, allowing the previous one to dry.
- Plan what kind of drawing you will make with your own hands.
- Using wire cutters, break the porcelain into the small pieces needed to complete your mosaic design idea. Set aside parts of a more regular shape for placement along the edge of the product.
- Use a knife to apply adhesive to each mosaic piece, then lightly press it into place on the table. Start working from the center, gradually moving towards the edges. Make sure to maintain symmetry in the drawing, lay the drawing evenly, leaving approximately the same distance between the elements. Lastly, decorate the edge of the tabletop.
- Leave the completed mosaic pattern to dry. In the meantime, prepare the grout for work. If you wish, add a little coloring agent to the material. You should get a homogeneous thick mass without lumps.
- Gently rub the grout with your fingers into the voids between the mosaic pieces until it fills them tightly. Coat the edge of the table well.
- Wet the sponge and wring it out well. Remove excess grout from the mosaic tile on the table.
- After complete drying, wipe the mosaic with a dry soft cloth.
A table with a beautiful mosaic tabletop will decorate your garden, cottage or apartment.
Advantages and disadvantages of mosaic countertops
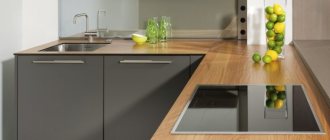
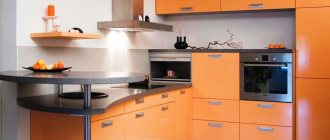
Decorating a kitchen table with mosaics is an unusual, interesting idea, and it’s worth considering this option.
The benefits include:
- the ability to create ornaments and drawings;
- resistance to mechanical damage;
- moisture resistance;
- heat resistance;
- original appearance;
- resistance to household chemicals and ultraviolet radiation.
Mosaic tiles are easy to care for, as stains do not stand out on the multi-colored surface.
Easy and quick care
The finish is difficult to scratch and chips almost never appear. The design and colors do not change during use.
Disadvantages of mosaic
- complexity of installation;
- a lot of seams.
If even one tesserae is placed carelessly, the ornament changes. Maintenance is complicated by the need to scrub the seams.
Despite the shortcomings, a mosaic kitchen countertop is an excellent option. It decorates the set and serves for several decades.
Step-by-step instruction
- Since the table should turn from beige to white, we first paint the lower part of the table top and legs with white paint. Leave until completely dry.
- Degrease the table surface. Apply glue to it with a spatula, spreading it evenly over the surface. Glue the mosaic. It’s easy to do this with your own hands, since it is already a composition glued onto pieces of mesh.
- To cover the ends, we also glue cut out mosaic strips onto them. The side decor should be secured with tape until completely dry.
- When the glue on the table has dried, we begin to process the seams. Since the object itself is white, we will use white grout. Carefully seal the seams with a rubber spatula. Remove excess grout with a damp sponge. Leave the table for 24 hours to allow the composition to dry.
There is nothing easier than decorating a table in this way with your own hands. Now you can safely put a pot of flowers - water spilled on the surface will not spoil the beautiful tabletop.
Master class: DIY mosaic table
— smalt mosaic tiles (1 square meter = 600 rubles);
— liquid nails (130 rubles);
— grout for tiles (1 kg = 120 rubles).
When the time comes.
There is a time when it seems to us that money can replace love, religion can replace spirituality, and PVC films and tablecloths can replace mosaic coverings. Everything flows, everything changes! And the time of delusion and ignorance also passes. It is at such moments that you need to go into the kitchen, take a critical look at it and choose a “victim” of the upcoming transformations.
Table after renovation.
Table in a year.
Choice of color and material.
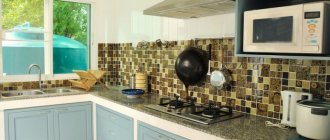
Smalt mosaic was chosen not under the pressure of fashion trends, but rather for ideological and practical reasons. And the color of the tile corresponds to the color of the dominant chakra. The tabletop will represent a simplified picture of the world: small green tiles are people, white grout is the unconditional love that connects us all, and the strength and durability of the coating will represent the indestructible Unity of the universe! Confused?! Maybe! But without ideology I cannot create.
Beginning of work.
To prepare the table surface for work, call all family members who cut a loaf without a board, put a hot pot of coffee on the tablecloth, and committed other unauthorized acts. Give them a knife in their hands and allow them to do everything that was previously prohibited! After the surface of the table has been cleaned of film, it is necessary to scratch the tabletop thoroughly to ensure good adhesion of the mosaic to the table and to degrease the surface.
Working with mosaics.
Once the table is ready for use, you can begin measuring. We lay out the sheets of mosaic on the table and cut off the excess. Maintaining the sequence of the layout, remove the tiles from the floor.
With some difficulty we squeeze the liquid nails onto the table and spread them over the surface with a notched spatula. We take a sheet of mosaic and carefully apply it to the tabletop, lightly pressing it over the entire surface so that each tile fits tightly to the table. It would be nice to wait 24 hours, but I don’t have the patience, so after 3-4 hours you can remove the paper covering the tile. To do this, you just need to wet it a little and wait, it comes off easily.
Here comes the dangerous moment of causal joy. The moment is dangerous because only 50% of the work has been done, and the table is already pleasing to the eye. No later than the next day, when the glue has dried, you need to apply grout.
Grout.
This was my first time working with mosaic and grout, so doubts and fear somewhat spoiled the process for me. But “the eyes are afraid - the hands do it”! Everything turned out to be simpler than it seemed, but more complicated than it is shown in programs about repairs.
Mix the dry grout with water (300 ml per 1 kg), mix well and generally strictly follow the instructions written on the packaging, and not at random.
Dump the grout onto the table on top of the mosaic and rub it diagonally across the table with a rubber spatula.
I didn’t have enough 1kg of grout for a 50*70cm table, but the packaging says that 1kg should be enough for 1.5 square meters. Apparently these data are for regular 15*15cm tiles, and not for 2*2cm mosaics.
Let the grout dry for about an hour. Using a damp sponge, without pressing, remove excess grout from the surface of the mosaic.
Improvements.
I chose not smooth tiles, but ones with irregularities and crevices, so that they would look more natural. This created additional difficulties, because The grout is stuck in the tiles. To get rid of this defect, you can use regular soda or pemolux.
Parade of hot pans.
When the grout has completely dried (about 48 hours), you can taste the fruits of your labors. Now you can avoid family conflicts and safely hold championships in cutting loaves without a board or arrange a parade of hot frying pans on the table.
Who cares? A big difference!
The difference between mosaic coating and PVC film is the same as the difference between “Sat-Chit-Ananda” and “Save and Preserve”.
Thank you for your attention! 
Description of work
- Prepare the wooden surface for decoration. Wipe the table and sand any uneven areas with medium-grit sandpaper. Wipe well again.
- Cut the discs into small pieces, approximately 3x3 cm.
- Glue the disk pieces to the table using glue. Place the elements on the table so that the distance between them is about 2 mm. Do not forget to alternate the back and front sides of the mosaic particles.
- Using construction putty, carefully fill all the empty spaces and indentations created during the design. Wipe off excess substance from the surface with a slightly damp sponge.
- After 12-24 hours, cover the mosaic table with two layers of acrylic varnish (with a break for drying).
17.11.2018
no comments