Some manufacturers do not adhere to these rules, so low-quality products are often found on store shelves. In order not to buy an unreliable chair for your baby, it is better to make it yourself. At the same time, you can not only choose the manufacturing materials, but also independently think over the colors, sizes and functionality of the furniture item.
Features of garden furniture
Children's chairs differ not only in appearance and materials, but also in design, design features and purpose. Features of the high chair are:
convenient design due to correctly selected dimensions. The back of the product should support the spine ;- stability and safe design;
- compactness and ergonomics;
- use of environmentally friendly materials.
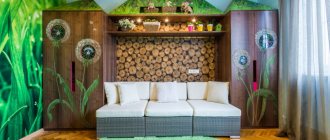
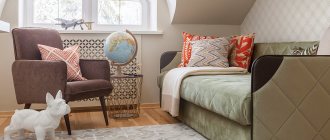
With such a piece of furniture, a child can comfortably spend his leisure time, drawing, making crafts from plasticine or going about his personal affairs.
Attention : the children's chair must correspond to the height of the child.
Therefore, when making it, it is worth taking into account your baby’s build. As for the varieties, chairs for children are:
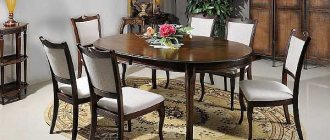
- Standard. Such models are no different from ordinary chairs for adults. They consist of a frame, 4 legs, a seat and a back. There are also options with sides, seat and back. Their advantages include functionality, ease of operation, and a wide range of applications. With such a chair you can go about your business, eat at the common dining table or get ready for school.
- Foldable. These designs do not take up much space when folded . They are distinguished by functionality and practicality.
Assembling a children's highchair
For the finished table, you definitely need to assemble a children's chair with your own hands. This will perfectly complement the composition and will be another great gift for your child. A children's high chair can be made simple, in the form of a stool, and you can also add a backrest, it all depends on the imagination of the creator. You can pick up a chair in a store, but then the furniture will lack originality and your individual approach.
You can also use blocks and plywood to assemble the chairs. For children they need to be made small so that they can move it wherever they want. You will find all the dimensions and drawings for assembly on our website, and you can take them as a basis and supplement them with your own parts.
Remember that the height of the chair should not deviate from the norm, otherwise it will be uncomfortable for the child to sit on it.
Material: wood or plywood?
You can make a chair for a child with your own hands from different materials:
Plywood. This lumber is natural and safe. Despite its light weight, the furniture is quite resistant to heavy loads .
In addition, plywood is easy and pleasant to work with. If desired, it can be painted in any color, making a bright, creative and very original children's highchair.- Chipboard. This material attracts with its affordable price, high technical characteristics and a wide selection of colors. For a child, you can make a chair in bright red, blue, lemon or green colors. Showing their imagination, dads build bright combined structures for their kids that can be used not only in the house, but also in the yard. Laminated chipboard is quite resistant to scratches, chips and other negative factors. It is easy to cut and saw with hand or power tools, does not emit toxins and has a long service life.
Natural wood.
Such furniture does not cause allergic reactions and does not provoke irritation on the body. It is pleasant to the touch, has a unique and attractive texture, has an unobtrusive smell of wood and is practical, reliable and durable.If you want to make a piece of furniture for a child yourself, there is simply no better option. Here you should also carefully consider the choice of wood type. Most often, people make children's furniture from beech, oak, pine, birch or larch.
Beech would be an ideal option . It is easy to process, does not release resin and has an incredibly beautiful texture. This wood is resistant to negative factors. It does not crack at high temperatures, does not darken over time and is resistant to mechanical damage, which is very important when furniture is used by small children.
Tip : Some parents get creative and make children's furniture from cardboard, plastic bottles or old car tires.
Car tires and plastic bottles are ideal choices for making outdoor furniture items. They are not afraid of an aggressive environment and will bring exclusivity to landscape design.
Feeding table design
There are different design options for a table-chair. A high chair with a platform-table, which at the same time plays the role of a fence, greatly facilitates the process of spoon-feeding a baby. Mom does not have to hold him in her arms or bend low to the highchair. You can place dishes on the table to free your hands.
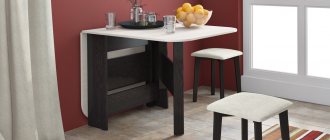
A wooden chair with a table can be made folding, like a stepladder. When the support legs are pushed together, the seat rises and the tabletop with armrests tilts back. When folded, it will take up very little space; such a feeding table and chair is convenient to transport when moving to the country. It is very important to give stability to the structure, to ensure reliable fixation of the parts when unfolded, so that the chair does not fold spontaneously.
An older child can already use cutlery independently, but it is too early for him to eat at a common table; it is more convenient to use a low chair with a larger table, which is also suitable for games and activities. Children grow quickly, so that in six months or a year you don’t have to buy or make new furniture for feeding; they usually make a transformer. The same part is used as a support, increasing the height of the high chair, and as a side table, which is placed on the floor together with the high chair. The table top of the chair can be unscrewed and removed to make it more convenient to sit down, otherwise parents will have to seat their grown child over the top, like a small child.
Here are 2 design options for a transformer, according to the first principle, factory furniture was made back in Soviet times, the second is modern, with a simpler, convenient transformation mechanism.
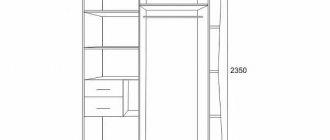
Scheme and drawing with dimensions according to GOST
Before making any piece of furniture, you need to carefully consider its shape, dimensions, and method of connecting parts. As for the shape of the children's chair, it can be anything. Here you can build on the child’s personal imagination and wishes. As a rule, parents make chairs for children with straight supports and backrests of the following designs:
- rectangular or solid square;
- with a wide truncated cone;
- straight through with a jumper bar.
But the dimensions of the furniture should correspond to the height of the child . The back of the chair should not be too high, not too low. Otherwise, it will simply be uncomfortable for the child to sit on the object. The ideal solution would be a back height equal to the distance from the floor to the seat of the chair.
The standard dimensions of a children's chair are:
- height – 60 cm;
- width – 30 cm;
- depth – 32 cm;
- height from floor to seat – 30 cm.
You can prepare a drawing of a children's chair in different ways. Some find ready-made options on the Internet and make furniture items based on ready-made sketches. As a rule, on such sites you can ask questions to professionals and get practical advice when making furniture yourself. Craftsmen who love to create creative furniture and know how to think it through draw a drawing by hand on a piece of paper. Some people use special computer programs.
Tip : to check the stability of the future chair, it is recommended to make a mock-up of it from cardboard.
Drawings and diagrams of a high chair with a table
Before you start making furniture products yourself, you need to prepare a detailed drawing, which should include all dimensions. A short diagram will not work in this case - only experienced carpenters can make a wooden chair and table using it.
For everyone else, before making a children's table and table with your own hands, you must either select detailed drawings or complete them yourself, taking into account the anthropometric data of the dimensions of the child's body, taking into account age.
Tools
The tools we will need are:
electric jigsaw;- drill or screwdriver;
- different screwdrivers;
- wood hacksaw.
The following materials are prepared from:
- lumber;
- self-tapping screws, screws, fasteners;
- wood glue;
- tassels;
- paints and varnishes.
Painting and decor
You can decorate any homemade table for a nursery either independently or together with your child. You can simply paint the table with any paint, apply patterns on it using a stencil, or use decoupage.
For decoupage, primer, acrylic paint, brushes and glue, as well as pre-selected pictures are most often used.
Step 1. The surface on which the picture will be applied is primed and sanded.
Step 2. Then the tabletop is painted a uniform color. It is better to choose special acrylic paints. Wait for the base to dry completely.
Step 3. Then the selected picture is glued using a special glue for decoupage or regular PVA. While gluing, make sure that no bubbles form under the paper.
Step 4. After the glue has dried, cover the tabletop with 2-3 layers of furniture varnish and wait for the table to dry.
Note: Wood is the most capricious of materials, so it is better to coat children's furniture with a safe varnish. Without a varnish coating, it will be difficult to remove traces of paint, fruit juices and other liquids that a child may spill on the countertop.
Step 5. The result is a bright table on which your favorite animals or fairy-tale characters will be depicted. See how it will look in our gallery.
How to make and assemble?
If natural wood is chosen as the material for the manufacture of children's furniture, it will need to be carefully prepared for the work process:
- The wood is protected with a grinding machine or sandpaper so that the baby does not get splinters and get hurt on a new piece of furniture.
- Next, the wood is treated with antiseptics.
- After this, the parts can be covered with stain and varnish or painted with non-toxic paint.
Attention : when choosing a varnish, it is better to give preference to turpentine-based material. It does not release toxins and does not have a sharp or unpleasant odor.
The process of manufacturing a furniture item will be divided into four main stages:
Preparing lumber for work. If the purchased wood is slightly damp, it will need to be thoroughly dried .- Cutting out the necessary parts according to the drawing. The prepared parts are polished.
- Assembling the product into a single structure.
- Finishing and decoration.
Our chair will be made of natural wood. To make it, we cut out the following elements:
- two short legs 25 cm long, with a cross section of 3.3 by 3.8 cm;
- 2 long legs 53 cm high with a cross section of 3.3 by 3.8 cm;
- back measuring 10 by 30 cm;
- seat dimensions 30 by 30 cm.
To strap the chair under the seat we will need four crossbars. Two crossbars are 25.7 cm long and two are 25.2 cm long.
Assembling the chair is carried out in the following sequence:
First, the rear legs are fastened with self-tapping screws to the crossbar.- Next, the front legs are attached in the same way and fastened to the rear ones.
- Now we screw the back and check the product for a clear horizontal fastening. Otherwise, the piece of furniture we assemble will not look aesthetically pleasing.
- The last step is screwing the seat.
As you can see, making and assembling a highchair requires a minimum of skills and very little free time. As a result, you will get an original and reliable chair model that will harmoniously fit into the interior of the children's room and will delight your baby with ease of use.
Children's chair made of plywood with drawings
Hello to everyone who loves to craft and do everything with their own hands. I suggest making a children's chair from plywood. This article will be very interesting for anyone who already has children, although adults can also use this chair, since the product is quite durable and light. This chair was made by me in full size, after which I took all the dimensions and designed it in the Compass 3D program.
Materials
1. Plywood 9 mm thick and 640 mm x 570 mm in size 2. PVA wood glue or similar 3. Paint - any at your discretion
Tools
1. Jigsaw (or hand) 2. Sandpaper 3. Ruler and pencil
Step one: drawing dimensions on plywood
To make our chair we will use 9mm thick multi-layer plywood, and for one chair we only need to take a piece of plywood measuring 640mm x 570mm. I used 9mm plywood, but if you have 8mm or 10mm plywood, that will work too, you just need to change some of the dimensions in the drawings (you need to change the width of all the eyelets on the back, seat and legs to the width of the plywood you are using ). First, transfer all the dimensions of the drawing onto a sheet of plywood.
Of course, this is not the easiest way to transfer drawings and here you will have to work a little. Of course, I have provided an easier way to transfer the drawing onto plywood, and everyone who has a printer at home will be able to do everything much faster, easier, and with better quality. In order to print drawings on a printer, you will have to install the Compass 3D program on your computer. We enter the name of the KOMPAS-3D V14 x32 Portable mini program into a search engine and download it from any resource convenient for you. This is a portable version of the program and does not require installation on your computer. Open the folder with the downloaded program
Next, open the Bin folder
Next, we launch the program itself
In the dialog box, click OK
Our program is open and ready to go. Download the drawing (Plywood 9 mm 640 at 570.frw) Now open the downloaded drawing in the program and click Preview
Now such a printout can be glued to plywood and everything can be cut out from it.
Step two: cut out the parts from plywood
After applying the dimensions to the plywood using one of the above methods, you can begin cutting out our parts. The most accessible tool we will use is, of course, a jigsaw. You can use a manual jigsaw, the kind that children use at school during labor lessons, or a more advanced jigsaw. After cutting, we should have the following details.
There is also an easier way to obtain our parts, and this method can be used by those who have a CNC machine or access to it. Download the same file above, open it in the Compass 3D program, and save it in the required format for the CNC machine software. Now our parts will be cut out in a matter of minutes.
Step three: preparing parts for assembly
Before you begin assembling the chair, all parts must be thoroughly sanded. We take sandpaper No. 100 and go over all surfaces of the parts from all sides, also knocking down sharp edges. It is necessary to check all the connections of the parts, whether everything connects well, and if necessary, immediately adjust the joints to each other. After this, we take sandpaper No. 240 and again go over all surfaces of the parts from all sides.
Step Four: Assembling the Chair
After preparing all the parts and checking the tightness of the joints, you can begin assembling the chair. We take two drawers and smear the joints with glue and then connect them to the legs of the chair.
Next, we apply glue to the legs at the joints and glue the seat, and attach the back in the same way. We wipe off the glue that has come out with a damp cloth, and leave the chair in a warm place for a day.Step Five: Painting the Chair
The final stage in making a chair will be painting it. Before painting, you need to go over the gluing areas with sandpaper No. 240, and go over the entire chair. Now there are many paint and varnish products on the market for painting any surface, and which paint or varnish to use is, of course, up to you.
Conclusion
I didn’t paint my chair because I made it as a prototype, trying to fit it and calculate all the dimensions. The chair is designed for children under 6 years old, but I designed it in such a way that even an adult with my height (1.80 m) can sit on it very comfortably. This chair can also be used as garden furniture, taken fishing, etc. I think that everyone will find their own use for such a necessary piece of furniture.
Become the author of the site, publish your own articles, descriptions of homemade products and pay for the text. Read more here.
Finishing a wooden stool for a child
When making furniture from wood or plywood, lumber will need to be pre-treated and given aesthetics with the help of paints and varnishes. To make the chair beautiful and practical, different decoration methods are used:
Enamel painting. This is the simplest option. When painting furniture, you can use bright and flashy colors. The main thing is that they are safe, dry quickly and do not have a strong or unpleasant odor .
You can paint a piece of furniture in any color. If desired, you can paint any patterns and designs on it. Involving your baby in the work process will give him a lot of positive emotions. The child will try together with you to make his chair the most beautiful and brightest.- Carving. This option is suitable for both wooden furniture and those made of thick plywood. Absolutely any design can be applied to a piece of furniture.
Staining with stain to highlight the beautiful wood texture with further finishing with varnish.
Such a piece of furniture will be resistant to negative factors. It will not scratch, deteriorate from moisture or direct sunlight, and will serve kids for many years.- Sewing a fabric cover. This unusual method will not only hide all the imperfections of a piece of furniture, but will also introduce a special atmosphere of homely warmth and comfort into the interior. The fabric for sewing the cover should be chosen according to the overall interior of the children's room. Here it is better to give preference to wear-resistant fabrics that do not fade in direct sunlight, wash well and dry quickly.
- Decoration using purchased stickers. This option will help you quickly make a fabulous piece of furniture with your baby’s favorite cartoon characters. This is an ideal option for parents who do not know how to draw .
Tip : a children's table can be a useful addition. And if you want to win a child’s heart forever, make him a car bed and a table for sand painting. He will appreciate it!
A few words about the dimensions of the structure
The table should not only be stable, but also be the right size for the child. After all, if the baby bends over the table or reaches for it, then vision or posture problems may occur. The dimensions are given below:
- A child with a height of 80-90 cm (1-2 years) needs furniture with a height of 35-40 cm.
- A child with a height of 90-100 cm (2-4 years) needs furniture with a height of 40-45 cm.
- A child with a height of 110-120 cm (4-6 years old) needs furniture with a height of 45-50 cm.
If the child sits straight at the table, then the height is chosen correctly. If the baby stands up, puts his leg under him or sits on a pillow, or bends over the table too much, then the size is either small or too large.
Photo
Ideas for decorating the final result can be seen in the following photos:
Stage 1: Drawings
Materials and tools
- Board 20x95x2000 mm, 8 pcs
- Self-tapping screws 35x3.8 mm, 75 pcs
- Varnish
- Saw or jigsaw
- Screwdriver
- Bits
- Drill
- Sandpaper or sander
- Brush
- Rags
Cutting the boards
- Board 790 mm long, 9 pcs - surface of table and benches
- Cross table support, 4 pcs.
Transverse table support
- Longitudinal table support, 2 pcs.
Table support longitudinal
- Leg, 4 pcs.
Leg
- Bench support, 2 pcs.
Bench support
This is what happened.
Table with lifting lid
A simple children's table made of wood is completely ready for further use. The child will be able to play and learn on it. Especially for drawing and various types of artistic creativity, you can make your own table with a lifting lid, similar to the one in the photo.
Take a finished tabletop measuring 90x45 cm. Build a frame from individual bars (50x50 mm). Take two pieces of wood 80 cm long, two 40 cm long and nail them together. Insert another one exactly the right size into the middle (about 35 cm). To strengthen the structure, install wooden corners in each corner with self-tapping screws, which you can plan yourself. Attach the tabletop to the front of the frame using 2-3 hinge-type furniture hinges.
Furniture hinges can be replaced with ordinary door hinges, which are sold in any store.
A creative table with a lifting lid must be supplemented with a lifting and adjustment mechanism. To do this, take two thin bars from 20 to 40 cm long and fasten them in a vertical position to the lid on the opposite side, using one more loop. They should be more powerful, since it is these loops that will bear the entire load during games and activities.
To fix the lid in different positions, nail 2–4 furniture hooks to the bars, depending on the lifting step. Screw one long enough bolt into the base of the frame so that they partially protrude. These are the bolts that will hold the cover up.
You will have to literally adjust the location of the bolts by eye. You need to lift the tabletop so that the adjusting bars hang freely, and then mark the necessary points for drilling.
To make a table, it is best to use ready-made legs from any material. Screw them to the frame from the bottom using self-tapping screws.
Sand all parts of the finished product until smooth. Apply a couple coats of varnish.
If you decide to make a kit, read how to make a highchair from wood