Just recently, the baby was so comfortable and cozy in your arms that at that moment it seemed as if he no longer needed anything. But after some time, the child begins to study and understand the world around him with a meaningful gaze, and tries to at least somehow interact with it. He grabs objects that come to his hand, tries to take his first steps on his own, and sits. During this same period, the baby begins to explore the kitchen space in his home. Yes, yes, this is a very important time in a child’s life. And this only means that now parents of an inquisitive child need to think about purchasing their first highchair.
When to make a purchase?
A special high chair is very necessary in the household and plays an important role in the life of the baby and his parents. Even if the baby is still feeding on breast milk, this does not mean that he needs to be held in his arms all the time. Moreover, it is not very convenient, and not entirely safe. After all, things that are ordinary for adults seem quite interesting, unidentified and fascinating to a child. Even a mug of hot tea can pose a serious danger to a baby.
Despite the fact that the baby may be aware that some objects should not be touched, he is still quite inept in controlling his movements, which means that trouble can happen at any moment. That is why, even in infancy, it would not hurt to give a child a special high chair that can protect him from unwanted incidents.
Which high chair to choose
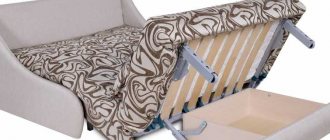
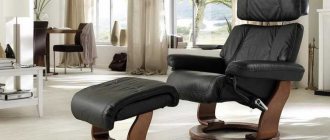
Most buyers choose the Nanny 189-1, 4 in 1 high chair. Reviews about this device are mostly positive. However, the company released a small batch of goods, so many customers are indignant due to the fact that most often the chairs are out of stock. The device is universal, so it is perfect for both boys and girls. Due to the fact that the chair is easily transformed, it can be used for children from 6 months to 2 years. At the same time, there is no need to be afraid that the child will roll over if left unattended for a few minutes.
In the process of creating the chair, everything was thought out to the smallest detail. It has a stable design due to short legs and a wide seat. The maximum load withstand is 12 kg. Due to the fact that the device is made of plastic, it is relatively lightweight. Its assembled weight is 9 kg. One of the most popular models is the Nanny 189-1 4 in 1 high chair (blue), made in Russia.
Making a wooden high chair
Before making a high chair, you should prepare the following tools and materials:
- saw;
- hammer;
- beams with a section of 400x200 mm;
- board (thickness 20 mm);
- fiberboard sheet;
- nails;
- batting;
- dowels;
- textile;
- glue;
- brush;
- sandpaper;
- gloves to protect your hands from splinters during work;
- plywood.
You will also need to purchase paint and varnish material. But you need to choose a non-toxic one. The one with an acrylic base will do. Such paints are modern and safe.
Return to contents
Stage 1: making parts
You need to start making a high chair by making parts for it. You will need to do the following:
- 4 legs (length 390 mm);
- 2 lower crossbars (length 340 mm);
- 3 crossbars (length 300 mm);
- top bars (length 220 mm);
- 1 small tabletop (dimensions 200x340 mm);
- 4 rounded elements.
To make such parts, you need to take the bars and saw them in half. From these, the legs are first created, then the upper and lower crossbars, and then the crossbars. They will need to be treated with sandpaper to prevent the baby from getting splinters, because he will grab all the parts of the chair with his hands.
Now you can move on to creating rounded elements for the sidewalls. They need to be cut out of a board to get the most durable and reliable chair; a drawing of these parts is presented.
It will be necessary to make similar markings on a wooden board. The diagram must be drawn so that the fibers of the material are located perpendicular to the bend angle. Then the finished part will not lose its strength over time.
The back and seats need to be cut from fiberboard. You will need to make 6 parts from it. Their size should be as follows, 300*250 mm. Their two corners should be rounded. The ends of such parts will need to be thoroughly sanded. After which you will need to glue 3 identical parts together and then put them under a press. The last thing you need to do is cut out the plywood tabletop. Its size should be: dimensions 200x340 mm.
Return to contents
Stage 2: we assemble the high chair
Now you can start assembling the high chair. You will first need to make rectangular dowels. They are carved from wood. Their size should be 8*20*50 mm. Under them, you will need to make holes in the parts with a depth of up to 40 mm.
They will need to be fixed with glue, and then additionally with nails. But it will be necessary to recess their cap into the surface of the wood - this will prevent the child from causing injuries and cuts.
You should start assembling the high chair from the side. It consists of 2 rounded parts, legs and lower crossbars. First of all, the last 2 parts are fixed together using glue, dowel and nails. Here it is necessary to ensure that the connection occurs at an angle of 90 degrees. Then you can assemble the top crossbar and 2 curves together. The second sidewall will need to be made similar to the first. In this case, during assembly it will be necessary to compare both elements several times to make sure that they turn out identical. The created sidewalls will need to be sanded.
Next, you will need to connect the seat and backrest together. Here you can use screws and a corner. After which you will need to wait until the glue on all parts is completely dry, and then you can assemble the entire high chair.
The sidewall is connected using crossbars (length 300 mm) and dowels. You will first need to make holes for them. Then the structure is additionally fixed with nails. Then you will need to attach the legs to the lower and upper slats, and then install the crossbars. A tabletop is fixed at one end.
After this, the finished structure is further processed with sandpaper. Then it is covered with paint and varnish material and left to dry. Then you will need to cover the seat and back with fabric. But first you will need to lay batting under it and secure it with a stapler. This covering will allow the baby to sit on the high chair with maximum comfort. This will complete the work on its creation. This means you can use the finished product for its intended purpose.
Return to contents
Product description
The “Nanny 4 in 1” high chair is designed for children from 6 months to 2 years. It is ideal for a baby who is just starting to transition from bottle feeding to feeding themselves. The child will feel quite comfortable and comfortable on such a chair.
In addition, parents will not be disappointed in this device either, since the chair can be easily adjusted, which means that the multifunctional design will grow with the baby. The product is also very convenient because when using it, the child will always be in front of his parents, which also guarantees his safety. The “Nanny 189-1 4 in 1” feeding chair is a safe and comfortable place for your child, which he will definitely like.
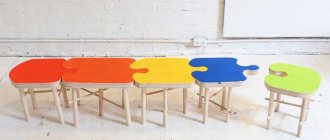
High chair options
The child begins to eat at a common table starting from six months. Of course, it is necessary that the baby eats food with all family members. Various options have been developed for convenience, but when you place your baby in a homemade chair, you must be sure of his safety.
Designs of children's high chairs for feeding:
- Chair with high legs - made on long legs. Once seated in it, the baby will be on the same level as everyone sitting at the dining table.
- Soft cover - similar in appearance to a slim cover that is attached to a regular chair. This option can be taken with you to the dacha or on a visit.
- Combination chair - a small chair with restrictive rings is placed on a low table.
Material selection
Coniferous pine or spruce wood is suitable for making a chair. This type is quite durable and easy to process, the wood texture is pleasant to look at.
Carpentry tools:
- nails, sandpaper;
- loops, screws, dowels (special connecting elements);
- saw;
- hammer;
- wood glue;
- fiberboard sheet, plywood;
- fabric, batting or padding polyester;
- varnish or paint for finishing coat, brushes.
Important! Choose acrylic-based paints, and non-toxic water-based varnishes, because your baby can not only breathe them, but also taste them.
Device Features
The kit includes a special removable mattress for the seat, which allows you to quickly change a dirty one. Thanks to the simple and reliable design of the fasteners and the presence of the necessary removable parts and footrest in the kit, the table will be very convenient not only for the baby, but also for parents. The chair's seat has several positions. So, it can be secured in the position of a rocking chair, a low or high chair. It is worth noting that the chair is made exclusively from safe materials, and due to its strength and high quality, it is quite resistant to shocks and falls.
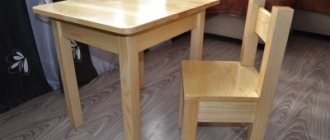
What you need to make a wooden highchair
We offer drawings and manufacturing procedures for a children's chair. Its dimensions:
- product height – 630 mm;
- distance between legs: depth (from front to back) – 280 mm, width (between front/rear) – 320 mm;
- length of legs: rear – 630 mm, front – 410 mm.
For a more reliable connection of parts, self-tapping screws and tenons will be used simultaneously.
To make a wooden chair for a child with your own hands, you need to prepare the following materials, tools and fasteners in advance:
- We will use a block with a cross section of 50x50 mm in the construction of the frame.
- 20x40 mm block for stiffening ribs and crossbars.
- We will make a chair seat from plywood, a board or a piece of solid wood 30x10 mm.
- To enhance the reliability of perpendicular connections, we will use metal corners.
- Electric jigsaw or hacksaw.
- Plane.
- Screwdriver or electric drill.
- If fastening will be done using spikes, you will need an electric router.
- Sandpaper or sander to smooth wood surfaces.
- Tape measure, square, ruler.
Step-by-step instruction
- First of all, you need to cut off 4 legs from the timber (20x35). 2 of them should be 410 mm long and another 2 – 630 mm. Then we prepare 4 connecting strips (from the same timber) 280 mm long. They will be assigned the function of stiffening ribs, as well as handrails.
- Using spikes of a standard diameter (from 8 to 10 mm), we connect the left legs: the short front and long back. Drill holes in the required places of the parts to be joined with an electric drill. For a strong connection, the hole must have a diameter 0.5 mm smaller than the tenons. Then generously lubricate each hole with glue and firmly hammer the spike into it.
- Next, we connect the front and rear legs with crossbars at a height of 250 and 410 mm (we get the height at which the seat will be installed).
- Similarly, in the same sequence, you need to do the right legs - connect the front and back.
- The places where the chair legs connect with the crossbars are additionally reinforced with metal corners. We fasten them with self-tapping screws.
- Upon completion, we compare the two resulting designs. They must mirror each other, otherwise the chair will turn out uneven.
- We fasten both halves together using 20x20x310 mm bars. We drill holes in the crossbars with a diameter of 8 mm. We screw into them self-tapping screws containing internal hexagonal recesses in the head. At the end of this process, we get an almost finished chair without a back and seat.
- At the next stage of work, you need to make the back. To do this, we take several (2-3) pieces of plywood or planks with the following parameters: width - 30 mm, thickness - 10 mm. We glue them together and place them under a press until the glue dries. We secure the back to the long legs with small nails. This detail will give the entire structure additional rigidity. In a similar way (from glued boards of the same size or plywood) you should make a seat.
Children's furniture should not only be comfortable and light, but also completely safe for the child. Therefore, after assembling the chair, it must be processed, varnished or painted. When playing with his furniture, the baby will move it and turn it over. All surfaces, edges and joints must be thoroughly sanded using sandpaper or a sanding machine, sharp corners must be rounded.
Several layers of drying oil will create a protective coating for the wood and extend its service life. Afterwards you can start painting. Choose light or bright colors for the decor of children's furniture; paints that are wear-resistant will not peel off. A layer of colorless water-based varnish will help securely fix the paint.
Assembly instructions
The “Nanny 4 in 1” high chair, the assembly instructions for which are included with the transforming chair itself, is quite easy to use. To install the seat on the base, you must first install bushings and rings on the ends of the axle. These parts come in the basic set with the chair. The free ends of the axle must be passed into the holes located in the base. Next, you should pull the caps onto the protruding ends of the axle.
To simplify the process, the elastic caps can be heated in advance in any convenient way. In order to turn a chair into a rocking chair, you need to turn all the stops on the chair to the “inward” position, but they should not touch the floor. The “Nanny 4 in 1” feeding chair, the instructions for which will help with its assembly, will bring joy to any baby.
If the stand, which is located behind the back of the seat, is adjusted to the lower groove and installed in the lock, then in the end you can get a high chair and, in fact, the table itself. Then the plastic tabletop is easily attached to the armrests, which allows it to be fixed. To do this, it must be pushed into the special holes until it clicks.
In order for the “Nanny 4 in 1” high chair to turn into a regular chair, you need to do the following manipulations. Place the chair legs in a special frame and secure them with buttons. Extend the frame and pull the covers included with the transforming chair over the hinges. Next, simply return the support to the lower position and hang the chair on the hooks, insert the support into the connectors and secure with a lock.
Work process
Drawings, dimensions, diagrams - all this is available on the Internet. You can also find photos and videos of the work process there. After creating a schematic drawing, you can start cutting out the chair for the child:
- Each piece of wood is processed with sandpaper before attaching them to each other.
- The dimensions must correspond exactly to the drawings, otherwise the high chair will not stand level.
- You need to connect from bottom to top in order to properly secure the seat.
Scheme
Cutting out parts for the chair
It is advisable to use a router with a copy cutter
The base to which the seat will be attached
The back and sides are ready
The children's high chair is transformable, it can be folded and hidden
Baby high chair is ready
Small recommendations
Before starting work, find out at what age you need a high chair. It should not be made too small or too large - this will cause inconvenience during feeding. All edges that come into contact with the child are made smooth and varnished in several layers.
In some cases, it is better to wrap the high chair with foam rubber. This will provide additional safety, and the rules say that the chair needs to be made at the highest level. Experts advise sewing a cover for the high chair that can be washed more often, that is, kept clean. The main thing is not what kind of chair, but how comfortable it will be for the baby to sit in it.
Knowing how to choose the right model and how to assemble a highchair, you will provide your child with high-quality and safe furniture. These necessary interior items will come in handy in any case, but buying them in a store is not always safe. And saving money always has a positive effect on future parents. Instructions on how to make a highchair will help you understand all the details and achieve an amazing result that will surprise all your loved ones.
Reviews about the device
Happy parents who have already bought their child a “Nanny 4 in 1” high chair note its reliable design, which is sure not to break. The advantages of this chair include its very comfortable and stable swing, as well as the manually adjustable tilt of the chair depth. The seat belt that the transforming chair is equipped with prevents the baby from accidentally falling out or running away from the seat, which is a guarantee of safety while parents are not around.
Recently, the “Nanny 4 in 1” high chair has become very popular, reviews of which are mostly positive. Among other things, the high-quality design of the chair can support a child weighing up to 13 kilograms, and the interchangeable table has special sides to prevent spills.
The chair has practically no downsides, but there are still some disadvantages. One of them is the size and lack of backrest adjustment. A high chair when unfolded takes up quite a lot of space, which creates inconvenience. However, this will not be a big problem for those who have a lot of free space in the kitchen. In addition, the transformable chair does not have wheels, which can play an important role for some.
Technology and plywood
To make a high chair for children from wood, you need to know or will have to master how to make some carpentry joints: on dowels, using dowels (lamellas) and tongue and groove. How they are produced, using examples of carpentry, see the videos, arranged in order of increasing complexity:
Video #1: dowel connections
Video #2: corner connection with dowels for frame structures (bursting corners)
Video #3: tongue-and-groove connection
Video #4: direct keyway connection for joining board panels
As you can see, at home, with simple hand tools, only poses can be done quite well. #1. Pos. #2 and #3 for a novice carpenter will turn out by hand with ease, and for poses. #4 And a good professional cannot do without a workshop and special equipment. And now - shhh! - all this can be done at home by a “complete teapot”, using only a jigsaw and a little chisel. If the parts blanks are assembled with glue from 3 layers of plywood, the thickness is, respectively, 1/3 of the required one. Among other things, this technology makes it possible to assemble parts of complex shapes from small-sized fragments, which makes it possible to denser, i.e. cut the material economically.
How straight and angular tongue-and-groove joints are made in this way is shown in pos. 1 and 2 fig. resp. If the tenon is made trapezoidal with rounded corners, then the strength of the joint will increase several times, i.e. will be sufficient for adult furniture. This technology is not used in production - it’s a hassle and therefore unprofitable, but at home it’s better than buying or renting a machine for 60-100 thousand rubles.
Tongue-groove connections of plywood components
To glue a package of blanks into a PVA part, you also do not need any special devices:
- Lay plastic film on a flat floor or table.
- Both surfaces to be glued are coated with a thin layer of glue; It's better to use a brush.
- Leave the adhesive layers until they are semi-dry and tack-free, when the adhesive film begins to become translucent at the edges.
- Place the blanks in a bag and press them.
- Cover the bag with another layer of film and place pressure on it from a dispersed load (books, for example) at a rate of at least 20 kg per 1 square meter. m of glued area.
Note: because The blanks in the bag may “float away” a little during gluing; they need to be cut with an allowance of 1-2 mm for finishing.
The tongue-and-groove corner joint must be reinforced with self-tapping screws with a diameter of no more than 0.5 times the thickness of the tenon, a pair per tenon. For example, if a part is 15 mm thick and consists of 3 layers of 5 mm each, then the diameter of the hardware is 2-2.5 mm. Glue is applied to the tenon and groove; the first is inserted into the last, as soon as the glue begins to come off (after 2-3 minutes), and immediately the connection is tightened with hardware.
How to tighten screws
In the above and all other cases of fastening parts with self-tapping screws, it is necessary to pre-drill blind holes for them with a diameter of the body (rod) of the self-tapping screw without threads and a depth of 2/3 of the length of its threaded part. A hole for the screw head is also selected in advance. After screwing, the head is covered with putty made from sawdust of the same plywood on the same PVA; Up to 2.5-3 volumes of sawdust can be added to 1 volume of glue.
What do young mothers say?
Almost all women who purchased such a high chair for their baby are satisfied with the purchase. Young mothers emphasize that due to the fact that the structure is made entirely of plastic, it is easy to clean, and the cover can also be easily removed and washed not only by hand, but also in a washing machine. The fabric is quickly removed and installed in its intended place. At the same time, you should not be afraid that it will be torn.
In addition, new parents claim that the child is very comfortable in such a high chair. Indeed, its seat is very comfortable, and the additional armrests allow the child to comfortably place his arms. Externally, the device resembles a chair, but only small. High-quality plastic was used in its manufacturing process, so this device will last for many years. That is, it can be used in the event of the birth of a second baby.
Materials
Faulty design of a baby's high chair
What to make a high chair for a little one is also an important question. It is better not to use metal at all, or in small quantities (for example, fasteners) and so that the child does not have access to it. Children's bodies are generally more resilient than adults, but babies' skin is very sensitive. This is determined by the instinct of self-preservation: what is simply slippery and a little cold for an adult is a danger signal for a child. Since he himself cannot yet avoid her, he has to appeal to his parents. Those who have children know how. But they don’t always understand why, and that’s what makes them cry out loud.
For example, in Fig. on the right is the erroneous use of steel fasteners. “Intensive use of corners” not only does not strengthen the structure, contrary to the claims of its author, but it is also dangerous for the baby. An adult’s finger will go unnoticed in the corner with a self-tapping screw, but the baby may get scratched. In general, children don’t mind scratches, but if he is regularly placed in something that bites for feeding, then how will this chair affect the child’s psyche? The question is rhetorical.
Processing and finishing
So, we are left with practically only wood, MDF and laminated chipboard of class E0 in terms of phenol emission. In a high chair for a very young child, it is still better to use hardwood or MDF, they are completely chemical-free. Hypersensitivity to pine resin or traces of phenol-containing compounds occurs in about 1 in 400,000 babies, but how can you be sure it's not yours? It is impossible to identify in advance.
A highchair for babies is exposed to external chemical influences of approximately the same nature and to the same extent as a kitchen stool, but the sanitary and hygienic requirements for it are much stricter. Therefore, before assembly, the parts of a wooden highchair must be treated with a water-repellent and bactericidal composition, and the finished product must be covered with a protective layer.
There is also almost no alternative here: impregnation is a water-polymer emulsion or, instead, PVA diluted three to four times with water. The coating is water-based acrylic varnish. There is no reliable evidence of complete safety for children of other compositions for processing/finishing furniture. Be especially wary of stains; Children's furniture with varnish is best left as is. Design and decor in this case are by no means determining factors.
About plywood
When making a high chair for the firstborn from wood, an amateur craftsman (who may be taking on furniture for the first time in his life) will have to face a number of technological difficulties, see below, respectively. section that cannot be overcome without a workshop and special tools. Plywood can help out; You can use it to do almost everything at home. But not every one. Simple birch (not waterproof and not baked) and also simple construction or packaging are definitely suitable. The latter is covered with so-called veneer. pine trees cut down in winter. Dried pine already contains almost no resins, and in the process of making plywood, their remains are completely removed. These types of plywood are made with casein glue, which is absolutely safe for children. They are given moisture resistance and additional strength by the impregnation described above, but twice: a second time after complete drying (about a day) of the initial one.
About the glue
Due to its combination of qualities, PVA is most suitable for gluing and gluing in the manufacture of children's furniture. Modern furniture pur-glues are much stronger, but also more expensive; for a product whose service life does not exceed 5-7 years, the first is unimportant, but the second can “bite”. But PVA has the following advantages:
- Absolutely harmless and safe, which has been proven by more than half a century of experience. As they say, at least eat it; even if the liquid gets into the eyes, it is washed off without any residue with water, if you rinse it immediately.
- PVA drips can be easily cut off with a mounting knife, and their remains can also be easily sanded clean.
- The PVA joint can be separated by warming it up properly with an ordinary household hairdryer. This is important if the high chair needs to be disassembled and stored until the next addition to the family. Also, if you need to replace its individual parts as the child grows, see below.
Brief conclusion. Is it worth purchasing a “Nanny 4 in 1” high chair?
This design is best purchased for a child who already knows how to sit well on his own, since the chair does not have backrest adjustment. In general, the design of the chair is quite strong and reliable, which is its undoubted advantage. If your kitchen does not have a lot of free space for a high chair, then this option will not be suitable for your case. Although the chair looks airy in appearance, it requires a lot of space, so it’s worth looking for another model. In addition, assembling the device is also quite labor-intensive, so this transforming chair should not be purchased by single mothers.
High chair for baby
Such an original chair can be made using simple drawings, or even without them, from a lightweight (715 g) material - plywood. The chair has small dimensions, namely:
- product height – 360 mm,
- height to seat – 180 mm,
- seat – 190x240 mm,
- back – 115x235 mm.
You can make a test model out of cardboard to see if a highchair of this size is suitable for your child. If this product is small, increase it by the required factor and feel free to get to work.
Materials and tools
- Plywood 8 mm thick.
- You can assemble the chair using spikes or simply screws, if desired.
- Feather drills, jigsaw.
- Sandpaper.
- PVA glue.
- Drill with screws for connecting parts.
- Clear varnish.
Operating procedure
- Based on the data or your measurements, draw a side part for the chair with a pencil on a piece of plywood.
- Drill decorative holes using feather drills. Large ones - using a jigsaw.
- To ensure that the second sidewall turns out exactly the same as the first, we place the finished part on plywood and outline it with a pencil. We cut it out the same way.
- We mark the back, seat and parts that give the chair rigidity and prevent the sides from loosening.
- When all the parts of the chair are ready, it is necessary to make them absolutely smooth, rounded, carefully sand the surfaces and especially the cut points.
- We assemble the chair using glue and fasten the joints with screws.
- At the final stage we are decorating the chair. Cover it with several coats of stain if you want it darker, or paint it a bright color and top it off with a coat of water-based varnish.
With a little imagination and your own drawings, you can change the appearance and finish of the high chair, and also make a table for a child of a similar design. Your child will appreciate it.
With the birth of a small child, mom and dad have more worries. And one of them is purchasing quality furniture for your baby. But the main problem is that such interior items are not cheap. And a young family cannot always afford to purchase a new, high-quality crib or changing table.
High-quality children's furniture is quite expensive. Therefore, it is better and cheaper for parents to assemble furniture for their child with their own hands.
But you can assemble children's furniture yourself.
For example, you can make a highchair with your own hands in just 3-4 evenings.
In this case, you can solve two problems at once: save the family budget and assemble a design that will be convenient for you and your child.