Now we will look at making our own high chair for a child with and without a backrest. Check out the step-by-step photos, drawings, layouts and instructions for detailed photo master classes on creating the simplest, ordinary and original models. At the end of the article we posted more than 800 photos of a variety of chairs for children and also a large gallery of photos of stools and chairs with backrests for adults. The material used is wood and plywood. It's not difficult at all, simple and fast!!!
Note: Check out the article -
DIY children's table 800 photos, diagrams, step-by-step instructions
Children's folding chair made of plywood drawings.
With your own hands
Cut from plywood
Photo source: www.object.md-design.ru/en/furniture/plywood-chair
What you need to make a wooden highchair
We offer drawings and manufacturing procedures for a children's chair. Its dimensions:
- product height – 630 mm;
- distance between legs: depth (from front to back) – 280 mm, width (between front/rear) – 320 mm;
- length of legs: rear – 630 mm, front – 410 mm.
For a more reliable connection of parts, self-tapping screws and tenons will be used simultaneously.
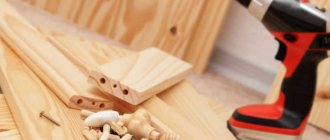
To make a wooden chair for a child with your own hands, you need to prepare the following materials, tools and fasteners in advance:
- We will use a block with a cross section of 50x50 mm in the construction of the frame.
- 20x40 mm block for stiffening ribs and crossbars.
- We will make a chair seat from plywood, a board or a piece of solid wood 30x10 mm.
- To enhance the reliability of perpendicular connections, we will use metal corners.
- Electric jigsaw or hacksaw.
- Plane.
- Screwdriver or electric drill.
- If fastening will be done using spikes, you will need an electric router.
- Sandpaper or sander to smooth wood surfaces.
- Tape measure, square, ruler.
Step-by-step instruction
- First of all, you need to cut off 4 legs from the timber (20x35). 2 of them should be 410 mm long and another 2 – 630 mm. Then we prepare 4 connecting strips (from the same timber) 280 mm long. They will be assigned the function of stiffening ribs, as well as handrails.
- Using spikes of a standard diameter (from 8 to 10 mm), we connect the left legs: the short front and long back. Drill holes in the required places of the parts to be joined with an electric drill. For a strong connection, the hole must have a diameter 0.5 mm smaller than the tenons. Then generously lubricate each hole with glue and firmly hammer the spike into it.
- Next, we connect the front and rear legs with crossbars at a height of 250 and 410 mm (we get the height at which the seat will be installed).
- Similarly, in the same sequence, you need to do the right legs - connect the front and back.
- The places where the chair legs connect with the crossbars are additionally reinforced with metal corners. We fasten them with self-tapping screws.
- Upon completion, we compare the two resulting designs. They must mirror each other, otherwise the chair will turn out uneven.
- We fasten both halves together using 20x20x310 mm bars. We drill holes in the crossbars with a diameter of 8 mm. We screw into them self-tapping screws containing internal hexagonal recesses in the head. At the end of this process, we get an almost finished chair without a back and seat.
- At the next stage of work, you need to make the back. To do this, we take several (2-3) pieces of plywood or planks with the following parameters: width - 30 mm, thickness - 10 mm. We glue them together and place them under a press until the glue dries. We secure the back to the long legs with small nails. This detail will give the entire structure additional rigidity. In a similar way (from glued boards of the same size or plywood) you should make a seat.
Children's furniture should not only be comfortable and light, but also completely safe for the child. Therefore, after assembling the chair, it must be processed, varnished or painted. When playing with his furniture, the baby will move it and turn it over. All surfaces, edges and joints must be thoroughly sanded using sandpaper or a sanding machine, sharp corners must be rounded.
Several layers of drying oil will create a protective coating for the wood and extend its service life. Afterwards you can start painting. Choose light or bright colors for the decor of children's furniture; paints that are wear-resistant will not peel off. A layer of colorless water-based varnish will help securely fix the paint.
Preparation of the drawing
Making a highchair with your own hands involves using a detailed diagram. The drawing reflects all the elements, their sizes, connection methods, length, ratio. The design with clearly thought-out parameters and adjusted corners will fully correspond to the height and build of the child. For ease of work, you can use the standard sizes of the main parts:
- Support legs. The length of the elements can reach 20 cm.
- Seat frame connecting strips. The parameters should not exceed 20 cm.
- Back slats. The size is 20 cm.
- Seating options. The width and height of the seat should not exceed 20 cm. In the back area, the part can be mounted higher, but its dimensions should not exceed 30 cm.
Tables and chairs for children must have reliable support, so bars with a section of 5x5 cm are used to create it.
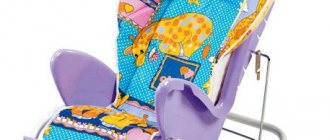
The dimensions of the furniture depend on the age of the child. All designs are divided into two large groups. The first is represented by products for the little ones. If you need to make a chair for feeding a child with your own hands, use standard parameters: height - 840–900 mm, back width - 450 mm.
Patterns for crocheting covers for chairs and stools, stages of work
The second group includes chairs, which are a smaller copy of furniture for adults. The height of the model in this case will depend on the growth indicators:
- height less than 85 cm - chair height 180 mm;
- 85–100 cm - 220 mm;
- 101–115 cm - 260 mm;
- 116–130 cm - 300 mm;
- 131–145 — 340 mm;
- 146–160 cm - 380 mm;
- 161–175 cm - 420 mm;
- more than 176 cm - 460 mm.
You can develop a sketch of the product yourself or use ready-made drawings that can be found on numerous construction sites. The best assistants in your work will be master classes with photographs and a detailed description of each procedure. It is worth checking first whether the sizes presented in the diagram are suitable for the child. If not, the height and width are increased or decreased in proportion so that the stability of the structure is maintained.
Creating a drawing yourself involves preparing images of each element with dimensions, type of material, connection methods, and types of fastenings. To avoid possible mistakes, it is recommended to make a test version using construction cardboard. This will help calculate the proportions and clarify the stability of the future product.
Required materials and tools
The choice of suitable material largely depends on the financial capabilities and experience of the master. In most cases, natural wood, plywood, and chipboard are used for production. Each option has its own characteristics:
- Wooden boards, bars. Dense species are suitable: oak, ash, birch, beech. The material is easy to process, durable, environmentally friendly, and harmonizes perfectly with any interior.
- Plywood. Multilayer boards made from softwood and hardwood veneers are often used to produce children's furniture. The material is easy to cut, sand, and bend, so it is suitable for creating original models and is light in weight.
- Chipboards. It is considered the most budget-friendly and short-lived option. Its strength is quite sufficient for the loads that fall on children's chairs. However, the material has a low ability to hold fasteners. It is usually used to produce flat elements.
Experts do not recommend using plastic to make furniture. The main reasons are fragility and short service life. In addition, the environmental safety of this material still causes a lot of controversy, so it’s better not to take risks.
If the high chair will be made entirely with your own hands, you need to prepare the tools. You will need a hacksaw or jigsaw, a screwdriver, a grinder, and a hammer. Brushes are useful for treating the surface of products with paints and varnishes.
If pine is used to produce a highchair, it is necessary to first perform a de-resining procedure. This will make the work easier and prevent the appearance of dirty tar stains.
Wooden boards, bars
Plywood
Chipboard
Tools
Decoration of the structure
A wooden chair made independently needs a protective coating that will reduce the negative impact of external factors. Most often, varnish is used for this. Experts recommend giving preference to acrylic compositions that can withstand any pranks of children. There are other ways to decorate furniture:
- wood carving;
- applications;
- applying all kinds of drawings.
Stages of making chair seats with your own hands, methods of fastening
High chairs for children are usually painted with bright colors. Select pleasant, cheerful shades. The only condition is that they should not irritate. Muted green, yellow, coral, blue, and beige tones are optimal.
The paints should not contain heavy metals or toxic compounds. Regular interaction with these components can negatively affect the health of a growing organism.
You should not decorate a hand-made chair with massive voluminous decorations. This often leads to injury. It is better to use painting, hand or stencil. Little children will love applications and images of their favorite fairy tale and cartoon characters.
A children's chair made of plywood with the addition of curly legs looks interesting. Various images are often cut out on the back with a jigsaw. A bright and unusual stool will definitely please your baby, who will happily sit on it, eat or play.
Before assembling the high chair, you should check the age and height of the child, create or select a suitable diagram, and prepare the necessary materials and tools. You can make original transformers, stools, and folding models with your own hands using detailed master classes. Painting, wood carving, and drawing will make the furniture even more attractive to the baby.