At the same time, it is not necessary to sign up for a gym, just get your own tennis table. And in order not to buy expensive equipment, you can always assemble the table yourself.
Types of tennis structures
Quite a large number of models have already been developed (or invented by people), in which everything is taken into account: the future location of the tennis table, the height, age of the players, the possibility of its transportation. Now there are the following types:
- Stationary tables for playing indoors. Their size may vary.
- Designs designed for outdoor competitions. They are characterized by a special coating that protects the tabletop from all the “jokes of nature.”
- Models that can be easily adjusted to suit the height of tennis players.
- Mini tables, due to their compact size, you can take them with you when going on vacation.
- Outdoor play structures are all-weather public equipment. The countertops of these models are made of concrete or shockproof glass.
- Universal designs - transformers that fold so that you can play tennis even alone.
Not all of these models can be made independently, but some original designs are not required for playing indoors or outdoors. In order to create a full-fledged tennis table without errors, it is better to start with the simplest type of this sports equipment.
Optional equipment
Net
Wicker net for tennis table is a standard sports equipment. Specific dimensions have been established for it:
- Length/height: 183 x 15.25 cm, height
- Cell size: from 1.3 to 1.5 cm.
A mesh made of cotton cords is an option for playing indoors. It is better to complement outdoor tables with a mesh made of metal wire or synthetic material. Plastic or metal alloy mesh fasteners may be included in the kit or sold separately. Depending on how often you have to install the mesh, you can choose one of the types of fasteners:
- Screw – securely screwed to the tabletop. There are screw-mount models with thick posts that can withstand strong winds and precipitation.
- Clip-on – quickly attached to the tabletop using a latch. Relevant if you need to frequently remove/put on the mesh.
The mesh color can be any. But the top edge of the tennis net, 1.5 cm high, is always painted white. In this part there is a strong braided cord that regulates the level of tension of the equipment.
| Stiga “Match” mesh with fastening (, China) | |
| Assembled size | 183 * 15.25 cm |
| Material | Nylon/ steel |
| Color | blue |
| Weight | 734 g |
| Nylon mesh with adjustable tension. Traditional screw fastening. Suitable for any field. Can be used for playing outdoors and indoors. ITTF approved. | |
| Price: | from 950 rub. |
Rackets
Ping-pong equipment, like tables, belongs to a certain class. When purchasing, you should focus on the player’s experience, age and how often the racket will be used to play.
The information on the packaging (in the instructions) indicates what type of rackets they are:
- For newbies. Amateur, children's version. Informationally indicated:
– speed and torsion value – up to 50%;
– control – up to 100%.
- Training (semi-professional). For non-professional players with extensive experience, students of sports schools, classes in fitness centers. Options:
– torsion and speed – up to 70%
– control is reduced to 90%.
- Professional. Indicators:
– torsion and speed – 100%
– control – 90%.
| Donic Top Teams 600 Racket Manufacturer: DONIC (Germany) | |
| Overlay | 3* 1.8 mm |
| Material | Wood Basic (5B) |
| Color | colorful |
| Weight | 0.165 kg |
| A racket for experienced amateurs and professionals. Class: training (semi-professional) Five-layer base. Handle with vibration damping technology. Shock-absorbing AVS system: 2 special soft layers in the racket handle Options: speed: 80 rotation: 80 control: 70. ITTF approved. | |
| Price: | from 600 rub |
Getting to know the battlefield
All sports equipment has standard sizes. “International classic” for a tennis table:
- height - 760 mm (600, 680, 700 - for schoolchildren);
- length - 2740 mm (2440);
- width - 1525 mm (1220);
- mesh height - 152 mm.
There are also mini tables for children, equipped with adjustable legs. Their dimensions are 110x610x650 mm. Professional equipment has a tabletop thickness of 25-28 mm, for clubs the standard is different - 22-23 mm, amateur tennis has its own numbers - 16-19 mm. Outdoor equipment can be even thinner - 12-19 mm, but a certain value is still more popular - 18 mm. To avoid possible injuries to players, the persistent structure of the tennis table is always deepened inward: the distance from the edges of the tabletop is about 200-300 mm. This is a necessity, not a recommendation.
The tabletop must be perfectly level, otherwise the game will turn into torture. Before serious competitions, tables of only two colors are allowed - green (calming) and blue (more aggressive). Table tennis fans have a richer palette, including green, brown (usually made from waterproof plywood), gray and blue. The optimal surface is matte, giving less glare. Glossy tables have their own, not entirely sporty, “specialization”: they are used for exhibitions and presentations.
You also need to take into account the requirements for the sports ground. To guarantee a comfortable game, sufficient space is necessary. For amateurs, a tennis “court” should be at least 3500x7000 mm (5000x8000). Another important condition is a perfectly flat surface, since homemade amateur tables are usually not equipped with height-adjustable legs.
If the table is installed outdoors, then more attention will have to be paid to the site. It should not generate dust, and the sun should not interfere with rivals. The optimal place is one that is reliably protected from both sunlight and gusts of wind, because they can easily change the trajectory of an almost weightless ball.
You can also compare prices for tennis tables:
Table tennis table drawing and dimensions
Important : the dimensions of the standard playing field are 1525 mm by 2740 mm.
The height of the playing surface above the floor should be 760 mm . The thickness of the tabletop for an amateur tennis table varies in the range of 12-28 mm, but the average is 18 mm.
It is necessary to pay attention to the fact that the supports of the tennis table should not extend beyond the contour of the playing field. Ideally, the support structure is recessed into the playing field and lags behind the edge of the tabletop by approximately 200-300 mm.
Candidates for the role of tabletop
Building sports equipment is not too difficult. The question needs to be posed differently: how to make a tennis table of high quality, reliable, convenient, ideal? And in this case, the material that is chosen for the countertop comes to the fore. Typically, several types of raw materials compete for the role.
Plywood
This material, the range of which is very large, is suitable for the manufacture of folding models. Its advantage can be considered the absence of the need for additional surface treatment, which will take time and cost. When purchasing plywood (FB, FSF), you must choose grade 1 or 2, the product that is marked “Ш1”. It means that the material is polished on one side. The standard sheet width (1525 mm) is ideal for making a tabletop consisting of 2 halves.
Such material, unfortunately, has some disadvantages, the main one being sagging. To eliminate this possibility, a rigid box-shaped base with struts is made for the tabletop. Boards assembled into a structure using self-tapping screws will cope with its role.
Another disadvantage is the reluctant rebound of the tennis ball from such a table. It is corrected by applying a double layer of acrylic water-based paint to the surface of the plywood, each of them must be completely dry. The surface is first cleaned, puttied, and after the composition has dried, sanded. A bonus of all operations will be the improvement of the water resistance of the countertop.
Laminated plywood
A variety with such a coating is preferable because a tabletop made of laminated material will not be deformed. Its basis is moisture-resistant birch plywood, moreover, it successfully resists mechanical stress.
The undoubted advantage of this option is the ability to choose the color to your taste. A relative disadvantage is the higher price, but a tennis table made of laminated material will serve its owners much longer.
Chipboard (chipboard)
This is the second contender, often used to create fairly massive stationary sports equipment, but when choosing, you need to look only at high-quality materials. It is even better to purchase a laminated type of raw material. In order not to do unnecessary work, they usually buy a green or blue sheet.
The standard sheet size (1750x2750 mm) makes it possible to obtain a tabletop with minimal adjustment; it (as well as the processing of the ends) can be ordered upon purchase. The cost of such a tennis table will increase when compared to a plywood product, but this sports equipment will be more reliable and durable.
Fiberglass
This is a great option for an all-weather outdoor table. The optimal sheet thickness is 10 mm; a suitable shade can also be found. The advantages of fiberglass are high strength, but low weight of the material. Fiberglass is not subject to deformation, is not flammable, but despite all its good qualities, it has a drawback - high cost, but it is absolutely justified.
The base can be MDF (LMDF), OSB. For the role of frame and supports, boards, wooden beams or metal (corners, aluminum pipes) are often chosen, but the latter materials require special tools and equipment. Other, sometimes unusual, street candidates included:
- aluminum composite panels;
- concrete with self-leveling floor covering;
- plexiglass;
- flat slate;
- plastic sandwich panels;
- thick textolite;
- cement bonded particle boards.
The main requirement for an ideal material is to guarantee a standard rebound (or close to it) of a tennis ball. A ball released into “free flight” from a height of 300 mm should bounce off the table surface by 250 mm. This indicator should be the same on any part of the playing surface.
The desire to save money can ruin a tennis table that has not yet been made. If you buy a slightly curved or knotty beam, or buy corners made of tin (as a replacement for steel goods), then the sports equipment will turn out to be weak, unstable, and unreliable, so it is unlikely that you will be able to enjoy playing on it.
What: chipboard or plywood?
Wood (chipboard) and plywood are best suited for making countertops. When choosing a material, special attention should be paid to the quality of the surface , which should provide the required rebound height of the ball.
The dimensions of the plywood sold will fit perfectly into the manufacture of a folding table, i.e. The tabletop is made of two parts.
Most often, plywood with dimensions of 1525x1525 mm , but the smallest sheets of 1475x1475 mm available for sale are also suitable. At the same time, plywood has a suitable surface quality and does not require additional processing. If you place a tennis table in the yard, you should choose moisture-resistant plywood marked FB and FSF or laminated.
Plywood has disadvantages such as sagging and warping in large sheets.
Therefore, it is not recommended to make a tabletop from a solid sheet of plywood. Or use a reinforced support contour with additional beams. Advice: it is recommended to choose plywood sheets of grades I and II with one sanded side, the marking of which includes Ш1.
The dimensions of the chipboard sold are suitable for making a solid tabletop. Typically, sheets of 2750x1830, 2750x1750, 2750x1500 mm are used. In order not to waste time on additional surface treatment, it is recommended to immediately buy laminated sheets in blue or green. Compared to plywood, a chipboard table will look more massive, which increases its stability. Advice: when purchasing material, it is recommended to use cutting and trimming services, which will eliminate the need to purchase additional equipment.
It is not advisable to split the tabletop into more than two parts, because joints and fastening lines are only permissible under the mesh.
Tools, materials
To make an amateur tennis table, you need to prepare the following tools:
- roller with short artificial pile;
- marking tools;
- hacksaw;
- hand-held circular saw (jigsaw);
- level;
- screwdriver
You will need to purchase the following materials in advance:
- aluminum corners (for edging);
- antiseptic;
- white spray paint;
- timber (50x50 mm) for legs, alternative - furniture legs with adjustable height;
- timber or boards for the frame (25x100 mm);
- wood glue (carpentry glue, PVA for wood);
- brackets for attaching legs - 4 pieces;
- plywood (2 sheets) or chipboard (one), thickness - 18 mm;
- masking tape;
- sandpaper;
- steel corners;
- thin rubber (pieces of leather);
- construction tape;
- self-tapping screws, their maximum length is 15 mm.
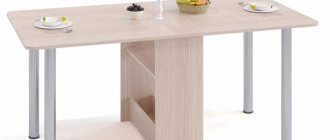
Making your own table
Many people like to play table tennis, but not everyone has the opportunity to purchase a professional table for this exciting game. Yes, there is no need for this. You can try making a tennis table with your own hands.
The product can be stationary or assembled. The size of the table tennis table is 760 mm high from the floor level. It must stand on a hard surface, have a flat surface, and there must be free space around it.
Required materials and tools
Before work, you need to decide where the product will be located and what its dimensions will be. Prepare materials and tools in advance.
You will need:
- sanded plywood (2 sheets, 1525 x 1525 mm, 12 mm thick or more);
- edged timber (5 pieces, 50 x 50 x 300 mm);
- metal brackets for attaching legs (4 pieces);
- self-tapping screws (5 x 89 mm - 38 pieces, 3.5 x 49 mm - 45 pieces);
- bolts for connecting brackets with legs - 4 pieces;
- antiseptic for treating wooden surfaces;
- wood putty;
- green and white spray paint;
- hacksaw;
- drill;
- welding machine;
- tools for applying primer and paint.
Plywood is sold in the required width; you only have to adjust it in length.
Blueprints
The product must comply with the parameters, otherwise it will be inconvenient to play. It is necessary to prepare not only materials, tools, but also drawings. The drawings indicate everything down to the smallest detail, even the mesh size.
The drawings are made clear and understandable.
Assembly steps
Before you finally assemble the structure, you need to prepare all the parts.
If the product involves a removable tabletop, then special brackets will be required that will act as fastenings and ensure quick disassembly of the table.
You need to make holes in the brackets for self-tapping screws.
For a plywood tabletop you will need two sheets of 1525 x 1525 mm. Cut 155 mm from each sheet. The junction of two plywood sheets will be strictly under the mesh.
Treat the cut timber with an antiseptic. Dry it.
To avoid confusion of elements, they must be numbered.
Once all the parts are ready, you can begin assembly.
Step 1. Mark the timber and assemble the frame using self-tapping screws.
Step 2. Screw metal brackets to the corners to strengthen the frame.
Step 3. Fit the legs to the fasteners, remove excess wood. The matching of the leg and the mounting socket is very important.
Step 4. Place the beam in the socket and screw it to the bracket. To do this, use bolts.
Step 5. Screw 4 beams to create a frame.
Step 6. Attach the tabletop to the frame using self-tapping screws. Drill holes, attach the lid to the frame and twist.
Step 7. Wipe the surface of the countertop thoroughly with a cloth. Apply a layer of putty to a clean surface. Let dry thoroughly.
Step 8. Paint the tabletop in two layers. The first layer must dry, only then apply the second layer.
You need to correctly calculate the length of the beams that will be under the tabletop. In order to prevent deformation of the tabletop, the bars must be made shorter than the length of the playing surface.
Table layout
After the lid of the product has dried well, you need to apply a special marking 2 cm wide. It is located in the middle of the product and parallel to each edge. Use masking tape to mark the boundaries of the markings. For application use white spray paint.
How to make a folding ping pong table
There is a sport close to table tennis - ping pong. There are sports federations for ping pong. The main difference is the use of rackets with hard rubbers.
Folding ping pong tables are suitable for playing indoors, while stationary ones are suitable for playing outdoors. A classic table will have standard dimensions, just like for table tennis. If the area of space does not allow you to accommodate a product of this size, then it can be made smaller. For teenagers, the height of the product can be 700 mm. A mini-stol for playing can even be 110 x 61 mm in size and have a maximum weight of 17 kg.
Many people would like to throw a ball at home, so folding structures are in great demand. The roll-out folding table makes it possible to perform different ping-pong exercises alone. When one half of the tabletop is raised, it plays the role of a bumper shield.
The mechanisms of folding products are complex, but you can create a homemade ping pong machine. When folded, the tabletop halves can be secured with detachable brackets.
You need to start work with a drawing and preparation of parts.
The drawing must indicate the dimensions of each part:
- The tabletop can be made of boards or plywood.
- To create a frame, it is better to use steel corners.
- In order for the frames to be rigid, they are strengthened with transverse corners.
- It is necessary to make holes on the side of the frames for attaching the legs and struts of the platform.
- Carts require boards up to 25 mm thick. For struts - up to 20 mm thick, 60 mm wide.
- For the legs, 80x20 mm boards are required; for their fastening it is better to use bolts with wing nuts.
This will allow you to fold the product if necessary.
You can make a folding table on wheels.
It is better to number all the parts and elements on the blanks so as not to confuse them.
The necessary furniture casters can be purchased at a specialized store.
Having prepared all the material, you can start working.
Step 1. Make holes for the bolts on the legs.
Step 2. Strengthen the upper parts of the legs with metal plates.
Step 3. Attach bushings to the holes for a stronger fixation.
Step 4: Level the playing surface. Install a nut under each leg.
Step 5. Fasten the legs in pairs using self-tapping screws.
Step 6. Install the countertop using self-tapping screws. It's better to mount it on the reverse side.
Step 7. Paint the countertop. Apply markings.
The roll-out folding simulator for outdoor play is ready for use.
Creating a tennis table
The work begins with the manufacture of its elements.
Tabletop
If the sheets of material were not prepared at the time of purchase, then this step is performed independently. Blanks (two for plywood and one for chipboard) are cut out using a hand-held or stationary circular saw. “Interference” with a jigsaw when first getting acquainted with it is highly discouraged, therefore, to master the tool, you first need training on some auxiliary (similar, but unnecessary) material.
Before surgery, the cut site is sealed with construction tape, which helps to significantly improve the quality of the cut. Then the Velcro is removed, and all edges are cleaned with sandpaper. The ends of the tabletop are treated: painted or pasted over, but a more suitable option is edging with aluminum corners.
Preparing elements
The first stage is cutting boards and/or timber into parts:
- longitudinal elements - 2 blanks of 2140 mm each;
- transverse - 2 parts 1025 mm each;
- legs - 4 pieces of 750 mm each, or 6 (+2 for the middle), for greater reliability.
The length of the legs requires a little explanation. If you add the thickness of the table top (18 mm), then the ideal height (760 mm) of the tennis table will not work, it will be larger. However, these excesses are necessary in the future for the alignment of the legs. Only after this operation are the allowances cut off. Each workpiece is carefully sanded with sandpaper, then treated with an antiseptic. Furniture supports can act as comfortable legs, allowing height adjustment. If the table is destined for a street fate, then it is better to replace the wood with a metal profile pipe.
Assembling the table frame
The blanks are used to assemble a wooden frame with a crossbar in the middle. Wooden elements are combined into half a tree or they give preference to the classics - “a tenon and a groove.” Self-tapping screws, steel corners, and metal plates are used as additional fasteners where the supports will be located.
Then the legs are installed. If a collapsible table is chosen, then brackets are mounted; the supports should fit into them quite tightly, but can be easily removed. To better distribute the load, metal plates are installed on the legs.
Connecting table parts
The tabletop is laid on a flat surface face down. A supporting structure is placed on it, and places for fastenings are marked. The frame is fixed with glue, the connection is reinforced with metal corners, evenly spaced along the entire perimeter of the frame (both external and internal), their maximum pitch is 300 mm. The corners are secured with self-tapping screws, then the product is left until the adhesive composition has completely dried.
The table is turned over, the product is transferred to its rightful place, and the horizontal playing surface is checked. If necessary, adjust the length of the legs (one or more). They are cut to a standard value with the same circular saw, or use a hacksaw. Rubber (leather) is glued onto the legs of a table that remains indoors to ensure better grip on the floor.
Mini-court design
All elements of the tennis table are treated with a primer. If plywood was chosen, then the playing surface is painted, having previously been puttied, sanded after drying with sandpaper and treated with a primer. Use matte paint, which is applied in two layers, giving the first one enough time to dry. The painted table is left to dry for a long time - at least a day.
The last stage is marking. To edge the playing field, a white stripe of spray paint is drawn, its width is 20 mm; to divide the surface into halves of the opponents, a thinner line is used: its maximum thickness is 3 mm. The ideal evenness of this “possession” boundary is ensured by first gluing two strips of masking tape. Having decorated the table according to all the rules, install the mesh; you can make it yourself, but it is better to buy it ready-made in the store.
Malfunctions and repairs
Self-repair of professional equipment is not recommended: if it was carried out during the warranty period and then contacted the service center, specialists will refuse warranty repairs.
Actions you can do yourself:
- replacing the mesh on models that provide this action;
- care of the playing surface, maintaining cleanliness;
- installation and dismantling of the structure according to the instructions;
- monitoring the condition of the mesh fasteners - if necessary, they are tightened.
Other actions involve risks, may damage the quality of the equipment and further cause injury to the player.
Do-it-yourself repairs are usually carried out when the warranty period expires, or if there was no warranty in the first place. Home repairs include amateur-grade and outdoor options that have been damaged by weather.
Frequent breakdowns include damage to plastic clamps and fasteners, abrasions, cracks and bubbles on the playing surface.
The equipment may become unstable. If you purchased a table without an anti-reflective coating, you can cover it with a special varnish or paint yourself.
The faulty fastener or retainer is replaced with a new one. Spare parts are purchased from the manufacturer or manufactured by analogy with the damaged ones. The scratched rough surface must be evenly covered with putty, dried, painted and varnished.
To eliminate glare, varnishes and paints are used: uniform application is important. If you apply the paint unevenly, the ball's bounce rate will suffer.
If they make an outdoor table
In this case, if there is no suitable surface, wooden legs are not the best option. Adjustable commercial supports are also not suitable for the street, since they will simply get stuck in the ground, and for installation on a hard surface they do not have enough adjustment limit.
Metal is a suitable material for such structures, because it is very easy to obtain an ideal horizon on the ground: the surface of the table is leveled by simply pressing the supports into the ground. This is an ideal option for folding tennis equipment.
Another potential street frame is two “goat” bases made of timber. To eliminate the risk of the playing field sagging, they are connected on top with boards or beams. The sizes of the “animals” can be arbitrary, but the main requirement to ensure the convenience of the game must be taken into account. The width of such supports should be narrower than the width of the tabletop by the same 200, or better yet 300 mm.
One of the most original and easy ways to get a stand for a tennis tabletop is to use a material that is very fashionable now - construction pallets. Other serious contenders for a street base are an almost monolith made of natural stone, a stationary “vandal-proof” base made entirely of concrete. However, these designs are unlikely to seduce land owners.
This is not to say that the work will require titanic efforts, special skills and large expenses from the home craftsman, since making a tennis table is quite simple. However, in this case, the greatest attention should be paid to its playing surface: the quality and horizontality of the tabletop, the absence of the slightest slope.
Visual examples showing how all stages of such work are carried out are the best help for any tennis “pioneer”, so here is a video, the comments to which prove its usefulness:
How to make a ping pong table with your own hands
Currently, there is a wide range of ping pong table models on the market, however, a homemade table can compete with most of them. The designs of such products are simple and do not require the use of complex technological techniques. And the preliminary purchase of high-quality materials will allow us to produce a product suitable for use both at home and outdoors.
Ping pong table
Before you start making such a table, you need to decide which design will be more acceptable for you. Ping-pong tables can be folding or stationary. The latter option is best suited for outdoor installation.
Stationary table
And folding models allow you to save useful space when the game becomes irrelevant. When deciding in advance where the table will be installed, you should remember that there should be enough space around it for players to move freely. The area of such space should be 5x8 m.
Folding table
The flooring deserves special attention. It is advisable to give preference to a solid and smooth anti-slip option. A floor made of bitumen or concrete is excellent for this purpose. Wooden flooring installed on a level and hard surface is no less effective.
Tabletop dimensions
In accordance with standards accepted throughout the world, a classic ping pong table should be 2740 mm long and 1525 mm wide, with a standard height from the floor of 760 mm. However, it is possible to make a table with other dimensional characteristics, taking into account individual requirements and the area of the space expected for its installation. For teenagers, the height of such a product can be from 600 to 700 mm. The dimensions of the mini-table are 2440x12200 mm, and in some cases even 110x61 mm. The thickness of the tabletop of such a product used within a club, according to generally accepted standards, should be 22 mm, while for a professional game you will need a tabletop with a thickness of 25 to 28 mm. And for amateur tennis, a slab with a thickness of 16–19 mm is quite suitable.
Tabletop dimensions and height of a ping pong table