28949
A sliding wardrobe is a multifunctional design that allows you to store a variety of things - from a tie with socks, to coats and fur coats. It is not surprising that the closet rod has ceased to be an ordinary holder for outerwear hangers; a holder for trousers, ties, and belts has appeared.
Dimensions of clothing rails
The length of the rod depends on the width of the cabinet. For example, in a standard wardrobe, its length does not exceed a meter.
Expert opinion
Alexander Didenko
Furniture assembler at Mabaks
If the cabinet is voluminous, install a larger crossbar, but I still recommend placing additional support under it.
The average length of retractable bars is from 25 cm to 50 cm.
The size of the Ikea retractable structure is 50x35 cm. It is convenient for shirts and light items.
Compliment - retractable clothes rail, load 7 kilograms
You should not install a crossbar longer than one and a half meters, as it may not hold up and break under the load of clothing. The maximum length for round rods is 1.5 m.
Oval bars are stronger than round ones, so they can be made longer. There are also telescopic rods with variable size and a load of up to 10 kg. Example on video.
Practical materials
According to the production technology of clothing storage devices, all materials must be durable and reliable. Constant high load gradually pushes the bar, which can lead to its breakage. To prevent a sad outcome, it is recommended to take a closer look at the materials for the production of floor and hanging rods:
- Chrome steel is the most common material for clothing storage devices. The raw materials are highly reliable and can withstand heavy loads for a long time. If you install the product correctly, choosing the length of the rod correctly, it will last for many years without a single scratch;
- metal alloys - used for the production of rods for commercial purposes. For example, metal fixtures are well suited for organizing the storage of theatrical costumes, and can also serve as clothing racks in a store. Such a rod will be highly durable, but the appearance will not be attractive due to the lack of coating;
- galvanized steel. The production technology makes it possible to apply a special coating to the steel material, protecting the product from wear and corrosion. A hanging place for storing ties and scarves can be made from this material.
The method of installing the rod will depend on the parameters of the closet or dressing room. If it is narrow and small, it makes sense to use a longitudinal fastening. If the cabinet has good depth, you can perform a transverse installation.
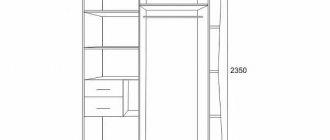
At what height should you hang the barbell?
The height of the crossbar depends on the length of the clothing:
- long clothes - 180–200 cm;
- things of medium length - from 140 to 170 cm;
- short clothes - 100–120 cm.
The most comfortable height:
- with a height of 180 cm - 200 cm,
- with a height of 160 cm - 190 cm.
The distance from the cabinet ceiling to the crossbar must be at least 4 cm.
If you need two longitudinal bars, mentally divide the closet space into two halves and imagine how long things will hang on the top bar and how long on the bottom bar. At this distance, attach the rods.
The crossbar for belts and ties should be fixed on the side wall or on the door if the wardrobe is a wardrobe.
Beautiful hangers for the hallway with your own hands
There is always a place for humor in the interior. Just as they once zealously fought against philistinism, today uniformity and the absence of any individuality in home design are despicable. And how we admire today the owners who know how to be attentive to every little detail in the appearance of their home.
You can get acquainted with ideas for homemade hangers on the Internet.
Think about how to make an interesting clothes hanger yourself. The item that will form the basis of the future hanger can be anything. The main thing is to successfully decorate and present it.
Examples of original hangers:
- Belt with hooks. An old thick leather belt can be made shiny, nailed to the wall, and equipped with coat hooks. Some people even perpetuate a family heirloom – a father’s or army belt.
- Decorative branch. Find a beautiful branch, paint it the color you want, varnish it, or simply do something to highlight its natural beauty. Attach it to the wall and equip it with special hooks on which you can hang clothes.
- Wooden fence hanger. You can make a decorative fence by painting it the desired color. Looks nice in a spacious, bright hallway.
- Hat with hooks. A wooden blank in the form of a hat, with hooks nailed to the bottom, will lift your spirits and be a cute accessory for the hallway.
As you understand, hooks can be nailed to anything - whatever you want to see every day can become the basis of a hanger. Perhaps you don’t want to say goodbye to some item that has already outlived its usefulness; it can be restored and made into a creative hanger. Someone did this even with their first tape recorder, and with the built-in lighting in the evenings you can enjoy the play of lights.
How to install a clothes rail in a closet
The installation method depends on the furniture parameters. If the crossbar needs to be placed in a narrow cabinet, it is better to use a longitudinal fastening. If the cabinet is deep enough, you can perform a transverse installation.
Installation of the longitudinal crossbar
First option:
- Place one end of the rod blank in the holder, measure the distance from the cut of the blank to the plane where the holder is attached to the wall. In our case it turned out to be 3 mm.
- Do the same on the other side.
- Measure the distance from wall to wall (w), subtract the sum of the distances to the holder from the resulting number. This will give you the length of the rod (d).
- Saw off the steel tube (I recommend using a 25 mm universal Joker pipe) with a grinder or a hand hacksaw to size.
- Calculate the distance from the back wall of the closet to the rod: usually 25–28 cm (depending on the size of the clothes and the dimensions of the hangers).
- Make holes for the wall socket with a screwdriver or drill (depending on the cabinet material) and secure the holders with 4x16 mm screws.
- Place the crossbar on them.
A ready-made kit for installing a crossbar in a closet can be bought in a store
Consider the distance from the cabinet ceiling to the rod holder - 4–5 cm.
Expert opinion
Alexander Didenko
Furniture assembler at Mabaks
Sometimes, for structural strength, you can additionally install a mount on the ceiling of the cabinet to prevent the rod from breaking.
Additional mount for ceiling crossbar
Second option.
Method of installing a wooden crossbar in a wardrobe.
- Drill holes at the ends and in the walls of the cabinet.
- Place the beam against the wall.
- From the outside, drill the self-tapping screw so that it fits into the hole in the end.
Such fasteners are dangerous because the crossbar can crack along its entire length when drilled.
Installing the crossbar
In the transverse position, a retractable microlift rod is often installed. It is attached to four screws screwed into the top of the cabinet. This mechanism is applicable for light items.
The crossbar is secured with four screws to the top of the cabinet in a convenient location
If you are going to hang outerwear and at the same time want to install it across the closet, choose a pipe not with a microlift, but a standard shape: oval or round. It will be more reliable.
A rod with a rigid mount has an increased load
Varieties
Depending on their purpose, furniture manufacturers distinguish the following types of rods:
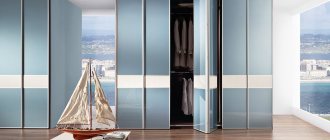
- retractable fittings such as microlift. The microlift system is used in wardrobes with a depth of up to 550 mm. The length of the structure varies from 250 mm to 500 mm. A retractable bar implies transverse placement of hangers. The number of retractable structures is set at the request of the client. The advantage of fittings is that by placing several elements in the closet, you can effectively sort clothes;
- pantograph lift - the design is suitable for completing built-in wardrobes with a height of more than two meters. The holder is attached to the top of the inner panel, lowering to the level of human height using a special mechanism, which makes it easy to remove or hang hangers with clothes and get things out;
- The standard rod is placed parallel to the bottom of the cabinet. An oval or round pipe has a high degree of strength. Depending on the length, a cabinet with two crossbars is possible;
- The trouser hanger is usually located at the bottom under the outerwear. Externally, the design resembles a clothes dryer. It will be convenient to place your trousers on it so that they do not wrinkle during storage;
- bar for accessories - the hanger is located on the side panels and cabinet doors. Designed for belts, ties, underwear (bras). On such a crossbar, small accessories will be conveniently located and easy to find.
For trousers
Microlift
Pantograph
For accessories
How to make a closet rod with your own hands
Self-made crossbars, in fact, are no different from already installed ready-made structures.
They may differ in the materials used. The store sells standard crossbars with ready-made fasteners, but in any garage you can find suitable devices for modifying them yourself.
What you will need:
- steel tube with a diameter of 25 mm, a length of 100–120 cm (for example, cuttings of pipes from a metal ladder or a forged bench);
- pipe connector - you can take a sleeve from a car bearing;
- two metal plates of rectangular or oval shape;
- drill;
- screwdriver;
- self-tapping screws;
- welding machine;
- Bulgarian;
- spray paint.
Manufacturing stages:
- Paint the tube with spray paint.
- Use a grinder to saw the connector into two parts.
- Weld each part to the metal plates - the fasteners are ready.
- Drill holes at the bottom and top of the resulting part - this blank is the flange.
- Make markings for the holders on the cabinet walls.
- Secure the holders with self-tapping screws.
- Carefully insert the ends of the pipe into the holders.
Types of rods
Devices, depending on the type and purpose, are divided into several varieties.
Microlift. Equipped with a retractable extension mechanism. The devices are designed for placement in narrow cabinets, the depth of which is no more than 50 cm. They are installed across the furniture. This arrangement makes it difficult to access things that hang from the rear wall. To make it easier to find things, the bar can be pulled forward.
Pantograph. It can be raised and lowered. This need arises in built-in wardrobes, in which individual hangers are located too high for easy access.
Hangers for trousers. Installed at the bottom of the cabinet. The bar consists of several crossbars. There are many types of designs, and they are also attached in different ways. The device provides convenient access to things.
The tie rod is similar in design to a trouser rack. It is equipped with several crossbars, but they are smaller. There is a built-in telescopic mechanism. The structure is placed across the furniture and pushed forward. Tremple bars that have several brackets are also sold.
Crossbar or pipe. This is the simplest type of barbell. It is a pipe fixed to the cabinet wall with furniture fasteners. Depending on the cross-sectional shape of the device, there are two types: round and oval. Round ones have a length of up to 60 cm. If the bar is longer, it will begin to deform under the weight of things. To avoid this, install additional racks.
Illuminated rod mounts differ from traditional designs by the presence of built-in daylight bulbs. The backlight is controlled using buttons located on the structure. You can improve a regular rod: holes are made in the bar and LED lamps are installed to provide lighting inside the cabinet.
What to remember
When choosing a crossbar, consider:
- Wardrobe size. If it is shallow, a crossbar will fit well.
- Correctly mark the position of the bar: do not forget about the indentations on the top and sides.
- The length of the tube should not exceed one and a half meters - otherwise the structure will not support the weight of the clothing.
- If there will be a lot of clothes on the hangers, choose a steel bar.
A rod in a closet is a solution for those who love order and a clearly planned space. With the right choice of materials and proper installation, it will serve you for many years.
How to choose a hanger on wheels
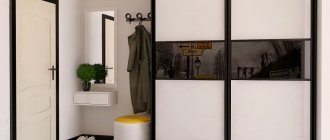
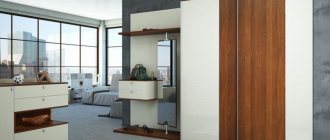
In the home interior, a hanger is used for outerwear, storing bags, umbrellas and other accessories. It saves space and can be used in a variety of configurations to suit the space.
The main question when planning and purchasing a rolling hanger is its purpose. Depending on this, the apartment owner chooses the desired model. The hanger is also selected to match the interior of the apartment or office:
- If you need a hanger for one person, then it is better to choose a suit version of a wooden hanger . It is better to place such a hanger in the bedroom for individual use or in the office of the office manager.
- For shops and exhibitions, durable metal hangers are better suited , which can withstand a lot of weight (if there are a lot of things) and will be convenient to move around the room as needed.
- To choose a hanger for the hallway of an apartment or house, you need to start from the design in the interior. If the interior is made in a classic style, the best options would be a stylish forged hanger or a wooden hanger with decorative ornaments. A chrome-plated metal hanger will suit the interior of a home with a more modern style.
- The best option for a children's room would be children's wooden hangers, selected according to the child's height and decorated in accordance with the interior and his wishes.
Wooden hallway: ideas for interior design (photo)
Glazing of balconies and loggias - recommendations and reviews.
DIY hanger on wheels made from pipes
The hanger is made of metal tubes with a diameter of 22–25 mm. You will also need wheels, screws and a drill.
- For a vertical base, pipes 1.3–1.7 m long (2–3 pcs.) are needed. Horizontal ones are made shorter - 0.7–0.9 m (4–5 pieces) and are used as lower crossbars.
- One of the horizontal pipes connects two vertical pipes at the bottom using screws, the remaining ones are attached tightly. So these bottom pipes form the bottom of the hanger.
- The top crossbar is screwed in the same way, holding the entire structure together.
- The entire structure can be placed on wheels; they are attached to the corners of the base.
Watch also the video on how to make a floor hanger with your own hands:
Article rating:
What is the name of the stick in the closet for hangers? Link to main publication
Related publications
- Double-sided cabinet as a partition