19103
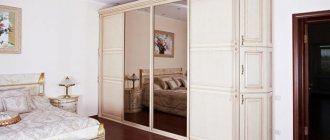
A home improvement system necessarily includes furniture designed for storing things. Most often, a three-door wardrobe is installed in bedrooms and hallways, as it is spacious and functional. The facade of the furniture is designed based on the stylistic decision of the room. The variety of textures and methods of finishing furniture surfaces allows you to turn them into decorative items that transform the room.
Advantages and disadvantages
A modern wardrobe with three doors differs from conventional furniture in a number of advantages:
- Large capacity. Even bulky items fit comfortably inside and do not wrinkle. The presence of shelves provides enough space for various small items.
- Small area. Despite its spaciousness, a three-door wardrobe takes up relatively little space and can be installed in a small room.
- Variety of models. If desired, it is easy to select or order a furniture option with any content, design and even a suitable price.
- Conveniently opening doors. This allows the cabinet to be installed even in a narrow space and ensures safety. The door will not accidentally press your finger or hit the handles (this model does not have them).
- Built-in structures allow you to hide communications, uneven walls, and open wiring.
- Zoning of space. The closet can be used not only to place things inside, but also as a partition.
Among the disadvantages are problems with roller systems, which begin to work worse over time. You can avoid them if you don’t skimp on door leaves and immediately choose expensive options. Unlike models with 2 doors, three-door coupes do not open completely and require the installation of additional lighting. Another disadvantage is the inability to move the built-in wardrobe to a new location.
Large capacity
Small footprint
Variety of models
Conveniently opening doors
Space zoning
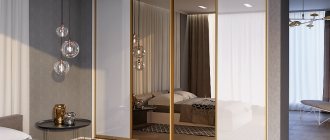
Features and advantages of a wardrobe with a mirror for the hallway
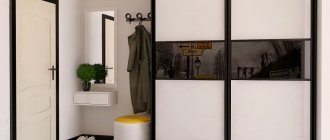
Despite the fact that the hallway most often has a small area, it should accommodate many items: outerwear, hats, shoes, accessories for their care, etc. All this can easily fit in a closet. The peculiarity of this furniture is its spaciousness and compactness; due to the sliding door opening mechanism, maximum usable space is preserved.
They have a lot of advantages, which is why they are so popular all over the world.
The main advantages of a cabinet with a mirror in the hallway:
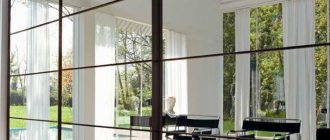
- The reflective surface visually expands the space.
- Stylish appearance that fits easily into any interior.
A sliding wardrobe with a mirror has undoubted advantages that push people to purchase them.
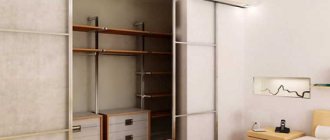
Varieties and materials
By design, sliding wardrobes are divided into two types - cabinet and built-in. The first option is almost no different from ordinary furniture - it also has a bottom, top cover and walls. If necessary, cabinets can be easily moved to a new location. It is possible to transport such furniture without disassembling it, although this reduces its strength. Other advantages include making the most of the space occupied, although they require more space than a built-in wardrobe. Due to the need for additional materials, such a model will cost more.
How to choose components for a wardrobe, useful tips
The height of a built-in cabinet is from floor to ceiling, the width is usually from one wall to another. This increases the efficiency of using the occupied space. The absence of walls and top allows you to save the amount of materials and time for assembly. The disadvantages of this option include the impossibility of moving it to another part of the room. If the built-in wardrobe is moved, cosmetic repairs to the ceiling and floor will have to be made at the former installation site.
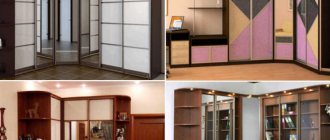
The standard form of compartment products is linear or elongated along the wall, which is suitable for large rooms. In rooms where there is not enough space to install full-size furniture, you can place corner cabinets. A radius model with closed elements made of curved glass would look good in the hallway - but this type of three-door coupe will be the most expensive.
Hull
Built-in
Linear
Radial
Chipboard is most often used for the box and filling of the structure. However, when choosing, the main attention should be paid to the facade of a three-door wardrobe; for its manufacture they use:
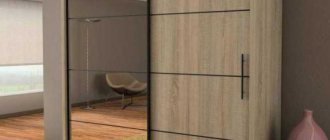
- Chipboards - MDF or chipboard. On top they can be covered with films of different colors that imitate natural wood and other textures. They are durable and affordable.
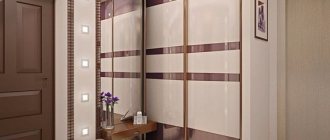
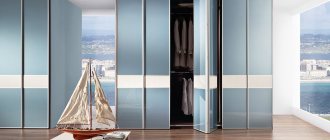
- Mirrors. This facade visually makes the room more spacious. A coupe with a sandblasted pattern allows you to further decorate the interior.
- Glass. Different options are used - matte, colored or transparent. The most impressive look is glass with photo printing.
- Composite materials. Gives the closet a more modern look.
- Natural wood. It is rarely used due to its high cost and heavy weight, but it looks respectable and expensive. A more profitable alternative to a wooden facade is MDF sheets covered with veneer.
Another popular way to decorate the front of a cabinet is fusing. It is a mosaic pattern made from fused colored glass. Acrylic paints are also used to decorate facades, which can improve the aesthetic characteristics of furniture.
MDF
Chipboard
Mirrors
Glass
Composite materials
Natural wood
Fusing
Examples of successful placement of sliding wardrobes in the hallway interior
Let's look at a few more interesting ideas so that you can finally form an initial idea about the correct location of this piece of furniture, and then we'll talk about functionality and other important things.
Using this example, you can take note of the idea of equipping wardrobe doors with hanging hooks.
And what’s interesting here is that not only was the wall removed and a cabinet placed in its place, but they also made a radius shape for the rear part.
This also added space on the shelves and an unusual-looking wall appeared in the adjacent room, which became the highlight of the living room.
Here's a closet that looks more like a feature wall than just regular clothes storage.
There are a lot of options! And you simply cannot list them all in one article.
Therefore, let's talk more specifically and look at the most creative ideas using specific examples.
Roller systems
When choosing a three-door cabinet, you should pay attention to the material used to make the roller systems. Steel elements are considered the most reliable and durable. However, they make a lot of noise during operation, so aluminum is usually used instead of steel - such guides move quietly, but wear out faster. They will have to be changed at least every 10 years. It is not recommended to choose sliding mechanisms made of plastic. Saving on rollers right away can quickly add up to additional costs. Plastic elements wear out within 3–5 years of use.
Tips for choosing guides for sliding wardrobes, installation features
By design, roller systems are divided into 3 types:
- Monorail. The suspension is located at the top, the rollers move along a profiled pipe. There are no guides at the bottom, but sometimes there may be a stop that prevents the doors from swinging. Monorail systems are the most reliable and expensive.
- Suspension with hook. The most budget option. The rollers are easily suspended on hooks, but this design is not durable, so it is not in demand.
- Support roller. The main part of the structure is metal guides at the bottom along which the rollers move. The upper part is needed to hold the canvas in a vertical position.
Support rollers are a system characterized by an optimal ratio of cost and service life. Popular brands use it to make cabinets. The warranty period for such a mechanism is on average from 10 to 15 years.
Monorail
Suspension with hook
Support roller
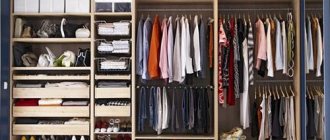
Internal filling
The contents of three-door cabinets can be divided into three parts - the upper shelf or mezzanine, the lower and middle space. The top is usually used to store seasonal or little-used items, from extra blankets for guests to rubber boots or winter hats. The bottom part is suitable for placing shoes, the middle part is suitable for casual wear.
To make more efficient use of the internal space, the following elements are used:
- Barbells. Installed in the middle parts of closets to accommodate clothes of various lengths. Can be located at different heights.
- Pantographs. They are used for the same purpose as rods, but in tall cabinets. They are equipped with retractable mechanisms for lowering to the desired level.
- Shelves. They are usually placed on the sides of sliding wardrobes, at a distance from each other of about 300–400 mm in height. With their help, you can effectively organize the storage of linen and small items. The shelves are made open, semi-roll-out and closed.
- Boxes. Another way to store small items of clothing. Can be pulled out partially or completely.
- Retractable hangers. Often these are filling elements for shallow cabinets. Can be supplemented with hooks or fastenings for clothes.
- Nets for shoes. Placed at the bottom of cabinets along with shelves.
If the furniture is made to order, additional non-standard elements of internal filling can be provided. For example, mounts for an ironing board or plastic baskets in which it is convenient to store useful little things.
Barbells
Pantographs
Shelves
Boxes
Retractable hangers
Shoe nets
Plastic baskets
Ironing board
Sliding wardrobe made of chipboard: features
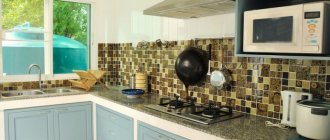
Most often, chipboard (chipboard) is used for the manufacture of cabinet and built-in furniture. The binder for the natural component – wood chips – is formaldehyde resins. They do not cause harm to humans, as they are contained in small quantities. In addition, the plate itself is covered on all sides with a protective laminated layer and edge tape. This protects the wood from moisture absorption and swelling.
Hallway in a modern interior Source mik-mebel.com
The advantages of the material include its strength, low cost and ease of processing in the manufacture of furniture elements. When making sliding wardrobes from fiberboard, both straight and curved elements are cut out. The slabs are used to make the back walls, as well as the bottoms of drawers.
Wide wardrobe for a large hallway Source pildrev.com
White frosted glass Source prom.ua
Laminated chipboard is a type of chipboard that is used to make exterior furniture elements. The peculiarity of the material is the presence of a protective laminated layer. The advantages of laminated chipboard include:
- High strength.
- Resistance to mechanical stress.
- Monolithic structure of the protective layer that does not absorb moisture and dirt.
- Wide range of colors and the ability to apply any design.
- Affordable cost and ease of processing.
- The presence of a protective edge.
A full-fledged dressing room in the hallway Source www.raumplus.ru
Due to the fact that laminated chipboard is easy to cut, it is possible to independently develop the design of a wardrobe for the hallway in accordance with your needs. Inside such cabinets, metal honeycomb parts and chipboard shelves are used. For storage, design the location of all kinds of holders, rods, baskets, organizers, drawers.
Comfortable dressing room Source fmebely58.ru
If you want to make your own wardrobe from laminated chipboard, then you first need to measure the room and draw up its plan on a piece of paper. The location of doorways, sockets, switches and structural elements of the room is shown on the scale plan.
A detailed plan allows you to select the optimal size and configuration of the cabinet, that is, determine its main overall dimensions. After this, you can begin to work out the design in detail. It is important to take into account the upcoming loads. When the frame is worked out, it is necessary to put all the elements with exact dimensions on a separate sheet - on their basis, the cutting master will produce a set of parts for assembling the cabinet.
Striped facade Source mandarin-mebel.com.ua
At the stage of developing a detailing plan, it is necessary to immediately select the method of fastening the parts together and the location of the fasteners. Holes for fasteners are also placed on the parts. Subsequently, when cutting the elements, the master will also prepare the holes so that during assembly he does not have to perform additional markings.
Large built-in wardrobe Source www.62.ua
All that remains is to purchase the necessary fasteners. For all parts, you must immediately make a note about the presence of a protective edge. When cutting, the master will immediately perform edging.
Based on the assembly plan, all that remains is to assemble the cabinet like a construction set. All of the above stages can be entrusted to specialists - they will take measurements, manufacture and assemble furniture.
Built-in wardrobe for the hallway Source decorpic.ru
Features of a chipboard cabinet include the following:
- The presence of a decorative laminated layer.
- The slabs have a thickness from 0.8 to 2.8 cm.
- The back wall is made of chipboard. The thickness is 0.8 – 1.6 cm.
- To make drawers, slabs 1.6 cm thick are used.
- For comfortable use of the interior space, you can install LED lighting.
To install the cabinet, use a niche in place of the pantry or the space between parallel walls. In this case, only the facade and internal filling will need to be made.
The sliding type of opening of the doors allows you to save free space, which is especially important in small hallways. The canvas moves using rollers along a guide from below or above.
Another advantage of an embedded storage system is its reliability and ability to withstand heavy loads. The load-bearing elements are attached to the walls, which can support more weight than the walls of a conventional chipboard cabinet.
Bright design with yellow accents Source pildrev.com
Mirror in the center Source shkafy-kupe.smebel.by
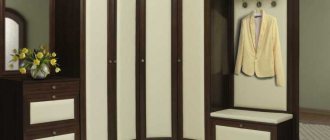
Features of accommodation
The contents and dimensions of structures may vary depending on the installation location:
- A closet is often installed in the hallway, covering one of the walls. A mirror facade will help to visually enlarge the space. Inside there must be a spacious middle part with hanger rods. The standard depth is 600 mm, for a narrow hallway - 450 mm.
- In the living rooms you can install cabinets with a niche for a TV and open shelves for storing souvenirs. With the help of such furniture you can replace an entire set - from a sideboard to a wardrobe. The length is chosen according to the location of the doors, the depth is usually standard.
- Wardrobes for the bedroom should have a compartment for bedding. The interior space of furniture for a married couple can be divided into a female and a male part. The depth must be at least 600 mm. To decorate the interior, a sandblasting pattern can be used on the mirror facade. This is the most popular option for the bedroom.
- The wardrobe in the children's room is designed to save space. Open shelves on which toys and books will stand will help improve the usability of furniture. It is advisable to select the design to match the overall interior of the room; the depth may be small.
Popular styles and colors for wardrobes in the living room, examples of placement
The three-door wardrobe is also suitable for installation in a study or home library. Inside such furniture you can store documents, office supplies, personal belongings, and install a built-in safe or minibar. The design of such cabinets is usually made in a classic style.
Hallway
Living room
Bedroom
Children's
Library
Sliding wardrobe in place of a pantry
Also, quite often there is a storage room at the end of the hallway. Why not a dressing room? And most importantly, making a wardrobe out of it will be much cheaper than ordering the entire frame and doors from scratch.
Here you only need to equip the walls of the pantry with shelves and install doors. See what this looks like in an example.
With proper planning of the interior space, the result will exceed all expectations, since such “hozzones” are usually quite deep.
Criterias of choice
When choosing a three-leaf wardrobe, pay attention to the following features:
- The standard width of one leaf is in the range of 700–1000 mm. To increase it, you will need to choose a higher quality, more expensive roller system. One way to add length is to insert narrow (up to 150–300 mm) vertical panels on the sides and in the center.
- It is not advisable to choose a depth of less than 600 mm for any room except narrow hallways. It is worth considering that the roller system will already take 50–100 mm of this size.
- The height of the built-in wardrobe coincides with the distance from the floor to the ceiling of the room. For cabinet furniture it is usually in the range of 2–2.2 m.
- The recommended material for the shelves and frame is chipboard. Choosing natural wood will significantly increase the cost of furniture and will lead to the fact that the boards may crack due to different humidity inside and outside. Fiberboard can be used for the back wall of the cabinet.
- To decorate a room, the best solution would be facades with mirrors or photo printing. However, this option significantly increases costs. To save money, it is easier to choose a facade made of laminated chipboard or MDF.
The best quality is found in wardrobes made by well-known global manufacturers. However, its cost will also be high. It is more profitable to order such furniture from local companies, especially since in this case you will be able to choose the content that best suits your individual requirements.
Dimensions
Quality materials
Filling
Design
Manufacturer
Cabinet assembly
A set of guides for the sliding system – 1 set. (length of the upper and lower guides – 1768 mm).
So, you have a huge number of parts of different sizes in front of you, and you don’t know where to start?
- Start by drilling confirmation holes on the interior shelves of the cabinet . To make this happen faster, stack all the shelves in one stack, measure the required distance from the edge of the shelves, and draw one vertical line along all ends of the parts.
- After this, mark the future holes with an awl and, armed with a screwdriver and a confirmation bat, make holes on both sides on each shelf.
- The next step will be making holes in the sides of the wardrobe . It's best if you make the markings from the inside of the frames, because this way you won't have to erase pencil marks on the outside of the cabinet. So, according to the drawing, you measure the required distances for the shelves, draw a line to which the part will adjoin, and drill holes for the confirmations. Do this procedure for absolutely all shelves. That is, you will need to make similar holes on the internal racks of the cabinet.
Now you can begin assembling the frame of a wardrobe with 3 doors. Using confirmations, connect the side stands and shelves, internal stands and shelves.
As for the shelves that are located between the internal standing ones, we suggest attaching them to shelf holders 5 mm in diameter. To do this, we make holes on the internal pillars, then insert shelf holders into them and install shelves on them.
Next, you need to screw the drawers, which act as a tie to the cabinet. Do this using the same confirmations, so the structure will be stronger
Adjustable legs 100 mm high must be screwed onto the bottom of the three-section cabinet. It is recommended to take adjustable ones, since the floor may bend. You can easily adjust each leg, while leveling the cabinet.
Screw the bottom of the cabinet onto the confirmations. All you have to do is screw the clips to the base plate, with which it will be attached to the legs.
Now you can bring the three-leaf wardrobe into a vertical position and screw the roof onto the metal corners. We can say that we are approaching the completion of the assembly of the three-door wardrobe.
Using self-tapping screws and a screwdriver, screw the back wall to the cabinet. We would like to draw your attention to the fact that it is best to do this with self-tapping screws, not nails, otherwise there is a risk that, over time, the back wall will fall behind. Make fasteners at a distance of 15-200 mm from each other.
Now you can screw on the tramp rod. It comes in two types: oval and round. Accordingly, the fastenings to them should be different. For an oval one, a special bracket is used, and for a round one, a flange is used.
Stepping back from the shelves 100 mm down and 250 mm from the end of the shelf (that is, you need to ensure that the rod ends up in the middle with respect to the side stand), first screw the flange, and then insert the rod into it, then screw the second fastener . Our closet design involves the use of three trampoline rods for different sizes of clothing.
At this point, you can screw the outer side shelves to the base of the 3-door wardrobe. First, make the appropriate markings on them and on the sides, and then start drilling. We advise you to do this fastening also with the help of confirmations.
Marking
Making a mark with an awl
Drilling
Resulting hole
Installing the shelf support
Let's score
Shelf support installed
All shelf supports are installed
Removable shelf installed
Drilling depth limiter using a dowel and a conventional drill
Dowel 6 or 8 on a drill
Making a drill depth limiter
Screw the back wall to the side open shelves.
Let's get down to the most important part - installing the sliding system. When ordering a system, take into account the dimensions of the opening of the cabinet itself - this should be the length of the rails. Let's start with the top guide. Screw it flush with the side posts. Make sure that there are no gaps and that the rails are not pushed forward.
When installing the bottom rail, the following nuance must be taken into account: it must be mounted with a slight offset into the cabinet. As a rule, this distance is 20-22 mm from the end of the sidewall.
In general, it would be ideal if, after screwing the top rail, just put the bottom one on the bottom, and try to insert one door into them. By adjusting the offset of the bottom rail, you can figure out how far from the edge it needs to be mounted.
Insert a stopper into the bottom rail - it is necessary to ensure that the doors are locked in the closed state in the future. Do as shown in the picture.
Now all that remains is to insert the doors in a checkerboard pattern into the upper and lower rails, and close the confirmation caps with special plugs in the color of the chipboard