For many centuries, chests were important elements of the interior; they could be found in almost every home, regardless of the wealth of the owners. Chests, having various sizes and shapes, were used during travel to store valuables and household items; They were also passed on as inheritance, often with a dowry collected for the bride. Recently, the fashion for chests has been revived; now they can be increasingly found in houses and apartments . They are sold in many interior stores. But if you wish, you can make a wooden chest with your own hands, since there are a huge variety of different options.
DIY wooden chest
Decorative chests: practical applications
There are many options on how to make a trap chest, or a large chest for children's toys, a woodpile in the form of a chest and a jewelry chest.
Capacious and compact products are decorated in accordance with the chosen style and for this you can use modern decorative materials.
Presentable appearance and practical spaciousness, proper organization of internal space helps to use all the capabilities of such products.
For holiday greetings, you can make a small and attractive money chest, which will be perfectly complemented by a bouquet of flowers and a greeting card.
Option No3. Small antique chest
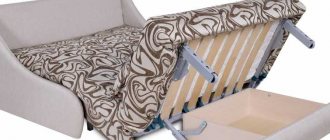
To make it you will need a furniture panel made of soft wood. The dimensions of the structure are as follows: 28x24x20 cm (although you can make the chest in other sizes). Having chosen the parameters, cut the shield into the bottom, walls and lid; You will also need 4 legs (in our example, their dimensions are 3x3x2 cm).
After sanding the future interior surfaces of the chest, assemble all the parts (except for the lid). For assembly, use wood screws, making holes of a slightly smaller diameter for them in advance. Select the correct length of screws to avoid the formation of through holes! Seal the screw heads with wood putty after priming.
Assembled wooden chest
Bottom view
Chest with lid
Important! Instead of putty, you can use wooden plugs (the fact is that its color may change after painting) or cover these places with belts, as the author did in our example.
Next, brush all external parts with a metal brush, including the ends of the structure. Do this along the grain to remove the softer wood tissue.
Metal brushing
The more time you process and the harder you press the brush, the brighter the structure of the wood will be revealed.
After this, apply a deep penetration primer (no color). Because of this, the pile will rise, which will increase the adhesion of the surface to the layers that will be applied further. When the primer has dried, remove any raised lint with sandpaper.
Applying primer
Sandpaper treatment
When finished processing, remove the dust with a wet cloth. Then apply acrylic wood stain (in our example we used a walnut shade), and then go over again with a damp cloth to remove excess product. This will reveal the structure of the wood.
Acrylic impregnation is applied
Removing excess impregnation
Result of work
Cover the structure with another layer of the same primer, and after it dries, look at the pile. If it has risen, remove it with sandpaper and wipe the surfaces with a wet cloth to remove dust.
To get the moss green effect, prepare acrylic paint in advance that has a chromium oxide color. It must be diluted with water and then applied to all surfaces of the structure. Do not wait for the paint to dry, but immediately remove the excess with the same wet cloth.
Chromium oxide (acrylic paint color)
Painting the chest
Excess is removed immediately
Product after painting
Once you have achieved the desired effect, apply the primer again. Inspect the pile. Dry the structure, then apply matte parquet varnish (in one or several layers - decide for yourself). The advantage of parquet varnish is that it is very wear-resistant.
The chest is varnished
Install the fittings. Make a hole in the middle of the lid and install a carrying handle there.
A hole is drilled in the center of the lid
Handle installed
Screw on the loops (about 5 cm from the edges) that are about 2 cm wide.
The hinges are screwed on
Install the latch lock. It will be located in the center.
Installing a Latch Lock
On the sides, step back 6 cm from the top and drill holes there to install the side handles. It is important to drill with extreme caution, especially at the exit of the drill.
Holes are drilled in the side walls
Prices for the range of drills
Drill
Holes are ready
Installed side handle
Next, prepare eyelets with an internal diameter of 0.4 cm, a riveter for them, leather 50x50 cm, a punch (required diameter - 0.4 cm), nails, 2 plaques 3x3 cm.
Take the leather, cut strips 2 cm wide from it, make straps with a length corresponding to the height of the front wall of the structure + grip to the bottom (corresponding to the thickness of the wall). Next, nail the straps on the front part of the structure at a distance from the edges corresponding to that of the hinges. There shouldn't be any difficulties with all this.
Nails, cut leather straps, hammer
Leather strips are nailed
The straps are nailed
Important! Use caution when using upholstery nails! Their length should not be greater than the thickness of the walls. Otherwise, the excess will have to be removed with pliers.
The excess length of the nail was bitten off with pliers
Upholster the lid, focusing on the previously attached straps, go to the back wall, close the hinges and go down another 10 cm. Cut the ends of the straps so that they look like a triangle with rounded corners.
Upholstered product cover
Same, rear view
Upholster the structure along the edges, moving from one leg to the other. Do not touch the bottom and legs. Be careful not to hit the screw head and forget the upholstery nails!
Upholstery of the chest along the edges
We do not touch the bottom and legs
Seal the screw heads at the bottom of the structure using the same straps with upholstery nails. Also try to act carefully.
Make lid opening limiters using the same straps. Secure them against the hinges.
Lid opening limiters
That’s it, the antique chest is ready, but if you wish, you can further decorate it. Good luck with your work!
This is what the finished chest looks like
Photo of the product before and after processing
What can you use cardboard chests for?
Not complicated technologies and a step-by-step procedure on how to make a chest from a box, described in this article, will help you make a chest yourself.
Such universal and thematically designed crafts can be used for different purposes, it all depends on the functionality, decoration and purpose of the finished product:
- for storing jewelry and money, small souvenirs;
- as a storage system for children's toys and treasures;
- as gift packaging for different sets;
- as a decorative decoration and design addition.
An antique-style chest or small chest is highly decorative and perfectly decorates the room.
To preserve its presentable appearance for a long time, you should carefully follow the manufacturing technology of the craft and select the right materials for manufacturing and decoration.
DIY chest decor: master class
A stylized English travel trunk from the late 19th century can be easily made from an old box using modern acrylic paints and imagination.
To make a chest with your own hands at home you will need:
- wooden box for equipment;
- acrylic art paints: white, kraplak, ocher, olive, chromium oxide, natural umber;
- green acrylic interior paint -1 can;
- gold acrylic outline;
- acrylic paint - metallic gold color;
- white craquelure composition in an aerosol can;
- oil varnish;
- acrylic artistic primer;
- brushes: synthetic round No. 2,3, flute brushes – synthetic and bristle paint brushes;
- stencil, carbon copy;
- hole punch, masking tape;
- palette or disposable plate;
- medium and fine grit sandpaper;
- thick paper or cardboard;
- acrylic putty, spatula.
- Before decorating the chest with your own hands, use medium and then fine-grit sandpaper to remove the peeling paint and clean the surface, leaving the paint that has not peeled off.
- Places where there are potholes or surface damage, fill with wood putty and a metal spatula.
- After the putty has dried, sand the surface with medium-grit sandpaper. Drying time is recommended by the manufacturer.
- After removing dust from sanding with a damp cloth, prime the surface using acrylic primer. Drying time: 30 minutes.
- After the primer has dried, paint the surface with green acrylic paint in one layer. The time for complete drying of the paint is 1 hour.
- Cover the corners of the box with masking tape and cover the surface with green paint a second time.
- Without waiting for the green paint to dry, apply a one-step white craquelure spray to the surface of the box. Apply from a distance of no more than 15 cm. Be sure to use safety glasses, a respirator or a painting mask. Spray on the street or on the balcony.
- After the surface is dry, remove the masking tape with a sharp movement. The size and size of the cracks in the resulting craquelure will depend on the thickness of the spraying - the more paint, the larger the cracks. Drying time: 40 minutes.
- Before decorating the chest with carnations, make blanks to imitate them. Paint thick paper or cardboard with gold acrylic paint. Then use a hole punch to make round “nail caps.”
- Add natural umber to the putty, mix thoroughly until a homogeneous mass of dark color is obtained and, creating a texture, apply to those places on the surface where the tape was.
- While the putty is still wet, place round “nails” at equal distances from each other, lightly pressing them into the putty. Drying time is 40-60 minutes.
- After the surface of the box to be decorated is dry, transfer the rose design onto it using green carbon paper. Place it, color side down, on the surface of the box, place the design on top and trace along the outline with a pencil.
- Paint the drawing with gold acrylic paint using a synthetic art brush No. 2. Do not cover the flowers with paint. Transfer the drawing of roses not only to the lid of the box, but also to the sides, having previously marked the location of the drawings and their joining.
- Outline the roses with gold contour paint, creating volume.
- Paint over the roses with speckled paint mixed with a small amount of ocher - about 2%.
- After adding 20% white to the kraplak and obtaining a pink tint, add it to the color of rose petals. Cover the leaves and branches with paint using a mixture of 50% chromium oxide and 50% olive paint. Apply the paint loosely, leaving gaps of gold.
- Cover the top of the resulting chest with oil varnish. Oil varnish will darken after drying and give the surface a noble shade of patina.
To know how to paint a chest correctly, look at the photo, which shows the detailed technique of this process:
Selection of materials
The technology of how to make a chest from cardboard or plywood can differ significantly in the way materials are processed.
For beginning craftsmen, the optimal solution would be to make a practical craft from a ready-made cardboard box, and after practice, you can begin to use more practical materials.
Chest in different styles
There is no generally accepted classification of chests. They can be roughly divided into:
- Vintage;
- Modern.
The definition “casket” or “chest” is found. This is still the same chest, but made more roughly, not for beauty, but for functionality. Previously, they were used to store food, mainly flour and cereals. The box is a light, elegant variation of the chest, the bottom of which is made of wood, and the side walls are made of bast. On ships, lockers are used - a marine analogue of a chest in which work equipment is stored. Chests differ in size, materials, decoration and lid shape (flat or convex). They can be either bulky cabinet replacements or tiny pieces for storing small items like rings and earrings. Antique chests are the same vintage models that highlight interiors decorated in ethnic (oriental, Russian), rustic or even classical style. There are original models made of frosted glass or plastic. Such options are suitable for high-tech, minimalism and luxurious loft. The main thing is that the smooth surface of the furniture does not have patterns and is painted in one of the neutral colors. Rough white wooden caskets with slightly cracked paint are ideal for a light Provence look. To highlight the decorative detail, it is decorated with a floral pattern using the decoupage technique. For free country living in the country, “grandmother’s” chests, which often litter attics, are ideal. They have an unsightly appearance, a rough surface, but with the help of sandpaper you can achieve a light shade of wood with an original pattern, which is varnished to fix it. The chests also go well with the exoticism of the colonial style, because the settlers transported their belongings in chests, which later became the first pieces of furniture in new houses in the territories they were developing.
Chests are historically associated with wedding preparations, but now, instead of storing dowries, they hide money given by young guests. Such models are decorated with openwork, rhinestones, satin ribbons and beads. The simplest options are made from ordinary cardboard and, as a rule, have a hole in the lid for envelopes, like a slot in a mailbox.
Assembling the chest
The procedure for making a chest for wood begins with cutting the source material in accordance with the selected sketch into individual elements.
Working with packaging cardboard is simple and convenient; it bends perfectly and is suitable for forming any configuration; it is easy to glue and decorate.
Chest decoration
If we are making a chest for money or jewelry, then it is necessary to decorate it beautifully not only on the outside, but also on the inside.
To do this, you can select different materials and cover it entirely with paper or wallpaper with an appropriate print, use self-adhesive film or acrylic paint, and bronzing technologies.
Note!
- How to make a photo album using scrapbooking technique? Unconventional DIY album design ideas. 80 Photos of Original Photo Album Ideas to Capture Life
- How to make a hat - original models, advice from craftsmen, instructions and examples of making hats (105 photos)
- How to make a gift box - step-by-step master class on making gift boxes (115 photos)