22880
An excellent furniture option for owners of small apartments would be a narrow sliding wardrobe that will fit into almost any corner of the room, leaving space for arranging other elements. To choose a narrow wardrobe for a room, you need to familiarize yourself with its features, types, and sizes.
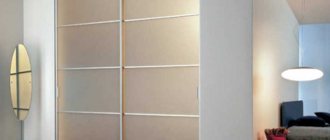
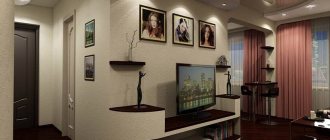
Methods for arranging a wardrobe in the hallway
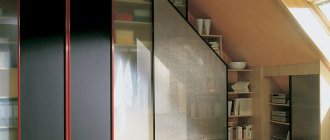
Design of a built-in wardrobe in the hallway Source industrial-wood.ru
A built-in wardrobe involves the use of room elements as enclosing structural parts. It is located under the stairs, in the pantry or in a niche. The simplest model is a facade from one wall to the opposite. However, there are other installation methods. For example:
- It is not necessary to install built-in furniture between two walls, especially if the area is long. In this case, choose a convenient length of the structure and install one side. In the remaining gap you can install a dressing table, an open hanger, a shoe rack or a bench.
- A wardrobe built into the ceiling in the hallway does not necessarily have to have doors that span the entire height of the structure. There are options in which the upper shelves are hidden behind separate facades - mezzanines. In this case, things stored on the upper shelves are hidden from prying eyes. Also, mezzanines can become a continuation of built-in furniture, when a doorway is located on the wall with a built-in wardrobe. This allows you to make maximum use of the free space of a small hallway.
Cabinets in niches Source www.franmebel.ru
Lighting inside the built-in wardrobe Source pildrev.com
- The built-in wardrobe can be divided into several sectors, between which there will be open niches. Mirrors, chests of drawers, benches, shoe racks, open shelves and hangers are installed inside them.
- Corner designs are popular. These include L-shaped, five-wall and radius models. It is worth remembering that a radius cabinet requires a lot of free space, while a corner cabinet, on the contrary, is compact but very roomy.
- A popular type of built-in wardrobe is the trapezoidal model, which occupies a corner but has two side walls. At the same time, the façade is smooth and the interior space is spacious.
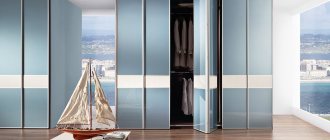
Corner wardrobe with mirror Source svetlogorsk.potolki-gomel.by
When choosing the location and configuration of the wardrobe, it is necessary to take into account the area and layout of the room. Corner and straight models take up the least space, but at the same time they boast great capacity.
Filled cabinet Source www.06274.com.ua
Comfortable dressing room Source prihozhaya.guru
Article about furniture
The desire for minimalism in the interior of living rooms has led to the appearance of wardrobes with doors framed by a thin narrow profile. It looks elegant, stylish, fashionable and pleasing to the eye.
Previously, wardrobe doors were framed with a C-shaped profile. It is called a “handle profile” because it has a protruding curve that is easy to pry with your fingers. The profile thickness is 33 mm, width – 35 mm. For those who are trying to minimize the furnishings and make living spaces more spacious and brighter, such a frame for a glass or mirror door seems somewhat cumbersome.
Initially, thin profiles for furniture were produced by foreign manufacturers. They were very expensive, since the door design provided for top fastening. In sliding wardrobes, the track was fixed on the ceiling rail, in modular furniture - on the lid. Both the system itself and its installation were complex and expensive.
Even with a narrow frame, the weight of a door made of glass or chipboard reaches 35 kg. Furniture and the overhead moving mechanism cannot withstand such a load for long. First, the cabinet roof sags. The door warps, it moves away from the sides, and gets jammed.
Ceiling mounting requires installation of a powerful rail. It can only be attached to the floor slab. Plasterboard ceiling lining is not suitable for this. But even in this case, the door does not last long. Due to high pressure, the rollers quickly wear out and get stuck.
What are the benefits of the new thin profile?
The narrow profile of MS-161 is the latest trend in interior design. Previously, due to the complex and expensive transportation system, only wealthy people could afford it. However, in 2020, a new design of compartment doors appeared, the rail for which is attached to the floor. It costs much less and is available to most consumers.
The narrow profile has the following advantages: •
. It looks very sophisticated, almost transparent. •
, and for framing decorative inserts. • Manufacturers produce
. • Thin metal element
.
Sliding wardrobes have become available to every Russian family thanks to the introduction of a new door movement system. Now the track is mounted below. The door rests its entire weight on the floor. The load is evenly distributed across all rollers rolling on a completely flat rail. Nothing sags or becomes deformed from overload.
Only a guide is fixed at the top, holding the door in a vertical position. It does not carry any load; it can be installed in apartments with suspended or suspended ceilings.
Buyers are delighted with the slim profile in a modern, minimalist interior. It fits harmoniously into the decor of the room, without burdening it with unnecessary details. Having selected the appropriate color of the planks, designers associate them with wall decoration and the design of other home furniture.
The thin narrow profile has only one drawback. Fingers cannot get caught in the narrow bar. It protrudes only 7 mm above the plane of the facade. For the front door this is not a problem. There is enough space for your fingers to effortlessly move a sheet of glass or chipboard that easily rolls on rollers.
It's more difficult with the back door. The protruding part of its profile is hidden by the front door leaf. In a system of three or more doors, this problem can be solved by moving the front door slightly. In a two-door system, you have to push the rear leaf, resting your palms on its surface. Because of this, handprints remain on the front of the cabinet.
If you are ordering furnishings for the bedroom or dressing room of a small family, the indicated disadvantage of a cabinet with a narrow profile is insignificant compared to its aesthetics, effectiveness, and visual lightness. This element is the most fashionable and in demand on the built-in furniture market today. Europe switched to its use several years ago. And the price of the system rolling on the floor is more than acceptable. Russian consumers have already appreciated the benefits and are ordering just such coupes.
If the cabinet will be installed in the hallway of a house where a large family lives, you should think about choosing a profile. Each family member, including children, will move the doors several times a day. In such conditions, it is more advisable to order a coupe with a traditional C-shaped handle profile.
To order a wardrobe with a thin profile, please contact our company.
Author Vyacheslav B.
All articles
Sliding wardrobe made of chipboard: features
Most often, chipboard (chipboard) is used for the manufacture of cabinet and built-in furniture. The binder for the natural component – wood chips – is formaldehyde resins. They do not cause harm to humans, as they are contained in small quantities. In addition, the plate itself is covered on all sides with a protective laminated layer and edge tape. This protects the wood from moisture absorption and swelling.
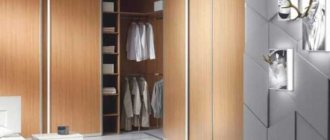
Hallway in a modern interior Source mik-mebel.com
The advantages of the material include its strength, low cost and ease of processing in the manufacture of furniture elements. When making sliding wardrobes from fiberboard, both straight and curved elements are cut out. The slabs are used to make the back walls, as well as the bottoms of drawers.
Wide wardrobe for a large hallway Source pildrev.com
White frosted glass Source prom.ua
Laminated chipboard is a type of chipboard that is used to make exterior furniture elements. The peculiarity of the material is the presence of a protective laminated layer. The advantages of laminated chipboard include:
- High strength.
- Resistance to mechanical stress.
- Monolithic structure of the protective layer that does not absorb moisture and dirt.
- Wide range of colors and the ability to apply any design.
- Affordable cost and ease of processing.
- The presence of a protective edge.
A full-fledged dressing room in the hallway Source www.raumplus.ru
Due to the fact that laminated chipboard is easy to cut, it is possible to independently develop the design of a wardrobe for the hallway in accordance with your needs. Inside such cabinets, metal honeycomb parts and chipboard shelves are used. For storage, design the location of all kinds of holders, rods, baskets, organizers, drawers.
Comfortable dressing room Source fmebely58.ru
If you want to make your own wardrobe from laminated chipboard, then you first need to measure the room and draw up its plan on a piece of paper. The location of doorways, sockets, switches and structural elements of the room is shown on the scale plan.
A detailed plan allows you to select the optimal size and configuration of the cabinet, that is, determine its main overall dimensions. After this, you can begin to work out the design in detail. It is important to take into account the upcoming loads. When the frame is worked out, it is necessary to put all the elements with exact dimensions on a separate sheet - on their basis, the cutting master will produce a set of parts for assembling the cabinet.
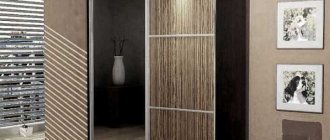
Striped facade Source mandarin-mebel.com.ua
At the stage of developing a detailing plan, it is necessary to immediately select the method of fastening the parts together and the location of the fasteners. Holes for fasteners are also placed on the parts. Subsequently, when cutting the elements, the master will also prepare the holes so that during assembly he does not have to perform additional markings.
Large built-in wardrobe Source www.62.ua
All that remains is to purchase the necessary fasteners. For all parts, you must immediately make a note about the presence of a protective edge. When cutting, the master will immediately perform edging.
Based on the assembly plan, all that remains is to assemble the cabinet like a construction set. All of the above stages can be entrusted to specialists - they will take measurements, manufacture and assemble furniture.
Built-in wardrobe for the hallway Source decorpic.ru
Features of a chipboard cabinet include the following:
- The presence of a decorative laminated layer.
- The slabs have a thickness from 0.8 to 2.8 cm.
- The back wall is made of chipboard. The thickness is 0.8 – 1.6 cm.
- To make drawers, slabs 1.6 cm thick are used.
- For comfortable use of the interior space, you can install LED lighting.
To install the cabinet, use a niche in place of the pantry or the space between parallel walls. In this case, only the facade and internal filling will need to be made.
The sliding type of opening of the doors allows you to save free space, which is especially important in small hallways. The canvas moves using rollers along a guide from below or above.
Another advantage of an embedded storage system is its reliability and ability to withstand heavy loads. The load-bearing elements are attached to the walls, which can support more weight than the walls of a conventional chipboard cabinet.
Bright design with yellow accents Source pildrev.com
Mirror in the center Source shkafy-kupe.smebel.by
Minimum wardrobe door width: the wider the better
Hello, friends.
When designing a sliding wardrobe, in addition to understanding the correct location of its internal contents, you also need to not make mistakes in calculating the dimensions of the sliding facades.
This applies to small wardrobes that can only contain two sliding doors.
So:
When the width of the product is relatively large (for example, from two meters), with a total height of 2.2 to 2.5 meters (usually, the height of a sliding wardrobe is always within these limits), the width of the sliding door can be planned from 600 mm or more.
But when the width of this furniture is 1000 millimeters or less, you need to understand the following things:
The width of the sliding door should be such that when “working” it does not warp due to the fact that it is narrow and high.
Therefore, you need to know one small “unwritten” rule (of course, there are no rules as such, it’s just a conclusion drawn from personal experience).
Here it is:
The size of the facade of the sliding system (sliding) must be such that the ratio of its width to height is at least ¼, or at least 0.25.
That is, at most, there should be four units of height per one unit of width.
For example, a façade measuring 2300x600 (mm) fits into this rule because:
600/2300=600:2500=0,26
0.26 is more than 0.25 so everything is fine.
But if its width were 500mm, then it would already be controversial, since:
500:2300=0.21 and this is already less than 0.25.
No, of course, and such a sliding door will work fine. I repeat once again that the numbers given here are just observations made from personal experience, and they are relative.
It’s just that, in the first case, the sliding facade will work without problems even with sharp shocks, but in the second case, with such shocks, it may warp a little, and it will “snip” (or even in general, it may “fly out” from the bottom guide).
But, for example, with a facade 400mm wide, you generally need to be careful.
It will work normally only with a very “careful” attitude (no sharp jolts and the like).
All this must be taken into account at the measurement stage.
For example, if you need a wardrobe with a height of 2.6 meters and a width of 1 m, then you need to understand that it will definitely have problems with the operation of the sliding system described above.
This is the point you need to understand, and if the cabinet is custom-made, immediately warn the customer about possible problems, so as not to look like an incompetent furniture maker with a guilty look.
And that's all.
See you in new blog articles.
How to make a wardrobe yourself: step-by-step instructions
To independently manufacture a built-in wardrobe in the hallway inside an existing niche, it is enough to follow a certain sequence of actions. It is worth remembering that each stage is important and the final result depends on how correctly the measurements and calculations are made.
Sliding wardrobes in a rectangular room Source sv.decorexpro.com
Stage 1: taking measurements and calculations
Using a tape measure, it is necessary to determine the outer horizontal dimensions of the niche - measurements are taken at the top, bottom and center. The same parameters are determined on the rear plane - the wall of the niche. These dimensions allow you to determine the parameters of future shelves.
Then vertical measurements are taken in three places along the front and rear planes of the niche - both edges and in the center.
Sizing calculation Source www.johnnystore.com
A nuance that must be taken into account when designing built-in furniture is the imperfection of the structural elements of the house - walls and ceilings most often cannot boast of ideal evenness. Therefore, when taking measurements and transferring them to the drawing, it is necessary to record all values as accurately as possible, with all errors, and also taking into account the thickness of the material.
At the stage of measurements and calculations, the details of the future structure are finally dealt with. Determine the location of shelves, holders and other fillings, the number of doors, the presence of mezzanines, the number of compartments, the presence of open shelves and a canopy with spot lighting.
Wardrobe from the inside Source avito.wiki
If the closet is small, then you can use the lower space of the niche to place shoes without occupying it with shelves or a built-in shoe rack. At this stage, all the little things are thought through - where and how clothes rails, compartments for small items, drawers and shelves will be located, as well as their material and design.
When performing detailing, indicate the dimensions of the elements, taking into account the presence of an edge with a thickness of about 2 mm, and also provide a margin in case the niche is too crooked. The more accurate the dimensions, the faster the installation of the structure will be without unnecessary adjustments.
Model made of wood Source cherkassy-mebel.ck.ua
Stage 2: cutting parts and choosing accessories
You can cut the parts yourself using a jigsaw, but it is better to entrust this work to a master. Most furniture manufacturing workshops offer a service for cutting parts based on a drawing. Thanks to the use of high-precision modern equipment, the quality of the cut remains high. In addition, you can immediately order the production of PVC edges - this is the most reliable and durable type of end cap, which is applied using a special machine.
Cabinet making process Source www.gloopla.com
Purchasing accessories will not cause any difficulties - a huge assortment is available in construction and furniture stores.
Stage 3: assembly
When assembling a built-in wardrobe in the hallway, consider the following:
- Due to the lack of side and top walls, assembly work begins with choosing the location of the shelves. The shelves are secured to mounting metal corners fixed to the wall. Marking is carried out on the basis of the drawing. Experts recommend choosing metal corners because of their strength and aesthetics, which cannot be said about their plastic counterparts.
- For shelves longer than 80 cm, additional fastening must be provided to prevent sagging and further damage to the element. Support is provided using metal corners attached to the back wall.
- The rod for shirts and dresses is attached to the walls using special round rod holders with holes for screws or dowels.
- To maintain cleanliness and easy maintenance, it is better to choose a shoe rack in the form of a portable metal mesh stand. It is attached to special hooks or clips. This allows you to choose the height of its location.
Even at the design stage of a built-in wardrobe, the method of finishing the ceiling is taken into account. If a tension fabric is chosen, then a mortgage is placed between the front border of the cabinet - a block 10 cm wide.
Wood-look interior Source mebelkhb.ru
Stage 4: installation of sashes
The guide with which the door leaf will move must have a strictly horizontal position. However, the ceiling is often not flat. Therefore, in order to align the guide, MDF gaskets are fixed between it and the ceiling, which are masked by a chipboard frieze 0.8 cm thick.
Cabinet assembly Source napoleonmebel.ru
To determine how far apart the walls, floor and ceiling are from each other, measure the height of the niche on both sides. Having determined the difference between the values, leveling pads from MDF are made and fixed under the ceiling. The upper guide is fixed through them. Holes for dowels are drilled in the ceiling, and then the guide is fixed with self-tapping screws.
When trying on a frieze, they leave a reserve, due to which it will be possible to make a precise adjustment of the part during the installation process. The frieze is applied to the gap, markings are made on its surface and trimming is performed along it.
The frieze is attached to the guide with double-sided tape, having previously degreased the surface. First, the adhesive tape is attached to the guide, then the protective film is removed from the outer adhesive layer and the frieze is applied.
Types of guides for sliding wardrobes Source www.youtube.com
You can also use double-sided tape to secure the bottom guide. This will make the movement of the shutters smooth and silent, and will also protect the rollers from premature wear. The sashes are inserted into the guides and adjustments are made.
Beautiful model for the hallway Source komandorz.com.ua
Advantages and disadvantages
The designs have found their niche in furnishing not only the hall, hallway, but also in living rooms and children's rooms due to their undeniable advantages:
- Narrow wardrobes in the hallway have expanded capabilities (functionality);
- Modern models provide additional storage compartments;
- In the absence of swing doors, they are ergonomic in space;
- Wide range of built-in and cabinet models;
- They have an attractive appearance;
- When installed on the doors of mirrors, they can visually expand the space of the corridor.
Modern models of narrow sliding wardrobes provide additional compartments for storing things.
Narrow cabinets have a number of disadvantages, which in comparison with the advantages are not so significant:
- The average cabinet depth is 50 centimeters (40-60 centimeters), ten of which are occupied by the “sliding” system;
- With a non-standard layout, the possibility of purchasing a finished product is excluded. There is only one option left - to make the product to order, which will affect its cost.
Narrow wardrobes have an attractive appearance.
The demand for cabinets of this type among the population has increased competition among manufacturers. Therefore, after spending a little time, in stores you can choose the optimal wardrobe for a specific corridor.
When installed on the doors of mirrors, they can visually expand the space of the corridor.
Wooden wardrobe
Natural wood is not suitable for making a built-in wardrobe. First of all, it's expensive. Secondly, wood cannot cope with the level of humidity, which is always higher in a niche or closet. As a result, the wood will begin to absorb moisture and deform.
Decorating a hallway in wood Source rpk-s.ru
But a free-standing wooden wardrobe, a model with a wooden facade and side walls, can be made. The use of natural wood can be a fundamentally important condition when creating furnishings in a classic style, as well as where imitation wood is inappropriate - in a loft style or Scandinavian interiors.
Model with dimensions Source formicart.ru
The advantages of furniture made of natural wood include:
- Presentable appearance.
- The presence of artistic carved decor.
- Rich natural shades and unique textures.
- High quality and environmental friendliness.
- Durability.
The only negative is the high cost of the product. However, partially embedded models do not require as many elements. Only the facade and side walls can be made of natural wood, and the interior space can be covered with panels imitating natural wood.
Functional space Source mebelino.com.ua
Sliding door options
Stage one. First of all, you need to take accurate measurements; all further work on the manufacture of the door or the entire cabinet will depend on this. We strongly recommend that you contact professionals if you are making a custom-made wardrobe or a door for it. You should carefully measure the access space to the cabinet at three marks: bottom, middle, top. If additional decor options are being considered, then their sizes should also be taken into account. In any case, doors for sliding wardrobes will be inexpensive for each of our clients.
Stage two. Delivered doors for sliding wardrobes must be equipped with all necessary spare parts for their installation. Be sure to check the complete chassis set, it consists of lower and upper guides. In order not to make a mistake and not to buy missing parts, we recommend that you seek help from our professionals, who will be able to make and install doors for sliding wardrobes inexpensively without any problems.
Stage three. A top track is attached to the ceiling, taking into account the depth of the cabinet. Standardly this figure is 640 mm. You should first measure the depth of the cabinet and make faint notes, which can then be used to guide you. Afterwards, the width of the opening along the ceiling along which the guide is cut is determined. Next, 2 holes with a diameter of 10 mm are drilled along the edges, while the rest are made every 50-60 mm with a diameter of 4 mm. It is very important to flare all the holes made so that you can completely screw in the screws. All that remains is to screw the guides to the ceiling or roof of the cabinet.
Stage four. This step consists of installing the bottom rail, following the method described in the previous paragraph. However, the lower track is fixed after the door is completely installed.
Stage five. Attaching the lower and upper rollers. After this, you can install the door in the upper and lower guides. To check horizontality, it is recommended to use a “spirit level”. If everything fits perfectly, screw the lower guide to the base (floor).
Stage six. Before you start adjusting the compartment doors, use special adjustable legs (usually they are provided in the kit). All adjustments are made with a hexagon. After the work has been done correctly, the compartment door should fit very tightly against the overall body of the cabinet, both in the closed and open positions. Doors should move smoothly, without squeaking or rubbing.
Stage seven. The final and most enjoyable stage of installing a compartment door. It consists of removing all protective films and coatings.
In our company you can
order sliding doors of a wide variety of types according to individual sizes and interestingly decorated.
We guarantee the high quality of our products and installation work.
Rectangular cabinet
This is the simplest and most spacious design. The cabinet can be fully or partially built-in. For such a model, it is easiest to choose a place and internal equipment.
In addition, there are many options for the external design of the doors, depending on the style of the hallway interior. The doors can be made glossy in a single color or any image can be applied to them using photo printing. To make the hallway more spacious and bright, you can use floor-to-ceiling mirrored doors.
Wardrobe in beige tones Source www.tucanodesign.pl
Rectangular cabinets come in two and three doors. The number of compartments is selected depending on the area of the room. To hide the storage area on the upper shelves, the facade is divided into two parts - doors and mezzanines.
Varieties of radius structures
Radius cabinets look original and unusual. They are concave, convex, combined (wavy), round and angular. Thanks to the variety of shapes, it is possible to choose a radius model for a room of any size and configuration. For example, a corner option will look best in a small room, and a concave or convex model in the corner of a spacious hallway. The wavy cabinet looks impressive.
Facade of a radius sliding wardrobe Source mk-stildizain.ru
The advantages of such models include:
- Stylish appearance.
- Larger capacity.
- Possibility to place anywhere in the room.
- The ability to hide the design features of the room.
- Many options for internal filling.
- Convenient sliding opening mechanism.
- Wide range of design options.
The disadvantages include the high cost of manufacturing, since you won’t be able to assemble such a cabinet yourself.
Shelf arrangement option Source www.optimaglass.ru
Square wardrobe
If the hallway area allows, one of its corners is allocated for a square cabinet with sliding doors. The size of this structure allows it to be called a separate room and used as a full-fledged dressing room.
Such a cabinet has two walls, and the other two form the corner of the room. External walls can be made of any material - chipboard, MDF, plasterboard or tempered glass. The last option looks especially extravagant. From the inside, you need to hang thick, straight-cut floor-length curtains.
Double-sided cabinet Source www.antonkassir.ru
The interior space is equipped as in a standard dressing room - shelves, holders, containers and organizers, a chest of drawers, a mirror, and clothes rails.
Stylish design Source shkafy-kupe.smebel.by