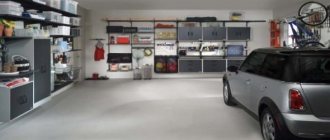
If you just keep a car in the garage, for you it’s just a small “home” for the car. But for many of our people, the garage is something more than just an iron (or brick) box. Some people enjoy tinkering with their car, tinkering with something, or even getting together with friends.
To make it comfortable to spend time in the garage, it must have heating. Most often it is a simple potbelly stove. How to properly install a chimney for it - we will consider below.
Questions to answer before starting work
To solve the problem correctly, answer a few questions:
- Do you need to heat up your garage as much as possible? If so, the chimney must be installed indoors so that the heat from the hot smoke passing through the pipe warms the garage.
- How should the problem be solved: quickly, cheaply or efficiently? If it’s cheap and quick, you can make a stainless steel pipe and run it directly through the wall. If it is of good quality, you can buy an insulated sandwich chimney and bring it out through the wall at the top or through the roof.
- Will you make the chimney yourself, or pay specialists? If you do it yourself, it will be easier to put a chimney through the wall.
- Is your garage adjacent to other garages? If yes, and there is no space between the walls, or there is very little of it (a person will not fit), there is only option 1: make an exit through the roof.
Should the outer part of the pipe be insulated, and why?
Due to the large temperature difference (it’s frosty outside, but hot smoke flows through the chimney), condensation will form on the surface of the chimney. It will flow down, spoil the appearance and clog both the chimney and the room.
To reduce condensation, the outer section of the pipe must be insulated. As an option, you can buy an already insulated chimney. But it will be cheaper to use a stainless steel pipe and insulate it yourself.
For insulation, the easiest way is to use any roll insulation made from mineral wool or foam rubber. It must be wound in several layers over the pipe from the beginning (from the place where the pipe exits through the roof) to the deflector). A wire is wound over the insulation (which will prevent it from unwinding) and construction tape is glued.
How to organize condensate drainage and cleaning hole 2-in-1? (+video)
Since chimneys in garages are most often assembled by the owners themselves, quickly and in the most economical way, they are not airtight. Leaks in the pipe will allow condensation to flow in winter. This is unsightly: brown streaks will be noticeable.
To avoid this, it is better to provide in advance a method for collecting condensate. The simplest option is to insert a tee in the place where the pipe will approach the penetration through the ceiling or wall. One end of the tee should go up, the second should “look” at the floor, the third should be located horizontally.
A pipe from the potbelly stove itself is connected to a horizontal hole. And any container is screwed to the bottom one, into which the condensate will drain. The container must be removable. If you remove the condensate collector, you can use this hole to clean the chimney from soot.
There is also a purchased option - a plug with a condensate drain. For a diameter of 110 mm it costs about 600-700 rubles.
How to properly assemble and install such a structure yourself is easier to understand from the video:
Chimney design options
It can be difficult to organize the correct chimney for a potbelly stove, and all because people do not know the usual rules and systems. In total, the builders mean three design options. The choice should depend on several factors, among which the main one is the design of the chimney, the diameter of the chimney for the potbelly stove, as well as the fact through which wall or roof it is discharged to the street.
- When the chimney of a potbelly stove is routed through the ceiling or roof, it is better to use an energy-saving design; this fact is especially important for the chimney of a potbelly stove for a garage. The design assumes the transfer of thermal energy, including from the pipe itself, which rises vertically. For such a scheme, it is better to initially provide adequate fire protection.
- In cases where the pipe is supposed to extend 20-30 cm to the ceiling, another heat source is also formed. The section of the chimney located in the room is responsible for this. In a do-it-yourself garage, when arranging such a system, you need to make sure that there are no structures on the side of the building.
- There are cases when the pipe is taken out “straight” from the wall opposite the stove. In this case, you need to separately calculate the dimensions and take into account tilts and turns. In addition, in this case, the design of the chimney requires calculating the height outside the building, the possibility of insulation and other issues. This design has one main advantage that can outshine all other types of outlets - high fire safety. But, in this case, additional heat is lost that would come from the stove pipe.
Options for chimney designs
In addition, the device may differ depending on where exactly the potbelly stove will be installed. For example, there are two options:
- Street.
- Room.
In the first case, installation does not require serious knowledge and skills; the main thing is to choose the correct diameter and insert the pipe into the right place. In case of installation outdoors, remember that for proper operation, one important factor must be taken into account, such as height. The height of the chimney, together with the stove, must exceed the height of a person.
Indoors, installation will differ depending on which one of the three types of installation is selected. Consider the individual characteristics of the room, size, and fire safety.
Choosing a chimney scheme for a garage (+ video comparison)
The chimney can be carried out according to 2 schemes:
- Through the roof. The pipe runs up from the stove and goes out through the roof to the street.
- Right through the wall. The pipe is immediately led out through the wall and goes upstairs from the outside.
- Through the wall under the ceiling. The pipe runs along the wall from the stove up into the room. Under the ceiling - it turns, goes through the wall, turns again outside, and goes upstairs.
Below we will look at each option in more detail..
Output through the roof
Installation through the roof is more complicated, because it is necessary to achieve a tight seal when the pipe is brought out. But if the rows of garages are located right next to each other (and this often happens in garage cooperatives), then the chimney can only be removed in this way. Alternatively, it can be brought out through the front wall (which contains the gate).
Materials you will need:
- Chimney. The material is selected based on the budget (we’ll talk about it in more detail below). Diameter - selected to match the diameter of the stove outlet. We'll talk about the length (height) below.
- Ceiling-passage unit. Attached to the ceiling hole from the inside of the garage. The cost of stainless steel polyurethane foam with a diameter of 110 mm is about 900-1000 rubles. You can do without it by installing only the master flush on top.
- Master flush (roof penetration). Attached to the hole in the ceiling from the outside (from the street). Costs about 900-1300 rubles. You can do without it.
- Deflector (to cover the pipe from above and improve traction).
It is best if the pipe does not have bends (and if there are, then there should be as few of them as possible, and if possible not at right angles). This way the smoke will be better removed from the stove during combustion.
But on the other hand, small potbelly stoves are installed in garages, and the chimney will still be short. Therefore, if you need to heat the room better, you can bend the chimney and run a small section inside the garage. So that the smoke, passing through it, heats the room.
Budget-friendly sealing of a roof passage without a master flush (video)
Output through the wall
To bring the chimney out through the wall, you don’t need a master flush and polyurethane foam - you only need a pipe, bends (for bending) and a deflector.
Exiting a chimney through a wall is easier than through a roof (because it is easier to seal cracks in a vertical wall than in a roof, which will receive more rain).
However, it is not always possible to arrange an outlet through the wall. Often garages are built side by side, or stand close to each other, or there is a very small distance between them where a person cannot squeeze through. There can also be another garage on the back wall (that is, your garage will be surrounded by neighbors on 3 sides). In such a situation, the only option left is through the roof.
The cracks in the wall (between the pipe and the wall) on both sides (from the street and from the room) must be treated with heat-resistant sealant.
Example: diagonal chimney with outlet through the front wall (video)
Potbelly stove from a gas cylinder
A potbelly stove in the garage from a gas cylinder is the second most common option. Since the cost of the cylinder is low, making a wood-burning stove will not be expensive at all. The advantage of this material is that it has rough walls that are easily machined with a welding machine and hold heat well.
In this case, the only difficulty will be preparing the cylinder, because all the gas must be released from it. Even if the structure stood for several days with the valve open, and at first glance the gas came out, its vapors may remain inside. And this is very explosive.
There is an opinion that if you cut off the top and pour water inside, the evaporation will go away. In fact, this is not so - the chance of an explosion is still present. But still, this option is safer than simply releasing gas.
Horizontal stove
Often, a potbelly stove is made from a cylinder in a horizontal form, since its shape is suitable for the combustion chamber. An ashtray is simply mounted below, with a separate door. But this is an easy option. In a more complex one, the silo is arranged inside the cylinder, but this method is not very rational.
Internal design of the potbelly stove
Instead of a grate, you need to drill holes (at the bottom of the cylinder), which will be placed at a distance of a centimeter and a half from each other. Such holes can be drilled in three to five rows. If there is a real grille, a window is cut in the wall of the cylinder, where it is inserted. Of course, its effectiveness is much greater than in ordinary drilled openings.
General view of a horizontal potbelly stove
For the firebox door, take a separately cut rectangle from metal and attach it to the canopies. In stores you can buy ready-made door designs for closing the firebox. The finished balloon structure must be welded to the legs; they can be cut from corners or pipes. The height of the stand can be adjusted to make it convenient to light and monitor the stove. At the back, make an exit for the chimney, which will be made according to the same principle as in the previous model.
Vertical stove
If the garage does not have enough space to make a horizontal stove, then you can also make a vertical one. For this purpose, the cylinder is divided into two chambers, and brackets are welded inside. A round grid corresponding to the size will be placed on them (or holes can be drilled in a selected metal disk). As in other models, two doors are installed - for the firebox and for the blower.
Vertical potbelly stove from a cylinder
A sheet of metal is used to cover the top part. The chimney is made from a pipe with a diameter of ten to eleven centimeters, bent by ninety degrees (three times thirty).
What pipes should I use? (+assembly video)
It is impossible to build a brick chimney in a garage; asbestos and ceramic ones are difficult to use.
Therefore, there are 2 options left:
- Stainless steel pipe.
- Stainless steel corrugation.
Corrugation can and is conveniently used to lay the inside of the chimney (which runs inside the garage). It can be carried out all the way to the tee near the wall or ceiling.
Stainless steel pipe - can be used both for the external (street) part and for the internal part. Working with it is a little more difficult: since it cannot be bent, each turn will have to be connected to a bend. But the stainless steel pipe is smooth inside, and the corrugation is ribbed (which means soot will accumulate).
Let's summarize: the simplest and cheapest option is corrugation inside, then a tee, then a stainless steel pipe outside. The option is more convenient (to maintain), but a little more difficult to install - a stainless pipe both inside and outside.
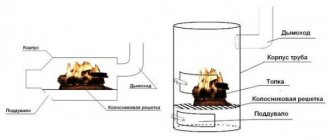
Design and principle of operation
A solid fuel stove of the simplest design does not have any intricate elements. Essentially, it is a metal container with two main compartments.
The main material used for its manufacture is metal. Since it must provide resistance to high temperatures, the metal should be selected with a thick wall. Be it a barrel, an old gas cylinder, a piece of pipe or individual pieces of sheet metal.
Use only steel elements to make a potbelly stove. Aluminum, brass, cast iron (except for the grate) materials are not suitable. There will be a problem with their installation due to the peculiarities of welding various metals. Also, the melting point of these metals may not be suitable.
The main compartment (firebox) is the container in which the combustion process takes place, which means it must be large enough, with access to air, outflow of smoke and other volatile combustion products, but at the same time structurally suitable for the installation site.
The second main compartment is the ash pit (ash pan). The ash pan is located under the combustion compartment, connected to it by mesh-type holes or a grate made of thick metal (rod, fittings). The ash pan serves to remove ash from the combustion compartment in a natural way. The ash, under its own weight, pours into the ash pan compartment through the holes. Ashes are removed directly from the ash pan by hand.
It is advisable to install a door on the ash pan; by adjusting the gap, you can control the intensity of the air flow entering the firebox. The door in the firebox should be closed after loading and igniting firewood.
Main compartments: firebox and ash pan
A pipe is welded into the top sheet, through which the smoke flows out. A metal pipe is welded to this pipe, leading the smoke to the street.
How much will chimney materials cost?
What's the price?:
- 1 m of straight stainless steel pipe, thickness 1 mm, diameter 110 mm: about 900 rubles;
- bend 90º, diameter 110 mm: 950-1000 rubles;
- bend 45º, diameter 110 mm: 850-900 rubles;
- T-shaped tee, diameter 110 mm: about 1000 rubles;
- plug with condensate drain: 650-700 rubles;
- master flush: 900-1300 rubles;
- ceiling-passage unit: 900-1000 rubles;
- deflector: from 1000 rubles;
- heat-resistant sealant: from 200-300 rubles;
- insulation (Penofol, thickness 3 mm, roll 30 m long and 1.2 m wide): 1800-1900 rubles.
Preparatory work
Before assembling the stove, you need to decide on its size and installation location in the garage. There are no standard recommendations on this matter. It is necessary to take into account such factors as the convenience of the design, understand the physical processes of heating the room and heat transfer, the flow of air into the room and its ventilation. The larger the heated surface area of the potbelly stove, the faster the garage room warms up. But the dimensions of the potbelly stove should not be a detriment to the garage area. This is also important for fire safety reasons, because the entire structure of the furnace is heated to fire-hazardous temperatures.
It is often recommended to install potbelly stoves in the far corner of the garage, and make the chimney in the opposite direction. Thus, the fastest heating of the room is achieved; due to the long structure of the chimney pipe, greater heat transfer is produced. The disadvantage of this design is the slope of the chimney pipe. The angle of inclination should not be less than 30 degrees. The ideal position is vertically up. Providing better heat transfer, you have to sacrifice the efficiency of the chimney. This increases the risk of smoke leaking into the garage. The seams of such a pipe should be checked for leaks before installation.
This principle of placing a potbelly stove would be more suitable for a basement than for a garage.
It is optimal to place the potbelly stove in a convenient place. The place itself needs to be prepared. It is necessary to lay a metal sheet or a small concrete slab on the floor, the edges of which should extend beyond the dimensions of the potbelly stove by at least 200 mm. This is due to fire safety. It is also necessary to remove flammable materials as far as possible from the stove.
Photo gallery: where is the best place to put a potbelly stove in the garage?
Location at the gate
Location in the far corner
Location at the gate
Garage chimney maintenance
The rules for caring for a garage chimney are the same as for any other chimney.
The system must be inspected at least once a year to see if it is damaged.
It is also advisable to clean the chimney 1-2 times a year. To do this, you can use chemicals (a special log that is burned in a potbelly stove, and whose smoke decomposes the layered soot). But it is better to use a brush. It will be easiest to clean the pipe with a brush if you install a tee in it with a removable condensate collector (the collector is removed and the chimney is cleaned through the opened hole).
Review of Furanflex polymer chimneys: characteristics, pros and cons
How effective is a Chimney Sweep log for cleaning a chimney?
Related Posts
Drawing and diagram: calculation of basic parameters
The main parameter that ensures the correct transfer of heat from combustible products in the firebox - not into the chimney, but into the room - is the correctly selected chimney diameter.
The cross-section of the chimney pipe can be calculated based on the volume of the firebox. The optimal ratio in numerical terms should be 1 to 2.7. This indicator is taken from the calculated parameters of metal and brick furnaces. It is nominal and generally accepted.
This ratio is very easy to calculate. We calculate the volume of the firebox. For example, 70 liters. Then the cross-section of the required pipe will be 182 mm. (70 * 2.7 = 189 mm, the closest according to GOST is 182 mm). This calculation means that such a cross-section of the pipe will optimally ensure the outflow of smoke in the chimney and sufficient resistance to retain heat in the potbelly stove.
Efficient heat transfer is the main parameter of a potbelly stove. The rest is design features. Which depend on the installation location and the imagination of the designer. This refers to the volume of the stove, its dimensions, the presence of legs or a stand, vertical or horizontal position.
The most efficient design, designed taking into account thermal technological features, is presented in the following diagram:
One of the most effective models. "Engineer Loginov" stove
The diagram clearly shows structural elements made of sheet metal with dimensions, the process of movement of hot air and combustion products in the section of the furnace. The names of the main elements are also shown on the diagram.
Long-lasting care
To ensure reliable operation of the unit, before each new season it is necessary to carry out simple manipulations to care for the chimney, namely:
- Carry out a visual inspection for possible damage due to rust or any other harmful effects;
- And also clean the pipe from soot. It is better to use special chemical additives added to the burned fuel. When burned, they enter into a chemical reaction with soot deposited on the walls of the pipe, thereby cleaning it.
By following the simple rules for chimney production during installation, as well as periodically checking it, you will get a good heating system for the garage that will serve you for a long time.
Features when drawing up drawings and working
Since it is possible to make a chimney correctly for a potbelly stove only by understanding the design features and features of working with the material used, you should study several recommendations:
- Since the chimney may burn out after a long period of use and require replacement, it is better to opt for a collapsible structure that will take up minimal space. Thus, a chimney for a potbelly stove can be divided into parts that reach the wall or ceiling, and elements that go outside, and, if necessary, replaced.
We recommend that you study in more detail the article about installing a chimney from a sandwich pipe with your own hands in addition to this article.
The diagram shows the correct installation and outlet of the chimney through the roof
Tip: You can additionally fasten and seal the seams between the parts of the chimney for a potbelly stove using asbestos cord or heat-resistant sealant.
- The chimney design can be divided into two parts, one of which removes smoke, and the other plays a heat exchange role. If a chimney is created for a garage that does not need to be constantly heated, you can make a chimney for a potbelly stove through a wall with direct access to the street. Otherwise, the pipe must be routed throughout the room.
We recommend reading the article about the design of a coaxial chimney and finding answers to your questions.
A damper mounted inside the potbelly stove at the entrance to the chimney will help regulate heat exchange.
Modern models of potbelly stoves have many modifications, which allows you to efficiently heat large rooms and use the unit with a high level of safety. If you have certain skills, you can adopt some elements when creating a chimney for a potbelly stove with your own hands:
- Use a special tight seal to eliminate the risk of smoke.
- Add valves that will help control the intensity of combustion.
- Purchase a system that processes the gases released, thereby increasing productivity.
- Finish with fire-resistant material so that heat escapes more slowly and the structure does not overheat.
Do-it-yourself wood-burning garage oven: safety rules
A self-made potbelly stove for a garage must first of all be safe. When using it, the following rules must be observed:
- the floor and walls around the stove must be made of refractory material : tiles, iron, plaster, brick. It is permissible to cover the walls with special plasterboard;
- flammable objects or substances near the stove
- the stove can only be built from proven quality materials;
- the garage must be equipped with a ventilation .
A DIY garage wood stove Therefore, ventilation of a garage equipped with a potbelly stove is extremely important for two reasons:
- if there is a lack of oxygen, the fire in the stove will go out or burn weakly;
- Excess carbon dioxide indoors can cause poisoning or death.
To remove combustion products from the garage, it is necessary to install a chimney , but if problems arise in the pipe, ventilation will prevent the garage from catching fire or poisoning the people in it.
The necessary access to fresh air can be ensured by leaving a small (up to 5 cm) gap under the gate or by making several ventilation holes under the roof.
Do-it-yourself wood-burning stove for the garage:
Selecting a location
It is best to install a potbelly stove in the corner of the wall opposite the gate. The heat emanating from the far corner will warm the room and remain in the garage even when the door is opened. The distance from the wall to the stove can be about 0.5 m if the walls are made of brick, iron or any non-combustible material. With wooden walls, it is better to move the stove 1 m and cover the walls with bricks, tiles or cover them with a steel apron.
IMPORTANT: The minimum distance from a homemade stove for heating a garage to a car and any objects that can burn is 2-2.5 m . Reducing this distance increases the likelihood of fire and poses a threat to the paintwork of the car.
An iron sheet is placed underneath the stove or the floor surface is cemented within a radius of 1-1.5 m. Thanks to this, coals that accidentally fall out of the stove or flying sparks will cool down without causing a fire in the garage.
Brick walls lined on the sides and end of the stove increase safety and increase the heat transfer The slowly cooling brick will maintain the temperature in the garage for several hours after the furnace has finished firing.
brick a square or rectangular stove yourself Incorrectly covering a cylindrical potbelly stove with stone can lead to a reduction in heat transfer to the room and rapid burning of the metal walls of the stove. increase the heat transfer of a furnace made from part of a pipe by welding metal ribs to its sides.
The dimensions of the potbelly stove for the garage are:
- height 50 cm (body 30 cm and legs 20 cm);
- width 30 cm;
- length 50 cm.
When making a potbelly stove from a metal pipe, the diameter of the latter must be at least 30 cm. For any stove shape, the minimum metal thickness is 5 mm.
Do-it-yourself wood-burning stove in the garage - drawings:
Fuel reserve
Firewood is the most popular fuel for garage stoves. They allow you to quickly warm up a room and are inexpensive (or you can prepare them yourself, i.e. get them for free).
For a potbelly stove , well-dried (preferably aged for more than a year) firewood, sawn 25 cm long and stored in a ventilated place protected from precipitation, is suitable. A shed is ideal for storing firewood , but you can also store it under a canopy. When choosing fuel , it is worth considering that different wood produces different amounts of heat:
- pine, spruce and larch burn out quickly and provide little heat;
- oak, birch, acacia, pear, apple, cherry and maple have greater density, burn slower and give more heat.
In addition, when burning coniferous trees, a lot of soot , which settles on the chimney and creates a fire hazard. Burning birch is no less dangerous - the released tar mixes with soot and settles in the pipes and on the walls of the firebox.
The most dangerous fire method is burning coniferous or birch wood in smoldering mode. Resins and tar settle on the pipes and impregnate the brick; it is impossible to clean them off mechanically.
It is advisable to stock up on firewood a year or two before use. Delivery can be ordered online or through advertisements in local newspapers. But you can stock up on firewood for free:
- in forest areas, obtain permission to cut down trees in a certain area (you will need to collect documents and spend time visiting authorities);
- collect dry trees and large branches fallen by the wind in groves, forest belts and courtyards;
- go to the nearest sawmill , where wood waste is burned or allowed to be picked up by those who wish (you may need a small remuneration for workers);
- find an area where furniture factories are cutting down forests - branches, tops and root parts of trees remain in place, which can be cut down and taken away.
Modernization of a potbelly stove
Installing a potbelly stove in a garage will provide warmth and comfort. But the efficiency of this furnace can be increased by 10-15%. Here is a list of technical solutions:
- Installing a brick jacket on the back and sides - we have already talked about this. The thickness is half a brick;
- Installing a chimney with a long horizontal section - it will retain some of the heat escaping into the chimney. We put the stove in one corner, extend the chimney to the other, and then take it upstairs;
- We cover the walls with steel sheets - they will reflect infrared radiation back into the room;
- Installing a steel jacket around the stove - we surround the potbelly stove with steel sheets located at a distance of 40-50 mm from its walls. This solution forms a convector that forces air to circulate throughout the garage.
This is quite enough to “squeeze” the maximum thermal energy out of the stove. When installing a furnace to heat your garage, do not forget to take care of purchasing a fire extinguisher.
Materials and their quantity
The list of materials required for the construction of a chimney varies depending on what kind of pipe structure it is decided to install. If the exit will be directly through the roof, then fewer corner bends will be required.
A standard size chimney will require the following number of pipes:
- 1 elbow 120 cm long, 10 cm in diameter,
- 2 elbows 120 cm long, 16 cm in diameter,
- 3 butt elbows 16*10 cm,
- Tee with a diameter of 16 cm and a plug for it,
- Fungus – 20 cm,
- Sealant.
In addition, for the construction of various chimney structures, other parts may be needed: an anti-spill canopy, a passage glass, thermal insulation materials.