When installing plumbing fixtures in residential premises, certain standards are adhered to, designed for the average consumer - this allows most people to use the devices comfortably. When installing plumbing fixtures with your own hands, it is useful to know what height the sink in the bathroom is: the standard from the floor, because compliance with this standard is optimal from the point of view of ergonomics, and the distance itself is determined by specialists using scientific methods.
The height standard is not the same for adults, small children and teenagers and is regulated by building codes and regulations (SNiP), it is taken into account when installing sinks in educational institutions for children, kindergartens, camps, hospitals and other institutions. In addition, regulatory rules establish not only the distance from the floor to the top of the sink, but also its location in relation to other plumbing fixtures and the installation of sanitary equipment in general.
Sink for the whole family
Why is it important to choose the right height and consequences if the sink is high or low
The reasons why the correct selection of the height of the sink placement is important can be considered from the point of view of its incorrect location above or below the regulatory requirements. If the sink is lower, possible consequences:
- Elderly people suffering from radiculitis often experience back pain from bending at an acute angle and being in an uncomfortable position.
- Often a cabinet with a mirror is placed above the sink; if you are forced to tilt low, your head will rest against its outer surface - this will interfere with water procedures.
- If the sink is low, it is impossible to install standard-sized objects under it: a household washing machine, a cabinet, a basket with laundry.
- With a low bowl and a standard location of the mixer, due to the large distance between them, the amount of splashes during water procedures will significantly increase, as a result of which you will have to spend additional effort and time cleaning the room.
- A low-mounted sink will disrupt the aesthetics of the room and will cause constant inconvenience when using water, which will be an irritating factor that spoils the mood of the residents every day.
The high location of the sink from the floor level also causes a number of specific problems:
- When placing a cabinet or washing machine under the bowl, a large gap will appear between them - this will disrupt the aesthetics of the room.
- Schoolchildren will find it less convenient to use the washbasin and will have to reach up.
- Small children need to buy a stand of a higher height to use the sink - this will increase the risk of injury from a fall and will require the constant presence of adults.
As can be seen from the listed factors, the standard installation height of a bathroom sink from the floor will help to avoid a lot of unnecessary problems with the ease of use of the equipment and the placement of furniture, laundry baskets or electrical equipment for washing under it.
SNiP 3.05.01-85 for placement of plumbing fixtures
Lamps above the mirror
If the purchased mirror model does not have built-in lighting, then you need to organize it. To do this, it is very practical to use spotlights or LED strips. You can also hang sconces on the wall (or even candelabra, if they suit the interior).
When organizing lighting, we observe the following rules:
- We place the lamps either above the upper horizontal edge of the mirror, or on both sides of it.
- It is better to place long lamps (or strips) along a long mirror.
- A wide mirror prefers light pouring from above.
- Lamps must be protected from moisture. Better if not below IP55.
- We prefer safe lamps (optimally 12 volts).
As for the mounting method, small sconces can also be attached to a mirror surface. So, by the way, there will be more light due to reflection. Hanging lamps placed on both sides will give the same reflective effect.
We will tell you where and how you can buy a bathroom mirror inexpensively in the next section.
Photo of a lamp above the mirror in the bathroom
Standard bathroom sink height
When deciding at what height to hang a sink in the bathroom, they are guided by SNiP 3.05.01-85, it regulates the ergonomic distances from the floor to washbasins in different types of rooms; according to the standards, it is equal to:
- 800 mm in public and industrial buildings;
- 700 mm in school and children's medical facilities;
- 500 mm in kindergartens and buildings with disabled people moving with the help of strollers and other devices;
For sinks and sinks, the standard distances from the top edge to the floor have the following values:
- 850 mm in public industrial buildings;
- 850 mm in schools and health care institutions for children;
- 500 mm for preschool institutions and premises with wheelchair users.
For the listed plumbing equipment, height deviations of 20 mm are allowed; if a group of similar devices is installed, a maximum deviation of 45 mm in one direction or another is allowed.
When installing one mixer on a bathtub and a washbasin, its optimal height from the floor to the top edge is 850 mm.
For school facilities, two sink height standards are regulated:
- 550 - 600 mm for primary school students;
- 650 - 850 mm for children of middle and high school age.
Standards from SNiP II-64-80 regulate at what height to install a sink from the floor in gardens and nurseries for children, its values:
- 400 mm for nursery groups;
- 500 mm for preschool groups.
Dimensional parameters of the space in the sink area and its height
How to determine the optimal height and whether it can be changed
If there are several people of different heights in the family (we are not talking about a big difference between preschoolers and adults), then you can install the sink at the optimal distance from the floor so that all family members can use it, while it will be equally inconvenient for everyone to take water procedures or wash dishes
It was experimentally revealed that the comfortable distance from the floor to the sink is different for men and women, it is 850 - 1020 mm for the male half, and 800 - 920 mm for the female half. If there is a middle class student in the family for whom a height of 650 mm is better suited, then you can calculate the optimal distance from the floor by finding the arithmetic average. To do this, add up the standard height values of 940 mm for men, 860 mm for women and 650 mm for a schoolchild, resulting in a sum approximately equal to 817 mm, which is optimal for a given family. This distance is within the standard range, so it will not cause any inconvenience when placing furniture or a laundry basket under the sink.
A more accurate option for correctly determining the height of the sink for the whole family is to measure the distances from the elbows to the floor of each member. In this case, we take into account the fact that it is most convenient to wash your hands if the sink is located 100 mm below the level of the elbows (with a higher location, water will flow down the elbows and drip onto the floor). With this method, the distance from the elbows to the floor of each family member is measured, minus 100 mm from the readings, and then the arithmetic average is found.
It should be noted that the above examples of calculations of optimal height do not make much sense when taking into account children and schoolchildren who will grow up over time; it is better to use the formulas in the case of adults with their constant growth.
It is clear that the height of the sink can be changed not only within the standard norms by 20 mm in one direction or another, but also at your discretion in order to provide additional convenience, however, you should not go beyond the limits of 750 - 900 mm, which fall within the standard deviation limits .
Free space and standards for distances between plumbing fixtures in the bathroom
Types of models and materials available on the market
For the production of overhead sinks, the following materials are used:
Ceramic is one of the most common materials for countertop sinks.
When we say “ceramics” we mean both porcelain and earthenware products. Both the first and second ceramics differ in chemical composition (slightly) and production technology (here the difference is greater). In terms of their consumer properties (durability, ease of maintenance, appearance) they are very similar, so here we combine them.
Although the difference in price between products made from sanitary porcelain and earthenware is significant (2-5 times). According to the author, this is due to historical reasons and an attempt to influence the psychology of the buyer - porcelain has always been positioned, and manufacturers willingly support this opinion, as expensive, elite sanitary ware. Although we repeat in terms of performance characteristics, it is a little better (but again, in the author’s opinion, not so much as to overpay 5 times).
Every major manufacturer has 1-2-3, or even a whole line of ceramic overlay models. Sinks of various shapes and sizes. Inexpensive, technologically advanced, beautiful and durable.
It is easiest to purchase a counter-mounted ceramic washbasin. It is practical and easy to clean. It is easy to find and replace if accidentally damaged.
Glass is the second most popular material. Glass countertop sinks are more expensive than ceramic ones. They are not inferior to ceramics in strength, but are significantly superior to it in elegance and beauty. Of course, the most beautiful countertop sinks are made of glass.
Like ceramics, there are a huge number of models of the most varied shapes from all major manufacturers. There are undisputed leaders here in terms of quality (kraus), assortment (frap), and price (also probably frap).
Marble looks great; together with a properly selected countertop, it creates a luxurious composition.
However, it is always expensive. Expensive sinks are made of cast marble, when the sink itself is made of marble chips and composite materials. Even more expensive, and significantly more, are sinks made of natural marble.
Some people think it is impractical. The material is porous and needs to be taken care of very carefully. We can agree with this when it comes to natural marble. True, we must not forget that if you are able to afford such plumbing equipment, you will definitely not take care of it yourself.
And modern overhead sinks made of cast marble are quite practical.
Granite is most often used for the production of kitchen sinks, but it is quite possible that you will also find granite bathroom sinks on sale.
Granite sinks can also be divided into those made from natural and artificial stone. Typically granite sinks are cast from composites and granite chips.
Granite, like natural stone, looks beautiful, but is not very practical. It is somewhat cheaper than marble. Artificial stone sinks are good because of their reasonable prices, variety of colors, natural patterns, and ease of care.
Metal overmount sinks for bathroom countertops are used less frequently. Such sinks are suitable for bathroom interiors in an oriental or Mediterranean style. Some models will look natural in classic interiors.
Such interiors are expensive to create and maintain, and therefore are rare, although it is an overhead metal washbasin in an antique “bronze” or “brass” look that can give them a finished look.
You can see what overhead glass sinks for a bathroom look like in our article. There are other types of glass sinks and countertops available here.
How to make a bathroom in a Khrushchev building beautiful and functional - the answer is here.
Distances from the sink to the surrounding plumbing fixtures
SNiP 3.05.01-85 and other standards, in addition to the height of the sink, regulate its location relative to other plumbing fixtures and walls, the recommended minimum values are:
- between the axes of washbasins located in a row - 650 mm;
- from the sides of the bowl to the walls in rooms with disabled people and ordinary residents - 200 mm;
- to the bidet or toilet - 300 mm;
- to a bath or shower - 300 mm;
- to the heated towel rail or socket - 600 mm.
When installing a sink, it is necessary to provide a free working area in front of it of about 700 mm; if the plumbing fixture for washing is located in a niche, the area increases to 900 mm.
Mirror height
It is difficult to imagine a washstand in a bathroom without a mirror, which is installed separately or in a cabinet designed for storing hygiene items, detergents, medications, and cosmetics. Recommended mirror bottom height:
- 1100 - 1250 mm from the floor;
- 200 mm from the top of the washbasin;
- at eye level if a small mirror sheet is used.
When hanging a mirror, it is important to take into account the proportions; it is convenient for a person to look into it while standing straight, while it is advisable to remove the lower edge from the sink so that drops of water do not fall on it when washing.
Examples of mirror heights
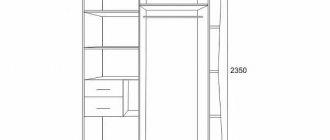
Cabinet assembly
For ease of transportation, sink cabinets are delivered to consumers disassembled. The kit includes panels, fittings, instructions and fasteners. The video shows in detail the assembly process of a typical cabinet:
Without a reliable cabinet, the kitchen sink will not last even the period specified in the warranty card. A good cabinet not only extends the “life” of the sink, but also provides additional space for storing utensils: you can hide dishes, detergents or cutlery in the underframe.
Types of shells
The retail chain offers several types of bath sinks, differing in installation methods, functionality and cost; sometimes ceramic kitchen sinks are used in the bathroom, which are built into the countertop. When choosing them, first of all, the size of the room is taken into account, because in a small bathroom the sink is above the washing machine; placing a bedside table or laundry basket under it will save significant space.
Also, the retail chain sells not only frontal, but also corner models of washstands for bathtubs, which are available in all the options listed below.
On a pedestal
Tulip-type washbasins have a supporting structure, behind which a siphon is placed and a sewer drain and flexible hoses for hot and cold water are hidden. The advantage of the design is the ability to install it without permanent fastening to the wall with large-diameter screws, which cause great damage to the exterior finish. The tulip sink has an aesthetic appearance and decorates the room, it is more suitable for use in large bathrooms (individual cottage-type houses, summer houses), its standard height from the floor is 850 - 900 mm.
Tulip and wall-mounted washbasins
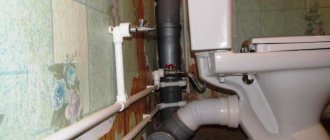
Hanging
The advantage of hanging structures of the classic type is their low cost and the ability to hang at any height from the floor level; this type occupies a leading position in terms of prevalence and is widely used in government agencies, enterprises, educational and healthcare facilities. A wall-hung sink in everyday life is not very convenient when used in bathrooms of any size - in a large room it will look unaesthetic due to the protruding siphon at the bottom, sewer drain and flexible hose, and in a small room it is impossible to place interior items under it. Although in modern apartments, when carrying out European-quality renovations, it is possible to hide sewer pipes and water supply in the walls, a protruding siphon worsens the appearance and does not make it possible to install furniture or a washing machine under the sink.
With cabinet
A sink with a cabinet is considered one of the most successful options, giving the room an aesthetic appearance due to the placement of sewer pipes, water supply and siphon in a closed cabinet, the free space of which can be filled with household detergents, household items, and laundry for subsequent washing. This option is ideal for small bathrooms, allowing you to free up useful space. In the retail chain you can purchase sinks with a hanging cabinet, on legs, or a plinth version, which can be placed on the floor with the entire plane of the base. The height of a standard bathroom vanity cabinet is 850 mm and can be changed into a wall-hung design or with adjustable supports.
Washstands with bedside table and table top
On the tabletop
Sometimes countertops are used in the bathroom, thanks to which they achieve greater functionality of the room. A common option is to use a long countertop, on one half of which there is a sink, and under the second there is a washing machine, while the top above the washing machine remains free and can be used for household purposes.
Sometimes the bowl is not only built into the countertop by analogy with the kitchen, but when purchasing a special model, it is installed on top, while the stove itself serves as a support for it. With this option, the countertop can be placed above the washing machine along with the bowl standing on it, which will save free space.
For washing machine
The advent of specially designed sinks designed to accommodate a washing machine underneath has allowed owners of standard bathrooms to significantly increase the usable area. A similar structure is suspended on a wall panel, while the siphon is shifted back and moved close to the wall, in which sewer pipes and water outlets are also hidden. In this version, the small-width washing machine is moved slightly forward, and its front part is placed in the same plane as the front end of the sink.
Height adjustable
One of the latest fashion trends is the use of height-adjustable sinks in households, where a durable bracket is attached to the wall, along which the bowl moves along with the mixer. Varieties of this method of fastening include sinks with decorative fastening on cables or chains to the ceiling; this option is exclusive and is not intended for the average consumer.
Washstands above the washing machine and with height adjustment
Fastening methods and necessary tools
A mirror is a fragile item that breaks easily, so its installation must be reliable and durable. You can fix the product in different ways. What tools are required for this depends on the type of work.
The nuances of choosing and using glue for mirrors, products from the best brands
Dowels and self-tapping screws are one of the most reliable fastenings; they can withstand the weight of a heavy object well. The dowels are installed in the drilled holes in the wall, then self-tapping screws are driven into them. The number of elements depends on the area of the product: the larger it is, the smaller the gaps between them should be. The recommended drilling depth is 5–7 cm. The mirror is hung at a short distance from the wall to ensure natural ventilation.
Bolts and screws are also a popular option. It is best to purchase mirrors with prepared holes. If they are not there, drill them yourself with a diamond drill, and then sand the sharp edges. The product is attached to the wall in prepared holes, the bolt heads are covered with decorative caps.
Plates are a good option for hidden fastening of canvases without frames. Steel parts are durable, resistant to mechanical stress, and can withstand heavy loads. Before hanging the product, the plates must be glued to its back. Next, drill holes in the wall and install self-tapping screws in them that will hold the plates with the mirror.
Glue, sealant - an option for “eternal” fastening, suitable for canvases weighing from 10 to 20 kg. Advantages – no need to drill holes. Procedure: level the wall to perfect condition (as before painting), install temporary supports for the mirror, degrease the wall. Apply adhesive to the back of the canvas. Having placed the piece of furniture on the supports, press it against the wall and secure it tightly. Remove the auxiliary elements after a few days. Proceed in the same way when gluing a mirror to sealant or liquid nails.
Double-sided tape - this method is suitable for small products without a frame. When choosing this method, you should pay attention to the moisture resistance of the adhesive tape, since this determines how long the mirror will hang. To attach it, the tape is cut into small pieces and glued to the fat-free back side. Having removed the protective layer from the tape, apply the mirror to the markings on the wall and fix it with your hands for better adhesion to the surface.
Criteria for choosing lighting for a bathroom mirror, connection rules
Dowels and screws
Bolts, screws
Plates
Glue, sealant
Double sided tape
Tips for installing sinks
Before installing sewer pipes and water sockets for a bathtub sink, it should be purchased in advance from a retail chain, without expecting that the outlets will optimally fit any design. When installing a sink yourself, the following tips may be helpful:
- A necessary tool that all plumbers use when installing equipment is a building level; it is used to level water sockets and plumbing fixtures. The various types of sinks used in households are absolutely not critical to the horizontal plane; they can be hung without using a building level, focusing on the horizontal seams of the tiles.
- To drill ceramics, two types of drills are used - first, holes are made in a cone-shaped tile in the rotation mode of a drill or hammer drill, then they change the drill to a Pobedit one and drill holes in the concrete slab in the perforation mode (shock-rotational movement of the drill). This technique will prevent the tiles from splitting due to the impact of the drill tip and will speed up the work.
- To drill through smooth and slippery glazed ceramic tiles under the overhead brackets of wall-mounted sinks, apply one or more layers of paper masking tape to the surface, followed by a pencil mark. The paper will prevent the drill from moving away from the mark and will make the work easier.
- When installing any type of sink near a wall, the adjacent seam is sealed with silicone sealant. To obtain a beautiful, even seam in the absence of experience in carrying out this type of work, use masking tape. One strip is glued to the side of the bowl, not reaching 2 - 3 mm from the wall, the second is fixed on the ceramic tiles of the wall, not reaching the same distance from the sink. Silicone sealant is squeezed out of the tube into the seam with a gun and leveled with an index finger dipped in a soap solution, moving it along the perimeter of the sink. After the silicone has hardened after a certain time according to the instructions, the strips of masking tape are removed and a straight, even seam of equal thickness along the entire length is obtained.
- If water sockets and sewer pipes are pre-installed into the wall, the main work when installing sinks is drilling the walls and driving in dowels to attach the wall-hung sink. To avoid cracking of the tiles when hitting the dowels, it is better to use a rubber hammer or place paper or a wooden board under them when using a hammer with a steel head.
- When screwing corner adapters into water sockets to which flexible hoses are connected, for sealing it is better to use not FUM tape, which is often cut by the sharp edges of the thread and then allows water to pass through, but flax tow complete with a special waterproofing paste.
The sequence of operations when installing a wall-mounted sink
SNiP 3.05.01-85 regulates the height of the washbasin in the bathroom, which has a standard of 850 mm from the floor to the top edge and is suitable for the vast majority of domestic situations. The norm can be changed without negative consequences when using plumbing fixtures for wheelchair users, children or small adults. If you need to change the standard height of the sink, use wall-hung sinks with built-in brackets or with height adjustment, with bedside tables without support on the floor, and options designed for installation in a countertop or on its surface.