Whitewashing with chalk has been known for a long time; many people want to get a perfectly white ceiling. After all, white color makes the room brighter, visually increases the height of the room and it suits any interior. But to get the perfect coating, you need to do the work correctly. Details on how to whitewash a ceiling with chalk with your own hands will be discussed below.
Characteristics of chalk whitewash
The composition of the solution directly affects the resulting quality of repair; therefore, in order to get the best result, with little experience it is better to purchase the most ready-made options. We are talking about chalk whitewash in the form of a paste.
Chalk whitewash is inexpensive, and it is easy to dissolve, so as a result, it will be easier for a beginner to get a rich white color from this composition; it will look great on the ceiling of the house. But if you don’t want to get a classic coating, then you can always use color to get other coating options.
This property allows you to diversify interior design options. Harmlessness to human health makes the product suitable for finishing any room. In addition to the ceiling, this material can be used to decorate various surfaces, for example, a stove or trees.
Harmlessness to human health makes the product suitable for finishing any room.
No. 2. What to whiten with: lime, chalk or water-based paint?
When people talk about whitewashing, they most often mean lime whitewashing . Lime (calcium oxide) is slaked with water to obtain a material that is used for finishing.
The main advantages of lime whitewash:
- bactericidal properties of the material, which is why this finish is used in kindergartens, schools, medical institutions, even in wet rooms. The antiseptic qualities of lime also make it possible to actively use it in arranging cellars and chicken coops. For the same reason, tree bark is treated with lime whitewash;
- if the lime mortar was prepared and applied correctly, the coating will last about 3 years or even more;
- resistance to temperature changes and high humidity. That is why bathrooms can be finished with lime if other materials are not affordable;
- excellent adhesion to almost all materials, including brick, wood, plaster and concrete;
- ability to fill small cracks;
- low price, which is typical for any whitewash.
With all its advantages, lime also has disadvantages . The main one is the possibility of getting burned, so all work must be carried out with gloves. Chalk is much safer in this regard. In addition, there is a possibility of leaving stains and stains. Allergy sufferers are not recommended to use this finish.
Chalk , like lime, is inexpensive and environmentally friendly, and among its additional advantages :
- safety at work;
- a deeper white color, which many people like better than the color obtained with lime whitewash;
- Possibility of use in rooms where allergy sufferers live.
Chalk, when interacting with water, is capable of accumulating it, which leads to the appearance of cracks on the surface and rapid peeling of the whitewash layer, so chalk whitewash is taboo in bathrooms, kitchens and other wet rooms. If the application technology is violated, you can get not only stains and stains, but also bubbles. In addition, chalk whitewash gets dirty.
There is such a thing among people as whitewashing with water-based paint . This finish has nothing to do with whitewashing and refers to painting. It began to be classified as whitewashing, apparently, due to the composition of the materials used - these are paints based on cement and lime . Today, painting with mineral water-based paints can be considered the best alternative to whitewashing. Among the main advantages of this option:
- resistance to abrasion, temperature changes;
- bactericidal properties;
- ability to breathe;
- safety for humans;
- ease of use, high drying speed.
However, the durability of such a coating is also not great, but the price is significantly higher than that of conventional whitewash.
Advantages and disadvantages
Before deciding whether to choose chalk whitewash for finishing the ceiling, you need to understand its positive and negative qualities. The advantages include the following:
- The work is not difficult to do, even a beginner can handle it, which will save money on the services of professionals;
- White color visually lengthens the room;
- Environmental friendliness;
- Repairs will not take much time;
- There is no need to purchase many tools;
- Acceptable price.
Negative properties include:
- Inferior in external qualities to other types of modern finishing materials;
- It will be necessary to take care in advance to protect the objects in the room, remove them from it, or cover them with film;
- The work requires compliance with safety measures. The composition may enter the respiratory tract.
White color visually lengthens the room.
Outdated options
Option 1: lime
First you need to understand the advantages and disadvantages of this whitewash option. Previously, lime was used to finish ceilings, both in residential and non-residential premises.
Advantages of lime:
- whitewashing the ceiling with lime is good because of its low cost;
- for ceilings, lime is a bactericidal material;
- the finish is resistant to different temperature changes and humidity levels.
- the mixture adheres well to brick, stone and wooden surfaces.
One of the disadvantages is that the material is not very safe if it comes into contact with the skin, as a burn may occur.
Option 2: chalk
Chalk is considered to be an environmentally friendly natural material. It is also not expensive and ideally whitens the ceiling surface. But don’t praise the chalky whitewash of the ceiling, because it’s not suitable for all rooms. So, for example, in a bathroom or other room with high humidity levels, whitewashing the ceiling with chalk is quickly washed off and the surface loses its appearance.
Lime-chalk whitewash compositions
Unlike lime whitewash, which does not have a pure white color, chalk is added to lime. The proportions of chalk to lime may vary, with options ranging from 0.25/1 to 1/1. At breeding 1.5 kg. chalk with 2 kg. lime with water produces a mixture with excellent coverage and non-smearing. It is possible to supplement the composition with glue and soap for better coverage.
Unlike lime whitewash, which does not have a pure white color, chalk is added to lime.
The process of preparing a whitewash solution
When choosing what to whitewash the ceiling with, it is worth remembering that diluting water-based paint will not cause any particular difficulties. This cannot be said about chalk and lime mortars.
The solution is prepared at the rate of: 1 sq. m of ceiling surface to be coated - 0.5 liters of mixture. Component compositions are designed for 10 square meters. m. It is better to mix such solutions with a construction mixer; they are stored for about 36 hours.
Chalk solution
Take 30 - 100 ml of glue (carpentry, PVA), 50 g of grated laundry soap, 3 kg of chalk, sifted through a sieve, about 20 g of blue to enhance the whiteness.
Initially, you need to dissolve the glue and soap shavings in water. Then, without ceasing to stir this mixture, you need to add chalk combined with blue.
Mortar
This whitewashing of the ceiling is somewhat simpler to prepare. 175 g of lime (mashed), 45 g of blue lime, and 10 g of table salt are diluted in warm water. In this case, a snow-white ceiling covering will not work, but its defects and unevenness will be hidden.
In both the first and second cases, 1 kg of chalk (lime) is dissolved in 2 liters of warm water. The optimal consistency of the solution is determined by using a metal knife: if, when it is immersed and pulled out, the solution drains without leaving any traces, then it is not thick enough.
The prepared mixture must be left for 15 minutes and then passed through a sieve.
Preparing tools
You will need few tools for the job, but you still need to make sure that they are at hand. Then the process will go faster, and you won’t have to be distracted by searching for them. Required:
- Spatula to remove old finish;
- Ladder;
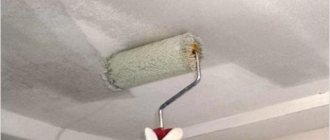
- Brush, roller or spray gun;
- Oilcloth;
- Capacity.
To make the painting process easier, it is better to choose a roller with an extended handle.
You will need few tools for the job, but you still need to make sure that they are at hand.
Preparing the room and ceiling
To get a high-quality result that will please the eye of the apartment owner, you must first take care of removing the old coating. After all, the old finish can appear through the new color, and also after a certain time and begin to crumble, damaging the new whitewash. And then the repair will have to be done again.
Repair work should begin with cleaning the space; you will need to do the following:
- If possible, furniture and other interior details are removed;
- Chandeliers are removed from the ceiling;
- The remaining items, as well as the floor, need to be covered with film or paper, the main thing is to secure them securely (you can use tape);
- To carry out the work, they bring a ladder, or the master can stand on the table.
Preparatory work for the ceiling consists of performing the following steps:
- Cleaning old whitewash.
- To eliminate areas with mold and mildew, if any, special solutions are used for this.
- It is necessary to remove the peeling pieces of the previous coating.
- To obtain an even coating, putty is applied.
- When the surface is dry, it should be sanded with sandpaper.
- Application of deep penetrating primer.
- After these manipulations, you need to wait 24 hours for the ceiling to dry.
To get a high-quality result that will please the eye of the apartment owner, you must first take care of removing the old coating.
Ceiling preparation
It is necessary to understand one detail: it is impossible to apply layers of whitewash on the previous ceiling covering, since it will peel off, which will undoubtedly interfere with the process. Therefore, the first step is to clean the surface to be treated of old plaster.
To do this, prepare the following items:
- bucket or basin with water;
- small metal spatula;
- sponge;
- a clean rag or towel;
- stepladder
If you start scraping the ceiling “dry,” a large amount of dust will inevitably form, and the work will be delayed for a long time. The best option would be to pre-wet the surface before removing unnecessary plaster.
You need to wet the ceiling as you move, from one area to another; by moistening the entire area at once, you risk that some pieces will dry out even before you start working with them.
After wetting the plaster, wait 3-5 minutes, during which time all layers will have time to become saturated with water, then carefully remove the coating with a spatula. Once you have finished dismantling the old whitewash, wipe off any remaining lime from the ceiling with a clean, damp towel or rag.
The next step will be sealing possible joints, cracks, crevices, and unnecessary holes. For these purposes you will need:
- putty;
- serpyanka;
- soil mixture;
- sanding paper;
- brush or roller.
The existing ceiling slabs form joints between each other; in order to make them invisible, it is necessary to fill them with putty and cover them with sickle tape on top. The putty mixture is again placed on it, which is thoroughly rubbed with a spatula to give the surface a perfect smoothness.
In addition to the joints, the ceiling must be inspected for subtle defects: small cracks are rubbed with a primer mixture, gouges, more significant chips are filled with putty.
Upon completion of this work, it is necessary to make a final leveling of the ceiling. This is done using a laser or water level, which is applied in various places to determine the values of the height differences.
Strong depressions and irregularities are puttied separately, and after complete drying, the surface over the entire area is treated with finishing putty in several layers.
How to prepare: in what proportions and how to properly dilute the chalk solution
How to dilute chalk for whitewashing a ceiling, the proportions necessary to obtain the best result include the following components and their quantities:
- Chalk - kilogram;
- Water – two liters;
- Blue for whitewashing - five grams;
- Laundry soap 72 percent - fifteen grams;
- Wallpaper adhesive solution - ten grams.
The cooking process itself consists of:
- Chalk must be thoroughly diluted in water, making sure that there are no lumps left in the mixture.
- Then this mixture is diluted by adding pre-diluted blue, laundry soap and glue.
Blue is used to create a protective layer from the harmful effects of sunlight, and also makes the solution snow-white. Violating the amount of it in the composition will lead to coloring of the composition, it will be colored.
If there is a desire to obtain other shades, then for this they resort to the use of special colors.
Blue is used to create a protective layer from the harmful effects of sunlight, and also makes the solution snow-white.
How to prepare the solution
Main ingredients for preparing the solution:
- water at room temperature – 5 liters;
- wood glue – 30 g;
- chalk – 3 kg;
- blue – 10-20 gr.
All ingredients are mixed together to the desired consistency. If the mixture turns out to be too liquid, you can add more chalk to the solution to achieve the desired thickness. Blue is added to enhance the whiteness effect.
The indicated components are enough to prepare a solution for whitewashing 10-15 square meters. meters of surface.
How to whitewash yourself with a brush or roller, spray gun or vacuum cleaner
For work, you can use standard tools such as a brush or roller, or to simplify the process, use a spray gun, which will also reduce the consumption of the composition. General operating principles:
- You should mentally divide the ceiling into meter by meter squares.
- The solution is stirred before staining so that the chalky part does not settle.
- Two layers are made, the second needs to be painted after the first has dried.
- When a brush or roller is selected, the action begins from the window. The 2nd layer is made perpendicular to the 1st to avoid streaks.
The spray gun will allow you to whitewash quickly, while getting an even and matte finish. You need to have a vacuum cleaner with a blowing mode. Stages:
- The finished solution is mixed and poured into a 1 liter jar.
- Place a spray nozzle on the jar.
- A hose from a vacuum cleaner is put on the sprayer; the supply is adjusted through the second hole on the lid.
- The movements are made in a circular manner, moving smoothly.
The spray gun should be at a distance of 70-100 centimeters from the ceiling surface.
The spray gun will allow you to whitewash quickly, while getting an even and matte finish.
How to quickly remove old coating
The first step is to understand what kind of finishing was done previously. Limestone whitewash appears in spots on chalk. To understand what kind of material was used, you need to touch the ceiling; if the coating stains the skin, chalk was used; if not, lime whitewash was used. Methods for eliminating previous coverage:
- Removing whitewash with a spatula and a brush with iron rods; after the process, the ceiling is washed with a cleaning agent and water;
- If the coating is thin, you can wash it off immediately with water and a cleaning agent;
- Concrete can sometimes be difficult to remove the previous finish. In this case, the surface is first wetted; a sprayer is suitable for this. The wetted whitewash will be easier to remove with a spatula, and then the surface is washed again;
- In very difficult cases, a special chemical agent is purchased. It is applied with a sponge or a spray bottle, and after a certain time the ceiling is washed. The waiting period is specified in the instructions for the product.
Next, putty and primer are applied.
The wetted whitewash will be easier to remove with a spatula, and then the surface is washed again.
Whitewashing process
It is not recommended to apply too thick a layer. It will peel off. The ideal thickness is between 2 and 3 millimeters. It is best to move the tool in one direction, carefully processing each section of the bark. It will be easiest to use a spray gun.
The height of application of lime mortar or paint depends on the age of the plantings. Whitewashing up to a height of one meter, which can be observed in city parks and on the streets, is more decorative than protective.
Young specimens are painted up to the lower branches. The latter are also coated up to the middle of the length. The trunks of mature trees cover up to two meters in height. All-round whitewashing (from the crown to the heels) allows you to create a kind of protection-fur coat, but this option increases the consumption of whitewash (paint) and is quite labor-intensive.
Re-dyeing
Move on to the 2nd layer after the first has dried. When a roller or brush is chosen for painting, it is better to apply it perpendicular to the previous one. Then the stains will not appear.
When working, you should not rush; if you have little experience, then acting quickly will make it difficult to avoid divorces.
When a roller or brush is chosen for painting, it is better to apply it perpendicular to the previous one.
How to whitewash a ceiling correctly
The most correct way to whiten a ceiling surface is to use a fairly liquid solution that penetrates well into microcracks and pores. This method remains more labor-intensive; accuracy and attention are required, since missed areas on the ceiling will instantly be highlighted after drying.
Chalk or lime is applied in at least two layers
How to dilute whitewash for the ceiling
There are two ways to whitewash a ceiling slab, either well or quickly. Usually they recommend at least 2 kg of slaked lime per 5 liters of water. The result is a very thick paste-like mixture, to which 30 g of laundry soap and the same amount of stationery silicate glue are added. The mass is ground to the state of liquid kefir. In order to whiten with such a mixture, serious physical effort is required, but the result is worth it.
The whitewashing process is as follows:
- The ceiling is generously moistened and soaked with water;
- The liquid lime mass is applied to the ceiling and stretched with a spatula and a stiff brush;
- After 10-15 minutes, the laid mass should be whitened with a lime mortar diluted in half.
Important! The lime “applies” well to the ceiling, but stains remain, so it is important to whitewash it a second time with a liquid composition.
The result is a very uniform, blemish-free, smooth and dense surface. Next time it will be possible to whiten it in 2-3 years.
Mixing should be done 3-4 hours before the start of work
How to whitewash a ceiling with the first layer
If you use a standard mixture of 1.7 kg of lime per 10 liters of water, you will have to whitewash it at least two, or even three times, depending on the quality of the concrete ceiling. Before whitewashing, you need to moisten the ceiling sparingly; there is already a lot of water in the solution itself, and its excess has a detrimental effect on the quality of the work.
The first layer is applied with a roller or brush. Despite the liquid solution, lime also needs to be rubbed into the ceiling, otherwise the first layer will not stick to the concrete. Whitewashing with a pneumatic sprayer or a knitting brush will not work; all the lime will end up on the floor of the room.
I rub lime on old whitewash with a spatula
How to re-whiten a ceiling
For the second layer, you can use any convenient tool, you can even use a household vacuum cleaner with a nozzle for spraying onto a liter jar. The main thing is not to leave marks or streaks on the ceiling.
The second layer can be whitened no earlier than half an hour after laying the first, during which time most of the water has time to be absorbed into the ceiling, and there is practically no dripping of the solution.
Safety precautions
Before work, it is necessary to wear protective clothing, goggles, a respirator and gloves, otherwise health problems cannot be avoided. After all, small fractions of chalk can get into the respiratory tract, and the eyes can also be easily damaged. The reliability of the device on which the master will stand must also be checked before work.
Before work, it is necessary to wear protective clothing, goggles, a respirator and gloves, otherwise health problems cannot be avoided.
Tips and tricks from the experts
Recommendations from experts will be useful to obtain high-quality results:
- It is advisable that the finished surface should not be exposed to direct sunlight and there should be no drafts in the room;
- Processing the corners is done with a brush;
- Check the lime or chalk used for the old finish, you can wet the area with water, if it darkens and is not sticky, it means that the first material was used, the chalk will stain the leather.
It is advisable that the finished surface should not be exposed to direct sunlight and there should be no drafts in the room.
The article gave advice on how to dilute chalk for whitewashing, and how to carry out the work itself. It’s easy to get a beautiful ceiling covering using this material; the actions do not require any special skills. But it is necessary to follow safety precautions and take your time, then the result will be of high quality and the owners of the premises will like it.
Ceiling surface whitewashing technology
Let's start this section of the article with the fact that there is a strict prohibition. It is based on the postulate that it is possible to whitewash a ceiling with lime mortar only if it has been whitewashed with this particular material. The same applies to chalk whitewash. That is, you cannot apply chalk if the surface was previously covered with lime.
Chalk leaves marks on the palms Source wallscloud.net
How to determine what building material the ceiling was whitewashed with. To do this, you need to run it with a damp hand. The lime will not remain on the palm, and the chalk will cover its entire surface. But on a lime ceiling there will be wet stains, but not on a chalk ceiling.
If the ceiling is whitewashed for the first time, then this problem does not exist. Therefore, first we will consider the option of whitewashing on an unprepared surface. And then we’ll deal with whitewashing the ceiling using the old whitewash.
Whitewashing a plastered ceiling
In principle, this process is divided into two stages: preparation of the ceiling plane and direct application of the whitewash material.
At the first stage, the ceiling is simply leveled and brought to maximum smoothness. For this purpose, today they use putties, which are applied in one or maximum two layers. The latter is sanded, but not always, because the whitewash material hides minor surface defects. So you don't have to use sanding. The only thing that needs to be added is that the use of primers will change the adhesive properties of the ceiling surface. Therefore, both the plaster layer and the putty layer must be treated with a deep penetration priming liquid.
Attention! Whitewashing is applied after the applied layers have completely dried.
Primer of the ceiling surface Source stroychik.ru