Interesting design solutions appear every day, and in order to keep your finger on the pulse of the day, you have to sacrifice a lot of precious time. Meanwhile, if you are planning a renovation and you are looking for a fresh and interesting idea for decorating your ceiling surface, then here is an excellent selection of design examples of plasterboard ceilings and suspended ceilings - a current combination that has become a trend in recent years.
- Origins of the combination
- All the benefits of combining
- All design flaws
- Popular design options
- Examples of custom design
- Conclusion
Origins of the combination
The appearance of suspended ceilings is not just a new stage in the finishing niche. In fact, the owners of modern apartments, most often located in not very cozy multi-apartment panel buildings or even in life-torn Khrushchev buildings, have got their hands on a powerful design tool that helps push the bar of room expressiveness to a qualitatively new level. In addition, the polyvinyl chloride film used for the installation of suspended ceilings had all the necessary qualities that guaranteed many years of safe and stable operation.
The owners were especially pleased with the opportunity to decorate their ceiling with original photo printing, which gave each room artistic originality and a truly designer charm.
However, the ability to create multi-level ceiling structures still remained with plasterboard. A reasonable decision followed quite quickly - to combine two completely different technologies in one project in order to create spectacular and monumental-looking multi-level structures. At first, this combination of two approaches to design clearly manifested itself in the private sector, where there are much more opportunities for the implementation of extraordinary creative projects, and then it began to be successfully implemented in practice in the case of much more modest apartments.
Work order
Since suspended ceilings are installed after all finishing work has been completed, in a clean room, the subsequent work should be like this.
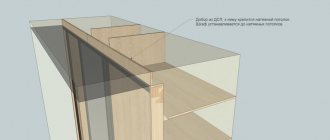
- After the required dismantling and preparatory work, the partition or frame cladding of the room wall is installed.
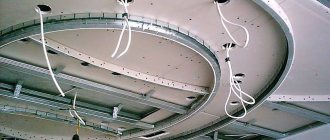
- During installation, load-bearing elements are added to the frame to secure the supporting ceiling profiles.
- Installation of a stretch ceiling begins after completion of all finishing work in the room. The installers are indicated where the load-bearing structures are laid for attaching the load-bearing ceiling profiles.
How to sheathe the frame of a combined ceiling with plasterboard
Before covering the frame with plasterboard, the material must be given time to adapt to the temperature and humidity in the room, so it can be left to lie in the room during installation of the frame.
Storing sheets in a vertical position is strictly prohibited. This may cause them to become deformed. It is advisable to work together with an assistant. A sheet of drywall is quite heavy, and therefore it is almost impossible to cope with the fastening alone.
We cover the metal sheathing in the following order:
- We fix the first sheet in the corner of the room with self-tapping screws. If the area of the level in the corner is smaller than the area of the sheet, then first draw a contour according to the template and cut out parts from it. Please note that the heads of the screws need to be deepened into the material, but do not overdo it so as not to break through it.
- We attach the second sheet to the remaining half of the profile, to which the first was previously fixed. We leave a gap of 0.5 cm between the gypsum board and the wall. The fastening step with self-tapping screws should be no more than 30 cm. We cover the entire area of the level in the same way.
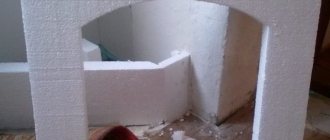
- We attach drywall to the vertical part of the box. To install on curved areas, bend it, making shallow cuts on the reverse side. You can also bend the sheet by treating it with a needle roller and soaking it in water. Before installation, the wet part must be dried by securing it with weights in the position in which it will be attached.
- After covering the frame with plasterboard, we cover the joints with the wall and between the sheets with reinforcing sickle tape.
- Apply putty into the gaps and fasteners with a small spatula.
- We cover the horizontal and vertical parts of the plasterboard box with overlapping fiberglass. If it is not on an adhesive basis, then we use PVA to fix it.
- In places where the reinforcing mesh overlaps, draw a line with a stationery knife and remove the remains.
- Using a drill bit with a crown, we cut out the installation locations for the lighting fixtures.
- We putty the finishing layer. Its thickness should not exceed one and a half centimeters.
- After the putty has dried, sand it down with fine-grained sandpaper.
- Remove dust from the surface with a dry sponge or vacuum cleaner.
- We prime the coating for additional protection, leveling and improved adhesion.
- We carry out the final finishing of the coating. Typically, in combined ceilings, the plasterboard part is painted with an acrylic composition.
To install the tension fabric, you need to wait until the plasterboard coating has completely dried.
All design flaws
There are few of them and almost all of them relate to the practical implementation of exquisite design projects:
- high cost of development and installation;
- complex multi-stage installation;
- impossibility of use in very small and low rooms;
- some design features of the basic ceiling base.
Popular design options
Nowadays, the combination of plasterboard ceilings in combination with suspended ceilings is rather a sign of the day and, in many ways, even a necessity, determined by the desire of property owners to surround themselves with comfort and customize the interior design of the room to suit their purely individual needs.
Perimeter from hl
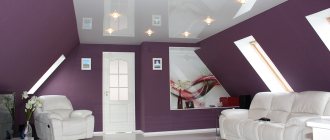
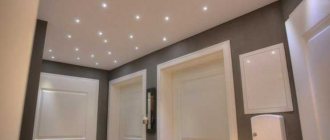
Perhaps the most common option, the one that “blatantly” dominates most proposed design projects, is the placement of a hanging plasterboard box around the perimeter of the room. In this case, the tension fabric is organically placed inside this improvised box. The advantage of this solution is obvious - the ability to contrast textures that are polar in visual characteristics to each other, as well as lay the installation foundations for future hidden LED lighting.
An LED thread stretched along the perimeter of the drywall not only performs a decorative function, but also helps give the structure the necessary volume. Often, low rooms lack the latter - so why not take advantage of such an advantageous compositional solution?
Oval round base made of gypsum board
A current design trend, which is only held back by its impracticality in the case of using small rooms. It consists in the fact that the base is made of plasterboard sheets and stretches along the perimeter.
The center released in this simple way is used to stretch the PVC sheet. Very often, a suspended ceiling in this version becomes part of the overall conceptual design when it is subsequently decorated to resemble a starry sky, a sunny day, clouds or any other print chosen by the designers.
Sometimes designers manage to overcome the lack of free space and successfully implement this idea even in modest-sized interiors.
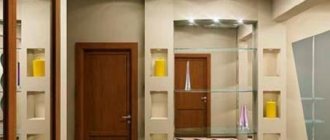
Center from gkl
This design option for ceilings made of different materials in a single concept is often called a “tablet”
.
Apparently, due to the fact that the plasterboard placed in the center of the ceiling surface resembles it in shape. Meanwhile, in the same way, a circle can change into a rectangle - the essence remains the same: along the perimeter
of the space.
Stunning volume, luxurious expensive effect, non-trivial color combinations - all this allows you to implement the chosen design option. Of course, if you have a ready-made project on your table, thought out to the smallest detail and already modeled using auxiliary programs. Otherwise, it is better to prefer simpler and more correct solutions.
Complex curves of a suspended ceiling
Of all the options, it is probably the most difficult to implement, but, as numerous photos show, compensation for the grueling implementation of all the complex geometric figures from plasterboard in practice becomes a unique design of its kind, created exclusively for a specific room.
Customers for such ceilings made of plasterboard and stretched fabrics are most often owners of private real estate - in large rooms there is room for unconventional design thinking.
Design of plasterboard and suspended ceilings
Plasterboard and tension structures are most often found in the following variations.
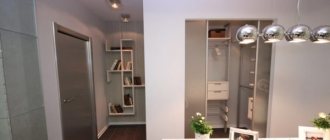
Drywall around the perimeter
Such a combined ceiling draws attention to itself and allows you to achieve a certain effect in the room, for example, visually increasing its height.
The photo shows a combined plasterboard and suspended rectangular ceiling.
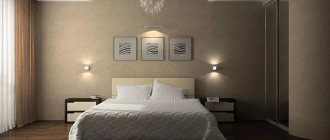
Backlit
Plasterboard and tension models are often decorated with various lighting, which can be located in a niche or along the perimeter of a protruding part of the structure. This lighting option makes the ceiling composition more pronounced.
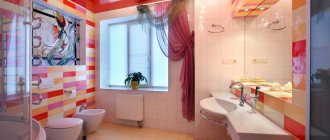
Figured ceilings with drawings
They give the room volume and spatial depth, and also allow you to visually divide the space into certain zones. Figured combined ceilings with patterns impress with their scale; they help create an individual design and make the interior spectacular and non-trivial.
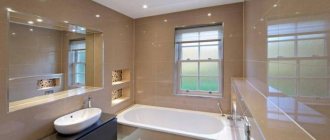
Examples of custom design
Some interesting variations of the combination of plasterboard ceilings and suspended ceilings in one room are presented in the following photos.
What can they be made from?
Much depends on the budget allocated for repairs. The cost of different materials varies significantly. Installation will also require certain costs and all these points together can be decisive when choosing the source material.
Among the inexpensive types of similar design, we can mention rack structures. You can combine them in a large number of options. It is quite simple to assemble a slatted composition, which will be framed with plasterboard, or you can use wooden surfaces. There are options in which only slats are used. The combination is carried out by installing planks of different widths and with different coatings.
Of course, drywall has not lost its relevance. Very beautiful ceiling solutions are still assembled from it. But, they have certain disadvantages, taking into account which the popularity of this design method is still falling.
Therefore, many types of finishes have appeared in which plasterboard complements the combined suspended ceiling. This opens up a huge space for implementing the most daring techniques or design ideas.
Combined stretch ceilings are now the most popular. They allow you to create a flat surface that will have several colors and textures. Various films or textiles can be placed on several levels, creating very interesting combinations.
In principle, you can combine absolutely any type of design and finishing. The main thing is that they complement each other and combine with the rest of the interior details.