Today, the use of plasterboard is quite popular, since it allows you to build a structure of any shape.
Today, decorative and functional structures are made from such a universal and pliable material as plasterboard. Various partitions with and without doors, figured arches, multi-level ceilings and even furniture are assembled from this unique material. Any unique interior element can be assembled with your own hands at home, even by a novice craftsman.
Beautiful DIY plasterboard construction: types
Plasterboard structures are a kind of box, lined with gypsum plasterboard sheets and decorated with decorative finishing. They are used for arranging interiors indoors. Let's take a closer look at their varieties.
Types of plasterboard structures:
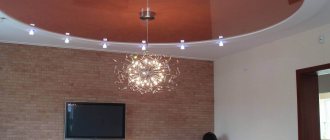
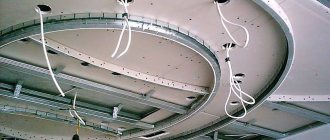
- Ceilings. These designs can be simple single-level, which are used to level the surface, or complex multi-level with shaped elements, lighting, tension fabric, installation of various lighting systems, etc.
- Walls. A simple design is used to straighten curved walls before decorating them. More complex ones are, as a rule, decorative partitions for zoning a room with all sorts of shaped elements. Also, full-fledged walls are constructed from plasterboard to separate one room from another. They can be equipped with a door or a beautiful arch.
- Arches. According to the shape of the openings, interior or decorative arches can be classic (the most common type), romantic (with rectangular arches and rounded corners), as well as trapezoidal (with a trapezoid-shaped arch). The portal arch is rectangular in shape of the doorway, and modern is something between a portal and a classic, with a small radius of curvature. An ellipse arch, on the contrary, has a large radius of curvature, and a semi-arch is an asymmetrical structure, one side of which is made in the form of a portal, and the other is any of the above varieties. Arches and semi-arches are mounted both for zoning and as decoration.
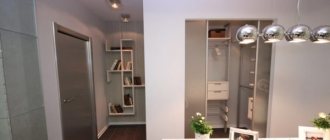
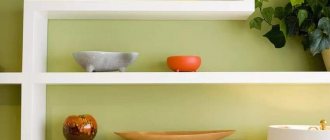
- Furniture. Furniture structures made of plasterboard are most often all kinds of racks, shelves, niches in the walls, etc. It is also quite possible to use gypsum plasterboard to build a mini-wall for the living room for a TV, a wardrobe and a bar counter. Furniture made from gypsum plasterboard is beautiful, original and quite functional: the frame of the structure provides for the installation of doors for niches and tabletops. Moisture-resistant drywall is great for use in the bathroom and kitchen. With proper finishing, you can use it to assemble a niche for a washing machine, a stand for a bathroom sink, and even a kitchen work area (a table with a sink and storage sections).
- Decorative boxes. They are used to hide all kinds of communications: wires, pipes, cables, etc. Drywall is used to level door and window slopes after replacing windows and doors, and to sew up ventilation pipes when moving kitchens and bathrooms.
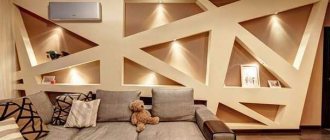
- Decor. Decorative partitions with geometric niches, figured structures on the walls and ceiling, false fireplaces and columns - all this is considered decor.
Drywall allows you to make a simple redevelopment of a studio apartment or a separate room. Thanks to the installation technology of this material, a wall, piece of furniture or decor can be built almost anywhere in the house.
Advantages and disadvantages of profile greenhouses
There are actually a lot of advantages. First of all, these are, of course, minimal manufacturing and assembly costs.
The design is light, but quite rigid, which allows it to withstand wind and snow loads.
make a greenhouse from a profile with your own hands in different shapes and sizes, while factory-made structures are most often made according to certain established standards.
Such a greenhouse can be moved from one place to another if necessary. Even if this requires disassembling the frame (for example, if the structure is large), putting it back together will not be difficult and will not take much time.
Since a metal greenhouse is, in fact, a lightweight structure, its installation does not require the construction of a capital foundation.
On the plus side, it is also worth noting that the frame is very easy and quick to assemble, no welding is required. And the frame elements themselves are reliably protected from corrosion due to the zinc coating.
If we talk about the disadvantages, then, of course, the frame is not as rigid as one made from the same profile pipes or wooden blocks. But with the use of additional reinforcements and jibs, quite good rigidity can be achieved.
Decorative plasterboard structures: corner interior elements
Corner structures made of plasterboard include all kinds of decorative shelves and niches for decorating internal or external corners, bar counters, portals for corner false fireplaces, cabinets, mini-walls or shelving. The technology for their installation differs slightly from standard designs, but there is one important condition: the presence of a free corner in the room.
Plasterboard structures for internal and external corners have completely different specifics for installing the frame. This is important to consider when drawing up a drawing.
Let's consider the construction of a corner structure made of plasterboard using the example of a simple decorative niche shelf or rack.
Before you start drawing up a project, it is important to decide on the type of structure itself, which can be:
- Wall-mounted (the frame is fixed directly to the wall, the floor and ceiling are not involved in this case);
- Floor-supported (the structure is attached to the floor and can have any height);
- Fixed to the ceiling (in this case, the shelf-rack looks like a hanging one).
It is also important to determine the functionality of this piece of furniture. If shelves or niches are planned for the installation of an aquarium or similar heavy objects, a suspended structure is out of the question. It is much safer to build it with support on the floor. Any type of design is quite suitable for placing books, photographs, decorative dishes or other lighter interior decorations.
Next, you need to measure the space allocated for installing the rack and draw up a drawing. According to the project, the necessary materials (profiles, fasteners and drywall itself) are calculated and purchased.
How to choose the necessary materials for lathing
The frame base is made of wood or galvanized metal profiles.
Profiles are fixed in damp rooms. Galvanizing protects the metal product from damage. The profiles are attached to a concrete base, which is always cold. At the slightest change in temperature it starts to get damp. Brick walls are also cold, which can lead to moisture build-up.
Wooden frames are built in log houses. In dry rooms. This may be a room in an apartment - you need to create a partition, use wood.
Wood cannot be mounted to a concrete surface or brick base. Fastening to the foam block is carried out after assessing the environment. Humidity percentage, temperature changes.
The tree absorbs moisture and swells. Subsequently, it dries out and becomes deformed. In this case, the sheets of drywall become distorted, which leads to damage to the entire structure.
Made of wood
For a wooden frame base, you need to choose dry treated wood. These are dried timber. If they are not treated, they need to be covered with drying oil or other protective material and dried. This may take up to 7 days.
So, for wooden sheathing you need the following materials:
- for guides you need a beam with a cross-section of at least 50x40 mm;
- metal furniture corners for fixing the beams to each other;
- dowel-nails for fixing wood to the rough surface;
- nails.
All metal fasteners must be processed and meet GOST standards.
From metal profile
Metal elements for the frame base must be galvanized. To install the sheathing on the wall, you need the following materials:
- guide and rack profiles (PN, PS);
- crabs;
- dowel-nails 6x40, 6x60;
- metal wedge anchor 6x40, 6x60;
- screws 13-16 mm;
- straight hangers.
Self-tapping screws are used to fasten profiles and other metal elements. There are 2 types:
- with drill;
- ordinary.
The choice of screw depends on the quality and thickness of the profile.
Preparation of materials and tools
Any repair begins with preparing the necessary tools and materials. To create a simple corner structure that is not designed for heavy interior items, you will need a minimum of effort.
Tools you need to have on hand:
- Drywall knife;
- Screwdriver;
- Impact drill;
- Plumb and building level;
- Tape measure, square and pencil;
- Spatulas and construction mixer.
In addition to the drywall itself, profiles and fasteners, you will need tape for sealing joints (serpyanka), a perforated corner for decorating the outer corners and putty (for further finishing, just choose a universal option).
See a detailed list of accessories for working with drywall: .
Types of profiles
Strictly speaking, a profile greenhouse is a collective concept. It denotes structures that are noticeably different from each other and are built from many types of metal (and not only) profiles. Some of the profiles were originally manufactured for other purposes, while others were created specifically for the construction of greenhouses. The most popular of them are shown in the table below.
Table. Types of profiles suitable for building greenhouses.
| Title, photo | Description |
| U-shaped or U-shaped profile | Many subtypes of U-shaped profiles, differing in width, wall height and metal thickness. They are used for the construction of various structures, including greenhouses. To combat corrosion, depending on the material, it is galvanized (for steel) or anodized (for aluminum). |
| V-profile | Metal profile of V-shaped section with “shelves” for fastening in the lower part and on the edges. A cheap and easy-to-use product, but inferior in strength to some U-profile options. Created specifically for the construction of greenhouses. Reinforced options may be called W-profiles. |
| Profiled pipe | Galvanized steel pipe of rectangular or square section. High levels of strength and reliability. To combat corrosion, it is galvanized or powder coated. |
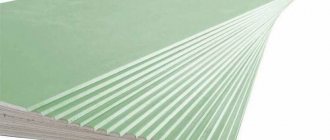
| CD profile for drywall | Load-bearing ceiling profile (PP) for plasterboard. It has a U-shaped section, bends at the ends. Equipped with corrugations that increase the strength of the product. |
| UD profile for drywall | Guide profile for drywall. It has a U-shaped cross-section and is used to form a frame plane from a CD profile and attach the latter to a wall, floor or ceiling. |
| PVC profile | Profiles made of polyvinyl chloride of U-shaped, square and other sections. It differs from metal analogues in greater flexibility and low cost with less resistance to loads. |
There are several ways to fasten profile elements to each other.
- Bolts and nuts with washers - well suited for profiled pipe, V-shaped and U-shaped structures. They provide ease of subsequent dismantling and reassembly of the greenhouse, but at the same time require preliminary drilling of holes in the profile and careful monitoring of the reliability of the connections.
- Self-tapping screws - used in working with all types of metal profiles, especially CD and UD. For a greenhouse, it is justified to use not “bugs”, but self-tapping screws with a press washer - a thin head will not interfere with the installation of the sheathing. Some of the screws come with drill bits on the ends to facilitate entry into the metal.
- Welding is a reliable and durable permanent fastening. Use only if subsequent dismantling of the greenhouse is not planned. Welding seams require additional protection against corrosion.
- Connectors - a variety of designs used to connect PVC profiles to each other.
Self-tapping screws with press washers
An example of fastening corners with self-tapping screws to a profile
Advice! When choosing a profile for a greenhouse, pay attention to the quality of the anti-corrosion coating, especially on the corners and bends - there it should not have abrasions, stains, foreign inclusions or other defects. Otherwise, the service life of the frame may be significantly reduced due to the gradual destruction of elements affected by corrosion.
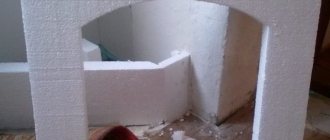
Construction for plasterboard: where to start
Any plasterboard product requires the presence of a frame, which is subsequently sheathed with sheets of plasterboard. Before starting installation work, it is necessary to prepare the surface for installation of the structure. If there is old finishing, it must be removed and the walls must also be cleaned of dirt and dust. The last thing you need to do at the preparation stage is to transfer the design drawing from paper to the wall using a pencil.
Sheathing device:
- According to the marks, holes are drilled in the wall for further fastening of the profile.
- To implement the corner shelf, we will need two blanks from the guide profile. From the beginning of the profile, measure the length of the future shelf to the corner, make a cut, then measure the width and cut it in the same way. The procedure is repeated twice so that when the profile is bent at the cut points, a rectangle is obtained.
- The workpiece is attached to the wall using dowels, and the same is done with the second workpiece.
For more reliable fastening and maintaining the desired shape of the shelf, the places where the profile bends are secured with self-tapping screws.
For detailed instructions on creating a frame for drywall, see here:.
Step-by-step instruction:
- At the first stage, a frame from the profile is installed. To do this correctly, the guide profile is installed along the perimeter of the wall, the plane of which forms the side of the corner. The profile is secured with long self-tapping screws (from 45 cm) and dowels.
- After installing the guides, mark the vertical position of the CD profile in 60 cm increments and install U-shaped fasteners for the ceiling profile at intervals of 1 m of its height.
- After installing the frame on one wall, it must be covered with plasterboard, and only then move on to the adjacent plane.
- Now you can make a frame on the adjacent wall, complementing the internal corner. First of all, install the UD guide profile. It is simply fixed to the sheathed wall using drywall.
- The next step is to install the vertical CD profiles on U-shaped mounts.
- The mounted frame is covered with plasterboard, and an additional chamfer is removed along the edge of the gypsum board adjacent to the corner. After such preparation, the finishing will be of higher quality.
When installing an internal corner, it is important to consider the distance between the screws. The rigidity of the base depends on this, and for the inner corner it should be maximum. Therefore, screws are screwed in in increments of 25 cm.
Frame sheathing or how to assemble a plasterboard structure
Further actions involve fastening drywall. To do this, first, markings of elements are made on a sheet of drywall, according to the drawing (upper and lower cladding, as well as end parts). Using a level and a construction knife, we cut out the desired element, making a cut with a knife along the markings of one of the sides of the material, then bending the sheet at the place of the cut and cutting through the cardboard on the back side.
It is better to cut the upper part of the shelf in one element in order to achieve a perfectly flat surface during further finishing.
Next, the drywall is attached to the frame using self-tapping screws. At this stage, it is important to ensure that the screw heads are slightly recessed into the material. Once the top sheathing is completed, the bottom sheathing is done, then the ends are sheathed. Next, serpyanka is glued at the joints of the drywall, and perfugol is placed on the putty at the outer corners and a rough finishing of the surface is performed. After the putty has completely dried, you can begin decorative finishing of the shelf, which can be wallpapered, painted, or finished in a combination way.
See our material for interesting finishing options:.
Secrets of finishing
If the frame of the structure is assembled correctly with a sufficient degree of rigidity, then the risk of cracks appearing at the junction of the sheets is minimal, but it still exists. Sudden changes in temperature and humidity, seasonal “walking” of the entire building can lead to the appearance of cracks. Therefore, special technologies are used when painting corners.
Finishing the internal corner from plasterboard
Procedure:
- Remove dust and prime the surface;
- Glue a soft reinforcing sickle tape, distributing it on both sides of the joint line;
- Apply a non-shrink (basic) putty of the appropriate type: a cement- or polymer-based mixture for wet rooms, gypsum for dry rooms;
- Treat the surface with sanding mesh or sandpaper;
- Cover with primer;
- Apply finishing putty, if necessary, in several steps for better leveling;
- Sand with fine-grained sandpaper.
The plasterboard corner is ready for painting or wallpapering.
Apply several coats of putty for a more even finish.
Finishing the outer corner of plasterboard
External corners are subject to stress - they easily become chipped when, for example, carrying furniture. In addition, even slight curvature at the outer corners is noticeable. To obtain a perfectly even and strong external corner, perforated metal L-shaped profiles (corners) are used. Procedure:
- Check the vertical using a rule with a level superimposed on it.
- If the edge is formed by the factory edges of the sheets, then the drywall is primed. If the sheets are cut, then first cut the edges at 45 degrees to the width of the perforated profile.
- A putty mixture is applied to the primed surface.
- Install the perforated profile, checking the level (on both sides of the joint!).
- For large deviations, a quick-drying mixture (Rotband gypsum plaster) and/or self-tapping screws are used to secure the perforated profile in the desired position.
- Remove excess mixture with a spatula, while simultaneously filling the perforated holes.
Further finishing does not differ from the usual one: it includes puttying in several stages with sandpaper processing and priming of each layer.
To further protect and at the same time decorate the outer corner of plasterboard, use outer plastic corners, which are glued after finishing with paint or wallpaper.
Examples of plasterboard structures (photo)
- Author: admin
Rate this article:
- 5
- 4
- 3
- 2
- 1
(0 votes, average: 0 out of 5)
Share with your friends!