Selecting materials
The choice of plasterboard sheets and materials for the frame depends on where the partition will be located, what soundproofing requirements are imposed on it and some other points.
For cladding
Before making partitions from plasterboard, you need to select sheets with certain characteristics. If they separate living rooms, a regular grey-brown gypsum board intended for finishing dry heated rooms will do.
There are also other types of cladding panels with a gypsum core on sale.
- GKLV - green sheets, characterized by increased moisture resistance.
Moisture-resistant plasterboard sheets Source stroy-market63.ru
They are recommended to be used for finishing walls and erecting partitions in rooms with high humidity and temperature changes. These are bathrooms, showers, laundry rooms, unheated terraces, etc. If the partition is lined with ceramic tiles, it is also better to build it from this material.
- GKLO - pink sheets, fire-resistant.
In country houses, they are recommended to designate the boiler room and other areas with increased fire hazard.
On a note! Sheets with a greenish gypsum core and a pink “cover” are fire and moisture resistant.
Fire-resistant plasterboard sheets Source pozharanet.com
The thickness of the material varies from 6.5 to 20 mm. For interior partitions, sheets from 12.5 mm, which have sufficient rigidity and impact resistance, are recommended. Products of greater thickness are rarely found on sale, therefore, if there is a desire to enhance noise protection and increase the strength of the structure, the frame is faced not in one, but in two layers on each side.
The most common sheet size is 120x250 cm. This length allows you to cover rooms with standard ceiling heights, and the width is convenient for installation and transportation.
Products with dimensions of 60x120 cm are also quite popular. They can be easily transported in a car trailer without using delivery services. This option can be considered if you need to decide how to make a small-sized plasterboard partition or a decorative interior structure of complex shape. If you need to cover a large continuous surface, it is better to use full-size sheets - it is more economical in all respects: the cost of the material itself and installation work, the cost of fasteners, putty for seams and other “consumables”.
It is more convenient to install decorative partitions from small sheets Source prorab.help
Delivery of such material to the site is possible only by freight, so the required quantity must be calculated accurately. To do this, you should sketch a drawing to scale, marking openings, niches and other structural elements on it, and calculate how many whole sheets are needed to cover one side. Then multiply the resulting value by 2 in the case of a single-layer coating or by 4 if there are 2 layers of plasterboard on each side. It is advisable to add 1-2 more sheets depending on the scale of the structure in case of damage to the material.
This diagram will help determine the optimal arrangement of sheets - vertically or horizontally Source www.bus-rus.com
For frame
The frame for mounting drywall can be assembled from dry wooden blocks or special galvanized profiles. Each material has its own advantages, but wood is used less often, since it is faster to make a partition from a profile, and it is more reliable in operation. Unlike bars, which tend to deform when drying out and changes in microclimate, they retain dimensional stability and original strength. But wood has better soundproofing characteristics.
For installation you will need 2 types of profiles:
- guides that are attached to the floor and ceiling and set the orientation of the partition in space;
- rack-mount, which are load-bearing elements and give the structure the necessary rigidity.
All of them have a U-shaped cross-section with different heights and widths of the walls. The racks must fit tightly into the guides; this must be taken into account when choosing the section size.
Types and sizes of profiles Source ibuildrussia.ru
As can be seen from the table, the length of products also varies. Therefore, before you make a partition from plasterboard and profiles with your own hands, you need to measure the height of the ceilings and select racks of the required length to avoid unnecessary waste.
It is important! Some craftsmen use ceiling profiles 28x27 mm and 60x27 mm to install the partition frame. You shouldn't do this if you don't want to end up with a wall with poor sound insulation that vibrates when you walk around the room.
See also: Contacts of companies that specialize in interior redevelopment
The thickness of the wall is also of considerable importance: in order for the screws to hold well and not turn when attaching plasterboard boards, it should be 0.6 mm or more.
The number of profiles is also calculated according to the following scheme:
- The racks are set in increments of 60 cm.
- The rack profile is also used to frame openings.
- The length of the guides is equal to twice the length of the partition.
Wooden blocks will also be needed - they are used to strengthen the racks around the doorways.
For sound insulation
The empty space between the cladding slabs is filled with insulation, which in this case acts as a noise absorber.
Rockwool mineral wool Source sprb.by
The best option would be mineral wool in rolls or in the form of slabs, the density of which should be 40 kg/m3 or higher. This material is rigid enough not to settle over time.
Advice! Choose mats 60 cm wide - they will fit tightly between the frame posts without additional fastening.
When deciding how to make an interior partition made of plasterboard that maximally insulates adjacent rooms from extraneous noise, it is worth thinking about preventing vibration waves from the walls of the building. This is achieved with the help of elastic damper tapes, which are glued to the profiles in places where they contact the walls and ceilings.
Installation of self-adhesive tape on the profile Source mr-build.ru
Wall plasterboard sheet size
Depending on the surface for which plasterboards are intended, they differ in markings, sizes and thickness. Traditional plasterboards, which are used for wall installation, are available in a thickness of 12.5 mm, and their sizes range from 60 cm to 1 m 20 cm in width, and their length varies from 2 meters to 4 meters.
But most often when finishing premises, sheet sizes from 2.5 meters to 3 m 30 cm long are used, and the width of a gypsum board sheet is 1 m 20 cm. Such sheets are convenient to transport and move around the room. They are not very heavy.
And working with such sheets is also quite simple. In some construction stores you can find sheet sizes in small formats, for example, 1 m 20 cm long and 60 cm wide. The finisher can even work with such boards alone, since the convenient sizes of plasterboard sheets and low weight allow do it.
We are erecting a partition
When starting the interior arrangement of your home, you need to know not only how to make plasterboard partitions with your own hands, but also when to start installation:
- In a wooden house, you should wait until it shrinks, otherwise the fragile slabs will break under the weight of the settled floors.
- In a stone house, you first need to finish all the wet work - screeding the floor, plastering the walls, etc.
Advice! After delivering the materials, especially in the cold season, you need to let the gypsum boards sit indoors for several days and acclimatize.
Marking the contours
Work begins with marking the future partition, for which we first mark its outline on the floor, not forgetting to mark the location of the doorway. Then they transfer this line to the ceiling using any available tool: a plumb line, a water level or a laser level. The ends of the upper and lower lines are connected by vertical lines on the walls.
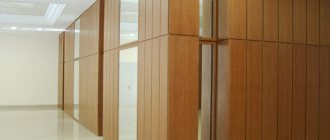
Plasterboard partition
Installing a partition is somewhat more difficult, so we will describe the process step by step with a photo.
Marking
First, mark the installation location of the partition. The easiest way to do this is with a laser plane builder (laser level). This straight line is applied to the walls, floor and ceiling.
If there is no laser level, you will have to use a regular construction level (of good quality) and a plumb line. First, mark a line on the floor - this is the easiest. Then, using a level, transfer it to the walls. If both lines on the walls are vertical, the straight line connecting them should be strictly above the line on the floor. Whether this is true or not can be checked using a plumb line, lowering it from a mark on the ceiling to the floor line.
Marking a partition using a level and plumb line
It is necessary to achieve a perfect match - the quality of all work depends on this.
Frame assembly
We will consider assembling a frame from galvanized profiles. Guide profiles are installed along the intended line on the floor and ceiling. It is marked UW or PN - load-bearing profile. They are most often fastened with dowels - 6*40 mm or 6*60 mm, the distance between two dowels is 30-40 cm.
The PN profile has a standard depth (wall height) of 40 mm, but can be of different widths: 50 mm, 75 mm or 100 mm. The thickness of the partition depends on the width of the supporting profile, as well as how thick the insulation and/or soundproofing material can be placed there.
General structure of the frame for the partition
Supporting racks are inserted into the guide profiles. They are marked CW or PS - rack profile. It differs from the guide in the presence of additional shelves on the walls. These shelves make it more rigid, increasing its load-bearing capacity. The width of the rack profiles depends on the width of the supporting ones: they must be the same. That is, the racks must be the same width. It is between them that the insulation is then installed.
Connection point between guide and supporting profiles
The posts are attached to the guides in two ways. The first is used mainly by professional builders. They work with a cutter - a special tool that breaks through and bends metal to the sides, fastening two parts. Amateur builders, when working independently with drywall, attach it to “fleas” (also called bugs and seeds) - small self-tapping screws with a screw at the bottom - TEX 9.5 (3.5 * 9.5 mm). They drill through the metal themselves, speeding up the assembly process (no need to drill holes). The racks are secured on each side with at least two self-tapping screws.
One point: if you are installing a partition in a high-rise building or on the ground floor of your house, then place a special film or some kind of material at the junction of the rack and the ceiling guide that will prevent squeaking. When people walk, vibrations occur and are transmitted to the profiles, causing them to rub and create a creaking sound. The second option is to make the racks 1 cm shorter. It is more correct: the shrinkage of the house is provided for and there are no unpleasant sounds.
The installation pitch of the racks is 60 cm or less. This distance is determined by the width of the gypsum board (plasterboard), which is standardly 120 cm. As mentioned earlier, it turns out that each sheet is attached to three racks. So it turns out that there should be 60 cm between the verticals.
If the gap between two posts is more than 60 cm, but less than 120 cm, a vertical profile is still placed between them in the middle, otherwise this section will “bounce” - the sheet will wobble and sag. One more point: the first rack is attached to the wall a little closer - the first sheet will be attached to the entire plane of the outer profile, therefore the distance should be a little less - 57.5 cm.
The distance between the racks of the plasterboard partition frame
It is advisable to strengthen the profiles to which doors or windows will be attached. The easiest way to do this is with a wooden block of a suitable size. It is inserted inside and secured with a pair of screws. You need to use dry wood so that the timber does not twist.
After all the racks are exposed and secured, the structures are given greater rigidity using jumpers - horizontally installed pieces of rack profiles. They are made in one of three ways suggested in the photo. The third option is the easiest to manufacture and easy to install.
How to make jumpers from a profile for a frame
The jumpers are usually placed at the height where the two sheets will be joined. Their edges must be fixed, so jumpers are necessary there. For the rest - in increments of 60-80 cm. If the wall is large, place it every 60 cm; if it is small, 80 cm is enough. Crossbars above the doorway are required: at the height of the door frame. It is also advisable to strengthen them by placing a wooden block inside.
Laying communications
After installing all the crossbars, you can begin laying communications and electrical wiring. It is advisable to install all electrical wires in a corrugated sleeve. If you place the partition in a wooden house or on a wooden frame, it must be metal. In houses made of non-combustible materials, in walls made of plasterboard on a frame made of galvanized steel, it is allowed to use plastic corrugated hoses made of non-combustible raw materials (marked “NG”).
Sheathing with plasterboard and heat/sound insulation
After laying communications, the installation of plasterboard sheets begins. They are installed in the same way as for sheathing. Do-it-yourself plasterboard wall covering begins on one side. Then, on the other side, insulation and/or sound insulation is installed between the profiles (bars) of the frame. After its installation, the gypsum board wall is sewn up on the other side.
The usual insulation for walls and partitions made of plasterboard is used:
- Mineral wool. This is glass wool, slag wool or stone wool (preferably basalt). The most environmentally friendly - without formaldehyde - basalt mats. They are easier to work with than glass wool - no skin or respiratory protection is needed, they are less susceptible to moisture than slag wool, they are easy to cut and hold up well, without additional fasteners due to their high density. Their disadvantage is their high price. The cheapest of these insulation materials is slag wool, the average price is glass wool, and stone wool is the most expensive.
Basalt mineral wool slabs are easy to install
- Styrofoam. To obtain good sound and heat insulation characteristics, a layer of 5-7 cm (density from 35 kg/m3) is sufficient. It is cheap, easy to install, retains heat well and conducts sounds poorly. The disadvantage is that rodents love it and when burned it releases toxic substances.
- Expanded polystyrene. One of the types of polystyrene foam. It is distinguished by a closed cell shape, due to which it has even better characteristics: it is denser, has excellent heat-insulating properties and dampens sounds well, rodents do not like it, and fungi do not develop on it. It can be cut with a hacksaw and can be installed by surprise. Does not support combustion. The downside is the high price.
In principle, it is possible to use other insulation materials, but the ones listed are the most popular.
We mount the frame
Installation begins with attaching the guide profiles to the ceiling and floor. They are laid along the marking lines, having previously glued damper tape to the base, and fastened in increments of about 50 cm, but at least 3 points for each element, regardless of its length.
Fasteners are selected in accordance with the base material:
- wood screws - for wooden floors;
- dowel-nails 6x40 mm for concrete floor;
- anchor dowels for concrete ceilings.
Make sure that the fasteners do not get into the electrical wiring Source www.hapori.ru
If the guide needs to be extended, the profile is cut with metal scissors or a grinder and attached butt to the previous one.
The next step is installing the racks. If necessary, they are overlapped, driving one profile into another by at least 40-50 cm and fastening them on the sides with self-tapping screws.
Video description
This video shows other, more reliable ways to extend racks:
Note! In the frame, the joints should be placed not on the same line, but staggered.
The first to be installed are the racks that limit the doorway. They will bear increased load, so they must be rigid. Before you make a plasterboard partition with your own hands, you need to think through this issue. You can ensure rigidity in different ways:
- use a profile with large wall thickness (up to 2 mm);
- make racks from two profiles folded into a box;
- place a wooden beam of suitable cross-section in the profile.
The upper horizontal lintel of the doorway is also cut from the rack profile and attached level to the side ones.
Video description
The correct installation of the lintel is shown in the following video:
Next, the supporting frame posts are installed. Fulfilling the following conditions will solve the problem of how to make a partition made of plasterboard and profiles strong, stable, and not susceptible to cracks:
- The pitch between the racks along the axes should be 600 mm, so that each sheet is attached at the edges and in the middle.
- For ceiling heights of more than 4 meters, the pitch is reduced to 40 mm, creating 4 fastening lines for each slab.
- The doorway posts are not stepwise and are not taken into account when marking.
It is important! Adjacent gypsum board sheets should be joined above the opening, and not on its side post. The ideal option is to fix the shortened post in the middle of the opening and move in different directions from it with the selected step.
- The length of the racks should be 1 cm less than the height to the ceiling, which is necessary in case of shrinkage of the house.
- Vertical supports are leveled and attached to the horizontal guide profiles with a cutter.
Preparing the walls for finishing
Having coped with the task of how to make a plasterboard partition in a room, you can think about decorating it - painting or wallpapering. But for this you need to do some preparatory work:
- First, holes are cut in the casing for the output of communications, installation of sockets and switches.
- Then the depressions from the heads of the screws and all the joints between the plates are puttied, while simultaneously gluing them with reinforcing tape.
Puttying seams between gypsum board sheets Source prorab.help
- After the putty has dried, the surface is sanded, dust is removed and coated with a primer.
- The final stage is to putty the entire surface with a thin-layer non-shrink mixture.
On a note! If you stick wallpaper directly onto drywall without a putty layer, it will be difficult to remove it during repairs without damaging the cardboard shell of the sheets.
Wall plasterboard: characteristics
To decorate the walls in rooms, traditional plasterboard with a thickness of 12.5 mm is used, but if you plan to hang anything on the walls in the future, two slabs should be attached to the sheathing for greater strength.
If you need to finish a room that has special requirements, you must use different types of plasterboard boards, for example:
- For finishing rooms with high humidity, such as bathrooms, toilets, kitchens, etc., it is necessary to use special moisture-resistant plasterboard. It is easy to distinguish by color. GKL slabs have a greenish color. This type of drywall does not delaminate due to humidity and fungus or mold does not form on it.
- If the room has special fire safety requirements, then in this case special fire-resistant types of plasterboard should be used; such gypsum boards are red in color. This type of gypsum board can be used near stoves, fireplaces, etc.
- If you need to combine both moisture resistance and increased fire resistance in a room, for example in a sauna or bathhouse, then you can use GKLVO brand plasterboard, which, thanks to the additional components in the gypsum, has moisture resistance and a certain fire resistance.
After installation of such specific plasterboards, they must be treated accordingly. So, for example, when using moisture-resistant gypsum boards, their surface should be treated with moisture-resistant putties, paints and other finishing materials that have a certain resistance to moisture. The same applies to slabs that have a certain resistance to fire; they should also be treated with fire-resistant materials.
Read more about the technical characteristics of plasterboard boards in the material:.
Briefly about the main thing
When deciding how to build a partition from plasterboard, you need to carefully prepare: choose materials for the frame, cladding and sound insulation devices. You will need guides and rack galvanized profiles, gypsum board sheets with the required characteristics and dense mineral wool. Installation begins with markings along which horizontal guides are attached. Vertical posts are installed in them at a certain pitch. Before cladding, communications are laid in the skeleton of the future wall, and after cladding one side, the frame is filled with insulation. Having completed the installation of gypsum boards, the plane is prepared for finishing by filling the joints and masking the attachment points.
Ratings 0
Thickness of plasterboard for walls used in interior decoration
If you couldn’t find such small sheet sizes, then it’s okay; you can cut large sheets of plasterboard using a special knife into the required sizes that are convenient to work with.
A few recommendations:
- To finish ceilings, slabs with a thickness of 6 mm - 6.5 mm are used, and such slabs are also used for the installation of any complex curved structures;
- In some cases, to save money, you can use 9.5 mm thick plasterboard boards for wall finishing;
- Sound insulation also depends on the thickness of the plasterboard sheet; the thicker the plasterboard sheet, the better the sound insulation.
In any case, the choice of sheet thickness depends on each specific conditions, room and volume of work performed. And also on the requirements for the room in which the plasterboards will be installed.
Our article will help you choose the right components for working with drywall:.