Definition of plaster
As you can guess from the name, this is a gypsum material. It is used to create partition blocks to divide the interior space into apartments or rooms.
What is plaster - it is a building material created from a mixture of gypsum powder and mineral fillers, giving the finished structure certain properties:
- Reducing the total weight of the product;
- Improving the strength of the finished product;
- Increased thermal insulation and sound absorption;
- For products operated in conditions of high humidity, hydrophobic additives are introduced into the plaster composition.
In many sources, this material is called alabaster in another way. In fact, alabaster is a product obtained by firing gypsum stone, followed by grinding and pressing into any design and shape. As with gypsum plaster, mineral additives are added to it. It turns out that alabaster is a derivative product of gypsum stone, but the concepts cannot be equated with each other due to different properties.
Plaster partitions - what are they?
Plasterboard partitions are a universal solution for dividing living space into functional zones. They are actively used in new construction for several reasons:
- Light weight does not increase the load on the foundation;
- The tongue-and-groove connection makes installation quick and easy; assembly is carried out according to the principle of the designer;
- Low thermal conductivity ensures heat retention in rooms;
- A high level of noise insulation due to the porosity of the material provides relatively comfortable conditions for people in adjacent rooms;
- Mold does not grow on plaster;
- The linear expansion of partitions does not actually change when the humidity in the room changes.
Plasterboard walls can separate not only rooms within the same living space, but also neighboring apartments. For such cases, thicker double blocks are chosen.
It is worth noting that plaster partitions cannot act as load-bearing structures.
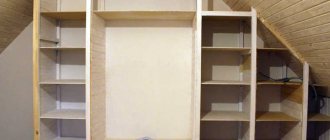
How to attach a shelf to a plasterboard wall
In general, hanging a shelf on drywall is a very difficult task, which becomes possible if you follow the right approach.
A well-organized and carried out work process using appropriate quality materials and correct weight distribution are in this case the key to success. You can attach shelves to a plasterboard wall using special dowels. Such fasteners can be of various types, but one of their advantages is that when screwed into the wall, they begin to open, thereby forming sufficient support and taking on a significant part of the load.
What you need
To hang a shelf on a plasterboard wall you will need:
- tools for manually or mechanically creating holes in the wall;
- dowels;
- screws;
- heavy items will require anchor bolts;
- If necessary, a cementing mixture is used.
Do not forget that during drilling a large amount of dust is generated, especially considering the composition of a material such as drywall. You will need to worry about protecting the room from dust, as well as personal protective equipment when carrying out such work.
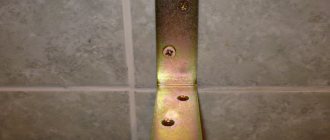
How to attach the fixing moment (fastening)
After drilling the holes for the fastenings, dowels are inserted into them, which go against the grain. After this, a screw is inserted into the dowel, for example, with brackets or hooks.
How to hang a heavy shelf on a drywall wall
You can attach a heavy shelf to a plasterboard wall by mounting it to a metal frame using special fasteners. To do this, you will need to perform a whole list of works:
- The locations of the fasteners are marked on the wall.
- Holes are drilled in the designated places, but not only through the drywall, but also directly through the profile.
- Butterfly dowels are inserted into the resulting holes and screws with fasteners mounted on them are tightened.
- The screws should not be overtightened, as long as they are able to withstand the weight of the shelf and the pressure it exerts on the wall.
How to make the right choice
There are 2 types of gypsum slabs:
- 1) Solid thickness 35…40 mm;
- 2) Hollow 8…10 cm thick.
Hollow ones have a more dense structure throughout the entire volume and are characterized by increased strength. Hollow ones are lighter, they retain heat better due to their structure, and retain sound up to 39...43 dB.
How to choose the right blocks:
- Both hollow and solid gypsum plaster slabs are suitable for arranging interior partitions.
- It is not recommended to overload the floor on wooden joists, so preference should be given to hollow blocks;
- All types of partitions are suitable for floors with monolithic screed;
- To fence important rooms (bathrooms), it is necessary to choose moisture-resistant products.
Specifications
They are regulated by GOST 6428-83. Changes are constantly being made to this standard. Gypsolite slabs, the dimensions of which are: 600 by 300 mm, 667 by 500 mm, 800 by 400 mm and 900 by 300 mm in thickness can be 40 and 80 mm.
According to their structure, they are hollow (80 mm thick) and solid (40 mm thick). It is noteworthy that the first slabs have less weight, better heat capacity and sound insulation. At the same time, full-bodied ones are more durable.
Another criterion is water absorption:
- a regular white slab has an indicator of 23 to 35%;
- the main advantage is the absorption of moisture during wet periods;
- for a green hydrophobic board the figures are 5%.
The remaining indicators are the same for hollow and solid blocks: sound insulation, compressive strength 5.0 MPa, fracture strength 2.4 MPa. Pay attention to the fire resistance limit (more than 2.5 hours) and the fire spread limit - 0.
Preparation for installation
When choosing gypsum panels as partitions, you need to properly prepare:
- Materials: the blocks themselves, soft damper cork tape for the backing, mounting adhesive for gypsum blocks;
- Tools: marking cords, pencils, large-toothed hacksaw, spatulas, level;
- May be useful (assessed according to the situation): M100 cement mortar for leveling the floor or timber for installation on joists under the partition.
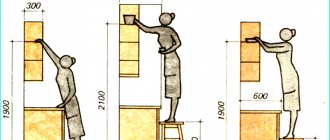
You should not design a fence more than 3.5 m high and more than 6 meters wide due to the design features of the partition. It is within these limits that the structure will be as strong and stable as possible.
A plaster wall should only be mounted on a leveled base. If it is a concrete screed, it is necessary to level out differences in height of more than 3 mm with a cement mortar of at least M100 grade. When installing on joists around the perimeter, you need to install a supporting beam.
Next, you need to mark the doorways and mark them on the floor with a thick line or notches on the beam. In order not to do unnecessary work, it is wise to determine the location of the openings taking into account the width of the blocks, so as not to cut them again. For example, a door will be installed at a distance of 2 gypsum plaster slabs from one wall, then on the other, only the slabs adjacent to the opposite wall will need to be trimmed.
Before installation, it is necessary to keep the blocks in the room for several hours so that they accept the ambient temperature and do not deform after assembling the partition.
For heavier shelves
To hang heavy objects on drywall (for example, not just one shelf, but a large rack), you need to use special fasteners. They will more securely fix the structure and reduce the likelihood of it falling.
Method 3: expansion and expansion dowels
The easiest way to hang a heavy shelf is with dowels, which you can buy at a store that sells repair supplies. The cost of these fasteners is high, but without them it will be impossible to attach heavy objects to a plasterboard wall.
Correct sequence of actions:
- Mark the places where the fasteners will be screwed.
- A hole is made in the plasterboard wall, the diameter of which will be slightly smaller than the size of the dowel. This job can be done using a hand or electric drill.
- The fastening element is carefully hammered into the wall.
- The rack is attached to the wall.
- Tighten the locking screw, which will open the inside of the dowel and increase the area of load distribution.
Method 4: Through Anchor
This device is used only when it is impossible to use expansion or expanding dowels. This situation may arise due to the small distance between the wall and the sheathing. You can attach a shelf to drywall using a through anchor in a few simple steps.
Installation instructions:
- Use a simple pencil to mark the location of the shelf.
- Drill a hole whose diameter will be equal to the size of the fastener used.
- A slot for the anchor sleeve is made in the load-bearing wall using a hammer drill.
- A metal or plastic sleeve is inserted into the resulting hole.
- Tighten the locking screw. As a result of these actions, the sleeve will open, and the entire load will fall on the concrete wall.
- After this, hang a shelf and place various objects on it.
Method 5: mortgage
So that after the completion of the repair there is no need to attach the shelves to the drywall, you need to foresee their presence on the wall in advance. To do this, install a special embedded beam to which all structures will be attached.
Order of operations:
- When installing the frame, choose the location of the rack.
- At these points, a thick board or timber is attached to the load-bearing wall. This is done using a through anchor. In this case, the thickness of the structure should be such that there is a minimum gap between it and the casing.
- After completing the finishing of the walls, the locations of the racks of the embedded structure are marked on plasterboard.
- A shelf is attached to them using ordinary self-tapping screws.
- The installation of other products is carried out similarly.
To hang shelves on a plasterboard wall, you need to put in a little effort and spend a few tens of minutes of free time. If mistakes can be avoided during this work, then the attached rack will perform its functions for a long time and delight the owners with its appearance.
Installation of plaster partition
All structures of a new building shrink over time and are capable of changing their linear dimensions. Wood and reinforced concrete, which are commonly chosen for construction, behave differently than plaster. To prevent dissimilar elements from having a destructive effect on each other due to different amounts of shrinkage after 1-3 years, a compensation damper tape made of cork should be attached to the floor under the partition. It will allow the structures to move independently of each other.
Following the markings with a spatula, apply the same glue to the floor on which the partition will be mounted. Place a tape over the solution and press it.
Installation of blocks begins an hour after rolling out the tape.
- Glue is applied to the damper tape and the first row of slabs is installed. The blocks can be placed on the groove, or you can cut off the ridge and place the element on the floor. The choice depends on your convenience. Glue is applied to the lower base and into the groove, an adjacent block is inserted, pressed and excess mortar is removed with a spatula.
- The second row is mounted relative to the first in a checkerboard pattern. The blocks must overlap the lower vertical joints both in the plane of the walls and at their intersections.
The progress of work must be monitored at every stage:
- The maximum permissible seam size is 2 mm.
- The evenness and verticality of the fence is checked when installing each block.
When finished, perforated metal corners are attached to the outer corners with glue, and the internal intersections are reinforced with sickle tape.
To give rigidity to the partition, gypsum blocks should be attached to the wall using hangers, corners or reinforcement. Each 1st, 3rd, 5th row (or all) is fixed to the fasteners with self-tapping screws, and the bar or corner itself is fixed to the wall with dowels.
There should be 1.5...2.0 cm left from the top row to the ceiling as a technological gap. It is filled with polyurethane foam and, after it dries, puttyed and covered with a ceiling plinth.
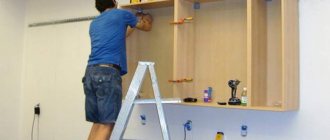
How to properly attach drywall?
To metal profile
To attach plasterboard sheets to the profile, use gypsum-metal screws with a fine thread pitch. When covering a metal frame with one layer of gypsum board, the optimal length of the self-tapping screw is 25 mm.
If the sheathing is in two layers, then the first layer is fastened with self-tapping screws 25 mm long, and the second - 45 mm.
Installation rules:
- Mark the attachment points on the gypsum board sheet in advance;
- Press the sheet tightly against the metal frame;
- Set the screwdriver to medium speed, because at fast speeds, the self-tapping screw can drown completely in the gypsum board;
- Start screwing the self-tapping screw into the places marked in advance;
- Recess the head of the self-tapping screw 1 mm into the gypsum board;
- Cover the attachment points with putty.
To the tree
GKL sheets are attached to the tree using SHSGD (gypsum plasterboard) screws. The most common sizes of self-tapping screws are 3.5x25 and 3.5x35 mm. When attaching a gypsum board sheet, the walls are first leveled.
To the base of concrete and brick
If it is not possible to screw self-tapping screws into the wall, then you can mount drywall using a special adhesive solution.
Stages of wall preparation:
- Remove protruding elements from the wall: screw heads, etc.;
- Clean the surface from paint and wallpaper residues. As a result, a base of concrete or brick should remain;
- Make markings in the places where the gypsum board sheets are attached;
- Apply the adhesive composition to the drywall in a checkerboard pattern (the distance between the adhesive mixture should be 300-400 mm;
- Press the gypsum board sheet firmly against the wall. Leave the sheet for 30-40 minutes to set.
To a wall made of foam block and aerated concrete
In this case, there are several ways to attach drywall:
- Fastening with a metal frame. Using dowels for aerated concrete and self-tapping screws, metal profiles are screwed to the base of aerated concrete blocks, then plasterboard-metal sheets are attached to the structure of the profiles with self-tapping screws.
- The second method of attaching drywall to aerated concrete is suitable for quick installation. GKL sheets are attached using an adhesive composition.
To the ceiling
To begin with, a structure made of metal profiles is installed on the ceiling. The profile is secured using dowel nails. The gypsum board sheets are secured along the supporting metal profiles. The sheets are secured with plasterboard-metal screws to the guides across the longitudinal structures.
Creating window and door openings in a plaster wall
To make a doorway, the blocks are laid according to the markings indicated at the preparation stage strictly vertically. When the opening reaches the top mark, act depending on the situation:
- When constructing an opening less than 90 cm wide, an auxiliary wooden lintel is attached to the plasterboard using self-tapping screws. The blocks are placed on it in the same way as the main masonry was laid - using glue with overlapping rows. When the mounting solution has dried, the jumper can be removed.
- When creating a wide opening over 90 cm, you will need to install a lintel made of a wooden batten with a height of at least 3 cm or a metal spacer. The lintel should extend 50 cm onto the supporting walls on each side. The element will remain in the partition; there is no need to dismantle it.
To mount a window or door frame, use foam and frame dowels.
Laying communications
Often, various communications are laid inside partitions:
- Thin pipeline;
- Electrical cables with boxes;
- Sewerage and heating lines are installed through the blocks.
Gypsum plaster is a durable material, so chipping it is not prohibited. On the contrary, the partition allows you to lay any communications both inside itself (in voids) and through through holes.
Gypsum plaster does not support combustion and does not ignite, so the electric cable can be laid without a protective cable channel directly through voids or grooves. If it is necessary to expand the canal, you can increase the permeability of internal voids with wide crowns up to 45 mm.
At the same time, you need to remember:
- The distance between the grooves must be at least 10 cm;
- The depth of installation of communications is at least 1 cm from the surface of the block.
How to attach to a plaster wall
Hanging a shelf or TV to a plaster wall is difficult, but using plaster is a completely solvable task.
Fastening of light objects to the plaster wall is carried out using plastic dowels, the inner legs of which are straightened into the cavity of the block and securely fixed.
For the installation of heavy equipment and plumbing fixtures in partitions made of solid blocks, it is better to use through metal studs.
Attaching conventional screws and nails to a plaster wall will not be effective.
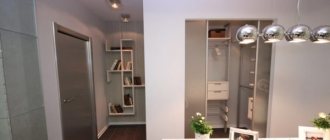
How to hang a shelf on drywall
Often home craftsmen are faced with the task of hanging a lamp, hanger, shelf or TV on a plasterboard wall. But many of them are quite justifiably afraid that the wall will begin to crumble and crumble due to drilling and other manipulations. Accordingly, all work must be carried out with caution, following the recommendations below.
Partition repair
When using partitions, different situations arise; over time, some sections of the wall become damaged, and potholes form that require repair.
How to repair a hole in a plaster wall:
- The first thing you need to do is clear the pothole and remove any dust from it.
- Priming the surface of the pit is necessary; it is better to use deep penetration solutions.
- For filling, it is optimal to use a gypsum mixture for plastering surfaces. It is diluted according to the instructions; to improve plasticity, you can add a little PVA glue when kneading.
- The pothole is filled with mortar using a spatula. The mixture is stretched beyond the recess. To improve the adhesion of the mixture, the dried surface can be sprayed with water from a spray bottle.
- Once the pothole is filled, the finished surface needs to be reinforced. For this it is better to use a nylon mesh. It is cheaper than metal, and with minor repairs its strength is sufficient. It is necessary to protect the hearth from cracking when the gypsum plaster dries. The mesh is applied to the undried solution and pressed with a spatula, covering the top with the same solution or embedded in the already applied one.
After completing the repair work, when the plaster has dried, the edges are sanded with fine sandpaper and further finishing is carried out (wallpapering, painting, etc.).