Determining the hanging height
The aesthetic component of the interior and the ease of use of the kitchen as a whole depend on the height at which the kitchen cabinet hangs. There are certain standards according to which wall cabinets are installed at a height of 550 to 600 mm from the level of the countertop. This distance is quite enough so that the hostess does not touch them with her head and does not reach for the top shelf on tiptoe.
Much depends on the height of the housewife herself and the height of the floor modules. According to the standard, the worktop is located at a distance of 850 mm from the floor. This parameter can be adjusted by the height of the base, the standard of which is 100 mm.
On a note. The height of hanging the upper cabinets is dictated by the distance between the worktop and the floor level.
Also, the height of the working area from the floor is affected by the thickness of the tabletop, which varies from 20 to 50 mm depending on the material of its manufacture. The front edge of the working surface protrudes from the facade by 30-40 mm, and the rear edge by 50-100 mm. This supply of hidden space is often useful for placing communications.
Choosing material for making shelves
Various materials are used to make corner shelves for the kitchen.
Tree
This is an environmentally friendly and safe material that does not emit toxins. Gives the kitchen coziness, creates a calm and warm atmosphere. To protect against insects and moisture, it is treated with special means. Wooden furniture is strong and durable; heavy objects can be placed on it.
Furniture products are suitable for classic interior styles, rustic, historical, ethnic and environmental. Combine with modern high-tech style. However, wooden furniture is highly expensive.
MDF and chipboard
Affordable substitutes for expensive wood, made from shavings and fibers. The panels are covered with veneer that imitates wood. For production, chipboard lined with plastic is used. It is practical and easy to clean.
Reference. MDF products are safer than chipboards impregnated with toxic glue. When exposed to high temperatures, glue releases harmful substances into the air.
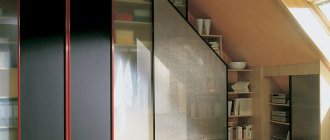
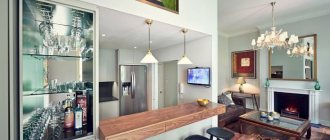
Glass
Glass products are elegant and airy. Artificial lighting makes them a bright accent in the interior. The shelves are made of durable tempered glass 8 mm thick.
The disadvantage of such products is that they require careful maintenance. Suitable for neoclassical, minimalism, fusion styles.
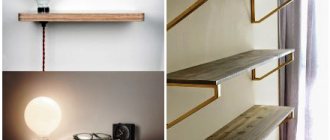
Metal
Shelves are either made entirely of metal (small lattice structures) or combined with wood. The metal structure is treated with special means that protect it from corrosion.
Metal products are suitable for interiors in a modern style - loft, hi-tech, minimalism.
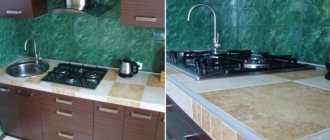
Stone
Furniture made of stone is expensive and heavy. Gives a luxurious look to the interior. To install a stone structure, a powerful wall fastener is required; it is only suitable for brick and concrete walls.
Combines with classicism, empire style, baroque, country and techno.
Mounting options for kitchen cabinets
Wall mounted modules are mounted on walls in two variations. The choice depends on the size and number of hanging modules, their depth and proportionality.
Mounting ideas:
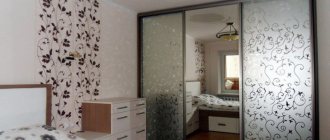
- Installation on one level means placing the modules at the same height, in a line.
- Fastening cabinets at different levels. The modules are mounted at different heights, and the tops of the underlying cabinets are used as additional shelves.
The latter implies the presence of cabinets of different heights. They are hung so that their lower part forms one line.
Installation methods
A variety of fittings for hanging kitchen cabinets allows you to choose the most optimal installation method for you. Fasteners can be selected in such a way as to make the work of the home craftsman as easy as possible. In this case, the structure will hold securely and firmly.
Methods for installing cabinets:
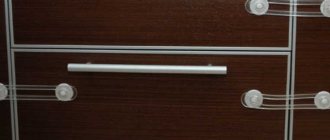
- On a bar with a hinge. Using a specially prepared strip with hooks greatly simplifies the work, allowing you to install cabinets accurately and without assistance.
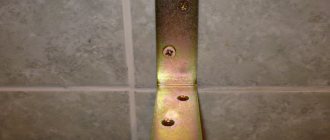
- For hanging corners and furniture hinges. This option is much cheaper, but you can’t handle hanging cabinets alone.
Preparation
The stage begins with preparing the material and tools for work.
The table below shows everything you need:
| Materials | Tools |
|
|
Next steps in the preparation phase:
- Checking the condition of the walls . If the cabinets are going to be hung on drywall, you will need embedded parts, since the fragile material is not able to withstand heavy loads. For curved walls, it is better to use a putty mixture to level the surface or mount the cabinets on a sheet of chipboard or plywood. Also, do not forget about decorative finishing.
- Marking . Using a tape measure, measure the distance from the worktop and set the laser level. If you don’t have such a tool, you can use a pencil with a ruler or a tapping thread, checking the evenness of the line with a level. It is at this mark that the lower level of the modules will be aligned.
- Preparing the site. It is advisable to prepare the space for work by clearing the tabletop of foreign objects.
For your information. By the time you hang the kitchen cabinets, it is necessary to install all sockets and switches, and also check their functionality.
How to attach a kitchen set without much difficulty - below.
Fasteners for lining and block house
Clamps for lining are brackets made of stainless or galvanized steel, sufficiently rigid to ensure strong and reliable fastening of the material. Lining differs from a simple board by the presence of a longitudinal groove on one side and a longitudinal rib on the other. Installing it with the help of such fasteners is quite simple; any novice home craftsman can cope with this operation.
The first board is installed strictly horizontally (or vertically) in level and secured with two self-tapping screws. Then the hooks of the clamps are placed in the groove of the board and attached to the sheathing in increments of about 50 cm. The next board is installed edgewise into the groove of the previous one, tapped with a rubber hammer, adjusted with a level, and the operation is repeated. Fastening the lining with such devices ensures durability, strength, reliability and complete absence of damage during installation and dismantling. The same method is used to use clamps for PVC panels.
Block house is often used as a finishing material - a high-quality finishing material that imitates timber. The block house is made from solid wood and, like lining, has a groove and an edge, thanks to which the lamellas (boards) are connected and create a smooth and beautiful surface. The dimensions of the clamps with which the block house is mounted differ from the devices for lining, but the design and principle of operation are the same. All fastenings of this type provide a connection that is invisible on the front side, emphasizing the aesthetics and nobility of walls made of natural wood.
Installation instructions
Methods for installing cabinets vary in level of complexity. The installation method directly depends on the chosen mounting option: cabinets of different heights cannot be installed on a rail.
Let's consider both mounting options.
On the rail
We attach the cabinet to the wall according to the bottom marking line and knock off the top one. This will simplify the task if the modules are planned to be mounted at the same height.
Further:
- We drill holes in the wall for the slats according to the markings.
- We drive dowel nails into the holes and firmly fix the rail.
- We hang the cabinets on the fixed bar.
- We level the modules using adjusting screws.
- We drill through holes in the side walls of the cabinets.
- Starting from the corner one, we connect the modules to each other.
The final stage of attaching the cabinets to the rail will be the installation of facade elements.
On hinges or corners
At the initial stage, this method differs in that the height of each module is noted separately. In the same way, attach each cabinet to the bottom fastening line and draw the top line.
On a note . The method of installing cabinets on corners differs from the option with hinges only in the place where the elements are attached. The corner is screwed to the upper end of the side of the cabinet, and the hinge is screwed to the back.
Further:
- We screw hinges or corners to the cabinets in the right places.
- We lean the corner module against the wall and place the fastening points.
- We drill holes in the wall according to the marks.
- We hold the wall cabinet in the desired position and use hardware to attach it to the wall.
- In this way we fasten module by module, checking the evenness of their joining and the top.
When all the cabinets are already hanging in their places, we tighten them tightly with through bolts and install the front parts.
Stages of work
- Mark the first point from the corner for fasteners on the horizontal marking line and drill a hole. There is no need to hit the entire row at once, since the hinges may be at different heights - you will have to make each subsequent mark after “trying on” the cabinet.
- Drive a plastic dowel into the socket and screw in an anchor hook or a powerful self-tapping screw.
- Screw the furniture hinges to the top of the module with screws - one on each side.
- Try the cabinet on the already driven fastener, place a bubble level on its lid to check the horizontal position and make a mark on the wall for the next dowel.
- After all the modules take their places, they are checked again visually and level, and then connected to each other with furniture ties or simply knocked together with slats along the top covers. Cabinets suspended by hinges should not move, but for reliability, you should first clamp them with clamps, placing pieces of fiberboard so as not to damage the surface of the walls.
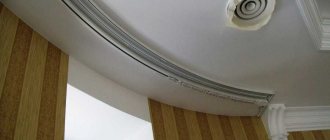
If the design of the set includes a decorative cornice, it is attached last - using furniture nails, screws or special glue. Upon completion of the installation work, all that remains is to hang the facades on the buildings and install the internal shelves.
Installing the upper part of the furniture: tips from the experts
It is difficult to carry out installation correctly, especially if you have never done such work.
Some professional advice will help you do everything correctly:
- Before hanging the upper kitchen cabinets, determine how to install them: overlapping the kitchen splashback or flush against it. The layout and general appearance of the structure will depend on this.
- When using a bar, secure the hooks on it in the middle position using the adjusting screws. Then secure them from the inside to the sides.
- When applying the top marking line, keep in mind that the mounting rail should be located 30-40 mm below the top edge of the rear wall of the cabinet.
- To correctly make mounting holes for the slats in a concrete wall without a hammer drill, use a punch and a hammer.
- When drilling into walls, if the drill bit jumps, make small holes with a punch, then continue drilling.
- If the plaster is crumbling, drill a small hole first and then drill it out to the desired size.
Nuances to consider
First of all, you should decide on the installation height of the cabinets, and also resolve issues of their installation in that part of the kitchen where communications are laid or are just planned (ventilation duct, gas outlet). To do this, you need to re-size the modules, without relying on the stated dimensions on the packaging, and make markings on the wall. If any of the cabinets will cover part of the gas pipe, it should be measured especially carefully in order to make cuts in the body and along the back wall.
It is better to select the optimal installation height experimentally, taking into account the orientation of the modules (vertical or horizontal), the location of the internal shelves and the height of the owners. Ideally, all adult family members should be able to freely reach the topmost cell of the closet without a stool or other supports. Although in some cases this rule should be neglected, especially if you have a cramped kitchen and wall-mounted modules have to be built up to the ceiling.
You can also use common recommendations for arranging an ergonomic work area in accordance with the height of the owners. The data is summarized in the table:
| Height of the owner/hostess, cm | Height of cabinets from floor level, cm |
| 155-160 | 175 |
| 160-175 | 185 |
| 175-190 | 200 |
Don't forget to check the distance between the top row of cabinets and the countertop of the work area. The optimal indicator is 60 cm, the minimum acceptable is 45 cm.
Features of hanging kitchen cabinets on drywall
The use of drywall is far from uncommon in modern renovations. The material is used to line the walls, and decorative and functional structures are built from it, such as furniture, columns, niches in the walls or partitions.
But how to hang kitchen cabinets on a hollow wall? There are at least 5 methods, but they all boil down to additional preparation of the partition for the installation of heavy structures at the stage of construction of the partition. Namely: the use of expansion anchors, the main wall as a capital support, embedded beams installed during the construction of the wall, the use of horizontal tires or conventional dowels.
How to properly hang kitchen cabinets on a plasterboard wall if it is already completed:
- We attach the mounting strip to the gypsum board surface in several places with anchor bolts into the main wall or self-tapping screws into the drywall.
- We mount cabinets on a rail.
- We tighten the modules together.
Tightening the cabinets prevents them from moving horizontally, allows them to be leveled in height and distributes the load across the points of attachment to the wall, eliminating the possibility of a separate module falling.
However, this fastening method is not entirely suitable for installing kitchen cabinets when storing heavy utensils or household appliances.
Important ! If you use the upper kitchen modules to build in appliances or store large quantities of groceries, use decorative tubes or cables.
How to hang a kitchen cabinet on drywall using auxiliary elements? The modules are attached to the vertical surface in the manner described above, but in addition, they are additionally suspended from cables attached to the ceiling, to the floor slab. Or they are installed on supports in the form of chrome-plated tubes, which form a frame supported on the floor.
What is a kleimer
A clamp is a special fastening element intended for a hidden type of fastening. The use of clamps allows you to hide fasteners and connecting parts from the surface of the material.
Essentially, a clamp is a fastening bracket. It is made of special spring steel or galvanized metal. Like all fastening building materials, kleimer belongs to the hardware group of building materials.
The word kleimer comes from the German klammer , which in translation has the following meanings: staple, paper clip, clamp, clamp, clip, etc.
In modern construction, kleimers have found the widest application. They are used when installing seam roofing, for fastening deck boards, all kinds of lining, MDF and other panels.
In the old days, fastening tongue-and-groove materials (various types of linings, boards, etc.), baseboards, as well as other finishing elements, was carried out using nails and screws. At the same time, very often the materials suffered various damages: cracks, splitting, delamination and many others. In addition, the fasteners were subject to corrosion, and corrosion stains appeared on the material itself. Fixing all these problems was quite difficult, and sometimes completely impossible. Therefore, the technology of hidden fastening on a clamp has replaced the once traditional fastening.