Types of shelves in the bathroom
There are three types of bathroom shelves: wall-mounted, floor-mounted and built-in.
Wall shelves
The most popular option. It is suitable for both spacious and small bathrooms. Shelves are divided into linear and angular and are attached to the wall either with drilling or with suction cups. The advantage of corner shelves is that they are located in little-used, often empty parts of the bathroom.
Calculate the exact cost of repairs using an online calculator
and receive a free detailed estimate for repairs
Calculate
Photo by ReRooms
Floor shelves
These shelves take up more space than wall-mounted shelves, but they are mobile and can be easily moved from one part of the bathroom to another. There are two options for whatnots: rectangular and corner. Suitable for bathrooms of different sizes.
Photo by ReRooms
Built-in shelves
Special category. They can only be done at the stage of bathroom renovation, so the place for them and their quantity must be thought out in advance. The base is formed from plasterboard, usually in a niche, and then decorated with ceramic tiles, mosaics, and artificial stone. This practical and aesthetic option is not inferior in its functionality to a cabinet, only without doors. This is a plus in the bathroom: everything is at hand.
Photo by ReRooms
Once in one of the previous articles, I promised to talk about how I installed a cabinet with a mirror in the bathroom. There seems to be nothing complicated about this, but in fact there are several nuances that would be useful to describe.
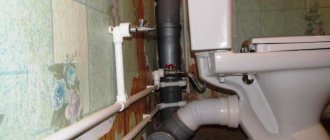
When I bought the cabinet, I didn't think about its weight. I paid attention only to the dimensions and convenience, as it turned out in vain. When I already bought the cabinet and brought it home, I realized that it would not be easy to hang an 8-kilogram cabinet on a wall lined with ceramic tiles. Not only are the “ears” for attaching the cabinet to the wall screwed with “toy screws” that will easily break out of the chipboard if you hang this colossus on them, but the tiles themselves on the wall do not really inspire confidence. You will have to drill through it, and even with a margin, so that the dowel-nail holds not only the tile, but also goes deeper into the wall. The thought of replacing the screws on the “ears” fastenings disappeared when I tried on a longer screw; it would immediately go right through the walls of the cabinet. Therefore, I had to figure out how else to strengthen the cabinet in order to reduce the load on the weak fasteners. And I came up with the idea of installing corners underneath the cabinet, which will carry the main load.
Now, in order, about the installation itself. First, I leaned the cabinet against the wall and marked the top and bottom borders with a marker directly on the tile. Then, I measured the distance from the edges of the cabinet to the center of the eyelet holes. There will be dowel nails on which I will hang the cabinet. Next you need to drill deep holes through the tiles into the wall. For fastening, I chose 4mm dowel nails 150mm long. If anyone thinks that this is a lot, I will explain this by the fact that, firstly, I have a thick layer of tile adhesive between the wall and the tile, secondly, the tile does not hold very confidently, and thirdly, the plaster itself on the wall is also crumbling. healthy And the cabinet will not hang empty, it is planned to fill it with many useful things. Therefore, for me, the best option is to take longer dowel-nails, which is what I did.
Now, you need to drill the intended holes and screw in the dowel-nails. What is the best way to drill into tiles without breaking them? There are several options, but they all boil down to the fact that you need to stick something on the tile, for example, several layers of tape, electrical tape, adhesive paper, etc.
I used special packaging adhesive paper and pasted it around the place where I needed to drill with an even square so that the drill did not move to the side. And after that he began to slowly drill. The main thing is not to turn on the bump stop right away. First you need to drill through the top of the tile (especially if it is glazed), then when the covering is drilled, you can turn on the bumper and continue drilling with it. But it’s better, of course, to do without it and go through the tile without a striker. And after the tiles have been passed through, the wall itself can be safely drilled with a chipper.
How to avoid over-drilling if your drill bit is too long? To do this, measure along the drill the length that needs to be drilled and make a mark by wrapping the drill with electrical tape or, as I did, with the same packaging paper tape.
So, the holes are ready. Now, insert the dowel-nails and screw in the screws to the end, leaving only the head and a small part of the screw rod so that you can hang the “ear” of the cabinet end-to-end, without gaps between the head and the fastening hole.
Having carefully hung the cabinet on the screws that are screwed in, we hold it, not letting it hang with its full weight, and mark the border of the cabinet on the wall from below. Here we will attach two corners on which the cabinet will rest.
We remove the cabinet and mark the holes for the corners. Leaning the corners against the wall, mark the holes on the wall and drill according to the same principle as before. Now we firmly screw the corners to the wall, and you can hang the cabinet on the top mount again.
Once in place, the cabinet rested against the corners from below and now you can load at least 50 kg into it, I think it will hold it!
Once I was done with attaching the cabinet, I ran the electrical wire from under the suspended ceiling (where I have a junction box) and connected it to the lamp switch and outlet on the cabinet. Now my dream has come true, I have additional lighting on the cabinet with the mirror to make it more convenient to shave and an outlet to connect the radio and listen to it while bathing in the bathroom.
Materials for making shelves in the bathroom
The main requirement for materials for bathroom shelves is resistance to temperature changes and high humidity. Plastic does this well, it is cheap, it can be shaped into any shape and painted in any color. However, it is cheap not only in price, but also in appearance, and it certainly cannot improve the design of the bathroom.
In order for shelves made of metal (stainless steel, chrome, enameled, coated) to be durable, and not for six months, you need high quality production, and this is expensive. If the quality is poor, metal shelves quickly rust and lose their fresh appearance.
Photo by ReRooms
Shelves made of transparent glass are unnoticeable and do not visually clutter up the space, while shelves made of colored glass decorate the bathroom. They are easy to care for, and fears that they are easy to break often do not come true.
Photo by ReRooms
Wooden shelves in the bathroom are by no means nonsense. Despite the fact that the tree itself absorbs water well, there are now products, oils and varnishes that are used to impregnate the wood, making it moisture resistant. Wooden shelves in the bathroom refresh the interior and intrigue guests.
Photo by ReRooms
Shelves made of artificial stone are produced only on individual orders. This material is not afraid of high temperatures or moisture and looks luxurious. Expensive, in a word.
Photo by ReRooms
Functions of shelves in the bathroom
Shelves in the bathroom serve four main functions. Firstly, all the necessary items are conveniently located: shampoos, balms, creams, lotions, soaps, toothbrushes and pastes, towels, washcloths, etc. Secondly, they prevent objects from falling under your feet in the bathtub or on the floor. Thirdly, they improve the appearance of the bathroom, participate in its design, decorate it, and create a holistic image of the interior. Fourthly, they increase the free space because they use the upper part of the walls.
Photo by ReRooms
How to choose shelves for the bathroom
To choose shelves for the bathroom, you need to pay attention to a number of parameters.
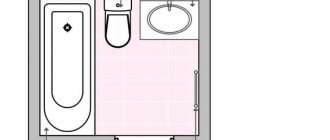
The first is the size of the room and the location of the main items: bathtub, sink, shower, toilet, if the bathroom is combined. The shelves should be placed so that they do not interfere, so a floor-mounted option is unlikely to be suitable for a small bathroom; it is better to choose wall-mounted ones.
The second is the bathroom interior design, what style it is made in, what you would like to bring to it. Shelves can both support and polish the appearance of the room, and cross out other decorative advantages.
Third, the material and type of structure of the shelves, how they will be mounted, and whether this type of mounting is suitable for walls. If there is a mosaic on the walls, shelves with suction cups are unlikely to fit here. And if the walls are made of artificial stone, you can’t do without drilling.
Photo by ReRooms
How to hang a shelf on a weak wall
The most labor-intensive operation during installation is drilling holes, which requires a hammer drill.
You can get by with a so-called “impact” drill, or even a hand bolt, however, you won’t drill much concrete like that. Brick wall - maximum. We insert a plastic or wooden plug into the hole - a dowel, into which we screw the anchor.
The problem may arise for the exact opposite reason - weak wall strength. Partitions made of foam concrete or gypsum concrete have low strength. The latter are common in bathroom cubicles of houses built in the 60-80s of the last century. Even a hand drill will take them, but installing the mount can be difficult. To begin with, when you try to screw in the anchor, the dowel turns and then dangles in the “frayed” hole. Let's look at how to hang a shelf on the wall in this case.
The solution is to create a support structure that distributes the load over the largest possible area, for which there are several techniques:
1.
When installing dowels in walls made of fragile materials, drill a hole with a drill of a smaller diameter. For a dowel with a diameter of 8 mm we use a drill with a diameter of 6-7 mm, for 6 mm a five-millimeter one.
2.
Place a small amount of glue into the hole. After inserting the dowel, wait for the glue to set and screw in the hook. We use adhesive mixture for tiles, “liquid nails”, etc.
3.
We take dowels of the largest possible diameter, or use two nested one inside the other.
4.
We use special spacer fasteners such as “butterfly” or similar.
Important - self-clamping anchors are of little use or not applicable for walls made of gypsum concrete, foam concrete, and hollow brick. They crush plaster and foam concrete, break fragile bricks.
Let's do the marking first. Modern furniture hinges are wide, which allows for significant tolerances, but still the markings must be done as accurately as possible, especially along the horizon.
Elements suspended at a noticeable (50-70 cm) distance from the ceiling are aligned with the horizon. Having determined the attachment point of one of the loops, draw a horizontal line using a building level. The distance between the centers of the loops is laid out on it, obtaining the places for subsequent fastening.