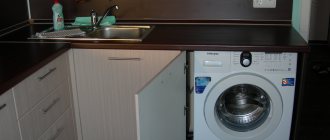
Installing a hob is a convenient and practical option for your kitchen. Thus, you can significantly save space, which is very important for standard small kitchens of domestic Khrushchev-era apartment buildings. In addition, hobs work on the same principle as solid stoves - so why not replace them with a more convenient option. It is important to note that installing a hob into a countertop is a completely simple process and anyone with a certain set of tools can handle it.
In order to understand the installation process and correctly implement it, it is worth taking a closer look at each stage of the repair work.
What are hobs?
Before we study connecting the hob to the electrical network, let’s get acquainted with its varieties. Built-in hobs are rectangular or hexagonal in shape, their width is 250 – 900 mm, their depth is 600 mm.
A beautiful panel pleases the hostess’s eye Source www.hotelresidencia.com
The manufacturing material is focused on various preferences and financial status of the consumer:
- Aluminum . Such devices require daily monitoring. They are very user friendly. These devices have an affordable price and withstand mechanical and thermal stress. The material is impact resistant but sensitive to scratches.
- Enameled . Their main advantage is their reasonable price. Enameled devices are available in a wide range of colors. They, unlike aluminum ones, do not show fingerprints. The disadvantage is the heaviness of the product, which does not always suit the parameters of the mounting surface.
- Stainless steel . These models are more expensive than enamel and aluminum. Reliable and durable. The downside is that fingerprints and water marks remain visible.
- Built-in glass-ceramic hob . Modern models with touch control. They have a stylish design and are easy to use. This material heats up and cools instantly. The only disadvantage is that glass ceramics is fragile and susceptible to cracks. Cold water sometimes causes chips due to impact on a hot surface.
Connecting the hob to the electrical network: single-phase and two-phase options
The greatest number of questions arise if it is necessary to connect the cooking surface to a network whose voltage is 220 V. Situations are especially problematic when the number of panel wires does not match the number of cables in the network. As an example, we can take the Hansa electric stove. Such a device is connected via 6 wires.
Hob connection diagram - single-phase version
If the network includes 3 lines, then the problem of connecting such a panel can be solved quite simply. For connection in this case, special jumpers are used, which are quite easy to purchase at any specialized store. Sometimes they are sold complete with the device. If necessary, you can do them yourself.
How to connect the stove in this case? Before connecting the device to the power supply, it is recommended to carefully study the instructions. The step-by-step process for connecting a panel to a single-phase system is as follows. The first thing to do is to find the lid on the back of the cooking surface. Next you need to open it. To do this, you can use a regular screwdriver. The terminals are located under the cover.
In the event that there are 6 terminals, and there are only 3 cables in the apartment, it is necessary to connect the contacts. To perform this operation, you will need to connect 3 wires that correspond to the phases with each other. Next, one neutral cable is connected to another. There is no need to touch the earth. The result is 3 lines.
In some models, the device already has jumpers. In such a situation, it is easiest to connect the hob. You just need to connect the network wires and the contacts of the electrical appliance. Video materials on this topic will help you answer the question of how to connect an electric stove yourself.
Two-phase connection diagram for a 380 V electric stove
Note! Single-phase networks can consist of only two wires. In this case, you need to act differently. In such a situation, a mandatory item is to purchase a separate circuit that will be used for grounding. If you ignore the ground connection, then the device can quickly fail.
Two-phase slabs are very rare. Often, when installing such a device on their own, people encounter difficulties. However, there is nothing complicated about it. When connecting such devices to a three-phase network, one of the cables is insulated.
How to connect the hob to a three-phase power supply (380 V)
Before connecting the cooking device to a three-phase electrical network, you must prepare a special cable. It should contain 5 copper conductors. The cross-section of each element in this case is 2.5 mm². Moreover, it is not so important what kind of cable it is. Both single-core and multi-core options are suitable for this.
Related article:
Sockets in the kitchen: location, diagrams and design features
How many sockets are needed? Placement rules, diagrams, norms and recommendations. Features of installing sockets for various devices.
Before connecting the hob and oven, you must check the network for the absence of current. In this case, the jumper is used only for two wires, which are zeros. These cables are designated by the Latin letters N. Thus, the jumper is used for wires N1 and N2. It is worth noting that some models of hobs have digital line designations. In this situation, the zeros correspond to the numbers 4 and 5.
As for the phase wires, they must be connected to each phase (one at a time). The diagrams in the pictures help you understand how to connect an electric stove. It is also recommended to study the relevant video materials. As mentioned above, the color of phase wires may vary depending on the standard. The most common cables are red, yellow and green. When connecting, you should be careful, as there is a possibility of incorrectly connecting the wires to the plug.
With a three-phase network, the neutral (zero) is connected at the top, and the ground, on the contrary, at the bottom. In turn, the wires indicating the phases are located in the middle. This order must also be followed at the outlet.
Connecting the device to a three-phase 380 V network
The problem of choosing hobs
Choosing a product on the market is difficult due to the lack of suitable types. After all, the type of installation of the hob depends on the parameters of the selected model.
Hob: view after installation Source tehznatok.com
Main product classification:
- Products are gas , electric and induction . As for the electric panel, this is the best option for a house where gas is not installed. If the buyer's first priority is comfort, experts recommend purchasing a gas appliance. The induction hob is characterized by a modern set of advantages.
- Dependent panel . A dependent model is a model produced together with the oven. In this case, the oven is located inside the kitchen unit or is integral with the hob. The combination of oven and hob does not always happen, even if they are manufactured by the same company.
- Independent model . It is not connected to the oven. The main advantage of such units is the arbitrary location of the device in the kitchen. The dependent model is made so that it can be placed exclusively above the oven.
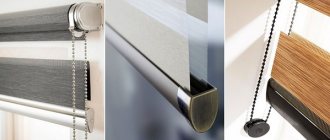
Differences by type of control:
- Mechanical mode of operation requires a rotating mechanism. Most consumers prefer this type.
- Touch models work with a light touch of your hand. This is a truly innovative method. Cleaning the panel is easy because the surface is smooth.
The main rule when choosing is security parameters. Source m.sm-shop24.ru
Rules for installing a hob above an oven
An induction hob has many positive characteristics. Among them:
- Rapidly heated surface to a certain temperature;
- Perfectly smooth surface, which allows for optimal care of the stove;
- Significant energy savings;
- Safety for children (exclusion of high temperatures, gas and open flame).
As you can see, this option has a lot of advantages. Therefore, it is not at all surprising that you also wanted to install this kind of stove at home. How to do it right? Installing a hob above an oven has a certain sequence and rules. In order to understand this issue in more detail, it is worth considering all the features of installing the panel.
- If you have started a process such as installing an induction hob over an oven, you should know that it must be equipped with forced ventilation and a cooling system;
- Remember that fastening must be done on a perfectly flat surface. Otherwise, deformations may occur that will interfere with the proper operation of the hob.
How to install a panel into a countertop
Independent connection of the surface first requires proper installation of the panel into the prepared cutout of the kitchen unit.
Installation is carried out in several stages:
- We determine the future location . Dimensions are determined with a ruler. It is most convenient to use a cardboard blank.
- Draw the shape of the panel on the board. A maximum of 1 mm can be left to allow the product to easily enter the panel.
- Drilling panel borders . Pre-drill in the corners of the marked shape. Diameter 9-10 mm. The drill must be made of wood or metal.
- The next step in installing the hob into the countertop is to cut a hole using a jigsaw. The tool is inserted into the finished hole, pressed firmly against the board, and then begin the cutting process. In this case, the brush should be pressed along the marking lines at low speed.
- Attach it securely to the top of the table using a set of clamps. Then remove the remaining wood.
- The remaining gap must be filled with special silicone sealant .
The process of installing a gas panel Source stroy-podskazka.ru
After installing the device in the set, you can begin the process of connecting it to the electrical network.
See also: Catalog of flat roof house projects
Step-by-step installation instructions
To install electrical built-in appliances, you will need a 220 V power socket. It is advisable to install it in advance and select the most suitable location before installing the headset. The electrical outlet must be located below the built-in equipment. By following this rule, it is prevented from splashing water and fat during cooking.
Tools
To integrate into a new furniture set, you will need a set of tools to make holes in the body and tabletop:
- drill;
- jigsaw;
- construction knife;
- roulette;
- Screwdriver Set;
- gas key;
- pliers;
- a device for measuring voltage in an electrical network.
Connection Tips
The process itself - how to connect the hob to the mains - is quite simple. You will need the following tools and components:
- An impact drill that is attached to a drill bit of a specific size to drill into a wall.
- Plastic inserts.
- Mounting screws for container.
- Screws for mounting the socket.
- Screwdriver.
- Knife to clean the ends of the crimp wires.
- Insulating tape.
Safe installation of the hob Source my-muzh.ru
In general, the plan for how to install the hob safely and independently should look like this:
- The connectors can be connected directly through the plate terminals. To access them, disconnect the cover on the back surface and remove the safety device.
- We focus on the color marking of the wires and the shade of the connected terminals. A single-phase network requires the use of a red wire with a membrane.
- Using a plug with a grounding terminal requires connecting the green/yellow wire.
A competent and secure connection first requires information about the parameters of the network connected to your home. Based on these technical parameters, the connection algorithm is selected.
Preparing the bore hole
Marking
The appearance of the finished kitchen depends on how accurately the markings are made, and an error of even half a centimeter will force you to purchase a new countertop.
Marking can be done in two ways:
- put the device in place and circle it with a marker;
- calculate and mark the mounting location to the nearest millimeter.
Despite the apparent simplicity and attractiveness of the first path, there are a lot of chances to make mistakes and apply incorrect markings.
Preliminary sizing
It is much safer to mark the installation location through careful calculations:
- The boundaries of the interior space of the cabinet above which the hob will be placed are drawn on the surface of the countertop. Thus, the place within which the work will be carried out will be designated. The markings must be applied with a pencil so that the lines can be easily erased upon completion of the work. If the countertop does not allow you to draw clearly visible lines, then you should stick paper masking tape on its surface, and draw markings on it.
- It is necessary to find the future center of the hole into which the housing will be installed. To do this, diagonals of a rectangle are drawn on the tabletop, formed by the front and back parts of the tabletop and the drawn boundaries of the cabinet.
- The center of the hob will be located at the intersection of the drawn diagonals. You need to draw two straight lines through it: one parallel to the edge of the tabletop, the other perpendicular.
- On these straight lines you need to mark the dimensions of the built-in part of the housing. You can look at them in the technical documentation or try them on yourself. These dimensions should be increased by 1-2 mm to make it more convenient to install the device later.
- Straight lines are drawn through the marked marks (parallel and perpendicular to the edge of the tabletop). They form a rectangle, exactly corresponding to the recessed part of the body and located in the center of the tabletop.
- It is necessary to ensure that the minimum distance specified by the manufacturer in the technical documentation is maintained between the final marking lines and surrounding objects.
- The resulting rectangle must be outlined with a marker and the extra lines erased so as not to make a mistake when cutting a hole.
The marked rectangle corresponds to the size of the hob
Cutting the mounting hole
To cut out a seat for the hob, you can use the following tools:
- milling machine;
- jigsaw;
- drill.
The highest quality cut is obtained when working with a milling machine. A slightly lower-quality cut is made by an electric jigsaw with a fine-toothed file.
For work you can use a drill or jigsaw
The procedure for cutting a hole with a jigsaw is as follows:
- Drill holes in the corners of the marked rectangle (from the inside) with an 8-10 mm drill.
- Using a fine-toothed file, carefully make a cut along the marked lines. The body of the jigsaw cannot be kept suspended; it should be pressed tightly against the tabletop.
The hole is cut along the marked lines
But not every household has convenient tools. A much less beautiful, but nevertheless suitable for installation cut can be made using a conventional drill.
The procedure for cutting a mounting hole using a drill is as follows:
- Using an 8-10 mm drill, holes are made along the intended line. They need to be drilled from the inside of the marks so that the drilled areas are in contact with the intended cutting line. Holes must be made as often as possible so that the cut piece of the tabletop can be easily broken off.
- Rough edges of the hole must be aligned with the marked line. To do this, you can use a rasp or a small file for wood or metal. The resulting edges must be made as smooth as possible.
Attention! After the mounting hole is made, you need to insert the hob into it. The device should fit effortlessly and completely cover the cut hole with its body.
Sealing the mounting hole
The next step is sealing. It is necessary to protect the countertop from water during cleaning or cooking. A tabletop made of wood or chipboard can swell and deteriorate as a result.
Sealing is done using acrylic sealant for plumbing or nitro varnish. It must be carefully applied in a thin layer from the inside to the ends of the hole made. There is no need to apply sealant to the top surface of the countertop - a special gasket in the form of a sealing tape that comes with the panel will be used there.
The ends of the table top are treated with silicone
Sealing tape sticker:
- An adhesive layer covered with a film is applied to the sealing tape. It should not be removed all at once, but peeled off gradually as it sticks to the surface.
- The tape is glued around the perimeter of the mounting hole in one piece. It is not cut at the corners, but simply glued with a turn.
- The end and beginning of the tape are connected end-to-end, without overlap or gap.
Some manufacturers equip hobs with aluminum seals. Instructions for installing them are contained in the documentation for the device.
Panel fastening
The hob is mounted as follows:
- The device is inserted into the mounting hole and centered so that the front side is parallel to the edge of the countertop.
- From inside the cabinet, the cabinet is attached to the tabletop with special plates included in the delivery set.
- Installation must be carried out in such a way that there are no gaps between the hob and the countertop.
- Using a utility knife, trim off the excess sealant from the top.
The seal is cut with a utility knife
Algorithm for connecting the panel to single-phase networks
This option is possible if a wire of three cores is embedded in the wall.
Scheme for connecting the panel to single-phase networks Source rolexforum.ru
To install the panel, the following steps are required.
- Use a screwdriver to unscrew the plate located behind the panel.
- Use jumpers to connect the first, second and third terminals. The phase connection is carried out using a brown, black or white wire
- We connect the blue wire to the zeros. These are numbers four and five.
- Cables for hobs are connected to the protective terminal (yellow).
- Tighten the mounting screws.
- It is necessary to check the reliability and tightness of connections and the functioning of the product.
The preliminary stage of connection is to check the technical condition of the sockets. If necessary, replace it.
See also: Catalog of companies that specialize in electrical work
DIY panel installation
Once the installation location has been selected and the necessary measurements have been taken, you can begin installing the panel. The set of tools depends on whether there is a hole in the tabletop or whether it needs to be cut.
Required tools and materials
To cut a stove into a kitchen countertop, you need to prepare all the necessary tools in advance.
During the work you will need:
- roulette;
- square;
- building level;
- pencil and marker;
- electric jigsaw or hand router;
- drill;
- Screwdriver Set;
- sealant;
- self-adhesive seal;
- hose for gas equipment;
- gas winding;
- adjustable wrenches.
The list may vary depending on the type of stove and the nuances of its connection. For example, a jigsaw and a router may not be useful if the installation is carried out in an existing hole. The main thing is that it is suitable in size for the purchased device. To install new equipment, you simply need to remove the old hob from the countertop.
Marking and cutting holes in the countertop
If there is no old hole, it needs to be cut in accordance with the dimensions of the panel. To get an even cut, it is better to use a milling machine.
Experts recommend following step-by-step calculations and taking into account some nuances:
- using a tape measure, you need to determine the center by drawing diagonals in a rectangle;
- draw 4 lines on the tabletop - 2 parallel to the edge of the tabletop and 2 vertical;
- Check the evenness of the drawing using a level.
It is recommended to stick masking tape on dark kitchen surfaces and make markings on it.
For ease of work, it is recommended to drill several holes - starting points, from which the cut will be made in a straight line. They are made with a drill with an 8-10 mm drill bit in the four corners of the drawn rectangle.
Next, cut out the seat for the panel itself:
- A jigsaw file is inserted into one of the holes with its teeth in the direction of one of the lines.
- The cut is made with light pressure on the tabletop from one hole to another.
- All sides of the drawn figure are cut out in a similar way.
To prevent the sawn part from falling, it must be supported from below with clamps or a stool. After removing the sawn piece, the cuts are checked for evenness and polished.
Sealing and sealing
After cutting the seat, you need to take care of sealing the tabletop. It is necessary to protect equipment from water during cleaning or cooking, and will also protect the material from rotting and destruction. Silicone sealant is mainly used unless other recommendations are specified in the instructions.
The use of the material has some features:
- the countertop is pre-cleaned of dirt and degreased;
- the cut is carefully treated with sealant around the entire perimeter without gaps;
- The applied composition is spread well with a spatula, and the excess is removed.
A rubber seal can also protect the tabletop. It is glued on top of the surface so that the edges of the panel lie exactly on it. Most manufacturers supply the stove with similar consumables and provide recommendations for their use in the instructions.
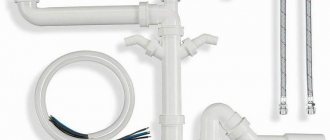
Connecting the hose to the gas pipe and to the hob
Before connecting the gas stove to the pipe, you need to select a suitable hose. It can be bellows, rubber or metal. The choice is purely individual, the main thing is that the product is of high quality.
Installation of a gas hob is carried out in several stages:
- The gas supply is cut off.
- The equipment is inserted into the seat.
- One end of the hose is connected to the gas pipeline using an adjustable wrench.
- The connection point is wrapped with a gas winding to avoid leaks.
- The second end of the hose is connected to the stove.
- The gas supply is turned on and the presence of leaks is checked.
- The burners are checked.
The stove can be used for its intended purpose only after it has been checked for faults.
Electrical connection
Before you install and connect an electric stove, you need to check the outlet. It must be grounded, suitable for power and comply with all standards.
If the stove model does not provide for the use of an outlet, then you will need to perform certain actions:
- Connect the electrical cord with grounding to the connectors of the stove according to the diagram on the back of the equipment.
- Connect the stove itself to the communications.
- Check the functionality of the equipment.
Some homes have slightly different wiring.
If the connection is to a single-phase network, then additionally carry out the following work:
- Lay a separate power line with a three-core wire.
- Install a special socket with grounding.
- Install a circuit breaker.
The functionality of the equipment is checked by connecting it to the network and heating the water.
Installation and fixation of the panel
Once the plate is connected and the seat has been treated with appropriate materials, you can begin the final installation of the equipment.
Installation is carried out using the following technology:
- The slab is placed in the hole with a seal and aligned in the center.
- The equipment is secured to the table using the fasteners that should be included.
- Using a screwdriver, carefully tighten the fastening bolts.
- The excess protruding seal is carefully trimmed with a knife.
Only if the installation is carried out correctly will the equipment work properly and without interruptions.
How the hob is connected to three-phase networks
Connecting the product to an outlet requires the use of a five-core wire.
Structurally, it consists of:
- three phases;
- grounding intended for protection;
- "zero".
Connection diagram of a panel with three phases Source rolexforum.ru
The process of connecting the hob is as follows:
- We connect a single-phase wire (black or white or shade) to the first terminal, another to number 2, and the rest to the third.
- The fourth and fifth terminals are connected with a jumper, and a blue neutral conductor is connected to them.
- Grounding requires connecting a yellow-green wire.
Hob connection diagrams: selection of stove models
Modern slab models that are integrated into the countertop are most often compatible with all types of phases. In Russia there are two strictly defined network standards:
- single-phase – 220 V;
- three-phase – 380 V.
Separately, it should be said that in some houses a 220 V network may have two phases. Before starting work on connecting the hob, you need to study the features of each type of network in order to understand the nuances of the work. Each type of system has its own characteristic differences.
Single-phase. Most often, this network option can be found in residential buildings that were built quite a long time ago. Single-phase networks are divided into two types: two-wire and three-wire. In old-style houses, single-phase systems have a voltage of 220 V.
Electrical diagram for connecting a hob 220 and 380 volts
First of all, you need to understand the two-wire network. It is worth noting that its distinctive feature is the wires of the same color. Phase detection in this case is carried out using a probe (screwdriver equipped with an LED) or a special tester.
Three-wire single-phase networks include multi-colored wires. The following shades correspond to a certain electric line:
- phase – red, brown;
- zero – blue, light blue;
- earth – yellow-green.
Single-phase switching circuit is quite common. In rare cases, such a network may have wires of the same color. In such a situation, it is recommended to use a tester, which will allow you to more accurately determine the purpose of each wire.
A two-phase network, which has a standard voltage of 220 V, is extremely rare. As a rule, such communication can be seen in new buildings. In this case, the color black (less often brown) is used to indicate the phase. Zero has the usual blue tint, ground is determined by a yellow-green wire.
The last connection diagram is three-phase. In such a system, zero and ground have standard colors. In turn, the wire corresponding to the phase can be indicated in yellow, red or green.
Installing the hob plug
If the device is equipped with a cable, where the plug is connected, and there is a suitable outlet in the room, then all that remains is to turn on the product.
In another case, it is necessary to carry out a certain algorithm of actions:
- The plug is pre-disassembled and the cable is passed through the prepared hole.
- We connect the brown and blue wires to the plug outputs.
- If o and “N” are present on them, then the brown wire is connected to the terminal with the letter “L”, and accordingly “N” receives a blue cable.
- The yellow-green wire is attached to the central terminal of the plug.
- The plug is assembled together and secured with a bolt.
Connection of wires in a plug Source cable.ru
The process of connecting an electric cooking surface
If the consumer decides to connect complex and powerful household appliances to the power supply network with his own hands, then he must have basic knowledge in the field of electrical installation work. Otherwise, to avoid negative consequences, you should invite a specialist. Therefore, we will not describe what tools need to be used when connecting an electric hob and provide step-by-step instructions for installation work. We will also assume that the power cable with grounding has already been laid to the installation site of the device. So let's get started! Let's start by installing the power outlet.
Power socket
Selecting and installing a power socket and plug is the most important part of the entire process of connecting powerful household appliances. The plug connection must be able to withstand the maximum possible current consumption. The design and other features of the socket and plug do not matter. For a single-phase network, the power socket and plug have three contacts, and for a three-phase network, five. The following figure shows both types of plug connections for connecting powerful household appliances.
Installation of a power socket and plug is carried out according to the general rules for electrical installation work. The main thing is to observe the polarity of the connection and not to confuse the phases with neutral conductors and grounding. If you are unsure which of the conductors is phase and which is neutral and ground, you need to use an indicator screwdriver or a multimeter. After installing the power socket and connecting the hob cable to the plug, it is necessary to perform certain manipulations in the terminal box of the device. This is the subject of the next section of the article.
Connection terminals
For different models of hobs, the terminal boxes may have different designs, but all of them are necessarily equipped with contacts for connecting the following conductors of the power cable.
- Phase terminals for connecting power supply L1, L2 and L3.
- Contact for connecting the working neutral conductor N.
- Terminal for connecting protective grounding PE.
As mentioned above, to connect panels to a single-phase network, it is necessary to install special jumpers on the phase contacts. For a two-phase network, one jumper is installed. The two neutral conductors are bridged for any connection. The figure below shows a diagram for installing jumpers for all types of electrical networks.
Most often, jumpers are included in the delivery of hobs. It is important to install them correctly and not to confuse the contacts. Otherwise, a short circuit may occur or the panel simply will not work. The bottom photo shows the most common connection option inside the hob terminal box for single-phase electrical wiring.
Before performing manipulations with the device connection terminals, you should study the instructions for connecting the purchased equipment. The body of most hob models also contains a detailed connection diagram, type of terminals and location of jumpers for different connection options. This will allow you to avoid basic mistakes when connecting panels, which we will discuss below.
Gas hob connection diagram
Once a gas stove has been selected, it is not difficult to connect it, provided that a similar unit has been used in this kitchen before. The gas hob must be connected using a flexible hose.
Example of a gas hob Source t10p.ru
The main safety requirement is to turn off the gas tap at the entrance to the apartment before starting the connection.
All modern gas surfaces are equipped with electric ignition.
Algorithm for how to connect a gas hob:
- Black and brown wires are attached in the plug to the terminal responsible for the phase.
- The blue wire is connected to the connector responsible for “zero”.
- The yellow-green colored cable is connected to ground in the central part of the plug.
- We check the functioning of the ignition in the gas hob.
Gas device installation:
- Installation is carried out in the workbench after cutting out a rectangle of the required size using a penetrating saw.
- It is advisable to leave a gap between the panel and the wall of about 5-6 cm for ease of installation of auxiliary communications.
View of the connected gas panel from below Source kuhnyamy.ru
Connecting an induction hob in the panel
A prerequisite for installing a hob and oven is to connect these devices via an RCD + automatic circuit breaker, or a differential circuit breaker with a leakage current of 30 mA.
Simple circuit breakers will not provide protection in the event of insulation damage and leakage to the housing.
- In the shield, the phase wire of the cable (usually brown, gray or other colors other than blue and yellow-green are chosen for the phase) is connected to the lower terminal of the diffavtomat without the inscription N or with the number 2
- Neutral conductor (choose a blue wire) - to the terminal at the bottom, marked with the Latin letter N
- Yellow-green wire (protective grounding) to the grounding bar
Connecting induction panels
Such plates are economical and efficient. Using the induction unit, only the bottom of the pan is heated, while the surface itself remains cold. Surfaces with this type of heating are the most expensive on the market.
Induction hob - a stylish and modern device in the kitchen Source tehnikaportal.ru
To connect an induction hob, you need to go through a certain algorithm of actions.
- There are two types of electrical cords. To connect the stove, you only need to buy the wire that is suitable for the wiring of your home.
- Now you need to open the cover on the back side of the surface. Here you should find a small rectangle. It needs to be dismantled.
- Opening the cover, we find the necessary terminals. We pre-mount the wires into the clamps. They must be securely tightened. This securely holds the cable out of the box.
- The next step is to remove the copper plate. The old style induction cooker has three cores. The modern model boasts 4 cores. The neutral entrance is in the middle. Phase holes are located on the sides. The ground terminal can be found at the bottom.
- It is necessary to establish a reliable connection between the wires and terminals. To install them, unscrew the fasteners and insert the end of the wire into the hole. Grounding is pre-connected. At the next stage, “zero” is added. The final step is to connect the phase holes.
How to connect induction panels Source mekelektro.ru
- The copper element is installed between the phase terminals.
- Be sure to check the strength of all connections.
- After the connection process, we check the operation of the device by turning it on.
When connecting, the electrical factor comes first. The surface heats up in a matter of seconds, so the burners can immediately begin their functions, creating comfortable use
The disadvantages of such panels include large electricity consumption. Consequently, connecting a hob imposes certain safety requirements when carrying out the described work.
Features of connecting an electric hob
All modern hobs are divided into types depending on the principle of operation. According to this indicator, electric, induction and gas appliances are distinguished. Connecting each of these types of equipment has its own characteristics. Panels operating from the mains require mandatory grounding for any number of phases.
When installing such a panel yourself, minimal knowledge in the field of electrical engineering will be useful. It will be much more difficult for a beginner who does not have such experience. You will need to study the design features of the device in detail and follow the instructions for connecting the electric hob. Typically, electronic models have all the parts needed to get the job done.
It is important to remember that when working with electrical equipment, you should remember the safety rules. Before starting the connection, it is necessary to turn off the power to the apartment (disconnection is performed on the panel). All work must be done carefully. Checking the final result allows you to avoid many problems.
Connecting Bosch hobs to the electrical network, as well as other modern devices, is usually done using a four-core cable. It is worth noting that electric models are gradually fading into the background. They have been replaced by more functional induction devices. Their peculiarity is that they do not heat up themselves, but act directly on the dishes.
Induction hob in the kitchen. Installation and connection to the electrical network