Which flooring to choose
For the ergonomics of the bathroom, it is very important to choose the right flooring. The floor should not be slippery as this may lead to accidents
The main types of materials used in bathrooms and toilet rooms are:
Tiles in the toilet
- Non-slip ceramic tiles;
- Laminate;
- Linoleum.
You need to choose very carefully. It should have a slightly rough structure so that it does not slip when wet. Typically, Italian ceramic tiles are of much higher quality than domestic ones and have a longer service life. Tile flooring has many advantages:
- This coating is abrasion-resistant and can be washed and cleaned without fear;
- Moisture resistance;
- Durability;
- Beautiful appearance.
There is only one drawback - ceramic tiles are afraid of mechanical damage; you cannot drop various objects on them, as they can deteriorate irrevocably.
By choosing laminate for your bath, you get a beautiful floor covering that can imitate expensive wood. Even a novice master can install laminate in a bathroom, the main thing is to fit the joints well. If the joints are poorly fitted, then moisture can get into them and the laminate will be deformed and damaged. It is advisable to lay special mats on top of the laminate; such a coating becomes slippery when exposed to water.
Linoleum bathroom
You can lay linoleum in the bathroom. This flooring is inexpensive, beautiful, is not afraid of moisture, and is easy to lay on the floor. However, when wet, linoleum is very slippery, so it is also necessary to use special bathroom mats.
Heated floors in bathrooms have proven themselves well, this is especially true for combined toilets with a bathtub. Such floors are pleasant to walk on with bare feet and do not require an additional source of heating in the room.
How to rationally equip a bathroom
In a modern home, be it a standard apartment or a private house, there is always both a bathroom and a toilet room, or a combined version of them. In most cases, they are not too large, but it is quite possible to allocate the necessary space for a sanitary area and a bathing area. Before purchasing plumbing fixtures, you need to measure the area of the room and determine the locations for the sink, bathtub and other equipment, taking into account the recommended rules and regulations for their installation.
It is recommended to install the bidet next to the toilet, at a distance of at least 60 cm.
When organizing space in the bathroom, you should take into account ergonomics and observe rational placement. It is necessary to determine in advance and accurately the maximum comfortable distance between the toilet and the bidet. There are no clear regulations on the size of this distance; its choice is quite arbitrary, but it must be taken into account that the distance from the sewer riser to the toilet is 1 m, and the rest of the plumbing is placed no further than 3 m.
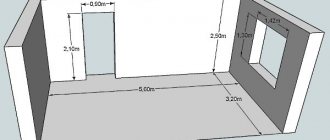
It is advisable to make the free distance in front of each device at least 60 cm (an area of 70x100 cm will be more convenient), and on each side you need to leave 25-30 cm. The direct distance between the bidet and the toilet, according to the advice of experts, can be made from 30 cm to 45 cm A shorter distance will not be enough to use plumbing, and a larger distance will not be very convenient. From the appliances to the washbasin, if it is provided in a sanitary area, there is a gap of at least 25 cm.
What is a toilet installation?
If the owner wants to install popular wall-hung toilets or bidets, he will also need to install a special structure - an installation. It performs the following functions:
- supports sewer inlet;
- supports the entrance of water pipes;
- sometimes he holds a water tank.
Using wall-hung toilets will free up space and also prevent dampness under the plumbing. Another advantage is that there is no need to dismantle the product if you want to change the floor tiles.
When choosing a location for plumbing fixtures, it is advisable to take into account that the back wall will move forward by 20-25 cm.
The tank is usually made of polymer material. After installation work is completed, it will be impossible to access it, because the built-in system is completely covered with external finishing, for example, ceramic tiles. When installation is completed, the owner will only have access to the ability to regulate using the drain button.
Therefore, it is important to initially purchase high-quality plumbing fixtures, because... If a malfunction occurs, you will need to repeat the procedure: remove the tiles, dismantle the bull, then install the system again. This will cost the apartment owner much more than if you initially buy high-quality plumbing fixtures.
Distance from the wall to the toilet optimal layout
During the renovation of a toilet and bathroom, when replacing plumbing fixtures, the problem of proper bathroom layout arises. One of the most important convenience parameters is the distance between the toilet and the wall, since if it is chosen incorrectly, using the device will be uncomfortable.
We will look at the regulatory requirements and find out what specific basic distances are determined by the instructions.
Bathroom remodeling
Separate toilet placement
Let's start with a simpler case, when the toilet is separated from the bathroom. It is simpler due to the fact that in such a toilet, in most cases, there is one device. In a larger package, it is possible to add a bidet, if the size of the room allows it.
We will immediately announce the standards for the distance from the wall to the toilet, adopted in SNiP 2.08.01-89 * “Residential buildings”:
Note! Official standards are mandatory for public and private construction of objects. Apartment owners will be able not to make them and place the devices at their own discretion, since their operation and maintenance are carried out by them
I would like to state that these standards are relevant in the case when the toilet is quite spacious, and you do not understand where it is better to put this or that device. But in most post-Soviet apartments this problem does not arise, since the dimensions of the toilet are minimal, and the toilet is placed in the middle of the cubicle near the back wall.
Note! Most of the Soviet-era toilet stalls have dimensions such that installing the compact exactly in the middle of the room near the back wall gives the very minimum distances to the side walls and the front door. Combined bathroom
Combined bathroom
If the toilet and bathroom are in the same room, the task is a little complicated by the fact that you need to rationally place a couple of plumbing fixtures in a fairly small room.
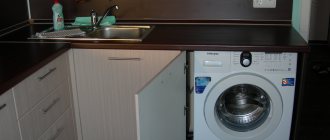
Additional troubles may result from the need to install household appliances - washing machine, boiler, etc. Along with this, the most acceptable layout option involves not only rational and ergonomic, but also harmonious placement of all objects from a design standpoint.
This is another feature of modernity: people want to live comfortably and beautifully, and this, as we know, cannot be prohibited.
If the bathroom is large, then you need to divide its premises into areas: the area of the shower or bathtub, the area of the washbasin, the area of the toilet, etc. But in most Soviet and many modern apartments there is no room for freedom, and the task comes down to meeting the minimum requirements for the distance between neighboring devices, devices and walls and the presence of passages.
Quite often, a compact and a bidet, and from time to time a washbasin, are placed in a line against the wall. In this case, there should be a gap of at least 20 cm between adjacent devices, preferably 30 cm. This means the distance from edge to edge.
If there is a sink next to the toilet, and it is also approached from the side of the appliance, then you must not forget about the space for tilting: while washing, a person leans towards the sink and moves back a little. The minimum space for this should be at least 70 cm.
Note! The dimensions of the distances to the side walls are taken without transformations - 38 - 45 cm from the middle axis of the bowl to the wall. Similarly, the requirement for the distance in front of the toilet does not change - it is at least 53 cm, for comfortable use - 76 cm
Here it is possible to make adjustments only on a large scale.
For combined bathrooms, the issue of saving space is very relevant. One example of such savings is a toilet with a tank in the wall. Installing this model with your own hands is complicated, but the use of modern installations and kits with frames simplifies this task.
When remodeling bathrooms and restrooms, take into account the distances between adjacent devices, and do not forget about the distances from the wall (see also the article “Bidet toilet: purpose and design features”).
Installation of a toilet installation - necessary tools
After choosing the appropriate type of installation and marking the height, width and other parameters, you can begin installation. Preliminary work includes leveling the floor. If you plan to install a block installation, you will also need to level the walls. As mentioned above, when installing this type, it is necessary to have a solid wall, because a regular partition will not support the entire weight of the product.
The next step is to choose the location of the toilet installation; it should be suitable taking into account the height and depth of the installation. After this, it is necessary to install communications: sewerage and water supply. The pipes must be positioned so that they are close to the installation site.
Required tools:
- drill with drill bits for concrete;
- FUM tape;
- adjustable wrench;
- hammer;
- screwdriver;
- core;
- corrugated pipe for sewerage;
- building level;
- double plasterboard, but it must be of increased water resistance.
Let's look at the installation procedure using the example of a frame installation.
Attaching the frame to the floor
Algorithm of actions:
- Pre-installation of the frame, checking the height and horizontal placement by the building level.
- Using a marker or pencil, mark the points where the frame will be attached. You should focus on ready-made holes in the installation.
- Move the steel frame aside and make holes for fastening at the points marked in the previous step. If installation is carried out in a concrete wall, in most cases dowels with a hex key are used.
- The frame is installed in place, and fasteners are screwed into the created holes.
Setting the installation height of the toilet
As a rule, the installation has a height that can be adjusted. It is necessary to calculate the height from the level of the finished floor, i.e. from the level of the floor covering. If at the time of installation the coating has not yet been laid, then its approximate height is taken into account and added to the installation height of the toilet.
So that the master can independently change the height slightly, the legs of the structure can be adjusted. When a suitable height is selected, it is secured using clamping bolts.
Watch the video
If the value needs to be adjusted, the bolts are loosened. At the stage of changing the height, you should definitely check the even horizontal position of the product using a level.
We attach it to the wall
To secure it to the wall, adjustable bolts are used, which are usually included in the kit. One end of the bolts is fixed to the upper frame corners, and the other is fixed to the wall using specialized dowels.
After this, you need to make sure that the installation is located in a strictly vertical position. The building level must be applied to the racks on the sides, then by rotating the nut on the fastening element, the position of the frame relative to the wall changes.
This alignment procedure is not particularly difficult, but its implementation is of great importance. It is important to align the structure as accurately as possible, checking in several planes.
When the technician carrying out the procedure has made sure that the installation of the toilet installation is carried out smoothly, it is necessary to press the moving element on the fastener. This will fix the screw and securely fasten the product in one position.
Watch the video
Connection of sewerage and water
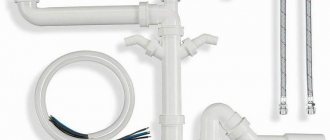
Then you need to connect the pipe, which is fixed on the frame with the sewer outlet.
Sometimes the kit includes an elbow for connecting to the sewer pipeline; if it is missing, you must use a corrugated pipe designed for sewer work. There is another connection option. To do this, a plastic clamp must be placed on the steel frame. It is into this that you need to connect the pipe, which is the outlet of the sewer pipeline. However, in this case it is necessary to know exactly the suitable pipe diameter.
The cold water supply is connected to the cistern through the appropriate pipe. The connection can be made with almost any pipe; the most important thing is to ensure the reliability of the connection. This is required to minimize the risk of joint depressurization and liquid leakage.
It is advisable not to use pipes made of metal-plastic with a press fitting. Such fittings require regular tightening for reliable operation, and due to hidden communications this is quite difficult to do. It is recommended to use copper, polypropylene or polyethylene pipes, the components of which are firmly connected by soldering.
The entrance to the tank and the adapter are connected by a flexible hose. It is recommended to use a branded product, but if this is not possible, any stainless steel plumbing hose will do.
Finishing, installation of buttons and toilet
After completing the main part of the toilet installation, finishing work should begin. Once the steel frame is installed, it should be covered with drywall. Typically 2 sheets are required.
First of all, marks of height and other dimensions are applied to the wall, then the profile is mounted at the created points. After this, the plasterboard sheets are installed to the profile.
Before finishing, it is recommended to install a box for the button to prevent the entry of construction debris and dirt. Holes are cut out on the drywall for the flush button, sewer outlet and water supply pipes, for 2 studs on which the toilet bowl is installed. After installing the plasterboard sheets, the tiles are laid.
When the finishing is finished, you need to cut the box for the drain button; its borders should be located approximately at the same level as the tiles. The button will be installed on 2 fasteners. Then you need to connect a cable (for the mechanical version) or a hose (for pneumatics) to the mechanism. Then the button should be installed in place and secured with bolts.
Attaching the toilet to the installation:
- A gasket is mounted, which is pressed onto the studs.
- The holes where the sewerage and water supply are connected are sealed with a silicone product intended for plumbing.
- The structure is installed on studs, then rubber gaskets are installed on them, and the fastenings are tightened.
- Excess parts of the gasket are cut off with a sharp knife.
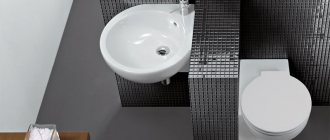
Ergonomics of the bathroom and toilet rooms
13.03.2009 17:54
(60 ratings, average: 4.17 out of 5)
To My World
Every time a renovation is planned, it is necessary to start with the so-called wet areas - the bathroom, toilet and kitchen. These rooms are the most difficult when planning and calculating ergonomic space.
When reconstructing (repairing) a bathroom, the necessary conditions are taken into account, namely:
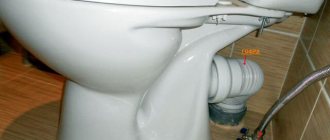
- The toilet must be located near the sewer riser; if this is not taken into account, then the toilet is placed above the floor level.
- The sink must be placed at a height of 85-90 cm from the floor level.
- In small bathrooms (less than 15 m2), for safety reasons, it is prohibited to install sockets and switches; they are located in front of the entrance to the room.
- In cases where the bathroom is more than 15 m2, you can install sockets for various equipment: heated towel rails, hair dryers, saunas, TVs and even electric fireplaces.
- Heated towel rails are located next to the riser for connecting to hot water. Electric heated towel rails can be installed at any height from the floor and next to an outlet.
Warm floor
They can be either electric or flexible pipes with hot water. The connection and control panels for the electric floors are placed in front of the door to the bathroom.
Toilets
There are floor-standing ones with a tank (compacts), floor-standing ones with a built-in tank, hanging ones, and also combined with a bidet. Wall hung toilets require additional space to install the flush cistern into the wall.
| Optimal dimensions of a floor-standing toilet | Optimal washbasin sizes |
Bidet
There are floor and hanging ones. It is better to buy complete with a toilet, to maintain the style and shape of the same design (in wall-hung kits, all communications must be hidden under one panel). The bidet is installed next to the toilet at a distance of 15-20 cm.
Sinks
There are ceramic, glass, steel, acrylic, stone and wood. According to the type of fastening, they are divided into console sinks attached to the wall with brackets, standing on a stand (tulip type) and built-in sinks. The standard sink depth is 45 cm. The length of double sinks is 120-150 cm. The distance between the sink and the shower cabin is or the bathroom must be at least 30 cm.
| Necessary optimal sizes for washing in the bathroom |
| Necessary optimal dimensions for towel drying in the bathroom |
Baths
There is a wide variety of bathtubs made from different materials: Cast iron. They heat up quickly and retain heat for a long time. Such baths are not subject to corrosion. The only limitation is the design; there are no other shapes other than rectangular. Steel. Durable surface, but does not hold heat well. Acrylic (plastic). Such baths are durable, but do not retain heat. They come in a variety of shapes and sizes. Quarilic (a mixture of acrylic with quartz powder). Holds heat well, durable and scratch resistant. There are also Wooden, Onyx, Marble and Steel bathtubs. In terms of functionality, there are regular and hydromassage bathtubs. The choice of bathtub depends on the size of the bathroom. There is a direct relationship between the height and length of the bathtubs - the longer they are, the lower their height. Common bathtub sizes are 170x70 cm. There are also sitz bathtubs with lengths of 150x70 and 120x70 cm.
| Standard dimensions of a rectangular bathtub | Standard sizes of a round bathtub |
| Standard sizes of corner bathtubs | |
Shower cabins
There are shower cabins of various shapes and sizes. They are divided into simple and combined. Simple ones come with a tray of various shapes and glass or plastic door walls. Trays in shower cabins can be: ceramic, steel, cast iron, acrylic, marble chips. The minimum size of a shower tray is 80x80 cm. Combined shower cabins are combined hydromassage baths with a shower cabin. They significantly save space in the bathroom.
| Various options for placing plumbing fixtures in bathrooms |
| Various options for placing plumbing fixtures in showers and toilet rooms |
| Next > |
Updated (03/14/2009 20:50)
Features and types
There are established standards for the height of the toilet, they were identified by engineers and specified in SNiP (Building Norms and Rules) - this is a kind of constitution for the construction world. Initially, the standard height was set at 40 cm. It is suitable for families with children and takes into account ease of use for both adults and children. But in our time, taking into account growth and statistics, the standard toilet height has become 43 cm. This is the standard size of floor-standing toilets that can be found in all stores.
Toilets usually come in two types.
A wall-hung toilet has several advantages.
- Clean floor. The hanging model makes it possible to easily clean the toilet room; you can only use a mop, and not manually get into difficult crevices; the floor can be wiped very easily.
- Design. The design looks stylish and modern, gives a feeling of free space, this adds comfort to the room.
- Silence when collecting water into the drain tank, since it is located in the wall.
- Excellent for private homes and public institutions (office buildings, entertainment complexes and large shopping centers).
In all other respects, there are no differences, because the contents of the tank, the mechanism of its operation, and all the attached communications are identical to the floor-standing models.
Hanging models also have some disadvantages.
- Price. Not only is the cost of the toilet high, but the installation, plasterboard screen wall, fastening mechanism, tools and materials will also cost more.
- Labor intensive installation. If a floor-standing toilet is attached with only two bolts, then when installing a wall-hung toilet you will have to work hard, setting the height, installing a plasterboard wall and an installation that holds the entire structure.
- Not recommended for apartment buildings. The fact is that pipes and plumbing in multi-storey buildings often fail and deteriorate; getting to communications and to the barrel of a wall-hung toilet, for example, to turn off the water, will be problematic.
Hanging toilets come in the following varieties:
- console type - standard hanging models of square shapes;
- compact toilet - the most popular model, despite the difficulties in care, has a leg that rests on the floor (is not attached to the floor);
- corner toilet - a solution for rooms with non-standard wall layout.
SNiP norms 2.08.01-89
Until recently, the Russian Federation mainly used the standards of the Soviet state, which paid great attention to the construction, industrial, epidemiological and occupational safety of its citizens
Recognizing the appropriateness of the data presented in these documents, obtained not just empirically, but also on the basis of scientific research, the norms and rules were still used at the level of recommendations.
The court took them into account when resolving disputes, but could also ignore them. The creation of a state register of regulatory recommendations, norms and rules, as well as methodological guidelines led to the fact that the developed norms and rules in the field of construction, production and the national economy acquired the status of official and legally enshrined
The main condition for acceptance was compliance with the norms of Russian law
The creation of a state register of regulatory recommendations, norms and rules, as well as methodological guidelines led to the fact that the developed norms and rules in the field of construction, production and the national economy acquired the status of official and legally enshrined. The main condition for acceptance was compliance with the norms of Russian law.
Sanitary and hygienic standards (SanPiN) are not only not outdated, but have become even more relevant due to the deteriorating epidemiological and environmental situation. None of the adopted sets of rules, according to the laws of the Russian Federation and regulations of the Ministry of Health, should conflict with the standards of sanitation and hygiene.
sizes and distances
Designers, doctors and manufacturers of bathroom equipment have long been paying attention to
bathroom ergonomics. The results of numerous studies have made it possible to determine the sizes of equipment suitable for 90% of people and its rational placement
The remaining 10%, who have larger dimensions, have to either endure the inconvenience or increase the numbers by purchasing larger showers and leaving more space between the elements of the bathroom.
Unfortunately, bathrooms are often so small that ergonomics can only be a dream. However, it is worth at least approximately adhering to the rules, taking into account the available opportunities. Ideally, 75 cm of free space should be left between each piece of plumbing equipment, as well as between the equipment and the wall/door.
This does not apply to toilets and bidets.
should be approximately
35 to 45 cm
. If you leave a long distance, it can be inconvenient.
Distance from shower stall or bathtub to sink
can also be reduced
to 30 cm
, but no less than that.
The washbasin bowl should be above the floor at a height of 80-110 cm
. Ideally, 90 cm, unless, of course, the bathtub is used by people of average height.
, the height of the countertop of bathroom furniture should be the same.
(tables, cabinets, chests of drawers, sink holes, etc.).
If children do not have their own bathroom, you need to take care of a comfortable bench so that the child can easily perform hygiene procedures while looking at his reflection in the mirror.
When washing at the sink, a person bends over, which means that there should be enough space in front of the sink for this. You cannot install a washbasin in a tight nook if there is no free space of at least 55 cm
.
However, there should be enough space so that a person, when washing his face and brushing his teeth, does not rest his elbows on the walls.
As for the toilet, there should be at least 35-45 cm to the right and left of it - no matter whether there are walls or other pieces of equipment. There should be at least 50 cm in front of the toilet, regardless of what is located there - a door, a shower stall or a sink. It is better if at least 75 cm is left in front of the toilet
If this is a toilet stall, then its average size should be 168 by 92 cm
Better if in front of the toilet
At least 75 cm
will be left .
If this is a toilet stall
, then its average size should be
168 by 92 cm
.
It needs to be mounted slightly in front of the edge of the toilet (20-30 cm)
.
The height of the toilet paper holder
from the floor is
60-70 cm
.
If a stationary shower corner
, then its size should be
at least 75 by 75 cm
, and this is provided that people of average build will take a shower.
Ideally, a shower corner or shower stall
should be
at least 90 by 90 cm
.
Low models
An installation frame that is short in height is necessary when installing a wall-hung toilet in a bathroom under a window or with sloping attic walls. For these conditions, manufacturers produce the following range:
Grohe Rapid SL (art. 38526000 and 38525001) - height 82 cm and 100 cm while maintaining the standard width of 50 cm while increasing the thickness of the tank to 151 mm.
Roca Duplo WC L – height 820 mm, width 500 mm, depth 160-190 mm.
Tece Keramag Espital – height 820 mm with the possibility of vertical adjustment within a range of 200 mm for installation in a concrete screed.
AlcaPlast Sadromodul AM118/850 - the distance from the floor to the upper edge of the frame is 858 mm with an increase in the depth and width of the structure to 510 mm and 170 mm, respectively.
Sadromodul AM101/850:
Two low models are included Geberit :
- height 98 cm, thickness 17 cm, width remained standard;
98 cm
- height 82 cm - installation depth increased to 170 mm.
82 cm
Viega model 8533 has a height of 820 mm from the floor level.
To do this, the manufacturer had to increase the thickness of the tank to 140 mm in order to maintain the volume of water inside it in the standard quantity for effective flushing.
SNiP Residential buildings on distance standards
The rules contained in the regulatory document are mandatory for the construction of any type of building - industrial, public, medical, educational and residential. However, there is an unspoken opinion that owners of premises in residential buildings and private buildings can deviate from the dictated standards if they themselves carry out their maintenance and operation.
Basically, such a retreat is made by the owners of premises with bathrooms, combined or frankly small. If the toilet is spacious enough, it is better to adhere to the established rules in order to use special rooms with convenience and safety:
- to the front (front) wall or wall with a door, if we are talking about a small toilet, the minimum distance is 53 cm. This is enough to not feel tightness in the knee joint;
- the maximum required distance from the frontal plane located in front of the seated person is 76 cm;
- the maximum distance from the front does not particularly need to be regulated, and if possible, the functional zone for a person can be more than a meter;
- from the middle axis of the toilet to the side wall, the established minimum is 40 cm. In some sources it is defined as 38 cm;
- the optimal distance from the central axis of the toilet is 45 cm. This is enough for comfortable operation of the plumbing fixture. But no one forbids installing at a greater distance, if the parameters of the allocated room allow it;
- in a separate toilet, the distance between the toilet and the wall on the left in standard buildings is usually equal to the distance to the wall on the right side;
- The location of the toilet in the toilet room is usually the center of the room, because the sewer pipe is supplied here. This also determines the position of the remaining toilets on the riser on the floors above and below;
- The second option for placing plumbing equipment is closer to the back wall. This does not make it possible to equip some kind of shelves or rack, but it is typical for the minimum dimensions of the toilet in apartments of standard construction, where the bathroom is separate;
- The toilet stall in Soviet-era houses was built according to size, when the central placement provided the necessary distances to the side wall and front surface with the entrance door located in it.
When arranging a shared bathroom, there are certain conditions that must be observed. These are standards for the distance of the toilet from other interior items that should be adhered to, even minimally.
But this is not a suitable option if the dimensions of one of the family members do not correspond to the average figures for which the building codes and standards are calculated.
Other installation details
As you can see, there are many nuances and problems hidden in installing a toilet. The distance from the wall in this case is no less important an indicator than others, so experts recommend planning this kind of work in advance so as not to forget about anything and do everything in accordance with the standards.
Please note that when lifting the toilet above the base of the floor, it is not recommended to use wood for this purpose, since this material is susceptible to rotting as a result of the adverse effects of condensation. Having moved the plumbing fixture to an acceptable distance from the wall to the side of the toilet (the numbers are indicated above) and mounted the device, it is recommended to pour a concrete screed, which additionally requires the use of screws, dowels and special fasteners for plumbing fixtures
Only in this way will the device be securely fastened, and you can enjoy the comfortable use of plumbing without worrying about breakage
Having moved the plumbing fixture to the permissible distance from the wall to the side of the toilet (the numbers are indicated above) and mounted the device, it is recommended to pour a concrete screed, which additionally involves the use of screws, dowels and special fasteners for plumbing fixtures. Only in this way will the device be securely fastened, and you can enjoy the comfortable use of plumbing without worrying about breakage.
Now you know what rules and regulations to use. The distance from the wall to the toilet is an important indicator that makes daily visits to the toilet easier and more comfortable. When faced with the need for redevelopment, studying this kind of material will help you avoid common mistakes that are so often made by repairmen who have started redevelopment on their own.
Why the bathroom should be ergonomic
The toilet is one of the most in-demand rooms in any home. The use of various plumbing fixtures should be safe and practical, and the overall decor of the toilet room should be pleasing to the eye. If all the rules for arranging plumbing fixtures are followed and the repairs are carried out in accordance with the standards, then using the bathroom will be comfortable and convenient.
In the process of renovating a bathroom, in order for the resulting room to be functional and comfortable, it is necessary to follow certain rules that determine the minimum dimensions of plumbing fixtures and the distances between individual pieces of equipment. The space in this room will be organized in such a way that all planned devices will fit in it, in addition, you will be able to use them freely and comfortably. The main and irreplaceable devices, of course, are the toilet and sink. You must plan the placement of furniture and shelves correctly. Often in this room it is also necessary to find a place for a washing machine.
If you have already decided which pieces of furniture, fixtures and equipment will be placed in the bathroom, you can start planning their location, taking into account the correct distances. Before you begin planning the interior design of a bathroom, you need to know the distance from the toilet to the wall, the standards that are established in order to comply with sanitary and hygienic requirements, as well as to ensure convenience when using plumbing fixtures.
Distance from toilet to wall in small bathrooms
In a small bathroom we value every centimeter of space, therefore, wanting to put all the necessary equipment in it, we need to carefully calculate the space and draw up a plan for the location of individual elements of furniture and plumbing.
To properly furnish a small bathroom, it is worth carrying out careful planning. A standard toilet has a length of about 70 cm. If you install a wall-hung toilet, it will protrude less, but at the same time it will stand further from the wall by the width of the installation or rack in which the pipes and cistern are hidden. Regardless of the size of the bathroom, a free space of 80 cm wide and about 70 cm long should be left in front of the toilet. In order for the plumbing fixtures to be comfortable to use, they must be at a certain distance from the walls. The required distance from them is at least 20 cm; the same distance is required for other elements of equipment.
Bathroom lighting
An ergonomic toilet or combined bathroom is characterized by good and practical lighting. Built-in light bulbs look good, as well as additional light sources that illuminate individual areas. There must be a small lamp near the washbasin that will provide good illumination for the person washing. Above the bathroom, the light should be more diffused and soft so that you can relax after a hard day at work. It’s good when the bathroom has economical night lighting, which will allow you to use the room without turning on the main light.
Average social standards
Standards for installing a toilet away from the wall are the results of measurements, studies, social and statistical surveys that allow us to develop standards for continuous production. Some of them were included in GOSTs and SanPiN and became standard standards for the sale of industrial products in construction markets and building materials supermarkets.
The children's toilet was developed according to standards obtained in pediatrics, where there are standard standards for each age - weight, height. Children who do not meet age standards have to adapt to any preschool educational institution - be it a kindergarten or a school.
At home, not everyone has the extra square meters and funds to install a special device. It is much more rational to use a special toilet stand. Social standards concern standardized equipment and room size.
If there are people who do not meet these parameters, they are inconvenienced or (if they have significant funds) they create toilets and buy custom toilets. The average size standards are as follows:
- The most common toilet size: bowl height - 40 cm, tank - 81.5 cm, drain pipe rises 185 cm. The compact itself is most often 65 cm long and 35 cm wide. It follows that from the central axis of the device to its edges can be at least 17.5 cm, if this is an adult and not a child’s version. Then it is clear why on a construction forum, when asked how many centimeters should be the minimum distance, they write that it can be 38 cm, and the distance from the toilet to the side wall is at least 20 cm. In total, 17.5 cm (almost 18 cm) from the central (longitudinal) axis of the bowl and 20 cm recommended to the wall, and give those 38 cm (minimum). And if you follow the SNiP standards and make 45 cm from the axis to the wall, then this will be the optimal average parameter, convenient for most people.
- For a toilet room, according to building regulations, 80 cm in width and 1 m 20 cm in length are considered sufficient for a comfortable stay and the exercise of natural needs. When converting old secondary housing, the length and width are often made smaller. Sometimes in this way meters are gained in the hallway or kitchen. In this case, they usually bring the bathroom and toilet closer together or expand the space by changing the layout of the bathroom and installing a shower stall. But in houses of mass standard construction with a separate toilet, there is often a size determined by GOST and SNiP, corresponding to SanPiN standards and providing maximum convenience to people living in the apartment.
The nuances of installing a toilet
The minimum distance from the toilet in the front part cannot be less than 53 cm, otherwise the discharge of natural needs will become problematic and cause harm to health. The optimal functional space in the front part is 75 cm. It is not limited in the direction of increasing it, but if this is not possible in a combined bathroom, then a toilet with a tank in the wall or wall-hung is used.
Equipping a combined bathroom according to existing needs is particularly difficult in a small apartment. In this case, they resort to installing a shower instead of a bathtub and draw up a scheme in which none of the devices will block access to the other during operation or, at least, cause minor inconvenience.
These standards are easily met when using standard designs and types of sinks, bidets, toilets, and washbasins. But if you purchase something unusual, an exotic shape or unusual dimensions, you need to take careful measurements so as not to experience difficulties during installation or not to be left with new equipment, the installation of which will be impossible under existing conditions.
Standard models
The installation height should ensure a distance from the floor covering to the top edge of the toilet sides of 40 cm, as this is the international standard. Accordingly, from the finished floor to the axis of the sewer pipe, the size is maintained at 229 ± 1 mm.
The tank is always located above the drainage system; its volume is from 6 liters, which is the standard amount of water for normal flushing of solid waste. Some companies provide a water supply of 3 liters, while the volume of the tank increases to 9 liters. Or they offer economical models of tanks with a small flush volume - 2.4/4 liters.
Installations of 80 cm are the lowest, with either the thickness of the tank or its width increasing, often a little of both of these sizes. To obtain narrow installations, you will have to increase the height and thickness of the flush tank.
The standard dimensions of a frame installation are considered to be a height of 110-120 cm, a width of approximately 50 cm and a thickness of 12–15 cm. In this case, the thickness is indicated in the documentation without taking into account the sewer pipe, the outer diameter of which is 110 mm.
From the manufacturer Grohe, the standard dimensions of Rapid SL frame installations are 1130 mm in height, 500 mm in width and 130 mm in depth at the top, as in the drawing below:
The installation depth can be adjusted up to 230 mm.
At the same time, models may differ in the design of the tanks and equipment (sound insulation, smart panels, other additional options). Design features are:
Roca offers a collection of frame structures in standard sizes:
- Duplo WC - width 500 mm, height 1090, depth 140 - 195 mm;
Duplo WC
- Duplo WC Smart – width 500 mm, height 1190, depth 140 – 195 mm;
Duplo WC Smart - Duplo WC Freestanding – width 500 mm, height 1120, depth 160 mm;
Duplo WC Freestanding
Dimensions of the basic Tece - TeceProfil: width 500 mm, height 1120 mm, depth 150.
The basic model from Alcaplast - Sadromodul AM101/1120 has dimensions: 1120 mm (height), 510 mm (width) and 125 mm (depth).
Tece also has a model Jadromodul AM102/1120 for installation in panel houses - it has additional legs for side-by-side installation in standard toilets (from 830 to 1200 mm);
Geberit brand has standard dimensions for frame installations of 120 mm (thickness), 500 mm (width) and 1120 mm (height) with the ability to adjust within 200 mm vertically. In total, the company has developed three series of similar hidden installation systems:
- budget Delta - the open-type frame does not have a crossbar on top, the release keys are plastic, made in three basic colors;
Delta
- elite Sigma - frame with top crossbar, more than 80 design options for drain buttons;
Sigma
- universal Omega - only one model out of three has standard dimensions; it differs from the previous version of the Sigma series only in the design of the tank.
Omega
Manufacturer Cersanit:
- Installation of AQUA 40
AQUA 40
- Installation LINK PRO
LINK PRO
The manufacturer Viega calls frame installations “prevista dry toilet elements”. The standard dimensions at this enterprise are 1120 mm in height, 500 mm in width and 120 mm in installation depth.
There are options with additional supports, fastening studs to the wall, and the ability to bleed air into the ventilation exhaust manifold from the toilet bowl.
Please note: the actual installation depth of installations starts from 150 mm, regardless of their thickness, this is due to the diameter of the sewer pipes - 110 mm. Therefore, installation thicknesses of less than 150 mm only make sense if pipes pass behind the tank itself.