Despite modern design solutions, over the years the rack is a universal option for storing things. But it’s not even about convenience or comfort. The aesthetic component also plays an important role here, because good shelving fits perfectly into almost any interior. You don’t have to spend money on buying such furniture, since you can make a wooden shelving unit with your own hands, without any carpentry skills.
DIY wooden rack
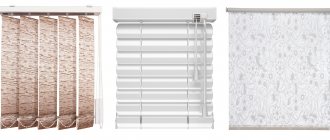
Types of racks
The rack is a spacious structure made of different types of wood. It consists of several shelves that are fixed on durable racks. The advantage of making a rack yourself is that you choose the size, color and number of tiers of the future structure. There are several types of racks that are designed to perform their functions . We are talking about stationary, mobile, rotating and hanging racks. Let's consider each of these varieties separately.
Shelving comes in different types
Advantages of shelving
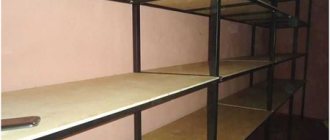
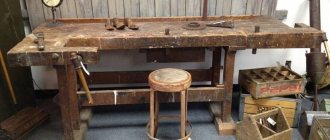
Stationary
The structure includes crossbars that serve as supports for the shelves being installed, and racks. To increase the strength of the rack, the structure can be attached to the wall. The number of shelves may vary depending on the taste preferences of the master. Stationary shelving can be open or closed, but the second option is more difficult to manufacture.
Exquisite stationary shelving
Mobile
The design is very similar to the previous version, with the exception of wheels on which the rack can be moved along the floor. The advantages of mobile products include their mobility, so you don’t have to disassemble the structure every time or ask a neighbor for help to rearrange the house. Racks are made with plastic or rubber wheels. The first option is cheaper, but the second is more reliable.
Rack on wheels
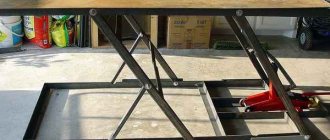
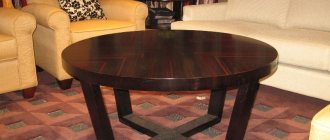
Rotating
A popular type of shelving that is easy to use. Such designs are great for people who need constant access to various items stored on wooden shelves. For example, a rotating rack is suitable for motorists who are working on their vehicle in the garage.
Rotating rack
Rotating bookcase Albero
Mounted
Such structures can hardly be called shelving, because the shelves are not attached to the supports below, as is the case with traditional shelving, but to the wall. But still, hanging racks are in great demand. The advantage of such shelves is their convenience, because the rack can be installed almost anywhere where there is extra space. As with other structures, wall-mounted shelving provides for the installation of a different number of shelves.
Modern wall shelving
Prices for different types of racks
Shelving
How to make a rack - step-by-step algorithm
A fairly large number of shelving options can be found on the Internet, where each craftsman presents a photo of the finished product for a shelving unit made of plywood. You can use it or invent it yourself. In any case, you first need to draw up drawings, indicating the dimensions of the component parts: support posts and transverse shelves. Let's say you decide to choose a standard rack with two posts and four crossbars. The manufacturing algorithm will contain:
- Based on the completed drawings of the rack, markings are made on sheets of plywood.
- According to the completed contours, the sheet is unraveled with a jigsaw, forming shelves.
- The side racks are made in the same way; however, it is better to choose a thicker slab for them.
- To ensure reliable holding, grooves are made in the side posts with a hacksaw and then with a chisel along their entire width.
- All surfaces of the rack are cleaned with sandpaper.
- To increase strength, holes are made at the joints, which will then serve as additional connection points.
- Assembly into a single rack is carried out. To improve the quality of assembly, a Euroscrew is used. This connection has received reviews as a fairly durable and convenient type of fastener, which holds the rack parts together very firmly and tightly.
Subsequently, you can finish the rack. This design will serve as a good place to store books, tools, place flowers, and so on.
What is needed to make a rack
Once you decide on the type of structure to be made, you need to calculate the amount of material that will be needed for the work. For example, to make a regular straight rack you need the following materials:
- wooden supports from 1.5 to 2 m long;
- bars for connecting supports;
- boards for making shelves;
- metal corners;
- a set of nails and screws (you need to take it with a reserve, because some of them may get lost in the process);
- special impregnation for wood;
- varnish or paint (optional).
Wood for making shelving
Prices for construction boards
Construction boards
To work, you also need to prepare some tools, most of which can be found in any garage:
- brushes for painting wood;
- vacuum cleaner or small brush to remove dust;
- electric jigsaw or regular wood saw;
- crosshead screwdriver;
- sandpaper or sanding machine (if you have one);
- hammer.
What tools may be required
Note! The amount and type of materials used may vary. It all depends on the chosen rack design. But in order not to interrupt the work process to purchase additional wood or screws, it is recommended to take materials with a small reserve.
Prices for popular models of screwdrivers
Screwdrivers
Step-by-step instruction
Step 1. Cut the lining, adjusting its length in accordance with the length of the rack. If the planks you bought are longer than the width of the structure, then the excess needs to be carefully cut off.
Trimming parts according to the length of the future rack
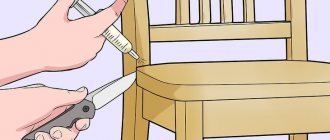
Step 2. Treat the surface of wooden products with impregnation, thereby protecting them from external factors.
Next, protective impregnation is applied
Impregnation application process
Step 3. Paint each of the structural elements. To save time, you can lay several planks together at once and paint them as one surface. Then turn them over to the other side and continue painting.
Convenient to process several boards at a time
Step 4. Once all the parts are painted, leave them outside until completely dry. The impregnation does not smell very pleasant, so it is not recommended to dry painted products indoors.
Wait until the wood is completely dry
Step 5. Make marks on the bars in the places where future shelves should be located. Then install metal corners in the designated places. If you have a screwdriver in the house, this will significantly speed up the work process.
Metal corners fixed
Step 6. Install the lower horizontal elements to create an “H” shaped structure. As a result, you need to make four such products.
There should be 4 such elements
On a note! At first, the installation of second horizontal lines must be performed only in the outermost structures. It is necessary to start installing the remaining horizontals a little later, when the bottom shelf is ready.
Step 7. This is what the rack design should look like at this stage of manufacturing. She is not very attractive yet, but this can all be fixed.
Making a rack with your own hands
Step 8. Fasten the first shelf, or rather, the boards of the first shelf to the horizontal bars. It is not necessary to use screws for this - you can get by with ordinary nails.
Installing the first shelf using nails
Step 9. Start nailing the outermost board first, which will be visible to everyone. Here it is necessary to choose high-quality material, without defects. After installing all the elements, the bottom shelf will be ready.
Finished bottom shelf of the rack
Step 10. Make small stands for the legs of the structure being manufactured, thereby protecting the floor covering from mechanical damage. In addition, if you add a few laminate scraps, they can be used to level the rack in the future.
Stands for shelving legs
Step 11 . Proceed to make the second shelf of the rack. All actions should be similar, only at this stage of work you can immediately install the upper horizontal lines.
Installation of the second shelf
Step 12 . Make sure that the shelf, or rather the planks from which it is made, lie on all horizontal lines. Ideally, all these elements should be in the same plane.
The boards must lie on all horizontal lines
Step 13 . If large gaps appear between the shelves and horizontal bars, level them using small pieces of laminate. Simply cut out a strip and place it under the board in the desired location.
This gap needs to be corrected
Step 14: Do not screw the side of the square that attaches to the upright too tightly. When eliminating too large gaps, the horizontal will need to be moved a little. Once everything is level, screw the fasteners as tight as possible.
One part of the corner is not fully screwed
Step 15 . Install the last shelf, making it slightly wider than the others. If the first two shelves use 5 planks, then the top one should have 6. This will increase the strength of the entire structure.
DIY rack is ready
Additionally, you can make a small ladder if the rack is high enough. The design of the staircase may vary. Now everything is ready and you can enjoy the result of the work done.
How to cover the rack
After assembly, a rack made of wood material must be coated with a final finishing agent. This will give the rack increased resistance to wear and environmental factors. Professional craftsmen recommend using traditional materials for finishing the rack, namely:
- varnish - with the help of this product, the slab for the shelving will acquire increased resistance to moisture and will be reliably protected from premature wear, while the unique texture with unique wood patterns and natural shade will be preserved;
- paint – the material will create a protective coating for the rack, which will give the plywood absolute resistance to steam and moisture, and external factors; the use of paint allows you to give the rack a color that is optimally suited to the overall decoration of the room;
- PVC film - the coating creates a lamination effect, due to which the rack will be completely protected from interaction with the external environment, the variety of textures allows you to imitate rare expensive wood.
If the rack does not involve loads and serves a decorative role in the room, the slab does not need to be covered with final finishing. In this case, the slab must be of first-class quality, and its surface must be impeccably polished.
To create an exclusive interior detail, shelving techniques such as artistic painting, decoupage and craquelure are used. Using these techniques, images with various motifs are applied to the rack. The most popular are pictures depicting animals, flowers, household items, architectural monuments, cartoon characters, etc.
Rack with side walls
In almost every apartment there are places that are not used in any way. Such places include a small space on opposite sides of the door, where there is usually nothing standing. If desired, it can be used rationally by placing a small rack in which you can store books, shoes or other items. The peculiarity of this design is that it should be covered with walls on the sides. You can make a rack yourself if you follow all the rules and recommendations.
Rack with side walls
Tools and materials
The list of tools and materials for making a compact shelving unit is practically no different from the list mentioned above. Prepare the following for work:
- chipboard (chipboard);
- thick sheet of plywood;
Plywood sheets of different thicknesses
- boards for the frame of the structure;
- set of self-tapping screws;
- glue for working with wood;
- impregnation (stain);
- router or electric jigsaw;
- roulette;
- paint brush and work gloves.
What you need for work
Important! Stain not only gives the wood a certain shade, decorating the entire structure, but also protects it from pests. Therefore, if you are in doubt whether to treat wood with stain or not, it is better to spend a little to save yourself from unnecessary problems in the future.
Prices for popular models of jigsaws
Jigsaw
Manufacturing
After the wood has dried from the previously applied impregnation, you can proceed directly to the manufacture of the rack. Below are step-by-step instructions, following which will make the work much easier. This is important for beginners who have not previously worked with wood.
Table. Instructions for making a wooden shelving unit.
| Steps, photo | Description of actions |
| Step one | Assemble the base of the structure by cutting out all the necessary elements for the rack from the boards. The number and dimensions of parts must correspond to the drawing according to which you assemble the product. Use self-tapping screws as fasteners. |
| Step two | Cut out the side parts of the structure from a sheet of plywood. After this, special grooves must be made in the resulting parts of the rack into which horizontal shelves will be inserted. |
| Step three | Make marks with a pencil on the remaining plywood, and then cut out the shelves and, inserting them into the previously made grooves, secure them with self-tapping screws. To accommodate books or magazines on the finished shelf, make it tall enough. As a rule, 30-40 cm is enough for this. |
| Step four | Connect all the previously cut parts into one structure, which ultimately needs to be attached to the wall. But if you plan to move the shelving unit in the future, there is no need to attach its base to the wall. |
| Step five | Cover the surface of the vertical shelving panels with chipboard to improve the aesthetics of the structure. Secure the plywood pieces using a screwdriver. |
| Step six | Decorate the shelves of the rack, thereby giving the manufactured structure a natural appearance. To make working with materials more convenient, use a clamp. |
| Step seven | Decorate the lower and upper parts of the structure with a special curly plinth made of wood. To prevent the caps of the screws from spoiling the appearance of the baseboards, secure them with small nails. |
After assembling the rack, you can immediately load it with various items, for example, books, toys or indoor flowers. The product can be installed not only in an apartment, but also in a garage, although for garage conditions you don’t have to worry too much when choosing materials for making the structure. It can be made from cheaper plywood sheets and wood.
White bookcase
Simple shelf with rope fastenings
Let's see how to make a simple shelf attached to the wall with ropes. This is an ideal decorative item for a room in a country style, loft, etc.
Step 1. The first step is to purchase all the necessary materials. To create one such shelf you will need a wooden board about 2.5 cm thick, rope rope (8 mm in diameter), a drill, hooks and dowels. You also need to take or buy a puncher, a tape measure, and to apply markings you will need a pencil.
What you need for work
Step 2. You need to make 4 holes in the corners of one board, one in each corner. The fastening ropes will be threaded through them. It is better to apply the markings first with a pencil, and then drill 4 holes at the marked points using a drill. You should not make holes at the very edge; it is better to retreat 2-3 cm from the edge of the board.
Drilling holes
Step 3. After this, the board needs to be sanded and coated with a primer and then paint, or you can get by with varnish or stain. You can continue to work with it only after the paint and varnish composition has dried. If a primer was applied, it is important to dry the primer thoroughly before applying a coat of paint.
Sanding the board
Prices for popular models of eccentric sanders
Random orbital sander
Applying primer mixture
Step 4. You need to make holes on the wall for the hooks on which the shelf will be hung. First you need to apply level markings (the points should be located at a distance equal to the distance between two holes located along the length of the shelf). Next, you need to drill holes in the wall, insert dowels into them and secure the hooks to the wall.
Next, holes for the hooks are drilled
Step 5. The piece of rope needs to be cut into 4 pieces of the same length, it is important to tie one of the ends of each piece with a nice neat knot, and then thread the ropes through the holes so that the knots are at the bottom of the shelf.
Beautiful knots are tied at the ends
Step 6. Now you need to tie the free ends of the ropes in pairs on each side and hang the shelf on the hooks in the wall.
The shelf is hung on hooks
This is what the finished shelf looks like
Such a shelf can be made very quickly, and it will look quite nice. It is suitable for arranging souvenirs or flower pots.
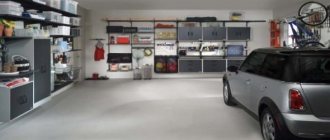
Recommendations for placing shelving
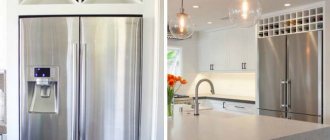
Installation of stationary shelving can be done in the kitchen, pantry or garage. Large open shelves provide great visibility. In this case, all items are easily obtained and just as easily returned to their place. It is better to install a closed shelving unit in a children's room or living room . For example, you can store a large number of books or toys there. The baby will be able to store his things in such a rack.
Kitchen shelving
Rack partition
If we talk about the rotating structure, then it can be installed almost anywhere, be it a children's room, a garage or a living room. The rack is more complex to make, and you also need to learn how to decorate it, because if you install the product in the middle of the living room, it will always be in sight of guests.