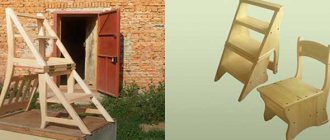
In everyday life, situations often arise when chair repairs are required. DIY repairs are much cheaper than calling a professional. It is necessary to find out the cause of the breakdown and select the right tool. Many people are interested in how to glue a wooden chair. It is worth taking a closer look at the materials needed to repair furniture. Wooden chairs with upholstered seats require a different approach than products made entirely of wood. Let's look at how to restore this furniture yourself.
Causes of breakdowns
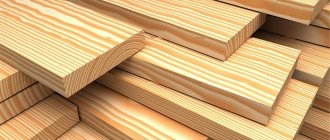
Before you look for how to glue a wooden chair together, you need to understand what caused the breakdown. This type of furniture consists of many parts that are attached with glue. Over time, the joints become unstuck. It happens that the legs move away from the harness. They are usually attached using spikes.
Some products may have manufacturing defects. A man sits on a chair with wooden legs and falls because one of the legs falls off. Don’t think that furniture is no longer usable and should be in a landfill. Breakdowns of this type can be easily repaired with your own hands without spending a lot of money on repairs.
Leg gluing and complete repair
Once you have decided on the choice of glue, you should make sure that you have the necessary tools. It has a significant influence on the strength and durability of the connection. For successful repair you will need:
- Sandpaper, sharp knife, chisel. Used to remove old glue residues, remove grease and prepare the joint of a leg or other part.
- Hammer. Required for reliable and tight driving of the tenon into the groove. It is important that it has a rubber nozzle (to avoid damage to the varnished coating).
- Clamps. To tighten the parts tightly. Pressing the glued parts of the chair as tightly as possible is not the least important element of a successful repair. In some cases, belt clamps are perfect.
What glue should I use for repair work?
If a wooden chair is broken, then it is recommended to use the best wood glue for repair. Nowadays the greatest demand is:
- "Kleyberite."
- "Moment" carpentry.
- "Trebond."
Professional carpenters put forward the following requirements for glue:
- It must be resistant to sunlight.
- Universal to use.
- The adhesive connection must be strong.
- It is recommended to use moisture-resistant glue.
- There should be no sticky residue left on the surface.
- Should not be toxic.
If you ask a professional craftsman how to glue a wooden chair, he will probably recommend using epoxy glue. It is best suited for wood products. PVA glue can be used. Some people use a two-component composition.
How to glue a wooden chair
Not every glue is used to fasten wood elements.
For furniture repair, substances are selected that meet the following requirements:
- water resistance;
- high adhesive properties - the factor contributes to the formation of a reliable seam;
- transparency - such glue, when dry, will not leave stains on the surface of the chair;
- high drying speed;
- environmentally friendly composition - the presence of toxic substances in the glue makes it undesirable
- use at home.
Many types of glue have these qualities; the most suitable for processing wooden furniture are:
- PVA,
- BF,
- epoxy,
- polyurethane,
- syndeticone glue.
Each of these options has its own characteristics and advantages. PVA glue has an unlimited shelf life and low price. In addition, it is completely non-toxic.
The advantage of the BF composition is that it dries quickly and can be used for items that are located in conditions with high humidity. This could be kitchen or bathroom furniture.
Many craftsmen prefer epoxy glue. What is attractive about this composition is its versatility. In addition to restoring wooden furniture, it can be used for any repair work.
Polyurethane adhesive has a wide range of applications. Its positive qualities are high resistance to temperature changes, moisture, ultraviolet rays and stress.
Syndeticone glue forms very strong connections. This composition is used for structures subject to high loads. This could be children's furniture, which rarely manages to be handled with sufficient care.
When choosing one or another product, you should be guided by the personal preferences and financial capabilities of the home craftsman. Most professional restorers recommend using PVA glue, but when purchasing, you need to pay attention to the country of manufacture and brand of the composition.
“Carpentry” and plasticized dispersions D40P-D53P are considered the most successful for woodworking.
Let's watch a video about adhesives that can be used for carpentry:
How can a leg be repaired?
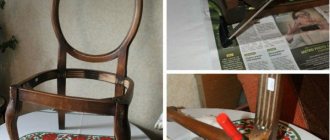
When people ask how to glue a wooden chair together, they often think about repairing the legs. This part is easy to install; it is important to choose the right tool. You should follow the step-by-step instructions:
- The loose leg must be removed from the socket. You need to remove the old layer of glue from the surface. If it is firmly stuck to the leg, you can try to steam it using a boiling kettle.
- If the old glue forms a thin layer, it can be removed with sandpaper.
- It is necessary to apply a layer of fresh glue to the surface of the leg and install it in the socket. For better adhesion, you can tap with a hammer from above. It is important to use a rubber grip on the hammer.
- If the glue has leaked onto the visible part of the leg, it must be removed with a damp cloth.
- Before using the furniture, you need to make sure that the glue is completely dry. To do this, you should wait 24 hours.
Features of PVA glue
This type can withstand temperature changes well. This glue is absolutely non-toxic. The advantage of PVA is its shelf life, it is not limited. Even a beginner in carpentry can use it, as there will be no marks or streaks on the surface. It is important to degrease the wood before applying PVA. You should press the gluing area with a press. Complete drying of the surface is achieved within a day.
It is distinguished by its fastening strength. The product is universal. They can be used to glue any parts of a wooden chair. This type of glue perfectly levels the surface and dries quickly.
It is considered one of the strongest compounds that can be used on wood. Wood glue is resistant to changes in room temperature. When preparing the solution, it is important to maintain the specified proportions, especially when adding cold water.
Lifehack #4. How to make a simple chair cover with your own hands
Procedure:
- We take measurements and write down: a) the width of the seat; b) seat length; c) the amount of fabric overhang over the side of the chair; d) seat height from seat to top; e) height of the seat from the top to the end of the overhang; f) thickness of the seat
- To find out the required length of a piece of fabric for a cover, add up dimensions b, c, d and d. The width of the piece of fabric is equal to the measured width of the seat.
- We make a pattern and carry out sewing according to the diagram presented in the video.
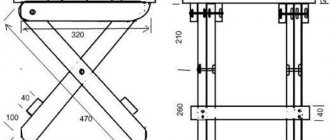
Fixing a gas lift in an office chair
Repairing the gas lift of an office chair with your own hands will help you save a considerable amount on the services of a specialist or buying a new thing. In this case, it is necessary to clearly determine the cause and severity of the malfunction; in many cases, the easiest way is to replace the entire cartridge. The part is not cheap, but new furniture is much more expensive.
When the chair starts to fall down randomly and the lift lever does not work, these are clear signs of a gas cartridge failure. Let's check it like this:
- You need to unscrew the seat and see if the lever presses the gas cartridge valve. In a working mechanism, when pressure is applied, the valve goes down and the gas cartridge moves out.
- The problem sometimes lies in a bent lift arm. Then you can carefully straighten it to its original state.
To repair or replace a gas elevator, you need to completely disassemble the chair. The process is described in the first part of the article (repairing the crosspiece of an office chair). Installing a new part is much easier than removing a broken one, the main thing is that you don’t need to hit it with a hammer.
Lifehack #6. How to restore a chair using the crackle technique
Procedure:
- Inspect the chair for chips and defects.
- Wash the chair with a soapy solution from shampoo with a few drops of acetic acid. The shampoo will remove dirt, and the acetic acid will remove greasy stains. Carefully wipe all small corners and parts, wait until the chair is completely dry.
- Apply a protective wood coating to the chair using a paint brush.
- You will need 2 cans of paint of different colors to apply craquelure (the effect of cracked furniture). It is best to carry out the work outdoors. A respirator must be worn indoors to protect the respiratory tract. First, the base coat is applied.
- Apply a second coat of paint of a different color and wait for the craquelure effect to appear.
- To decorate the seat, apply any lace or openwork curtain to the seat, then go over it again with a spray can of the first color.
- To enhance the effect of antiquity, paint of the first color will help, applied to the corners of the chair slats and its fittings, as well as defects and chips with light brush strokes.
- Varnish the chair.
Additional gluing points
To securely secure the structure, many craftsmen, after gluing the parts, use a tension belt or clamp to press tightly and dry quickly.
If, after repairing the structure, creaks and other problems remain, and the seals did not help, it is advisable to use the services of professionals and contact a workshop for help.
Wooden furniture, in particular chairs, is an element that complements the interior of probably most residential premises. Many of them are not only functional, but also aesthetically pleasing. Unfortunately, wooden products, unlike those made from artificial materials, consist of a large number of elements and tend to become loose, begin to creak, or may even fall apart. There is no need to rush to get rid of them and send them to a landfill. Often, all you need to fix and continue to use your favorite chair is some glue and a couple of simple tools.
Main types of adhesives and their characteristics
- PVA: no toxicity, fast acting, unlimited shelf life.
PVA glue is in demand in the furniture industry, the manufacture of interior items, and, if necessary, to join any wooden parts.
BF-2 glue is suitable for gluing wood; it has an optimal range of qualities - it is not susceptible to fungus, oils, gasoline, and is waterproof.
Syndeticone glue is excellent for gluing wood and gluing various materials to it.
Polyurethane waterproof wood adhesive is considered the most resistant to stress and vibration.
Procedure
- We remove the wheels. Usually they do not have a rigid fixation and are easily removed from the mounts.
- We turn the chair over; for stability, you need to place it with the seat on the chair so that the back rests on the floor.
- It is necessary to disconnect the swing and adjustment mechanism - piastr. Unscrew the 4 screws securing it to the seat. Then you need to lightly tap it to knock it off the gas lift, since usually this is a non-threaded, conical connection. It is advisable to use a wooden or rubber mallet and not hit the edges of the parts; they are easily deformed. If the connection is “stuck”, you can use a special liquid or gently tap it with a hammer.
- Remove the gas cartridge stopper. The locking clip is located in the center of the cartridge recess; you need to carefully pry it with a screwdriver and remove it. Then you need to remove the washer and put it aside along with the clip. Now we disconnect the gas lift rod. Be careful! Inside the glass, gas lift parts may stick to the lubricant: 2 washers and an oil seal with a bearing. Set them aside and do not confuse them with the stop washer during assembly.
- We knock down the cross. You need to be especially careful with plastic ones. It is better to hit with a mallet or an ordinary hammer through a piece of wood, with light blows from all sides.
This work must be done extremely carefully and carefully; with careless work by a non-professional, the piastre and gas cartridge often break.
To reassemble you need to do everything in reverse order.
- Repairing the crosspiece of an office chair itself does not always make sense if it is plastic. Glue and soldering with a special soldering iron for plastics do not provide strength; they can only be used to seal small cracks.
- You can attach a broken leg of the cross using a metal or plastic overlay. Sometimes a plastic tube of suitable diameter is used for this and secured with glue or screws.
- For broken or cracked metal crosspieces, welding is the best option.
General information
How to improve the appearance of a product
If we are talking about an antique chair, then you can give it a fresh, attractive appearance using several restoration methods:
— repaint;
— repair some elements or the entire frame;
- reupholstery;
- decorate.
The entire chair, if it is not upholstered, can be given the tone of natural wood or repainted in bright colors. Upholstered seats and chair backs are reupholstered with new material.
New “notes” in the interior
During the Soviet period, all chairs were without any special decoration; you can give them a modern, well-groomed look using the following materials:
- tapestry;
- flock;
- decoupage;
- craquelure;
- sesal;
- shabby chic.
During reconstruction, you can use any color scheme, both paints and fabrics.
Lifehack #7. How to fix a broken plastic chair
Procedure:
- Take thin rivets and suitable sized metal plates with round slots of the required size. They will strengthen the structure in the place where the “injury” occurred.
- After placing the pad over the broken area, drill several holes in the chair with a drill.
- Apply overlays on both sides, insert rivets into the holes, and secure them with a special tool.
- Additionally glue the broken area with strong plastic glue.
Chair assembly
Lay newspapers or plastic wrap on the floor. Thickly coat the grooves and tenons with PVA glue and assemble the chair structure. Press each joint firmly so that the adhesive comes to the surface. First remove the excess with a knife blade, and then immediately wipe with a damp cloth.
If the groove is loose and became too large for the inserted spike, will drive the wooden stick, a toothpick or a wooden skewer, fluff them with glue.
Secure the assembled frame of your wooden rarity tightly with a rope and leave to dry for a day or two, depending on the ambient temperature.
Softening old glue with steam
Steam flows from the kettle on the stove through a rubber or plastic hose to the socket in the chair. Hot water will flow down the tenon nest wrapped in a cloth. This way the remaining glue will dissolve faster.
To thoroughly strengthen a loose connection, the individual parts must first be separated. To do this, especially on frames with crossbars, it makes sense to separate the still quite strong adhesive seams.
If the chair wobbles not only because the glue joint has become loose, but also because the legs are different lengths, you should wait until the frame is glued back together. Only after this will it be possible to accurately determine the difference in the length of the legs.
If the glue is very strong, try steaming it. Regular glue dissolves in water. Steam can soften the glue even in tightly closed seams.
For this purpose, use a rubber hose that is used for squeezing juices, or buy a thin gasoline hose with a diameter of 6 or 7 mm at an auto parts store. Attach a suitable metal tube to both ends of the hose, insert one of them into the drilled plug, and it, in turn, into the spout of the kettle. This way you can direct the steam to the right place.
Before you start steaming, move a chair closer to the stove and position it so that you can easily reach the area to be treated. Make sure that the water formed as a result of cooling the steam does not drip onto other places, especially the soft upholstery.
Wear a mitten on the hand with which you will hold the hose, as the hot steam will cause the hose to become very hot.
Direct the steam to the edge of the glue joint and try to move both pieces of wood apart after a while - it is likely that this can be done in a couple of minutes.
This method will help remove old glue on exposed trunnions. Steamed wood must first dry before it can be glued again.
This is what the connection between the drawer and the back (above) and front (below) legs of the chair looks like.
A more labor-intensive method is gluing a chair, in which the drawers located under the seat are inserted and tenoned into the legs, and to increase stability, all corner joints are secured from the inside with triangular or trapezoidal blocks made of solid wood. Here you are faced with a rather complex connection, where it is not enough to separate just one glue seam.
If you use force, you will break the thorn of the tsar, or even break it off completely. This is where hot steam comes in handy.
Make sure that the frame is subsequently glued at exactly the same angle.
Thin wedges can be inserted into the large tenons on the sides to ensure a tight connection to the chair leg.