Schoolchildren, elderly people, students - in any age and professional category you can find people who cannot imagine their life without a computer. For a comfortable stay at the workplace, they need a comfortable desk. It is not always possible to place all the necessary accessories, fit the tabletop into the interior and select dimensions that match the format of the room. If you have problems purchasing the right model, you should think about making your own desk for a personal computer. A computer desk top can be simple or complex. There are a huge number of configurations and options. To make this piece of furniture, it is enough to think through the details and strictly follow the instructions.
Table top for computer desk
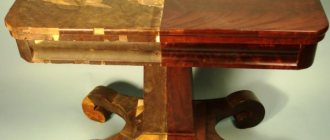
Table restoration
Each of us at least sometimes thought about creating with our own hands something unusual, original and something that could stay with us for many, many years. So, an ideal option for creativity could be a table surface that has already slightly lost its diligent appearance and is just asking for help.
Methods of restoring furniture today are simple and accessible to everyone. By doing it yourself, you will receive an exclusive item that has no analogues in the whole world.
Color and design
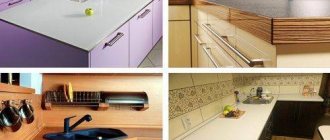
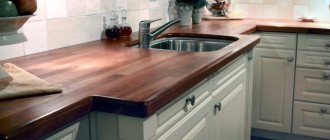
When choosing the color scheme of the countertops, the overall stylistic design of the room is taken into account. Traditionally, preference is given to very light or, conversely, dark wood tones. White products fit perfectly into most modern interiors.
How to assemble a simple coordinate table with your own hands, tips for craftsmen
When it comes to a table for a child, in addition to convenience and safety, it is important that the little owner likes the workplace, and therefore any pleasant colors of the tabletop are acceptable. The main thing is that they are dim, monochromatic, and do not tire the eyes. Additional decor, as a rule, is not used. However, some designer products can be made with a drawing or photo.
Examples of DIY table decors, an overview of the best techniques
The design of the countertop depends entirely on the tastes and solvency of the owners:
- The surface can be completely flat and smooth.
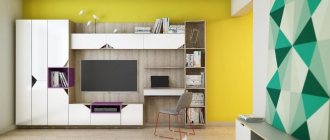
- Attached shelves - open or with doors - allow you to make more practical use of free space. In modern models, their size is pre-calculated for the installation of office equipment.
- Pre-treated holes are created to make it convenient to connect a variety of equipment without cluttering the surface with wires.
A variety of materials allows you to choose the optimal tabletop for your desk, suitable in terms of quality and cost. It can be made in any style, in a wide variety of shapes and sizes. It is important that this thing is comfortable, attractive, puts you in a working mood and contributes to productive activities.
Methods for restoring table surfaces
Some of you who want to restore a table have probably wondered how the whole process works and what is needed for this. Many people mistakenly believe that a lot of money is needed to restore the attractiveness of a particular thing. This is wrong!
Direct proof of this is the inexpensive methods of restoring table surfaces, which you can learn about right now:
- Painting using old, unnecessary tulle. To decorate an old table with an interesting pattern, just arm yourself with tulle and spray paint of the desired color. Then you need to lay the fabric over the horizontal surface of the table so that the pattern is correctly positioned. Then paint over everything with paint and wait until it dries completely. Remove the fabric and discard it as it is no longer suitable for use. Unless you decide to make the same pattern on old chairs or a cabinet.
- Ceramic tiles can also be a great way to restore an old favorite table. The big advantage of this material is its practicality and durability. The tile will be able to withstand many years of loads and various types of impacts on its surface. You can purchase both large pieces of ceramics and small fragments, which are very popular today (mosaics). In the absence of the opportunity to spend money on such purchases, the old surface of the desktop can be decorated with fragments of broken bottles of different colors.
- Self-adhesive film is one of the most budget-friendly ways to restore old furniture. Its price will allow everyone to feel like a designer and make a cute piece of furniture even from a shabby table.
- If you have some knowledge in the field of burning techniques, then you have every chance of making a real work of art from a wooden surface. In this case, you cannot do without a special device - an electric burner.
- No less popular and accessible is the method of restoring old interior items using the decoupage technique. Using old newspapers or magazines will turn the wooden surface of the table and the product as a whole into a stylish and unusual element of your home.
Design of rooms with a window sill turning into a table
Design options for a window-sill table in various rooms.
Window table in the kitchen
A window sill that turns into a table is the most practical design move for a small kitchen space that should be used as usefully as possible.
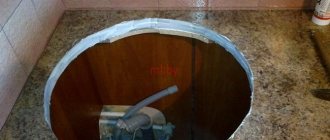
The photo shows the interior of a small kitchen with a window sill integrated into a wooden countertop.
This design allows you to create more work space in the kitchen; for example, this surface can be used to place a sink.
Table built into the window sill of a children's room
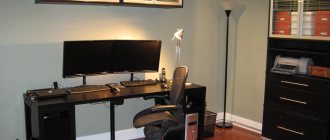
This design will be a good solution for both a teenager’s and a schoolchild’s room. A window sill-desk, equipped with a lamp, a well-thought-out storage system, side shelves or bedside tables, will provide the child with a comfortable study area with good lighting.
The photo shows a light-colored window sill table in the interior of a nursery for two boys.
A window sill table is also often used in arranging a room for two children. This allows you to use the area more efficiently and save useful space.
The photo shows a nursery for a girl with a window sill that turns into a desk equipped with side shelving.
Photo in the living room
In the living room, such a design can be particularly highly multifunctional. The tabletop can be turned into a work area, a hobby space, or even a dining area, which is especially convenient when guests arrive.
The photo shows a wooden tabletop with a continuous transition to the window sill in the interior of a small room.
Examples in the bedroom
The table, as an extension of the window sill, easily becomes a mini-office or dressing table. When the tabletop is placed along the entire wall, it can also be decorated with various indoor plants or beautiful decor.
Ideas for balconies and loggias
By replacing a standard narrow balcony window sill with a wider base, you can create a comfortable resting place. For a small loggia, it is advisable to choose folding table models.
Photo of the desk in the office
With the help of this design, it is possible to create an unobtrusive design, create a fresh environment and a comfortable working atmosphere.
What is needed for restoration
In order to restore the original appearance of the table or give it a completely new look, the first step is to clean it of paint and film (if it is covered with a special material). The recovery process is not as simple as it seems at first glance. You will have to be patient and have the following items:
- Gloves and respirator.
- A sheet of sandpaper for sanding the surface.
- Roller or brush (if you plan to paint the table by hand).
- Impregnation for wood products (if the table is wooden).
- Wood glue.
- Varnish or stain for the countertop.
- Primer.
Solid, stylish stone
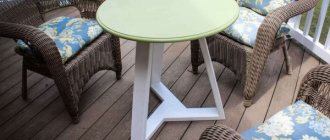
You can also make a table with your own hands from stone - granite, marble, sandstone, onyx or composite stone. This material is characterized by a long service life, pleasant appearance, ease of maintenance, and environmental friendliness. A stone table is perfect for outdoor use.
But such a piece of furniture will be quite expensive, even if it is made by hand. Another disadvantage of stone products is their very heavy weight. Some types of stone are sensitive to chemicals and, due to their porosity, can absorb moisture. So, for example, a stain may remain on marble from wine spilled on it.
A popular solution is to use several materials when making a table. For example, the legs and base can be forged, and the tabletop can be wooden. But in this case, you need to take into account the characteristics of each of the materials used and provide the product with appropriate care.
03.10.2016
no comments
Preparing the table for restoration
Before you begin restoration, you need to assess the general condition of the product, in our case the table. You also need to pay attention to the legs; if they are loose, secure them more securely with screws. Then you need to check the table for the presence of all the necessary parts. Next (if the table is disassembled) it needs to be disassembled into parts and each one individually cleaned of old paint, sanded and reassembled.
Some experts say that every time you disassemble a table, you reduce its shelf life. Therefore, it is worth assessing the condition of the product and only then deciding whether it is worth processing each part separately. You may be able to handle the furniture unassembled. Often, unreliable structures can be damaged after using a hammer or hammer. If the table is more solid and made of thick wood, you don’t have to worry about its condition in the future.
Primary processing
Before restoration, the table must be treated with an antiseptic. This is necessary in order to protect its surface from moisture, pests and mold. This will make the tree inaccessible to small insects. After this, the product must be left to dry completely. On average it takes a day, sometimes two. Then, using a sanding machine, you need to remove the top layer from the surface. If your household does not have such a device, you can use regular sandpaper. Also, at the end of this process, the table can be finished with a fine-grain sanding.
Restoration
If there are nicks or cracks on the surface of the old table, they need to be filled with putty and sanded again. Then check it for any irregularities and remove them with sandpaper. Large defects can be eliminated by making a stencil. This can be done by covering the area around the chip with paint and pressing a piece of clean sheet onto it. The blank print will serve as a stencil. Then you need to attach the veneer to it and cut it clearly along the contours. Carefully coat the veneer with wood glue and place it in the problem area. Small veneer can be pressed down with something heavy and left to dry completely for 9-10 hours.
After all defects have been completely eliminated, the table surface is usually coated with alkyd or shellac paint. Due to their special composition, both options are ideal for covering wooden surfaces.
Coloring
Once the cosmetic renovation of the old table is completed, you can begin painting. The first step is to decide on the shade. Today there are many manufacturers who offer a wide color palette. However, despite all the diversity, some of us still don’t find the right shade and are in no hurry to get upset. You can get out of this situation by buying two paints, when mixed you can get the desired color.
The most common and reliable paint for covering countertops now is water-dispersed acrylic. It is very resistant to moisture and dries quickly. It must be applied to the table surface with a thin brush. For large areas, you can use a foam roller. Let dry and paint again. If you are painting the table a dark color, you can repeat the procedure three times. If the table you are restoring will be placed outside, it is better to use alkyd paint. It does not fade from direct sunlight and is not afraid of moisture.
Drying oil-based paint is often used to paint coffee tables. If you use this product, the table will be suitable for use in 4-5 days.
How to make a computer desk at home
Ergonomics, quality of material, reliability of fittings – requirements are imposed on any furniture based on its purpose. The work area always involves increased load and quite a lot of wear and tear. Therefore, when creating a sketch, you need to consider how the parts will be attached, how strong the table will be, and so on.
Tabletop fastenings may vary
Sketch development
A sketch is needed to fully determine the assembly order, quantity and types of base material for the countertop, design and configuration.
Procedure for developing a diagram:
- first determine the style - it is important that the size and shape of the tabletop fit into the interior and dimensions of the room;
- Next, the color, material, and other individual characteristics of the model are determined;
- If you have no experience, you can use a ready-made drawing, or take a diagram from design programs as a basis. The advantage of ready-made packages is the accuracy of calculations (dimensions, markings for the frame, fittings and other important assembly components).
Prepare a sketch of the tabletop
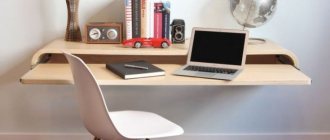
If the tabletop is connected to a special niche in which excess wires will be hidden, you will have to think about through holes in advance. They will help maintain order in the workplace.
The simplest PC desk should match the decor of your living space
Dimensions
When making calculations, you need to pay attention to the length and width of the tabletop.
The length should not be too short or too long, and in general it is recommended to follow the rules:
- The space for the owner should be approximately 60-70 cm.
- The rotating part of the tabletop is approximately 55-60 cm.
The average size of corner computer tabletops is 160-170 centimeters; for a compact PC placement, 130 cm is sufficient. The straight model goes well with a length of 100 cm or more.
Additional details affect the dimensions
The depth of the countertop is determined by a fairly simple method:
- The worktop without extensions must be constructed with a minimum depth of 45 cm.
- If there are extensions, the depth of the tabletop should be from 60 to 70 cm.
- Tabletops in designs with drawers have a depth of at least 65 cm.
- For corner countertops with lower shelves, the depth is calculated to be at least 85 cm.
Standard dimensions of a straight tabletop
What you will need
Before you go to buy a tool, you need to decide on the base material - this determines how much and what quality it will be needed. If we talk about the basic set for work, it includes:
- Tape measure, square, ruler for measurements.
- Pliers.
- Hammer.
- Awl.
- Screwdriver.
If you plan to make a countertop from laminated chipboard or LMDF sheets, the following tools will be useful:
- Iron for joining edges.
- Drill bit for installing door hinges.
- Screwdriver (using nails and a hammer is not always possible, but screws form a stronger and more reliable structure).
Tools for creating a tabletop - varied
Prices for popular models of screwdrivers
Screwdrivers
A metal tabletop frame requires:
- Bulgarians.
- Electric drills.
- File.
- Sandpaper.
Additionally, materials may be required that will give the final product an original look.
The final appearance of the table can be supplemented during the assembly stage
General operating procedure
You can imagine assembling a tabletop as a sequence of actions:
- production of table components;
- preparatory work – processing of parts;
- combining structural elements.
A table made of laminated chipboard is quite rigid in itself and does not require a frame. To make a tabletop, you need to do the following:
- cut slab parts according to specifications;
- process the edges of the resulting parts, for which they use thin materials on which an adhesive layer is pre-applied, or thick ones with a special edge;
- Various methods are used to assemble parts - confirmat, ties, screws, corners, etc.
Material processing
Prices for the popular range of circular saws
A circular saw
If the countertop structure contains metal elements, welding work may be required in a prepared room or outdoors. If you don't have a welding machine at hand, you can use bolts. It should be remembered that in this case the connection will not be as neat and compact as with welding seams. An exception is the use of chrome-plated tubes, when the assembly is initially carried out using bolts and connecting elements.
Working with metal is complicated by the presence of welding joints
Working with solid wood to produce a solid table requires special equipment and manipulation of machines located in specialized workshops. Wooden parts are processed with a lot of dust and debris, so it is better to carry out final finishing and assembly at home, entrusting the preliminary work to professionals.
Choosing a place for the table
A desk that is too large will make it difficult to move around the room, while a desk that is too small may not be functional enough for everyday tasks. Therefore, when designing a tabletop, this point should be taken into account.
The following requirements must be met:
- presence of a grounded socket;
- the absence of heating devices near the table - batteries, fireplaces, electric heaters, so that the computer does not become unusable due to unacceptable temperature conditions of operation;
- decorative elements, shelves and pictures should be removed so as not to interfere with the placement of additional elements above the tabletop.
Simple corner table
The simplest corner option will not require the future owner to have any special design skills or work with various materials.
Stage 1. In order to construct a simple corner tabletop, the materials you will need are:
- standard chipboard or laminated chipboard, as well as laminate – 1 piece;
- about 2.5 m. C-shaped edging (PVC profile);
- fastener
Drawing for cutting and fastening the tabletop
The T-shaped edge can only be taken if a special tool will be used for the work.
To mark the parts of the table you will need chalk or a marker. They can also be useful during assembly. The ideal option for work is washable markers.
Stage 2.
After cutting the base material, the table is assembled.
We fix the tabletop with corners to the wall
Schemes for fastening the corner part
The advantage of this method is the rational use of raw materials. The trimmings will close the gap in the corner, and will also become the basis for shelves - for a printing device (1st) and a speaker system (2nd). A general idea of the assembly can be seen in the photo. The fasteners in the green circles are self-tapping screws that are screwed into the slots using washers. The red part refers to the support for the far corner of the tabletop. In this case, the self-tapping screw is located obliquely and upward in the wall.
The cuts in the process of working with the material may be sloppy - in this case, they are either covered with a finishing edging, or left in their original form, when this is acceptable from an aesthetic point of view.
Despite the simplicity of the design, a computer tabletop made according to these instructions can withstand up to 80 kg. weight. An additional advantage of the table is its compactness and ability to take up minimal space in the room. If a system unit is supposed to be placed under the table, you need to equip furniture corners for it. To prevent it from tipping over, you can add a stopper made from a piece of plastic box to the structure.
The finished structure can be supplemented with shelves
A corner shelf in a room is an excellent solution that will not allow a single centimeter of free space to go unused. Find instructions for making shelves in a special article.
Video - DIY computer desk
Video - Do-it-yourself table or purchased one?
Video - Do-it-yourself computer desk from chipboard scraps
Surface protection
A painted wooden table can be coated with polyurethane varnish to extend its life. Thanks to its special composition, it will protect the surface from external influences. The varnish should be applied to a smooth horizontal surface of the table in several layers, allowing each layer to dry for several hours. After this, the table must be sanded. After varnishing, the surface of the product may have small dots or light spots. Don't be afraid. After polishing, such defects will disappear.
Wax and foundation
Upon completion of the work, the table can be covered with wax. To do this, you need to purchase special wax sheets at a beekeeping store. They need to be softened by leaving them in the sun for a couple of hours, then rubbed on the table. To do this, you can use old felt or other dense fabric. Despite the severity of such work, in the future it will show good results: the furniture (in our case, the table) will not only have a pleasant aroma, but also a chic appearance.
You can also wax the surface area of the table. To do this, take an ordinary soft cloth and rub the wax into the surface of the product. As a rule, the table after such treatment will have a pleasant, refined shine. This labor-intensive process is worth the result. It would be a shame to hide such a table in the kitchen; most likely, you will decide that it belongs in the living room.
Ergonomics of working at a desk
Three important points of computer ergonomics:
- You should not place the keyboard low from the tabletop - a difference of 50-70 millimeters from the level of optimal eye contact with the work surface is enough. In addition, 230-350 mm is sufficient. in a side design so that a person can work comfortably behind it.
- The tilt angle to the center of the display ranges from 0 to 20 degrees. For comparison, when writing on a typewriter it is from 40 to 45 degrees.
- The design of the tabletop must be done in such a way that in the final product the elbows do not dangle in space, creating chronic tension. Typists typed while swinging their arms, so they did not have problems with the musculoskeletal system, which cannot be said about those who type at a computer with their arms hanging freely.
Working at a computer desk should be comfortable
The retractable keyboard panel remains a controversial element that complements the tabletop for working at a PC. Arguments for and against regularly appear among doctors and other specialists responsible for work ergonomics. Currently, computer equipment owners are actively using wireless designs, which greatly simplifies the task. In this case, the keyboard is put aside, control is rarely needed, hard printed sources can also be placed on the table without any problems.
Multifunction devices and scanners
Currently, a block of advanced functionality with the ability to print on a printer, scanner, and copy printing is becoming especially popular. The largest and most expensive ones need to sit on a separate desk or most of a traditional computer desk, so they are not often purchased for home use.
In addition to the computer, the table is designed for additional devices
In residential settings, drum scanners are used, which are professional devices for working with graphics. They also require separate space on the computer desk, but this is not always convenient. As a result, a niche is created in the desk cabinet - this is enough to place a document inside the scanner. The main thing is to make the niche high enough for the scanner lid to move. At home, you can also equip the table structure with a pull-out shelf.
Acoustic devices
When adding additional equipment to a PC system, you should adhere to the layout of the sound system speakers relative to the table.
The acoustic system is placed on shelves
If the listener is near a table, the speaker system is installed at an angle of 90 degrees (in the context of speaker elements). Placement on a corner tabletop is ideal for this.
Acoustics can be placed directly on the table
How to properly care for lacquered furniture
The varnished working surface of the table should receive special care. Those who want to maximize its lifespan should follow these recommendations:
- To care for furniture coated with varnish, it is best to use a special napkin with a special pile, which will make the table/chair/bedside table shiny and beautiful.
- Dust can be wiped off the varnished or polished surface of the kitchen table only with a dry cloth. Humidity promotes faster darkening, as well as peeling of the veneer.
- A great old-fashioned way to care for lacquered furniture: warm beer with wax. The cooled liquid should be rubbed onto the surface, and after drying, rubbed with a woolen rag or a piece of felt.
If water gets on the furniture and the drop has dried, it should be lightly sprinkled with flour, then wiped with a piece of soft cloth or dry medical gauze. You can also use starch or talc.
Varieties
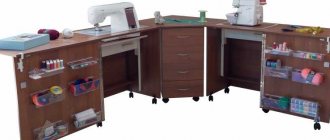
The range of pull-out tables for the kitchen is wide-ranging. If you have experience in the field of furniture manufacturing, you can make the design yourself, using fittings and components that are easy to find in specialized departments. There are several models:
- Retractable single surface with cocktail mechanism. The design consists of a base tabletop and an additional element fixed on springs. The guides are placed on the work surface and cabinet. The fittings are metal, equipped with a bearing and roller mechanism. Thanks to the closers, the kitchen table folds smoothly and silently. If the model includes several modules, telescopic mounts will be required.
- Two-tier surface. The main feature of the product is its multi-layer nature. The telescopic design is designed to create a full-fledged tabletop for snacking or working. The lifting mechanism will ensure the uniform arrangement of all elements.
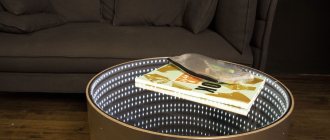
- Roll-out table. It is a full-fledged working surface on wheeled supports. If necessary, the structure can be removed, so it is not suitable for a small kitchen. The optimal location of the tabletop is between the facade and the storage cabinet. There are models with a limiter and freely moving ones.
A variety of unusual tables, non-standard shapes, colors and materials
When choosing suitable furniture for the kitchen, you must be guided not only by personal preferences. The area of the room, the availability of free space, and mechanisms are of great importance.
Retractable single surface with cocktail mechanism
Roll-out
Two-tier surface