Despite the fact that tiles have waterproofing properties, seamless masonry is quite rare. Basically, during the work process, uniform tile joints are left, requiring treatment with a grout mixture. Choosing a grout for tiles in a bathroom or kitchen can be difficult.
Today, manufacturers produce various compositions that are not only resistant to the development of fungus and mold, but also perform a decorative function.
Grouting of joints must be of high quality and impeccable, so as not to disturb the impeccable appearance of the installation.
Criteria for choosing high-quality grout for tile joints
To better understand the advantages of a particular putty, when purchasing, you need to rely on the following selection criteria:
- Width of the joining seam. Each package indicates the maximum permissible width, that is, the thickness at which the prepared solution will not crack after drying (the range is from 2 to 40 mm). For joints up to 5 mm, you will need a plastic composition without the addition of minerals, from 5 to 10 mm - the composition requires the presence of small grains of sand, more than 10 mm - an elastic mixture containing large fractions of mineral additives is required.
- The basis. The strength and moisture resistance of the composition depends on the materials underlying the building mixture. The most chemical and water resistant polyurethane grout. A cement-based mixture is not the most durable, but it is a budget option. In addition, they are easy to apply to walls and floors. Basically, water or latex additives are used to prepare the grout. Epoxy resin products are durable and resist moisture, but require a hardener to mix.
- Color. A variety of colors will visually improve and decorate the design of the room, since the substance also plays a decorative role.
- In what form is it implemented? Some products are sold in finished form, immediately suitable for application. There are mixtures sold in dry form. To achieve the desired consistency, dilution in the correct proportions is required.
- Manufacturer and cost. Popular brands have a diverse range and reasonable pricing.
Each master has his own secrets for choosing high-quality grout for joints.
For reference! The grouting of ceramic tiles must be uniform, elastic and have an easy to clean surface after drying.
Advantages and disadvantages
Like any building material, relief tiles have their pros and cons. It is universal, looks good in almost any interior, and has many color options. Due to high-quality manufacturing technology with careful firing and glazing, it is especially durable and designed for many years of use.
However, excessive strength can turn into a disadvantage: it will be difficult to tightly attach a heated towel rail, hooks, or even shower stall mounts and a wall-mounted sink to the wall. Due to the texture, a gap may remain between the wall and the object.
In terms of price, relief tiles will be more expensive than regular tiles. In addition, if you decide to save on finishing work and plan to lay it yourself, keep in mind that cutting a single textured pattern is quite difficult.
Advice: choose certified tiles, the pattern of which will not differ in color and finish. However, small errors often do not serve as an obstacle to purchase, since texture does not always imply identity.
Types of grout mixtures by material
Construction stores offer a wide selection of grouts. Each category is divided according to certain criteria intended for different types of finishing work.
Don't forget to choose the right grout color for your joints.
Cement based
The grout mixture is a cement-based powder. In addition to the main component, materials are added to the solution to impart moisture resistance and elasticity. In addition to cement, there are cement-polymer and cement-sand fugues. A simple cement composition is more often used for joints no larger than 0.5 cm. Grout with the addition of mineral components is used for joints larger than 0.5 cm.
Main advantages:
- profitable price;
- ease of application;
- the ability to restore the original appearance if cracked;
- quite high strength.
Cement-based grouting is quite popular these days.
Among the disadvantages are:
- small selection of color palettes;
- long hardening;
- slight moisture absorption.
It is not advisable to use it for rubbing joints in rooms with high humidity. Suitable for filling gaps on kitchen backsplashes, floor tiles, porcelain tiles and hallways.
For reference! The porous structure of the material accumulates water on the surface, which leads to the growth of mold and destruction of the fugue.
Silicone grout
The sealant is well suited for sealing large joints between ceramic tiles. As a rule, it has a silicone, less often acrylic base. A wide palette of colors and shades allows you to choose the appropriate option. However, the material is more suitable for sealing seams between the bathroom and the wall, the sink and the wall, and around the shower tray.
Silicone grout is used in damp areas.
Changes in color during use and the appearance of mold are not suitable for grouting tiles. The hydrophobic mixture is most effective when finishing joints with a width of 2 to 7 mm.
Resin based putties
There are fugue based on furan resins and epoxy based. The epoxy mixture is two-component and contains a cement base. Suitable for rooms where there is constant contact of the tile surface with water and household chemicals.
Epoxy resin mixtures are often used in the renovation of commercial and industrial premises.
Main advantages:
- moisture falling on the surface simply rolls off;
- does not fade when exposed to UV rays;
- long service life;
- resistance to temperature changes (withstands temperatures from -20 to +90°C);
- the surface is smooth, without pores;
- does not crack;
- elasticity before hardening.
Disadvantages include difficulty in dismantling.
Kinds
In addition to the fact that relief tiles can be ceramic or porcelain stoneware, it is worth understanding that they differ in other parameters, such as the type of relief.
- Imitating natural stone. This type of relief tile allows you to replace expensive marble, granite and any other natural material. This option is widely used by well-known manufacturers in Italy, Spain, Germany and France. By choosing such tiles, you can not only save money, but also significantly simplify the installation process.
- Imitating brick . This type of relief tile allows you to create an urban style and tiling your house faster and cheaper. I would like to note that this type is quite durable and is widely used in outdoor work.
- Flora and fauna . All kinds of mollusks, fish, shells, birds, trees, flower buds, animals - these are the reliefs that are perfect for a bathroom or room where you want to create an original interior.
- Imitating wood. This type of relief tile is intended to replace natural timber, parquet or other wooden covering. Can be used both indoors and to create an original exterior. The material behaves less capriciously than wood, but you won’t gain much in terms of cost.
- Various ornaments and geometric shapes . This is a universal type of tile that will suit almost any room. Simple straight lines and outlines will create a feeling of calm and bring a classic touch to the interior.
- 3-D effects and imitation modeling. These types of relief tiles can create various visual and optical effects or illusions. However, you should be careful when choosing such materials, since this type will not be appropriate in all rooms.
Relief tiles can be either glossy or matte. Which one to choose is up to you.
How to choose grout color
Using a special putty, you can not only simplify the design, but also give it a brighter and more interesting look.
trust the designer when choosing the grout color.
There are a few important tips to consider before choosing a color:
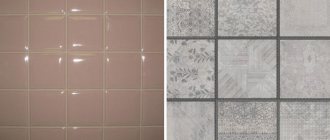
- for single-color masonry, a lighter or darker grout is suitable, within 1-2 tones (if there are decorative inserts, the color of the mixture should match the color of the additional slabs);
- a dark color will favorably highlight each slab, pattern, design or color of the cladding element;
- Light shades visually increase the area and unify the pattern;
- a transparent grout or a chameleon effect is suitable for a multi-colored facing element;
- It is more practical to choose dark colors for flooring (the surface retains its clean appearance longer);
- to give expressiveness, preference should be given to contrasting shades;
- Multi-colored grouts or fugues with the addition of decorative elements (for example, with the addition of metallic impurities) will help transform the interior.
In addition to metallized fugues, mixtures with silver, gold or mother-of-pearl elements are sold.
Relief and drawing
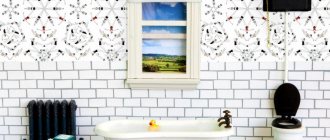
Glazed tiles are most often used for bathrooms. It can have either a matte or glossy surface. Thanks to the shiny surface, you can visually enlarge the room, as it becomes more airy and bright. The glossy surface also has its disadvantages. For example, it becomes very limescale, which can be caused by water. Therefore, caring for such tiles is much more difficult than matte tiles.
Read Kitchen salon website now with on-line consultant
Ceramic tiles can be of two types: smooth and embossed. If you are going to purchase relief tiles, you should carefully consider how evenly the glaze is applied to all decorative elements. For a small room, you should choose a tile that does not have many relief elements. They will look good as accents.
For small spaces, it is best to use designs that occupy one tile. You can place several decorative elements on a plain wall. Large solid panels are well suited for narrow and long rooms. For small rooms, dim paintings that can be assembled from tiles would be appropriate. To decorate a room, you can use vertical stripes of a more saturated color than the main tone. You can alternate light and bright vertical stripes with rows of patterned tiles.
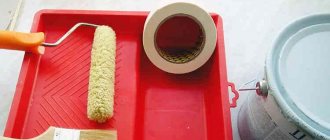
Tools for grouting tiles
Finishing with a grout mixture involves performing the work using special tools.
Use professional grouting tools.
The main ones:
- A spatula made of durable and elastic rubber, shaped like a rectangle or trapezoid. Available in different sizes depending on the area of the tile. A fairly thin fabric quickly gives the seam a curly shape. It is important to choose the right tool, as it performs restoration work where you cannot scratch the surface. The quality of the spatula affects the design part of the grouting technology.
- Sponge. A damp block removes excess mixture and levels its surface. The aesthetic appearance depends on this cleaning method. According to their intended purpose, they are subdivided for work with cement and polyurethane grouts (made from foam rubber), as well as with mixtures based on epoxy resins (cellulose).
- Grout float (the lower part has dense rubber). With its help, the mass is smoothed and the mixture is leveled in the gaps.
- Grouting mesh. Performs grinding of the surface of the mixture located at the joints.
Modern craftsmen use the most progressive and fastest grouting methods.
The most convenient option is a pistol. With its help, gaps between finishing elements are filled. Suitable for working with any type of material. Available in two types: for grouting ceramic (tile) tiles and for sealing stone joints.
Renewing old bathroom grout or replacing mastic
To renew the old grout layer, you need to prepare a mixture, take a spatula, a molding tube and a soft cloth to clean the surface of excess composition. When the mass is prepared, it is applied to the desired areas in small portions. The voids are filled carefully. The mixture can be compacted a little. The excess is removed immediately before the mass hardens. Finally, a tube is used to make the seams smooth.
The voids are filled carefully.
How long after installation should I grout the seams?
After completion of the finishing work, it is necessary to bring it to its logical conclusion. To make the surface smooth, all gaps must be rubbed. Here the instructions on the packaging of the tile adhesive or other mixture used will come to the rescue. There you can also see the drying time of the composition. As a rule, it ranges from 1 to 3 days.
In most cases, the joints can be sealed within 24 hours after installation. In this case, you need to clean all the seams in advance, since after the mixture has completely dried, the task will be difficult to complete.
Allow the tiles to dry after installation.
Preliminary preparation is important, as it requires insulation and blocking of access to air. Failure to do this will increase the risk of mold and mildew. Also, glue residues can interfere with the quality of finishing finishing work.
For reference! It is recommended to clean the joints 6-8 hours after laying the tiles.
Features of choice
- When you decide to purchase relief tiles, you need to understand how much money you are willing to spend. Calculate the entire square footage and think twice about whether it’s worth it.
- Do not purchase goods from unknown manufacturers. Always ask for a quality certificate, and also read reviews about the selected product.
- If possible, review the entire lot of relief tiles. Check each unit to see if it differs in color or texture.
- Think in advance about what style you want to create. Wood-effect tiles will not always be appropriate in a children's room. Also decide what would be better: a glossy surface or a matte one.
- Try to create a unique style that complements or builds on the relief tiles.
If you are not yet familiar with my colleague’s article about the peculiarities of storing weapons at home, then here you go.
I hope my article today was helpful to you. If you have your own thoughts about using relief tiles, please share them in the comments. I will be very interested.
Calculation of the required amount of grout
The task of calculating the amount of grout arises quite often. Many manufacturers indicate approximate consumption for standard size tiles.
Several factors influence the consumption of grout:
- tile dimensions (thickness, width, length);
- seam width (optimal dimensions for floor cladding - 2-3 mm, for wall cladding - 1-2 mm);
- joint depth (depends on the total thickness of the adhesive layer and tile);
- density (the indicator is influenced by the formulation of the composition and manufacturing technology, the optimal specific gravity is 1.5-1.8 kg/dm³).
The amount of grout can be calculated using the appropriate formula.
The formula for calculating the required amount of grout mixture (Рз) is as follows:
Pz = M×K, where M is the length of the seam, in meters, K is the joint consumption coefficient, in g.
The length of the seam per 1 m² is calculated using the following formula:
M = (A+B)/A×B), where A and B are the length and width of the facing material, in m.
The coefficient for calculating the reveal is determined by the formula:
K = W × D × R, where W and D are the width and depth of the seam, in mm, P is the volumetric weight or density of the grout.
The obtained result must be increased by 10-15% of the calculated value.
How to grout clinker tiles: sealing joints in different ways
There are several methods to fill the free space between products. Each of them has its own advantages, disadvantages and nuances, which also need to be taken into account and observed when carrying out work with your own hands. If a specialist is involved in this, it is better for him to make a choice in the direction of the most suitable method, since the level of his skill has a significant impact on the final result.
Preparatory work
Sealing of seams must be carried out in several stages. The first step is to prepare the walls, for which you need to carefully remove all remnants of tile adhesive from the joints that will undergo further filling. For this task, you should resort to using a knife, file, narrow spatula or other similar tool. At the end, you need to remove all the debris that has formed, and then moisten the seams with a spray bottle, a damp brush or sponge, which will improve the adhesion of the grout to the clinker tiles and the base.
Semi-dry method
When carrying out work using it, a suitable option is to use exclusively cement grout, which only needs to be pre-mixed with a small amount of water so that it eventually takes on the appearance of wet sand. It is imperative to thoroughly mix the mixture until dry particles are completely eliminated.
In addition, when sealing the free space between clinker tiles, it is necessary to resort to the use of a special mason's jointing tool, the size of which must be selected taking into account the thickness and length of the seams.
Note! Cement can cause irritation of the skin and mucous membranes, which is why it is imperative to wear a respirator and protective gloves before using it.
The advantages of the semi-dry method are as follows:
- Affordable cost of cement grouts used during the work.
- Original decorative effect.
- The composition used does not contain substances hazardous to health.
- Excess material can be easily removed from embossed clinker tiles.
The disadvantages of the semi-dry method are as follows:
- To perform the work efficiently, you must have the appropriate knowledge and skills, which is why many tilers prefer other methods.
- The depth of the joints must be at least 5 mm, which should be taken into account at the stage when clinker tiles are yet to be laid.
- Slight variety of shades.
If this method is preferred, work must be performed in the following sequence:
- On a hard horizontal surface, which can be a trowel or a piece of plywood, pour a small amount of solution.
- Next, you should press the tool against the clinker tile in the area under the seam that is being processed and, by means of jointing, compact the grout into it.
- In the same way, it is necessary to continue the work until all the gaps between the products are filled.
After the mixture has hardened, the seams filled using the semi-dry method have a rough, decorative texture. If hand-molded products were preferred as the facing material, then during such rubbing it is possible to give the coating an antique effect.
Method using a grout gun
Filling joints with this tool is quite easy, which is why it is often chosen by many novice craftsmen who are faced with such tasks for the first time, but it must be borne in mind that the method is only suitable for smooth clinker tiles. Otherwise, if excess grouting material gets on products with a relief surface, it will not be possible to fully clean them from it in the future.
The grout, which is applied using a gun, contains plasticizers, which give the mixture greater plasticity and ensure ease of use. When sealing seams with such material, difficulties can arise only in the final stages, which can also be avoided after gaining some experience in carrying out work using this tool.
The grout material with which the tool is filled comes in many different colors, making it easy to choose the optimal shade for yourself from among those available. In cases where there is a need for a large amount of the mixture, it is advisable to purchase it from one batch. If this is not possible, then during preparation it is necessary to mix grout from different packages.
When carrying out work in this way, a number of the following advantages can be identified:
- Prevalence. The material is available in many different colors and manufacturers.
- Easy to apply. Even a novice master can fill the seams without errors.
- You can resort to using this method in cases where there is a need to seal joints between tiles with a rough texture, since in such a situation it is possible to avoid severe contamination of its surface.
- The mixtures contain plasticizers, which provide frost resistance and increase the service life of the facing material.
There are also disadvantages when filling seams using a gun, and these include the following:
- High cost, since in addition to purchasing the grout itself, you have to additionally purchase a special tool.
- Incomplete hardening of the mixture after its application, due to which, under the influence of mechanical loads, a slight shift of the clinker can occur.
The process of sealing the seams of clinker tiles using a gun should be done as follows:
- Initially, you need to prepare the solution. Once mixed, it should have a paste-like consistency that will not spread over surfaces during use.
- After this, you need to fill the grout with a construction gun, after which you can use it to begin applying the compound at the seams. During the work, it is necessary to prevent material from coming into contact with the cladding surface. If this cannot be avoided, then the contaminated area must be wiped without delay, since after hardening the mixture can harm the appearance of the clinker tiles.
- Next you need to wait for the initial setting of the solution. It should have plasticity, but not contaminate your hands when touched. Manufacturers indicate the time after which this occurs, but it should be borne in mind that in the heat, setting can occur faster.
- Then, using a construction knife, you need to carefully cut off the excess grout to avoid scratching the surface of the clinker tiles.
- After this, you need to smooth the grout material with a spatula or finger to make it smooth. During the work, it is necessary to avoid creating recesses, since during the further period of operation water will begin to accumulate in them, which will reduce the service life of the clinker tiles themselves.
In general, due to its versatility, ease and convenience, this method is recommended to be initially considered and given preference, especially if mashing with your own hands is carried out for the first time.
Rubbing seams over the surface
You can carry out work using solutions of this type either using a spatula or using a gun. This method has the following advantages:
- Versatility. With the help of such compositions, it is possible to seal the seams between tiles, which are laid both inside the house and outside on the facade.
- Significant wear resistance. The material has high adhesion rates, resistance to ultraviolet radiation and mechanical damage.
The disadvantages of this method include the following:
- The method is only suitable for products with a smooth surface.
- Application, rubbing and further cleaning are quite difficult.
- Too limited number of colors.
- Compared to other grouts, its cost is much higher.
If preference is given to this method, then the work must be performed in the following sequence:
- The first step is to mix the solution.
- Then you need to wait about 10-15 minutes for the mixture to infuse and become homogeneous.
- At the next stage, you need to re-mix the solution using a construction mixer or drill. If necessary, you need to add water to it in such an amount that the resulting composition acquires the consistency of liquid sour cream.
- After this, it is necessary to apply the mixture to all areas of the surface and level it using a rubber float. As a result, the seams should be in the same plane as the cladding.
- After the grout has set, all excess should be removed from the tile using a foam sponge, which should be directed at an angle of 45° relative to the base.
If a high-quality mixture is used during the work, then its removal from the surface of smooth products occurs without any significant difficulties. They appear when using a low-grade composition or in the case of processing embossed clinker. In addition, the reason may be that the grout has dried out, which is why it should be taken into account that outdoors the mixture will gain strength in just 2 days, and it will become much more difficult to remove it. In such a situation, special chemicals designed to dissolve cement are the salvation.
Having found out how to grout clinker tiles with your own hands, and what methods there are for this task, it becomes easier to make a choice in the direction of the most suitable one for yourself, with the help of which in the future you will be able to perform high-quality sealing of seams, which as a result will not only complete the cladding, but also will increase its service life.
Video:
How to prepare tile grout
High-quality jointing of tile joints depends on properly prepared mortar. Mixing a multi-component composition can be difficult. This grout sets faster, so it is prepared in small portions.
Correctly following the grouting instructions will guarantee an excellent final result.
Before breeding, you need to carefully review the instructions. It is important to observe the proportions and mixing technology. To prepare the solution, you need to take ¾ of the required amount of water, add the dry mixture there and stir well until smooth. Then gradually add the remaining water to the desired consistency. Water temperature is important. It should be cool, from +15 to +20°C.
Use professional advice to get good results.
If the volume of grout is small, a trowel is suitable for mixing; for processing a large area, it is recommended to use a hammer drill with a mixer attachment. When the mixture is ready, wait 5 minutes and mix again. The finished mixture should have a consistency similar to thick sour cream.
For reference! It is more convenient to dilute the mixture in a round container; in a square container, a powdery substance remains in the corners.
Execution of work
The technology for grouting ceramic tiles involves the following stages of work:
- Preparation of the mixture.
- Filling seams.
- Removing excess mixture.
- Leveling and smoothing the surface of the seams.
If you purchased wet grout, you can start working right away. When choosing a two-component or dry one, you will need to prepare the composition in accordance with the manufacturer's instructions: first stir the mixture, then let it stand for a while and repeat the process. The composition becomes homogeneous and elastic. It is much easier for them to grout the seams on the tiles.
This material is also suitable if updating old grout is required. Such seams look unkempt and often crack. In this case, the old composition is carefully cleaned to a depth of at least 2 mm, the gaps are removed from dust and slightly moistened. Further work with tile grout is done using a rubber spatula.
Preparation of the solution
High-quality sealing of tile joints is impossible without a properly prepared mixture. For beginners, mixing two-component compositions causes difficulty. These solutions set faster than others, so you need to prepare them in small portions. Filling the gaps between tiles is a painstaking and lengthy process, so you need to correctly calculate your capabilities. This will avoid over-consumption of an expensive two-component mixture.
A two-component mixture for grouting joints is prepared in accordance with the manufacturer's instructions. First, the powdered composition is poured into the container, then the hardener is gradually introduced. The proportions are indicated on the label.
Rubbing seams with this solution is always convenient. It is elastic and soft enough, when it sets, it becomes viscous. It is important not to make a mistake and correctly measure the volume of each component.
Preparation of the seam surface
Grout for tile joints is applied only to a clean surface, so preliminary preparation of the gaps is necessary. They are cleaned of glue and other residues. To do this, use a spatula with a metal blade or any other suitable tool. After this, use a dry sponge or rag to remove all small particles from the cracks. If you have a vacuum cleaner, you can use it.
Applying grout
The grout is applied to the tiles by holding the spatula at an angle of 30°. Carefully and slowly fill the gap to its entire depth, trying to avoid the formation of voids. Particular attention is paid to the joints of 4 tiles (cross-shaped cracks). If necessary, remove excess solution with a damp sponge. When working with deep gaps, a grout bag will help. The solution is purposefully squeezed out of it into the gap, and it fits more tightly than when using a spatula.
How to properly grout seams on tiles with your own hands
Processing of seams gives the coating a monolithic hermetic plane. The surface of the stove must be completely free of dust and dirt.
Be sure to clean the tiles before grouting.
Preparation of the seam surface
How to do the preparatory work:
- clear the gaps from the fixing plastic crosses;
- use a knife or spatula to remove excess adhesive mixture at the joints;
- remove dust from the seams with a brush or brush;
- vacuum the joints;
- wash and dry the tiles.
Some mixtures set better on a slightly moistened surface. As for grouting ceramic tile joints with two-component mixtures, this condition does not need to be met.
Carrying out work carefully and responsibly will bring you good results.
In order not to damage the fragments of the facing element, the glue is removed not with a sharp blade, but with a wooden stick. Seams on a porous surface are sealed after covering the joints on both sides with masking tape.
Grouting technology methods
Before you start processing, it is important to first learn how to properly grout tiles on a wall or floor. The method will depend on the materials included in the paste.
There are several ways to grout joints. Each master chooses a method depending on the job.
Dry
This cleaning method prevents dried paste from getting on the seams. The work is done with a grater; hardened pieces of grout are periodically removed from the tool. It must be held perpendicular to the surface of the facing material and moved diagonally in the direction of the seams.
Follow the correct grouting technique.
If, while processing gaps, the trowel catches a little grout, the resulting dent is filled again with the mixture and the joint surface is leveled.
Wet
The mixture in the gaps should be dense, elastic, but not hard. If the grout solution is pulled by a damp sponge, it means it is not ready for processing.
Use specialized tools to grout joints.
To perform cleaning, you will need a container of clean water and a soft sponge with rounded edges. This shape does not form grooves during the grouting process. Wet the sponge generously with water and remove excess mixture using circular movements. After treating 1-2 m², the sponge should be rinsed and wrung out a little; after cleaning 8-9 m², the water in the container is changed. Continue the process until the tiles and seams achieve their final appearance. Then leave the lining to dry.
There is no need to rush during the grouting process; do everything carefully.
For reference! Before treating gaps, they are pre-treated with an antifungal or antiseptic primer
Finishing
The final stage is to seal the seam. It is carried out to enhance the protection of the cladding from moisture, since the adhesive composition is exposed to negative external factors and deforms the tile. The transparent substance gives the composition dirt-repellent properties and protects the grout mixture from moisture absorption.
Tiles laid outdoors also require grouting.
The procedure is performed using a silicone-based mixture. However, such a product adheres less well to the surface of plumbing equipment. Therefore, when sealing gaps around the bathtub, a moisture-resistant sealant is used.
Do not neglect the advice about using a moisture-resistant sealant, this will improve the appearance and durability of the grout.
Features of epoxy grout
Epoxy grout is different in that it consists of two components. One part is packed in a bucket and is like a thick dough. The second component is the hardener - a liquid, usually amber in color. It is packaged in polyethylene or a plastic bottle. These two components must be mixed before use. Moreover, the proportions must be observed very precisely. Otherwise, either the composition will harden very quickly (if there is a large amount of hardener) and you will not have time to “work out” it, or it will not harden at all (if there is not enough of it). It is equally important to mix everything well, achieving a homogeneous composition. Poorly mixed epoxy grout also does not harden or sets in lumps.
It is more convenient to work with a special tool with a rubber sole.
How to grout tiles with two-component grout: measure and mix
The most questions arise about mixing polymer grout in parts. As already mentioned, it is sold in buckets. There are packages of 1 kg, 2 or 2.5 kg, 5 kg. The viability time of the composition is very short - the stated time is about 40-60 minutes. As usual, we take half as much (to make sure it doesn’t seize). Without work experience, a kilogram, or even half a kilogram, cannot be worked out in 20-30 minutes, and after this time it turns into stone.
Measure carefully and mix thoroughly
Beginners should really start with 250 grams. How to knead such a small portion without disturbing the proportions? Using regular kitchen electronic scales. It is true that it is desirable that these are electronic scales and that they have a high accuracy class (permissible error - 1 gram). That is, we will mix epoxy grout in mass fractions.
To be sure the proportions are correct, weigh the “dough” and the hardener. We weigh the main component without packaging, the hardener in the bag. We take into account that several grams go into packaging. Record the exact weight. For example, 1000 g and 80 g. We need to get about 250 g of the composition. This means you need to mix 1/4 of each component. We proceed like this:
- We take plastic dishes and put them on the scales. If you can, reset its weight to zero; if not, just write down how much it weighs.
- We lay out the main component - exactly 250 g. Try no more and no less. Without a hardener, it is flexible and easy to lay out in the exact amount. Return the remaining “dough” to the bucket and close the lid tightly.
- Add 1/4 part of the hardener. From 80 g it will be 20 g. Again, it should be exactly 20 grams.
- Take a narrow metal spatula and thoroughly knead the mixture until smooth. This takes about 2 minutes.
Before grouting the seams on the floor tiles, prepare the composition.
On this, you need to quickly get to work. You haven’t forgotten that before grouting the seams on the tiles, they need to be cleaned and dried. This must be done before kneading.
How to form a joint from epoxy grout
To work with epoxy grouts, there is a special tool - a grater with elastic edges, white felt for removing residues (a hard cloth can be used), and a cellulose sponge. The grater is convenient to use, but it costs quite a lot. If the tiled floor area is substantial, it may be worth the splurge. If it's only a few square meters, you can do it with a rubber/plastic spatula.
This is what a special spatula for epoxy grout looks like
The application technology itself is no different. We quickly fill the seam in the transverse direction, remove the remains, but not longitudinally, but at an angle. When using a rubber float, the composition is thoroughly removed during the process. This saves composition. After you have worked out the kneaded part, remove the excess from the tile. Wipe off the remaining composition from the tiles first with a dry, hard cloth (ideally white felt), then with a soft cloth.
You can also fill the seams with a syringe. It turns out more neatly, which is important on a textured surface
Then, you need to form a seam. Manufacturers recommend a special cellulose sponge (sold in the same place where grout is sold), because the usual one leaves traces. The coating and grout are not cheap and there is simply no point in saving on a sponge. Rub with a sponge in a circular motion or diagonally. Try not to trace along the seam - this will wash out the composition. The seam should be flush with the tiles or porcelain tiles (can be lower if you want). When polishing and shaping the seam, do not press too hard - if dents form, they will remain so. Adding a thin layer is useless. It peels off. You can only clean everything out and fill it with a new one. This is the difficulty of working with epoxy grout. All this work should take less time than the period before the composition hardens. So we work quickly.
This is a cellulose sponge. Use it to wash off the residue and form a seam.
After using a sponge, water remains on the tiles. Epoxy grout is dissolved in water. If you don’t remove it, after it dries, streaks will remain and you’ll have to wash everything away. To completely clean the plaque that remains on the surface, use a special remover. It makes sense to buy it together with grout from the same company.
There is a way without finishing wash. The water that remains after washing must be removed from the surface with a soft cloth. It removes not only water, but also the remnants of epoxy grout. But when you wipe the tiles, make sure that the fabric does not “climb” onto the seams. You can't touch them.
Differences in grouting technology for floor tiles and walls
There are no significant differences. The technology is unchanged, the work is performed in the same sequence, but there is a slight difference:
- the flooring mixture must be resistant to mechanical damage;
- processing of seams on the wall is carried out vertically from top to bottom (it is convenient to use a spatula);
- Grouting of floors is done diagonally using a trowel, spatula or construction bag.
Floor grouting is different from wall grouting.
After complete drying, the seams are treated with silicone-based sealant.
Advantages of volumetric cladding
Among the advantages, it is important to highlight novelty and relevance. Technologies that make it possible to produce finishing ceramics with three-dimensional patterns have only recently appeared. And manufacturers are actively improving them, changing the severity of the relief, making it more complex. Initially, relief tiles for the bathroom were offered in only a few variations: with patterns of waves, lines, and sand dunes. Today, designs have become more interesting and varied: geometric shapes protruding from the plane of the wall, the effect of crumpled paper, imitation of decorative plaster. Even the imitation of stone and marble has become voluminous, which will definitely form into a separate design direction.
Other benefits:
- the ability to make the interior attractive even in a monochromatic design;
- use as decoration and main cladding:
- average cost of collections, not luxury segment.
Tiles with three-dimensional patterns are varied and affordable. But it also has disadvantages that are important to consider.
Preventative measures for seam cracking
The tile, depending on its purpose, experiences different loads. Tiled flooring is exposed to moisture, ceramic tiles or porcelain stoneware are often laid on a “warm floor” system and experience temperature changes. As a result, seam defects in the form of cracks may appear.
The appearance of cracking indicates serious violations committed during grouting.
To avoid the problem, you should follow some recommendations:
- It is good to clean the gaps between the plates;
- observe the proportions of the grouting mass (excess water always leads to the formation of cracks after drying);
- It is better to knead the paste in two steps to give it time to mature (after the first kneading, leave for 5-7 minutes and mix again);
- You cannot speed up the drying process of the mixture with auxiliary means, as a result it will become less durable;
- It is not recommended to make excessively wide grout joints;
- grouting tile joints should not be done in direct sunlight;
- Do not expose dry grout to aggressive chemicals.
The tile surface should also be used carefully.
If the paste continues to crack, you should pay attention to the operating conditions (insufficiently level base or heavy load).
Advantages
- Aesthetic component . Of course, relief tiles are a great way to transform any interior. Correctly selected structure and colors will give the room originality, uniqueness and unique style. This type of room cladding will delight not only the eyes of the owners, but will become the subject of admiration for any guest.
- Convenience. Considering that manufacturers currently produce high-quality products that are identical from batch to batch, laying such tiles is a fairly simple and easy task. Minor unevenness of the wall, errors in joints or seams are not a problem. The tile itself compensates for all imperfections, making them invisible to the naked eye. In addition, the use of this building material in repairs will significantly speed up its completion.
- Strength and durability. Relief tiles go through various stages of preparation and several stages of firing. This allows for significant strength and resistance to moisture and temperature changes. It receives a monolithic structure, without voids. They are the ones who impart fragility and contribute to its destruction.
- Big choice. Now the market is represented by a huge selection of various relief tiles, all kinds of shades and textures. Anyone can choose the option for heated floors, walls or outdoor use.
How to re-grout tiles
During operation, the grouting of previous seams on tiles requires updating, since plaque, cracks, dirt or grease appear on its surface. Also, the gaps between the tiles may darken and begin to crumble.
After a certain time, grout joints should be renewed.
To renew the seam, products such as cleaning gels, powdered household chemicals, and sprays are used. The products are applied to the surface of the seam, left for a certain time and washed off with water.
You can also remove the old grout and apply new one. You can do this using:
- Dremel with attachment;
- water (if the paste has been applied recently);
- small diameter drills with a conical tip;
- weak solution of citric acid;
- knife with a sharp blade.
The main thing is to choose the right effective method for removing grout.
Its durability and appearance will depend on the properties of the grout mixture.
Finishing work on laying tiles, mosaics or ceramic tiles always leaves gaps. To improve the tightness of the surface and protect against the formation of fungus and mold under the facing material, the finishing must be given a final look. To do this, the tile joints are grouted, the quality of which determines not only the attractiveness of the room design, but also the duration of its operation.
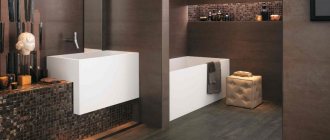
Ceramic relief tiles: features
Tile with a relief pattern differs from the classic one by an embossed three-dimensional pattern. The texture provides several advantages:
- Aesthetics. Textured tiles are difficult to replace with other finishing materials. It is the texture that helps make the interior expensive, sophisticated and at the same time quite minimalistic, since additional decor is not relevant.
- Versatility. Embossed porcelain tiles and ceramic tiles look great in any room, be it a kitchen or a bathroom. Ordinary tiles turn such rooms into standard ones, while relief tiles transform the space.
- Comfort to use. Where ceramic tiles require leveling the walls, relief tiles can forgive minor defects in the base.
- Strength. Three-dimensional tiles are fired and glazed to create a monolithic product, without any inclusions of air bubbles. Thanks to this technology, a strong and practical material is obtained, which is also environmentally friendly, resistant to fluctuations in temperature and humidity, and does not absorb moisture.
Speaking about the advantages, we need to discuss the disadvantages of relief tiles.
Prevention
As a rule, old tiles are held in place only by a porous grout, so for the purpose of prevention, you can not remove, but renew the grout between the tiles. Acids, reagents and folk remedies are suitable for this. Periodic renewal of the grout allows you to securely hold the tiles and maintain the proper appearance of the space between the tiles.
Preparing tiles for grouting
Protection from contamination by grouting of the surface of unglazed ceramic tiles (terracotta, clinker) or tiles with a rough glaze texture, tiles with a prominent texture, spongy texture, highly porous, as well as tiles with a relief having grooves, depressions, cavities, ridges, sharp edges of the relief.
Attention!
The effectiveness of the protective liquid must be checked using exactly the same grout that you want to use for the entire work and carried out on separate tiles, but set aside from the same main batch!
In any case, we recommend using a grout color that, even if the surface is slightly contaminated, will not actively stand out on the surface.
On the picture:
different types of surfaces that need to be grouted using special methods (tiles taken from the Moshkoff Studios collection https://moshkoffstudios.com)
I would divide all complex surfaces into two cases:
CASE 1. For tiles with a very rough texture, with a sharp relief, a texture that has grooves, depressions, cavities, and hollows, mechanically isolate the surface with masking tape and use a grouting bag (grouting gun)
- this is the only reliable way (see step 4 from Case 2). Before using it on the main surface, it also needs to be checked and trained on several separate tiles.
CASE 2.
For surfaces that have a smooth, slightly rough texture and surface, but high porosity or are completely unglazed, this
method of applying a protective layer
; I describe its steps below:
STEP 1
Prepare and clean the surface
- Take several (preferably three to five tiles) from the same batch that will then need to be processed, all further inspection steps must be carried out on these separately selected tiles - Take a lint-free rag or a non-marking sponge ( for example, cellulose, nonwoven materials) - clean and new!
— To clean the sponge, use clean, soft water (ideally specially demineralized). — Wipe the surface of the tiles with a cloth slightly moistened with an acidic cleaner for construction stains. Attention!
Acids in cleaners can destroy some surfaces (cause dullness, dull colors, “eat” applied metallized effects, destroy the gold plating layer, etc.), so before use, be sure to test whether this particular cleaner affects your surface on a separate set aside for experiments tiles - you don’t need to soak them like you do with street clinker or bricks! just wipe with one movement (alternatively, try using acetone if the acidic solvent begins to damage the surface). — After cleaning, do not touch the surface with anything, keep it in a dust-free place (it is good practice in modern expensive construction sites to use a portable air purifier in the premises for painting, such as is used in booths when painting cars or, for example, in carpentry production in paint booths). - Let stand for at least 2 hours (if you suddenly get very wet, then stand for up to 12 hours).
In
the photo:
the cleaner and protectant
that I use myself is a water-based product.
On the picture:
The second option for impregnation and protective agent
that I use myself is a product based on white spirit.
STEP 2
Cover with a protective layer
- Take a lint-free rag or a non-marking sponge (for example, cellulose, made from non-woven materials) - a new one!
another! I'm reading! — Wipe the surface of the test tiles with a cloth slightly moistened with a protective solution. Inf:
protective liquids can be temporary (for example, Sopro-747 from Mapei), which will be washed off after use, and permanent, which will remain on the surface forever.
Of the permanent ones, there are applications that are not visible (for example, Dali is water-based) and there are those whose layer is slightly noticeable like a very dull varnish (these can also work, but you need to keep in mind that this will change the shade of the tile more strongly, but they are easier even though they smell stronger, they apply more smoothly and are more stable). Also, many protective liquids are sold in the form of a concentrate; personally, I prefer ready-to-use ones. Therefore, do not buy just any, but follow the instructions on the package and !
Be sure to experiment with use.
— Technique:
do not wipe for a long time: do not rub or rub, but simply apply the protective solution evenly.
It is advisable to apply the protective liquid in one “wiping” motion. It is not advisable to apply the protective layer by spray, since with this method you need to have a good tool and high skill to apply the liquid evenly. Each part of the tile should be given the same amount of time to apply the protective liquid, that is, there is no need to apply the liquid longer in any one place: since in this place more protective liquid will be absorbed into the porous tile and at the border between two zones of the tile with different amounts of absorbed protective liquid a permanent white contour line may form. After application, the surface should be evenly damp and there should be no “puddles” or any accumulations of protective solution (for the same reason). After you finish applying the solution, the tile will immediately begin to dry out, since unglazed ceramics quickly absorbs moisture, it will dry unevenly, usually faster at the edges - this is normal. Attention!
It is necessary to avoid getting the protective layer on the side edges of the tiles, that is, in the seams between the tiles where the grout will then be placed in the seams. — If you can’t apply a protective solution so that after it dries there are no white streaks left, then you need to throw away these experimental tiles and take a few other tiles and try all the steps on them from the very beginning, just dilute the protective solution (if it is aqueous, then demineralized water, that is, add 20% water, and if it is alcoholic, then white spirit). If the solution, even after dilution, still leaves stains after drying, then this means that this particular protective liquid is not suitable for this composition of this particular tile, this also happens. Then you need to move on to step 4 with other ways to protect the surface from grout. — After cleaning, do not touch the surface with anything, keep it in a dust-free place. - You can move on to the next stage after 8-12 hours.
Covering an entire wall
In spacious rooms, facing one of the walls with relief decor looks impressive. For this purpose, tiles of a single color or with a marbled or plaster pattern are best suited.
In the photo: continuous wall cladding with Vallelunga Memento porcelain stoneware.
In the photo: facing with relief tiles “concrete look” Venis Suede.
Pictured: Porcelanosa Oxford Taco ceramic wall tiles with a wood pattern.
In the photo: Gardenia Orchidea Linear ceramic tiles.
In the photo: monocolor relief tiles from the Porcelanosa Vetro collection.