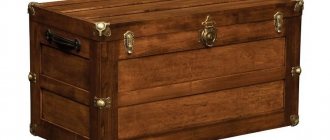
One of the popular design solutions used when decorating a kitchen is installing a corner. This piece of furniture has earned popularity due to its functionality, attractive appearance and the ability to optimize the use of space. This is especially important for small rooms. However, even in spacious kitchens, a corner will not be out of place - it will perfectly perform zoning of space.
DIY kitchen corner - drawings and diagrams
Reupholstery and restoration of the kitchen corner
For many people, purchasing a new kitchen corner always takes a backseat, as it is expensive and there are always more important and necessary things to buy.
In one or two days it is quite possible to update a worn-out soft corner and refresh the kitchen interior.
In such a situation, restoration and reupholstery of the kitchen corner becomes a good option. Of course, you can take the furniture to a specialized workshop or call a craftsman directly to your home, but you can also do this work yourself.
A comfortable soft sofa in the dining area pleases the eye and gives the entire kitchen a feeling of coziness.
Such furniture has a fairly simple design, so restoration can be done even by a person with no experience, who has never wondered how to reupholster a kitchen corner.
Upholstery of backrests and seats
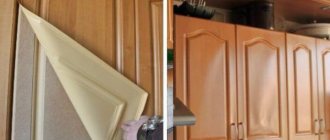
It is sometimes more advisable to upholster the headset elements before assembling them. Thin fabric is often used to cover the inner walls of boxes and cover the backs of seats and backs. Masking material is nailed with furniture nails or staples after upholstery.
Filler for soft kitchen corner
Those who make a soft corner for the kitchen with their own hands use foam rubber as a filler. You can put a 20 mm thick sheet on the back. It is better to cover the seat base with foam rubber with a thickness of 40 to 80 mm. Polyurethane foam with a density of at least 30 kg/m³ is durable and elastic. Softer foam will wrinkle after a short time.
The filler is fixed to the base with glue, which is applied to the contact surface of the wooden slab in a zigzag or checkerboard pattern. Along the edges of the base, polyurethane foam can be secured with a stapler.
Sometimes original mattresses and pillows serve as the seats and backs of the corner. The covers can be filled with crushed foam rubber, siliconized fiber, etc.
Which fabric to choose
The most common upholstery fabric for the kitchen corner is leatherette. Contaminants are easily removed from it. The material imitating expensive leather is cheap, wear-resistant and does not fade for a long time. For upholstery, you can choose microfiber. It is not inferior in basic characteristics to leatherette, but, unlike it, “breathes”. The disadvantage of microfiber is its short service life.
Those who choose flock should know that the inexpensive material is not practical, since its pile accumulates dust well. Beautiful, durable jacquard upholstery is expensive. Teflon fabric is not cheap either, although its properties are superior to other types of upholstery.
Natural fabric is least suitable for finishing sofas: it gets dirty faster. It is more difficult to clean. The material wears out quickly.
Fabric cutting and assembly
Before you make the upholstery of the corner with your own hands, you need to accurately determine the dimensions of the seats. When cutting fabric, you need to take into account the thickness of not only the base, but also the lining. When designing the development, you need to add 1.5-2 cm to the dimensions of the material. The side parts of the upholstery are sewn together. You can make a coating by combining fragments of materials of different colors and compositions.
Upholstery material
Place the seat or backrest slab on the upholstery fabric lying on a flat surface (face down). The material is stretched and attached to the base at 2 points, in the center of the long sides. Then, without allowing distortions, it is fixed with staples or furniture nails in increments of no more than 3 cm.
Selection of materials
The most popular types of material for covering a furniture corner for a kitchen are tapestry, velor, artificial or genuine leather. To increase service life, give preference to the most durable fabrics.
Choose good materials for upholstering the soft corner.
Genuine leather is an expensive material, but at the same time it is a very durable material that will last you a very long time. Foam rubber is usually used as a filler. It is advisable to use a denser and taller one, then the furniture will be more comfortable and voluminous.
In order not to rashly buy too much and update the corner at minimal cost, you need to carefully measure it and draw a pattern.
It is also worth preparing several pieces of plywood, as they may be useful for replacing damaged frame elements. In addition, prepare the glue that you will use to glue the filler.
Use high-quality filler to restore the soft corner.
Required materials and tools
To work on making a kitchen corner from wood, you will need the following tools:
- circular saw, hacksaw or jigsaw;
- drill;
- screwdriver;
- square;
- roulette;
- pencil and chalk;
- mallet;
- stapler;
- surface grinding tools;
- scissors;
- construction knife.
The fasteners will be:
- self-tapping screws;
- confirmations;
- furniture bolts with washers and nuts;
- dowels.
You need to purchase materials such as:
- foam rubber 80 mm thick for seats;
- thin polyurethane foam for finishing the backs of sofas;
- leatherette, jacquard fabric, etc. for upholstery;
- camouflage fabric;
- piano or furniture hinges;
- plywood or chipboard;
- Fiberboard;
- bars 40x40 mm;
- staples;
- ABS or PVC edge for finishing ends;
- steel corners with holes.
For a kitchen corner made of solid pine, you need to buy 100x40 mm boards and plywood. The wood is planed with an electric or manual planer. Final sanding is done with sandpaper or a belt machine. Only smooth, dried wood without signs of rotting or cracks is suitable for work.
Required Tools
To carry out the restoration and upholstery of the kitchen corner with your own hands, you will need the following tools:
- Anti-stapler and furniture stapler. They will be needed to remove the old upholstery and attach the new one. If you don’t have an anti-stapler, you can use a regular knife to remove staples;
- Scissors;
- Hammer;
- A set of open-end wrenches for disassembling the frame;
- Ticks;
- Pencil.
Only a professional approach will help you achieve a good result.
Of course, this is just the minimum required set; you may also need other tools, but this will depend on the complexity of the repair work.
Reupholstering sofas for the kitchen is done quite carefully and it is important to take this work with full responsibility.
Frame repair – if necessary
The frame of the kitchen corner must be carefully inspected and elements that have become unusable must be replaced. Accurate markings and accuracy in processing parts will help avoid mistakes in assembling furniture.
If the coating has peeled off the legs, they need to be cleaned of dust and dirt. Then the wood is sanded. Delaminations, gaps and cracks are filled with wood glue.
High reliability of gluing is ensured by clamps that press the contacting surfaces together. After priming, varnish or paint can be applied to the wood. Holes for fastening in the updated frame elements are drilled before gluing the filler.
Stages of work
When reupholstering furniture, there are several stages that will be necessary in all cases with rare exceptions. Let's take a closer look at how to cover a kitchen corner with your own hands.
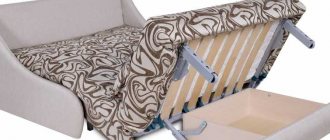
Removing the upholstery
To remove the upholstery, we need to gain access to the parts we need. If the back of the kitchen corner is covered with a fiberboard sheet, carefully remove it. Using an anti-stapler, remove the furniture staples that secure the old upholstery and remove it as carefully as possible, since we will need it later.
Use an anti-stapler to remove old upholstery.
The filler in kitchen corners is usually glued to the frame. Therefore, tearing it off the glue will not be difficult. If somewhere after this there are remains of filler on the plywood of the frame, remove them with a knife.
Cutting fabric and filling
First you need to prepare patterns for new upholstery on thick paper. This is where the old upholstery comes in handy. It needs to be straightened with your hands, and in case of a strong jam, ironed. After that, lay it out on paper and trace around the perimeter with a pencil, including all overlaps.
Choose high-quality foam rubber.
After this, cut out templates from paper, according to which you can begin cutting out the prepared material.
The foam rubber for the filler is cut out exactly according to the same principle.
Important! To keep the shape as long as possible, when cutting out the filling, add 1 cm from each edge.
Frame repair
Carefully inspect the frame of your kitchen nook with the upholstery removed. Clean the elements from dirt if necessary. Minor cracks can be filled with glue. If there are severely damaged elements, then you need to carefully unscrew them.
To disassemble the angle frame, open-end wrenches can be useful.
Measure the removed parts and cut new parts from the prepared plywood using the resulting dimensions. Drill holes for mounting in the required places. Assemble the frame with new parts.
Reupholstery and assembly
Glue is applied to the plywood base of the kitchen corner, onto which foam rubber is placed. Next, you need to cover the corner parts with material and use furniture staples and a stapler to secure the fabric.
Be careful when re-tightening the soft corner.
Work with the material slowly and carefully to avoid tears and distortions of the upholstery. If the kitchen corner consists of blocks, then first assemble the corner part, and then the side parts. Complete the kitchen nook assembly by attaching the fiberboard back wall.
What to look for when choosing a corner model
When purchasing finished products and making furniture with your own hands, it is necessary to take into account a number of factors.
Modern classification of sofas
Room dimensions
Kitchen interior items may vary in size and number of seats. It is necessary to select the configuration of the corner taking into account the layout of the kitchen, its size and the rest of the furnishings. The installed corner should not serve as an obstacle to a comfortable stay in this room. A convenient option for kitchens with a lack of free space is a corner with a transforming table. Folding stools can be used as additional seating if necessary.
Folding stool
Kitchen corner options:
- corner modules to accommodate four people;
Diagram of a corner module for four people
- model for a company of six people;
Model diagram for six people
- compact model for three diners;
Corner for three people
- module with sleeping place.
Corner with sleeping place
Number of family members
The furniture installed in the kitchen should allow everyone living in the house to comfortably sit at the dining table. It is also necessary to take into account the possibility of guests arriving. Of course, if the dining room is not intended for such gatherings. It should be taken into account that a person of average build requires at least 60 cm to sit comfortably at the table.
The size of the furniture will depend on the number of family members
Ease of use
The corner can be hard or have soft filling under the upholstery. In the first case, sitting on the sofa will not be very comfortable, especially for a long time, but it will last much longer. In addition to the fact that the upholstery of soft models wears out faster, the filler itself has a service life (for polyurethane foam - 10 years, for foam rubber (its elastic modification) - 3 years). In addition, hard models are less susceptible to contamination. Such systems, as a rule, are cheaper than more comfortable analogues. And you can solve the issue of excessive rigidity with the help of pillows.
Example of a hard corner
Availability of storage space
The produced models allow not only to use the furniture for its intended purpose, but also to optimize the occupied space as much as possible. The presence of niches under the rising seats, in which you can store household belongings and food, or drawers, is very helpful, especially for owners of small spaces.
Kitchen corner with storage
Material from which the body is made
Connoisseurs of natural materials and comfort in the interior will appreciate corners made from solid wood. They are attractive and environmentally friendly, but are usually quite expensive. An analogue of wood is laminated chipboard and LMDF. These materials, which are cheaper and not always safe for health, are currently most often used in the production of furniture. If desired, you can also purchase a corner made of metal . Metal structures are characterized by durability, strength and resistance to external influences, but they cannot be installed in all interiors. Often a combination of different materials is used in production.
Metal corner for the kitchen
Modern kitchen corner
Material used for upholstery
You should choose the appropriate option based on the design of the room and the functionality of the coating. Natural or artificial leather can be used for finishing. Recently, the synthetic version is almost as good in quality as the original, but its cost is significantly lower. Impregnated synthetic fabric is also quite easy to clean from dirt, does not fade in the sun and does not attract dust. Aesthetically looking and pleasant to the touch, pile fabrics are not so easy to care for. A beautiful jacquard that looks like a tapestry or suede can be expensive. A good option is a fabric-based Teflon coating. Interesting models with a combination of finishing materials.
Sofa upholstery may vary
Kitchen design style
This factor is closely related to the previous two. If the kitchen is decorated in high-tech or techno styles, you can opt for metal structures. Wooden furniture is suitable for classic kitchens. One thing is important - the installed corner should not stand out from the general concept of decoration and furnishings.
The style of your kitchen is also very important.
Prices for different types of kitchen corners
Kitchen corners
How to sew a cover yourself
To protect the upholstery, you can use a corner cover. First you need to choose the shape of the cover and fabric. Draw it yourself or find the appropriate pattern on the Internet. Take some old fabric, cut it according to the patterns and sew it.
You can use leather or fabric upholstery on the sofa.
Try the resulting draft on your corner. If any defects are found, correct them. If you are satisfied with how the trial version fits on the corner, then proceed to cutting out the main material. Sew in zippers and clasps if necessary. Decorate the case as you wish.
Choose the color of the fabric based on the interior design of the kitchen.
Place the finished cover on your kitchen corner. But don’t get carried away with decorating too much, because this is a cover designed for a kitchen corner, and an abundance of decorative elements will look inappropriate there.
The leather upholstered corner is easy to use and care for.
How to make a kitchen corner with your own hands
Below is a detailed plan on how to make a corner consisting of two sofas: an elongated and a shorter one, and a third part - located between the sofas, located in the corner part. Drawings and schematic images are made with all parameters and in section. This article will tell you about sliding doors to the kitchen.
The soft corner should be comfortable and roomy, accommodating at least 3 people.
From chipboard
This is the material that is most often used for self-made furniture, including cutting tables. It is affordable and represents a budget option. Read about removing stains from towels here.
Selection of materials according to schemes
Chipboard and plywood are used to make the frame, and materials that are affordable and of high quality are used for upholstery. Here are some of the most commonly used options:
- Synthetics . These fabrics are very durable and easy to care for. The cost is quite affordable, cleaning is carried out quickly and efficiently.
- Faux leather. The material does not absorb moisture, which is important in the kitchen. Maintenance is also easy: just wipe with a damp sponge and then wipe dry.
- Microfiber. An ideal option in the kitchen, the material is very resistant. If you make the upholstery from it, the kitchen corner will last a very long time.
It is necessary to select a filler for the upholstery fabric. The most inexpensive is foam rubber. But if you want the shape of the sofas to remain normal for a long time, it is better to use polyurethane, which has a better fiber structure. Its cost will be a little more expensive.
Tools
You should first stock up on the necessary materials and tools. It is recommended to make a list so that later everything you need is at hand. Below is a list of important tools.
- hammer;
- roulette;
- set of drills;
- drill;
- scissors;
- jigsaw or hacksaw (required for cutting sheets of plywood or chipboard yourself);
- metal corner;
- glue;
- edge for end processing;
- fasteners (confirmations, dowels);
- stapler (special construction);
- furniture bearings;
- loops for fastening seats.
The first step is to cut the plywood or chipboard.
Manufacturing
It is recommended to start with a long, cozy sofa. Two types of chipboard are used: polished chipboard is used to make the seat, backrest, niche, and also the stop strip. The remaining components are made from laminated chipboard. The elements are made one piece at a time, and there should be 2 sidewalls. The parameters are taken from pre-prepared schemes. This link will tell you how to choose the right knives for the kitchen.
Scheme of a long sofa
After preparing the parts, assembly begins.
- In the areas where fastening is planned, it is necessary to make marks with a pencil, and then drill holes in these places.
- Edge parts should be glued to the end parts of the sidewalls. This way they are closed.
- Prepare self-tapping screws and use them to attach the thrust bearings where the end parts meet the floor.
- Then you need to assemble a niche. All parts of the niche (walls, bottom) are connected to each other. This is where deferred confirmations come in handy.
- Take the pre-prepared sidewalls and fix the niche on both sides.
- The seat bar is fixed to the wall of the niche. Dowels will be needed.
- The seat is hinged as it rises. You can put things you need in the kitchen in a niche.
- The backrest blank is also fixed using dowels.
- Next, the upper bar is mounted, and the lower, persistent one is mounted below. Two metal corners will come in handy here for reliability.
We can assume that the long sofa is assembled. The next stage is upholstery. You will need to cut 2 pieces of foam rubber. For this, a nichrome thread is used, which will help to cut smoothly. If the thickness of the material is small, less than 5 cm, then a knife will be enough. This material will tell you which laminate flooring is best for the kitchen.
The back: the width needs to be 4 cm larger, the length should be left equal to the chipboard.
It is important that the end parts are covered with filler; wood glue will help fix it.
Seat: the length is several centimeters longer, the front end part should be covered. The width is equal to the parameters of the chipboard sheet.
Seat bar
Then you should cut out the upholstery. Its dimensions should allow the foam rubber and chipboard to be completely covered. Leave enough material inside to staple the fabric. Place the staples at intervals of 2 cm.
The material must be tensioned first on the planes, and only then fixed on the side end parts. It is important that the fabric does not wrinkle or sag, but is stretched evenly on all sides.
Short sofa
Again, as with the long sofa, the pieces are cut out first. The dimensions indicated in the drawings should be strictly followed. The type of chipboard (laminated or sanded) is selected in the same way as in a long sofa. The assembly is the same.
In the same way, the sidewalls are made in quantities of two pieces, and the remaining parts are made in a single copy.
Connecting part
Corner strip
Back
This is the most important, third part, connecting the long and short sofas. The thickness of the chipboard must be at least 16 mm. From it you need to cut two strips for the backrest, then a blank that will be mounted at the seat level. Next, you need to prepare a part of the backrest in the shape of a trapezoid (located in the center of the kitchen corner). Lastly, the side parts of the back are cut out.
Seat
The assembly steps are as follows.
- The central part of the backrest is attached to the side parts of the backrest using dowels and confirmations.
- Two stop strips are attached to the backrest. You will need metal corners and dowels for secure fixation.
- The prepared central structure should be carefully connected to the side panels of the long and short sofa.
- Then, by analogy, the seat should first be covered with foam rubber, and then the material should be stretched and secured with a stapler. The staples are fixed at a distance of 1 - 2 cm.
At the final stage, it is important to securely fasten the central connecting part of the kitchen corner. Metal corners and confirmations are mandatory for stability. After fixing them, the kitchen corner is ready for use.
With storage drawers
The design is not semicircular, but consists of two connected rectangles.
This version of the kitchen corner will not seem so complicated, but it will suit a certain style, for example, minimalism, very well. Moreover, it is easy to make. You will need plywood (thicker, about 18 mm) or furniture sheets.
After constructing the frame, the parts can be painted in a shade that matches the rest of the furniture and upholstered. Decorative pillows will add coziness.
Materials and tools
You will need the following:
- a hand saw or jigsaw for preparing parts;
- self-tapping screws;
- nichrome thread;
- foam;
- pencil;
- roulette;
- upholstery material;
- loops;
- drill;
- drill;
- paint (water-based);
- brush;
- primer;
- metal corners;
- plastic bearings.
Cutting parts according to drawings
Unlined frame.
- You should draw up drawings and use them to cut out parts from furniture board or thick plywood. You can use a hacksaw or an electric jigsaw. The tool must be held at a right angle.
- Initially, the base of the corner is assembled: the bottom is attached to the front part, then the back wall is fixed.
- It is necessary to attach a transverse bar in the center, which will not allow the structure to sag under the weight of the body of sitting people and will not lead to cracks in the material. From the inside and front side it forms an angle of 90 degrees.
- Then the side parts of the sofa are attached.
- Sofa No. 2 is made in a similar way.
- To make a corner in the shape of the letter “L”, you will need self-tapping screws, which fasten the 2 sofas together.
- Next, the backrests are fixed from the back of each of the sofas. And in the junction zone they are connected using confirmations. For reliability, metal corners are used.
- You should mark in advance with a pencil the places where the fasteners will be, and then just screw in the screws.
The drill must be 0.5 mm smaller than the diameter of the screws.
Lastly, the covers (seats) are attached using hinges.
Assembly
If you choose the painting option, then experts recommend using acrylic paint, which lasts a long time, does not wear off, and is easy to care for. It does not allow moisture to pass through, which is very important for this room.
You can cover furniture sheets or plywood with stain, paint or varnish. But it is very important to prime it before doing this and let it dry to protect the wood from rotting processes (in the kitchen there is often a high level of humidity).
Only after complete drying should you begin to assemble all the parts together. Lastly, the covers (seats) are attached using hinges.
Then you can start upholstery. It will be enough to make special pillows. To do this, foam rubber is first cut to fit the size of the seats, and then covers are sewn from the material and stretched. They can be removed and cleaned when dirty. And the foam rubber changes over time to a new one. As an alternative, you can cover the covers with additional fabric.
Made of wood and boards
If you have boards available, you can make a very simple but convenient version of a kitchen corner from them. And chipboard will be needed for the walls of the drawers under the seats.
Cutting parts: what materials will be needed
- boards;
- chipboard;
- stapler;
- roulette;
- scissors;
- foam;
- upholstery fabric;
- hand saw or jigsaw;
- sandpaper;
- drill, attachment for it – “crown”, diameter – one and a half centimeters;
- dowels;
- batting;
- glue;
- varnish;
- brush;
- pencil.
A detailed drawing is not necessary here, since they are based on the kitchen area. After the blanks you should get the following number of parts:
- stand – 3 pcs.
- leg – 2 pcs.
- cross piece for a long sofa – 3 pcs. (same) + 2 more;
- transverse part for a short sofa – 5 pcs.
- bars for sidewalls – 4 pcs. (2 on each side).
All prepared parts must be cleaned of debris and sanded well. First, apply coarse sandpaper. Gradually you need to switch to medium and small.
Frame diagram.
Then you need to take a drill with a “crown” attachment and make holes for the dowels. All components of the wooden frame are secured with 2 dowels. The drilled holes must be coated well with glue, and then the dowels must be driven in and pressed.
It is very important to fit the elements to each other at right angles to avoid distortions; a hammer will help to drive in the dowels. Internal corners also need additional strengthening; for this, a metal corner is used.
Varnish or stain coating
It is recommended to paint the parts with varnish or stain. But if stain is used, then you need to go over it with sandpaper again, so as not to subsequently drive in a splinter due to the raised fibers.
Assembly and upholstery of the sofa
The bottom of the drawers on the inside, at the bottom, must be secured with a metal corner. Next, you need to cut 2 sheets from the chipboard and lay them down on the frame (you get the bottom of the box). The sides and front sides are also divided. The seats need to be a few centimeters larger to fit well on top of the boxes.
Covered with fabric.
Seat installation
The chipboard needs to be coated with glue and the cut foam rubber should be placed. Lay a layer of batting on top, as when decoupaging a stool, you need to fix everything with a stapler. After this, cover it with furniture material. The corner is ready.
Advantages and disadvantages of self-upholstery
The advantages of this approach include the following:
- saving money;
- the ability to perform work in your free time;
- compliance of the new type of corner with your tastes and preferences;
- pride in independent work and the repair experience gained.
Synthetic fabric does not deteriorate during use, does not fade, tone and color remain unchanged.
In addition, during restoration it is possible to make some changes to the design of the furniture. You can give free rein to your imagination and come up with a completely new design for your old kitchen corner.
Restored upholstered furniture will breathe new life into kitchen gatherings, pleasing the eye with a harmonious design.
The disadvantages of repairing a kitchen corner with your own hands include the fact that due to the lack of experience in such work, it is not always possible to achieve a good result the first time.
A soft kitchen corner helps create a special atmosphere of coziness and comfort in the kitchen.
Chipboard corner
This furniture consists of three parts: two sofas of different lengths and a connecting part. For manufacturing you will need the following set of tools and materials:
- jigsaw for cutting chipboard sheets;
- metal connecting corners;
- self-adhesive plastic tape for the ends of chipboard parts;
- wood glue;
- pencil or marker for marks;
- drill and drill bits;
- scissors;
- dowels for fixing the walls;
- confirmations;
- seat loops;
- plastic legs for installing the corner on the floor;
- stapler for fixing upholstery to chipboard;
- ruler or tape measure;
- hammer, screwdriver.
To decorate the kitchen corner, choose durable materials that are resistant to moisture: synthetics, microfiber or leatherette. The most popular fillers are foam rubber or polyurethane foam. The second material is more elastic and durable, but costs an order of magnitude more.
Assembling a long sofa
This part of the furniture consists of a back, seat, niche and sides. For parts with upholstery, use sheets of sanded chipboard. For the remaining parts, laminated chipboard is used.
The sofa body is assembled according to the instructions:
- The sidewalls are marked and cut out according to the drawings in duplicate. Places for confirmations and dowels are marked and drilled.
- Similarly, prepare the remaining parts of the sofa according to the diagram.
- The rough ends of the chipboard are covered with plastic tape, irregularities and sharp corners are eliminated.
- Plastic legs are nailed to the ends on the floor side or fixed with self-tapping screws.
- The parts of the niche are connected and secured to each other with confirmations.
- A seat bar with hinges is attached to the wall of the niche. They will provide the ability to raise the seat and use the interior space for storage. Install the seat.
- The lower and upper thrust strips are connected to the backrest by metal fasteners.
- All parts of the sofa are connected to the sides with dowels. After checking the correctness of the work, the parts are secured with confirmations.
To make the seat and back soft and comfortable, upholstery is done. To do this, cut out two sheets of foam rubber using scissors or a knife. For the back, cut the pieces according to the dimensions in length and with a margin of 4 cm in width. The seat needs a small offset of 2 cm to bend at the edge. Spare parts of foam rubber will cover the ends on the front side, and the corners will be soft. The filler is attached to the chipboard with glue.
The fabric is cut with a margin to secure it on the wrong side of the slab. The material is fixed with a stapler on one long side, the fabric is slightly stretched and secured with staples on the opposite side. The fabric is then straightened and secured along the short sides. The tension should be uniform, without visible differences.
Assembling a short sofa
The work process repeats the previous stage, but according to separate drawings. The sides of the short and long parts are the same in size.
Corner part
The connecting element plays an important role, as it turns two soft sofas into a full-fledged kitchen corner.
On the chipboard sheet, blanks for the stop strips and backrest, the base for the seat, and the side parts are marked.
The main stages of assembly work are as follows:
- The sidewalls and the central part are connected to each other.
- The stops are attached with metal corners to the sidewalls.
- Upholstery of the seat.
- Connect all the parts together.
For the final assembly of the soft corner, it is necessary to connect the sofas with the corner part with confirmations. Check the assembly accuracy and reliability of the entire structure.
Is it possible to reupholster other furniture?
You can reupholster the old upholstery on other furniture as well. Nowadays, there are many specialized companies offering restoration services for sofas, armchairs, chairs, stools, ottomans and other pieces of furniture.
In addition to the soft corner, you can also upholster other pieces of furniture with this fabric.
Thus, reupholstering a kitchen corner with your own hands will allow you not only to update the appearance of the furniture, repair damaged parts, but also to give a special individual style to your kitchen, while saving a significant amount of money.
Add bright colors to your kitchen to freshen up the interior.
Furniture decorated with your own hands will create a special atmosphere of home comfort, which is so important. After all, it is in the kitchen that the family gathers after a long day of work to eat, chat and share impressions; it is in the kitchen that close relatives and friends are often invited, who will be pleasantly surprised by the new thing.
Take care of your upholstered furniture to extend its life.
Upholstery and assembly
do-it-yourself corner should not only be reliable, but also look beautiful. That’s why you can’t do without stylish upholstery. When choosing a material for covering a corner, you should pay attention not only to its practicality, but also to the correspondence of the appearance to the design of the room.
First, foam rubber with a density of kg/m3 must be glued to the parts . The soft elements of a kitchen corner are considered to be the back and seat. In the process of preparing the backrest for upholstery, it is necessary to cut a rectangular piece of foam rubber 4 cm wider than the width of the backrest. A supply of material will be needed to bend the foam rubber at the end of the part.
The foam blank for the seat is made 2 cm wider than the structural element itself, since it will only have to be wrapped at the ends at the front. The foam rubber is attached to the wood using glue for quick installation.
Then he proceeds to cutting the fabric: lay the main element and trace it along the contour. Then, 5 cm is added on each side of the drawn line and a pattern is made along the new border. The result should be a fabric with dimensions 10 cm greater than the width and length of the fitted part.
To fasten fabric with a turn-up, use a stapler , securing the upholstery material with it only on one side of the part. Then the fabric must be stretched evenly, and only after that it is attached to the part from the reverse side. In the same way, the remaining sides must be fastened with a stapler with tension.