Vladimir Sadovsky
Ideally, cable laying in drywall should be carried out in parallel with finishing work. If you compare this process with installing electrical wiring using other methods, then much fewer difficulties arise.
The main thing is to follow the list of technical recommendations and rules. For example, the electrical network should be reliably protected from any mechanical damage associated with the installation of sheathing on the frame.
Laying cables in a plasterboard wall
The finished system must guarantee complete safety during operation. It is imperative to think about situations where there is a need to replace components installed under sheets of drywall. In this case, you will need free access to cables and other elements without damaging the wall finish.
Features of the work
Since there is no universal method for installing electrical wiring under plasterboard sheets, the main methods will be discussed below. In any case, you should start by drawing up a detailed diagram. The locations of the sheets themselves, joints and screws for fastening are indicated on the walls.
Any socket or switch must be installed at least 200 mm away from the edge of the drywall. The requirements are similar when working with metal profiles, so installation lines are calculated with an eye to future installation. After this, they begin to take measurements and transfer the diagram onto paper. Having completed all the steps, upon completion of the installation of the gypsum board, you will know where to lay the communication elements.
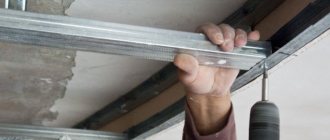
Cable wiring and installation of the frame under the gypsum board
Wiring under drywall in a groove
Hidden wiring under drywall should be done if you are gluing drywall. To complete this process you will need special grooves. Installation of wiring in plasterboard structures is carried out as follows:
- First, markings must be made on the walls. Those places where you plan to install sockets or switches must be marked separately. To ensure your wiring is level, you will need to use a level.
- After applying the markings, you need to start gating. Using a hammer drill, you need to hollow out sockets 3.5 mm deep.
- Wiring under drywall should be laid in grooves of equal depth. You can also make your grooves with a hammer drill.
- After gating is completed, you can proceed to laying the wiring. Installation must be carried out in a corrugated pipe.
- After laying the wiring, the grooves will need to be covered with putty. Only after this can you start gluing the drywall.
Which cable to choose for electrical wiring under gypsum boards
Finishing in a house or apartment can be done with three different types of plasterboard sheets: ordinary, moisture- or fire-resistant (GKL, GKLV and GKLO, respectively). GCRs are suitable for ceilings and walls: they are inexpensive and look aesthetically pleasing. The main disadvantage is poor protection from moisture, the possibility of smoldering of the internal part with subsequent inflammation and release of toxins. For this reason, when installing hidden wiring, it is important to use gypsum boards.
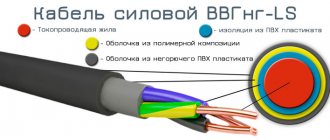
As for the wire, the VVGng cable is suitable here. The last two letters indicate that the product is non-flammable. When installing the cable under the ceiling and in a free space with a height of at least 15 mm, you can additionally use corrugated PVC pipes. If clearance is limited, pay attention to the VVGng-LS wire, which has double insulation. However, its cost in comparison with conventional VVGng will be 1.5–2 times higher.
Power cable VVGng-LS 3x1.5 with double insulation
Wiring protection
Modern cable for electrical networks is made of copper and covered with a special sheath. When installing systems under a plasterboard finish, there is a high probability of damage to the wires, since the gypsum boards are attached directly to the perforated frame with self-tapping screws. Thus, it is important to use protective corrugation to eliminate the possibility of damage to the wire by self-tapping screws.
Corrugated tubes are characterized by increased flexibility, so they do not complicate the installation process, providing reliable protection from mechanical stress. This approach eliminates the risk of short circuits. Additionally, such products increase the waterproofing properties of the wiring, which is important when using the network in the kitchen, bathroom or toilet, and also protect the cable from rodents (in private homes).
Installation of wiring under plasterboard in corrugation
Alternative options are polyvinyl chloride tubing and plastic cable ducts. Their protection is slightly better, but the installation process is significantly more complicated. Unlike corrugation, it is almost impossible to bend ordinary plastic.
Installation of wiring in plasterboard structures
The wiring under the drywall in the frame must run under the sheathing in the frame. This installation method is considered quite simple. If necessary, pipes can be used behind the drywall to run wiring. To complete this, you must complete the following steps:
- First you need to mark the wall.
- After this, you can begin assembling the plasterboard frame. If the wiring is installed in a partition where there is no concrete base, then it is necessary to fasten the cable only after covering one side.
- You need to drill holes in the profile where the cable will be laid in the future. If necessary, you can also lay the cable through a corrugated pipe. Some profiles may already have ready-made holes.
- The corrugated pipe must be laid inside the frame. This is necessary so that the screws do not damage the protective casing.
- Wiring in drywall must be fixed. That is why the wires must be secured using plastic clamps.
Once the wiring is secured, you can sheathe your frame. You can then begin installing outlets and switches into the drywall. In the sockets section we have a ready-made article on this topic. As you can see, wiring under drywall is not difficult.
We recommend reading: retro wiring in the house.
( 1 votes, 5.00 out of 5)
Laying and fastening of wiring
Plasterboard sheets can be installed on walls or ceilings with or without a frame. Even partitions in the house can be created from them. The second option has recently become less relevant. However, if this is the one chosen, then you should prepare in advance special places where the cable will be laid. You will have to groove the surface of the walls, and then hide the electrical wiring inside the groove.
The situation is similar with the installation of sockets, switches and panels, only you will have to make not grooves, but entire “pits”. To fix the cable on the wall, use special clamps.
The frame method of installing gypsum boards looks different. As in the option discussed above, you can hide the wiring inside the groove, holding it with clamps. However, it is much more convenient to fix the cable on a metal frame to which the drywall is attached.
Fastening the cable to the metal frame with plastic ties
The frame may have pre-drilled holes for plastic ties. If they are not available, they can be done independently using a drill. This option is the most preferable.
Laying and installation of wiring
The method of laying electrical wiring depends on how the plasterboard finish is installed. The method without installing a frame is used quite rarely. In this case, it is necessary to groove the surface of the main wall and place the wire in it. For the places where switching and switching means will be installed, holes also need to be prepared. After this, the cable is attached to the wall with special clamps.
With the frame method of sheathing with plasterboard, the wiring underneath can be carried out along the wall (as in the option described above) or directly at the base of the finish, using frame posts as a cable support. To do this, you can purchase special slats that have ready-made points for wiring . Fastening in this case is often done using a plastic cable tie.
You can also drill holes in the rack profiles for horizontal lines. Most often, wiring is laid using a frame base.
Wiring under plasterboard made of metal profile
The first thing you need to do before starting work is to think over the layout of all inputs and outputs for the mounting locations of sockets and switches. You also need to plan where and how the electrical wiring lines will be laid. Two methods are used: wiring on the ceiling and along the walls. The choice of method depends on whether the ceiling is covered or not.
If you have a suspended or suspended ceiling made of plasterboard, then the line must be laid inside the ceiling. If it is not available, the wiring is done along the walls, with the cable laid horizontally, the distance from the ceiling is 150 mm.
First, a frame made of a metal profile is mounted using the standard method. In the necessary places, rails with special holes for the cable are installed (if such were purchased).
To make work much easier, it is recommended to apply the layout of electrical cable lines, as well as switches, sockets and distribution panels, to the surface of the ceiling or walls. This way you won't miss anything.
At the next stage, it is necessary to secure the distribution panels in each room. To attach them to the wall, you can use the most common dowels or drywall screws.
At the next stage, power supply lines are laid. To begin with, clamps or clips are attached along the entire length with self-tapping screws, which will secure the cable, previously enclosed in a corrugation. Fastening ties can also be used as fastening material.
Methods for installing wiring under gypsum boards
Below are four options for laying wiring under plasterboard walls.
If the sheets are glued to the base wall
In construction, this finishing method can be compared to applying conventional plaster: between the wall and the finishing material there is only a thin adhesive layer. Therefore, to lay the wires you will have to ditch the walls. Unlike plastered walls, grooves can be made less deep. However, remember: the distance between the inside of the drywall and the outer protection of the wire should be 5 mm or more.
Important! Under no circumstances should you try to lay sheets directly on the wiring. Drywall is less durable than plaster, so it can be easily damaged, which increases the risk of mechanical stress on the cable.
Grooves in drywall for wiring.
Let's move on to the socket boxes. There are two types of products: internal and external. External ones are attached directly to the wall surface (in our case, drywall). For internal ones, you need to make a 20 mm recess in the base wall. The cable is hidden in grooves, the end is placed in the form of a ring directly in a pre-made “hole” for the socket box. The recess in the drywall is drilled after finishing work is completed (most importantly, do not forget to mark where the recess for the socket is located).
If simple boxes for electrical installation products are installed, then recesses in the drywall should be made in advance. The diameter should be selected with a margin of 5–10 mm, taking into account the dimensions of the product being installed. Further actions are similar to the previous method: hide the cable in the grooves, make a ring from its end and place it in the recess.
Fastening socket boxes in plasterboard
Before installing the plasterboard sheet, glue should be applied around the recess for the electrical installation product. After placing the gypsum board, remove excess plaster to create a monolithic hole. Make sure there are no gaps between the wall and the drywall. Then place the box in the hole, securing it with a layer of alabaster.
Drywall is fixed to a special metal frame (no insulation)
Using this method, electrical wiring is installed under the drywall between the wall and the finishing gypsum board. You need to create recesses in the profile, then process all the edges using sandpaper, which will protect the wire from damage to the insulating layer. Next, stretch the cable according to the pre-selected pattern.
Regardless of using a cable with a three-layer sheath or a corrugated product, when pulling it through the profile, place special bushings in the holes. If you don't want to buy, make these items yourself using pipe scraps. On the outer surface of the plasterboard you need to apply a schematic display of the wiring. When screwing in self-tapping screws, it is important that the fastening elements are positioned with a distance of at least 100 mm from the cable. This will reduce the risk of damage to the wire and the likelihood of a short circuit. A screw can become a phase conductor, transferring it to a metal frame for attaching drywall. It is important to perform high-quality grounding of the profile.
Try to place the cable away from the drywall itself. Move it as far as possible from the areas where drilling will be done.
Another option for installing wires is fixing them on a load-bearing wall using special clips. It is necessary to make holes in the wall, observing technological gaps. In this case, the likelihood of cable damage is minimized. Any gap in the profile is shown on the markings to avoid screwing screws into the void. In the case of vertical installation, the cable is fixed with clips or a tie to the profile itself.
The presence of insulation between the sheet and the base wall
This process of installing electrical wiring is identical to the previous option, but some fire safety measures must be observed. If the insulation is mineral wool or other non-combustible material, you can proceed according to the method above. It is enough to carefully place the insulation next to the cable. If the material is characterized by some kind of fire hazard, then the wires should be hidden in metal corrugations. Tubes made of flame retardant plastic are suitable. It is advisable to install the bushings described above.
Cable laying in insulation
Similar rules must be followed when installing wiring in a wooden house, the walls and ceiling of which are finished with plasterboard sheets. It is even possible to lay special steel pipes, which will completely eliminate fire due to a short circuit.
Insulation and drywall are glued to the base wall
If the insulation material is rigid (classified as structural), then you can do without a metal profile. In this case, the insulation and drywall are attached to the wall in turn using special glue. A certain air gap is formed between the base wall and the insulation. The cable is hidden in the grooves. An alternative option is to make channels in the insulation itself. Glue the sheets over the insulating material. If the thickness of the finished sandwich panel is acceptable, it is possible to install socket boxes with mounting on a load-bearing wall.
Installation of wires under drywall with insulation
Tools for wall chiselling
When doing home renovations, many are faced with the question of how to tap a concrete wall for wiring with their own hands. There are various tools for this, which will be specifically discussed below.
Hammer and chisel - ideal partners
This work is carried out in separate stages. First you need to use a chisel one or two times the width of the spire to mark the edges of the groove. Then, placing the point across the groove, you need to knock out a small piece of the wall in depth. Then you can proceed in two ways - first remove the entire top layer of the intended recess and only then knock out the depth of the groove, or “dig” deeper to the end after every centimeter of the top layer removed.
Important! Using a hammer and chisel to make a groove in concrete is almost impossible.
Hammer. He's a hammer drill
To perform gating with this tool, you need three attachments - two drills of different lengths and a spatula. First you need to drill holes 2.5 cm deep along the entire length of the intended line. They should be evenly spaced at a distance of 1-1.5 cm from each other. Then, replacing the drill with a blade, walk along the furrow from point to point, forming a continuous groove. You can work with a hammer drill quickly and cleanly. And after the work is completed, you will get a highway of the given depth and width. And the unattractive appearance can later be masked with putty.
Important! Do not place the hammer drill blade across the furrow. Otherwise, an unplanned piece of the wall may break off.
Universal grinder
In order to use an angle grinder for slitting, it needs a diamond disc. High-quality cutting with such a disc is particularly precise and in the process does not leave any chips or cracks on the working material. An important factor is also the reduction of noise levels.
Don't miss: How to get rid of mold in your bathroom once and for all. Mold in the bathroom on the tile seams
First you need to make parallel cuts, which will be clear boundaries of the future groove. The width between them must correspond to the standard dimensions necessary for laying the cable. Then, using a chisel or hammer drill, deepen the furrow to the desired size. The differences between the previous methods are essentially minimal. However, the edges of the grooves are smooth. This is very important when damage to the wall material needs to be reduced to “zero”. But, it should be taken into account that the grinder produces a lot of dust, which in a short time can cover the entire room. To avoid this, you can involve a person with a construction (not household!) vacuum cleaner, who will hold the suction pipe close to the source of dust.
What to do when drywall is already installed
Options for installing electrical wiring in parallel with wall finishing were discussed above. Now let's figure out what to do if the finishing materials are already installed on the walls. First, decide what is between the drywall and the base wall.
The first option is to place drywall on the wall using an adhesive compound. You will need to cut through the finishing surface and then groove the material for the cable installation. After such installation, you will be forced to restore the wall by painting it or wallpapering it.
The second option is simpler. It implies that the sheets of drywall were fixed to a metal profile. However, it is important to know the electrical wiring diagram and where exactly the metal frame is located. If you don't want to damage the front part, try running the wire through the baseboard. Drill a hole for the outlet or switch, then use a regular plumb bob to determine where to insert the cable. Remove part of the plinth, lower the rope along the plumb line, threading it through the hole. Tie a cable to the rope and pull it up. After this, the box is placed using any convenient method, and the cable is pulled to the shield.
Pulling the cable under the installed plasterboard
The third option is when insulation materials were installed between the wall and the gypsum board. To enter the cable, use the steel wire left over after installing the corrugation. If rigid insulating boards are used, then it will not be possible to get out using this method.
Since in any of the above options the cable under the drywall will be located chaotically, it is advisable to install it together with a protective corrugation. An alternative is a wire with three layers of insulation. Finally, be sure to make appropriate changes to the room's electrical circuit.
Electrical wiring in a plasterboard ceiling
If only one lamp is planned, then the cable should be laid to the upper edge of the walls. Holes are made in the plasterboard ceiling opposite each other in a straight line. An electrical cable is inserted into one of them and moved to the other. This method allows you to stretch it several meters.
If several lamps will be installed, the work must be carried out before attaching the drywall to the frame. If the sheets are already mounted, they will have to be removed.
Let's look at how to stretch a cable under plasterboard on the ceiling:
- A wiring diagram is drawn, on which all points of distribution of electrical elements are marked. Next, markings are made on the ceiling;
- According to the plan, the cable is attached to the ceiling using clips or perforated metal tape;
- The wires are connected to electrical points through installed socket boxes.
On a plasterboard ceiling, you can install light spotlights that are light in weight and have almost no impact on the suspended structure.
Wiring in rooms with high humidity
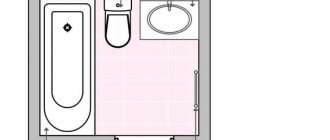
Water is one of the best conductors of electric current, therefore, when installing wiring in a bathroom, toilet, or bathhouse, certain recommendations should be followed:
- The switch and distribution panel must be placed outdoors with a high level of humidity.
- Sockets must be located at least 65 cm from the water supply.
- Any electrical appliances used indoors must be grounded.
- The electrical line for this room must be protected by a separate fuse.
- It is important to connect all ground bars to equalize the electrical potential.
In rooms with high humidity, it is necessary to provide grounding for devices.
Cable under suspended ceiling
This option has several fundamental differences from installing wiring in plasterboard walls. The wires for ceiling lights are routed along the top edge of the walls. You need to drill holes in the plasterboard sheets in order to thread the cable through them. Run the cable before the drywall is installed. As a last resort, you can dismantle the sheets to provide convenient access to the space under the ceiling.
Organization of electrical installations under a suspended ceiling
Woodwork
When plasterboard sheets are installed in a wooden house, the wiring technology is greatly simplified. The concept is the same as usual, but instead of a drill, you should use a cutter, which can successfully replace an electric tool. To secure the corrugated hose, use plastic clamps or copper wire, making sure that the wiring does not “move” too freely. The more attachment points (within reasonable limits), the more reliable the configuration.
The same approaches can be used when working with 380 V networks.
In the following video you can clearly see how to lay a cable in a plasterboard wall.
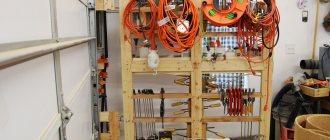
Selection of materials and necessary tools
For high-quality laying of wires under sheets of plasterboard you will need:
- Plastic or metal corrugation that protects the cable (suitable when the wire is located between drywall and the base wall). Metal corrugation is necessary if flammable insulation is used.
- Cable channel (it can replace corrugation, but this will increase overall costs and complicate the work).
- Power cable, which is selected depending on the specific situation. If corrugation is not used, then three-layer insulation should be chosen. If the cable is hidden in the grooves of the base wall, double insulation is suitable.
- Ground wire to equalize potentials.
- Fastening elements: clips, bushings, ties and so on.
- Special socket boxes for drywall or regular boxes if the sheets are glued directly to the wall.
- A drill or other tool for making holes.
Tools and materials for electrical wiring installation
Step by step laying
Below are step-by-step instructions for installing electrical wiring under drywall trim.
Step 1. Preparation
Assemble the metal profile, but do not rush to install the plasterboard sheets. Decide where to place the wiring: under the ceiling or along the walls. It all depends on the specific situation. If you have a suspended or suspended ceiling, it is better to hide the wires at the top and then lower them vertically to sockets, switches and other boxes.
If the ceiling in the house is made of concrete or wood, and only the walls are plasterboard, then the wiring should be placed in them, closer to the top. The distance from the ceiling must be at least 10 cm. Remember: when choosing places to install sockets and other equipment. Once you have your diagram on a piece of paper, transfer it to the wall. Calculate materials and proceed with installation.
Installation of a frame under plasterboard
Step 2. Installation of the box
Place distribution boxes. There should be one of these in every room of the house. Attach the component to the wall or ceiling using self-tapping screws.
Installing distribution boxes under drywall
Step 3. Laying the wires
Prepare the necessary materials and tools, and then proceed with installation. Secure the clips along the cable route. The distance between the fastening elements must be at least 30–40 cm. It is possible to use plastic clamps, which will speed up the work, but will increase the likelihood of damage to the corrugation due to the sharp ends of the profile.
Before pulling the corrugation through the metal frame, drill holes of a suitable diameter. You can buy a profile with holes already made. A similar method is used to connect the junction box and the points where sockets and switches will be installed. Mark on the drywall where the corresponding component will be, and then sew the sheet to the frame.
Step 4. Switching electrical installation products
All that remains is to install sockets and switches. They are usually called electric points. Using a drill, make holes in the places where they should be located. Install the socket boxes into the drywall. You need to make holes in the bottom to thread the wiring through. Pull out the cable and place the socket box in the groove. When everything is done, check the electrical circuit by supplying power to the apartment or house from the distribution panel.
Installing sockets and switches in drywall
Step-by-step instructions for sealing gates with your own hands
It's time to seal the groove in the wall. By following these instructions, even a beginner can cope with the task:
- Using a narrow brush, sweep out dirt and dust from the recesses. A lot of dust is generated when processing bricks. It will prevent the putty from adhering well to the surface. Even a primer won't help.
- Once the gutter is clean, it is primed. The primer will improve adhesion (adhesion) to the surface and prevent the formation of cracks. The entire surface must be treated with high quality, even in the most inaccessible places. A paint brush is used for work. The packaging indicates how long the composition needs to dry.
- While the primer dries, check the location of the wiring. Before sealing the wall after gating, you should make sure that the wiring does not stick out. If the electrician is conscientious, he will not spare the fixing elements and secure the cable inside well. However, there are masters who do this poorly. The putty will not hold the wire, so you need to spread the alabaster and fix it in that place. The plaster will harden quickly.
- It is important to wait until the alabaster and the primer layer dry. Then you can start preparing the solution. Its consistency should resemble thick sour cream or paste. For sealing, the composition should be slightly thicker than a regular putty solution so as not to spread along the groove. The preparation method is indicated on the packaging. You already know the best way to seal the grooves after laying the wiring. It can also be cement mortar when the finish is tiles. But most often they use the Rotband gypsum mixture from Knauf.
- Now it's time to seal the groove. It is filled with solution using a small spatula. It is important to apply the solution perpendicular to the wires. After this, excess putty or cement is removed with a wide spatula. It should be drawn along and the excess should be removed.
- If the wall is painted, you can reinforce the seam with reinforcing tape. It is enough to apply the serpyanka to the freshly filled groove and fix it with a small layer of plaster.
Advice! Instead of sickle tape, strips of fiberglass or a construction bandage will do.
When the mixture dries, apply a primer.
Don't miss: DIY shower tray. How to make a shower tray with your own hands: materials, types, installation steps
This way you can seal the grooves in the bathroom, kitchen or other room. After such manipulations, the wall surface is ready for any finishing. The wiring is hidden, the grooves are sealed.
In the end, I would like to note a few nuances that beginners miss. Experienced professionals advise not to ignore these points:
- priming is done in any case. It doesn’t matter if we are talking about sealing wiring or pipes. If the brush does not reach some areas, the composition can be applied by spraying. All manipulations are carried out with gloves, since after drying the primer will be problematic to wash;
- the pipe or wiring must be securely fixed in the groove so that cracks do not form on site during operation;
- The plaster mixture should be applied in a herringbone pattern. Due to this, the adhesion of the mixture to the wall will improve;
- It is recommended to remove excess mortar from the wall with a wide spatula. In this case, it is better to wield it at a right angle.
By adhering to all the rules, you can be sure that the work on sealing the grooves will be successful. And even after several years of use, the plaster will not crack or fly off. It can only be destroyed by a purposeful action, for example, to repair wiring.
Main process
After carrying out the preparatory work, you need to check that the cable does not protrude above the surface, that is, it is recessed along its entire length. In places where it is not recessed enough, you will have to use a grinder or a hammer drill to make the groove deeper. The best way to check is to use a spatula along the wall.
The sealing of grooves for electrical wiring is carried out using the following technology:
- Dilute alabaster or building plaster as indicated on the package. Remember that this fixation mixture hardens very quickly, so it is better to dilute it in small portions and quickly apply spot fixation with a small spatula. Fastening in this way should be carried out on the walls and on the floor, at a distance of about 1 meter, and in the flow it is recommended to apply every 50, or even 30 cm. The better the cable products are fixed in the wall with alabaster, the easier it is to carry out further work on sealing the grooves.
- After the plaster has set and securely holds the wires, the main plaster is mixed. Each type has its own layer thickness limits. When sealing grooves with Rotband, this thickness should be no more than 50 mm. If it is necessary to apply a thicker layer, then this must be done in several stages.
- The thick plaster mixture is applied immediately with a small spatula perpendicular to the cable and the groove in which it is embedded, and then leveled wide until the level of the entire surface coincides with the sealed groove. All unnecessary excess is removed.
- If the wall will be painted after this, then one of the materials is used: reinforcing tape, sickle tape, construction bandage, fiberglass strips. She applies it when there is not yet a completely flat surface, since another layer of plaster will be applied on top of it.
- After the sealed and leveled surface where the groove with the cable was has completely dried, the priming process is repeated. Sometimes it may happen that the plaster shrinks a little, it’s okay - this is normal, you need to apply an additional layer of putty. If, on the contrary, convex places appear, you need to rub such places with coarse sandpaper or a special grater.
- The last stage is finishing putty work to level the walls. If ceramic tiles are applied after sealing, then these finishing works are not necessary.
Finally, we recommend watching a video that clearly shows how to seal grooves in a wall with electrical wiring:
Now you know how to seal a groove with your own hands. We hope the tips provided were useful to you and helped you complete all the work yourself!
How to save money
Here are some practical recommendations that will allow you to install electrical wiring while spending a minimum of financial resources:
- Avoid purchasing cheap materials, including cable, corrugation, fasteners, socket boxes and boxes. Poor quality will lead to the fact that the wiring in the drywall will fail after 2-3 years. In the worst case scenario, electrical appliances may break down. Rewiring is a complex process that requires removing some sheets of drywall.
- Take your time and make sure the quality and reliability of the system. Separate power and lighting lines.
- If you replace the cable, check that the old wiring is in good condition. If all is well, you can leave the circuit that was used. In addition, some parts of the wiring may not need to be replaced.
- The cable cross-section is calculated depending on the load it must provide. At the same time, it is important to make a certain reserve. You can't know what you'll want to use 1-2 years from now. The reserve in cross-section will allow you to play it safe and avoid the need to replace the wiring.
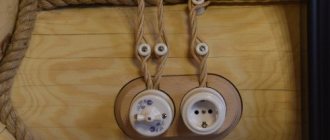
- If you don't want to drill holes for sockets, use overhead hardware.
Installing an overhead socket on drywall
Remember that the open method of wiring on drywall violates all electrical and fire safety rules. Therefore, it is not used in this case. Do not forget to turn off the circuit breakers before installing or replacing the cable. All electrical installations (sockets and switches) should be installed at the very end. This approach will prevent damage to the decorative part.