Finish options
The work area is the central detail of the room, and if you choose the right material, you can create an interesting and stylish design. Ceramics must be of decent quality so that the apron, exposed to steam, splashes of grease and water, can be easily washed off from dirt and retains its original appearance for a long time.
It is advisable to prefer glazed tiles, since porous or embossed ones will create difficulties with cleaning the room. Discreet and neat light ceramics will be one of the best options. An apron made of boar tiles in white will fit perfectly into the interior of both large and miniature kitchens.
Kitchen in pastel colors Source www.pinterest.com
If you want to create a practical and stylish interior, smooth ceramics in brownish-beige tones will be a good choice. This combination is very popular now. The work area will not need frequent washing due to its texture and color.
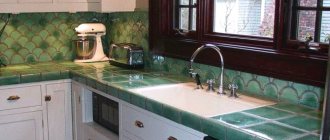
Tiles for the kitchen backsplash Source dizainkuhni.com
Contamination will not be too noticeable on the imitation of natural stone. It is also important to purchase high-quality grout that will not turn yellow over time (for example, epoxy). It has antifungal and water-repellent properties, is resistant to fats and ultraviolet radiation.
Kitchen apron made of tiles: photos of practical solutions
The wall in the kitchen between the countertop and hanging cabinets is always visible and attracts attention. So it can be an interesting decoration for a room, unlike any other place, often giving the room a special style. In addition to aesthetic values, the properties of the material are also taken into account - the wall above the kitchen table is one of the places most susceptible to contamination, so it requires special finishing. Therefore, the area should be covered with a material that fits inside and is easy to clean. Ceramic tiles would be a good choice.
Ceramic tile is the material of choice for walls above kitchen counters. Not surprising, since it is non-flammable, easy to clean and resistant to water and steam. However, the popularity of tiles does not mean that walls decorated with them should look standard and boring. A wide range of ceramic tile manufacturers provides the buyer with a large selection and interesting solutions. To achieve an original effect, you can choose tiles that imitate wood, intense colors or unusual patterns.
Kinds
Square-shaped ceramics are a universal finishing material that is easy to lay and arrange. It can be porous and glazed, patterned and single-color. Usually for the work area it is recommended to take types without a pattern or with a barely noticeable print. To prevent the apron from being boring, it is complemented with decor, ornaments or panels.
White square tiles Source vdom.ua
A rectangular tile made in the form of bricks with rounded edges is called a “hog”. She received this name because of her peculiar convex and smooth appearance. More often it is plain and without a pattern, and has a glossy glazed surface. It is produced in a variety of shades, so it is easy to choose for any interior style.
Tiles 10 by 30 for the kitchen Source en.eyeni.ru
Diamond-shaped ceramics are used to finish the work surface of kitchens in a classic or rustic style. Its range includes glazed, matte and colored products. They can be decorated with a pattern, ornament, gilding, or relief print. For small rooms, it is better to prefer a light color scheme, and arrange dark elements in the form of longitudinal stripes.
Ivory kitchen design Source dizajnintererov.com
Mosaic is a tile that has a peculiar convex texture or is made of shaped elements glued to a special base. The material is of excellent quality due to the elimination of tile seams. The fewer there are, the longer the original condition of the apron will remain. There is a mosaic made of stone, glass, wood, ceramics, metal and porcelain stoneware. Thanks to the wide range, this tile is suitable for any style direction.
Kitchen in black Source uiut.boltai.com
Three-dimensional tiles are made from reinforced concrete or ceramics. This type of material does not convey a multidimensional image, it is opaque, and its volume is created due to texture. There are three-dimensional tiles made of plaster, wood and tile.
The kitchen is exposed to steam, grease drops, and water, so the material from which the apron is made should be easy to clean, not have pores or complex texture, and resist moisture and steam. These characteristics correspond to stereo tiles chosen in the colors of the main kitchen interior.
Bright colors Source spbproekti.ru
Kitchen apron under tiles
Not everyone knows that wallpaper can also be successfully used over kitchen countertops. This allows you to quickly change the kitchen by creating a beautiful backsplash under the tiles, as well as getting a smooth surface decorated with an interesting color, pattern or print. Wallpaper for the kitchen is becoming more and more fashionable, and their selection allows you to create really interesting effects.
Important! It's best to choose specialty kitchen wallpaper designed for that room (usually vinyl with a non-woven backing or the more expensive fiberglass) because it's stain and heat resistant and can be easily cleaned.
You can choose wallpapers with interesting graphics, but also ones that mimic other materials, such as tiles. This option will allow you to get a rich color finish that best suits your interior and taste. Wallpaper with light tiles will give a pleasant, sterile effect, and those created in cool colors will bring a bit of Greek freshness or sea relaxation, warm colors will be cozy, and red ones will be able to stimulate the appetite.
Advantages of wallpaper in the kitchen:
- allow you to create interesting patterns, colors and textures;
- they are easy to clean;
- they are quite cheap and easy to glue;
- some can be painted;
- allow fairly frequent and simple changes in location;
- allow you to compensate for slight unevenness in the walls.
Disadvantages of wallpaper in the kitchen:
- protrusions on the wall require careful processing;
- incorrectly chosen wallpaper can quickly deteriorate and become discolored.
Laying methods
The method of installing ceramics also affects the interior of the kitchen. There are several methods for placing tiles. Installation of fragments in one row is simple and accessible even to an inexperienced builder. This method is suitable for plain, patterned and printed tiles.
White and black in the kitchen Source ok.ru
Imitation of brickwork is suitable for hog tiles. It is also possible to use square ceramics. Tiles of any color are suitable, as well as a combination of two contrasting or several similar shades.
When installing patterned tiles, they often stop at laying them diagonally. It allows you to visually expand the room. This method is also suitable for combination with mirror fragments. This apron looks very unusual. In this case, the material requires trimming, and its consumption will increase.
Apron for the kitchen in bamboo color Source www.otdelka123.com
In addition to laying in the form of bricks, a herringbone pattern is often used for “hog” ceramic tiles. They combine different shades and textures of ceramics.
Boar tiles for kitchen backsplash
An interesting effect can also be achieved by choosing classic shaped tiles. An excellent example of such cladding are rectangular models, that is, hog tiles. Even the simplest shape will attract attention if it is laid out in a non-standard pattern. Rectangular hog tiles placed on the wall in a decorative thin mosaic will look unusual. You can also use them as decoration and combine them with normal sized tiles.
Popular media formats
If you have a small kitchen, you need to choose small tiles to create a backsplash. For a spacious room, you can use large fragments of finishing material. To minimize trimming, it is necessary to choose slab sizes such that they are a multiple of the planned height and width of the apron.
It is advisable that the apron tiles fit under the furniture at the top and bottom, then it will have a complete look. The usual height of the working area is 50-60 cm. In the area of the gas stove it is usually a little higher, since the ledge under the hood is also covered with tiles.
One of the most used for decorating a backsplash is 20x20 square tiles. The universal “hog” competes with it in popularity. This format fits well into interiors of different styles. This tile is also sometimes called “subway”. The sizes of boar tiles for a kitchen apron come in different sizes; the most popular size is 7.5cm x 15cm.
It is convenient to purchase medium-sized tiles with holes for the “hog”. It is much easier to lay than shallow ones. Even a beginner who decides to decorate the kitchen on his own can do the installation.
Emerald tiles Source postroika.biz
In most cases, 10x10 squares allow you to lay ceramics without cutting, which is why they are often chosen for decorating a backsplash. For a small room, this is a win-win option, since it allows you to visually expand the space, and the kitchen units will look better against its background.
10x10 tiles are easier to install in areas with difficult access. Also, due to its good contact, it is often used in combination with decor and panels. A significant disadvantage of small tiles is the presence of many seams, but with high-quality grouting this is not so significant.
Cozy kitchen Source profiplitka.ru
Square ceramics with a width of 6 and 12 cm are suitable for interior design in Provence or Scandinavian style. The light or pastel colors of these tiles are suitable for small spaces. In combination with small fragments of the flooring, such tiles will visually expand the kitchen and make it brighter.
Ceramic tiles for the kitchen Source abcceramica.com.ua
In Soviet-era interiors, square slabs 16 by 16 and 18 by 18 were often used. These universal sizes have still not lost their popularity because they look good in kitchens of different sizes and styles. Most often they can be seen in the design of panels and combinations with different decor.
Patchwork style Source www.cosedicasa.com
The slab size of 24x24 cm is usually not used for miniature rooms; it is used to decorate the work area of large kitchens. In small rooms it is permissible to lay them diagonally so as not to narrow the already small space.
Relief ceramics Source dizainkuhnibest.ru
To give the work area the appearance of a stone or wood slab, ceramics with large fragments up to 48 cm in length are used. To simulate decking, take tiles 18 or 12 cm wide.
Rectangular ceramics also remain relevant for decorating the work area. The most popular sizes are 10x20, 20x30, 25x33 and similar formats.
Beautiful beige kitchen Source distgroup.by
To simplify the design of a kitchen apron, an imitation of small 10 by 10 tiles is used. Due to the presence of divisions, it looks similar, but the masonry surface has fewer seams. Elements sold in sizes 20 by 20, 20 by 30, 30 by 30 and more. The more, the faster and easier it is to install.
Decorative inserts are used in combination with background plain tiles. These elements are much more expensive, but they enliven a monotonous and boring background, introducing rich notes into it.
How to lay tiles of different colors
Plain tiles undoubtedly calm the interior without introducing unnecessary (and often unnecessary) shades. But if the kitchen itself has a monochrome palette, or you think that with bright colors on the apron it will be easier to cook, then feel free to dilute the monoton.
When combining two or more colors on a kitchen apron, make sure that they are also present in other details: dishes, textiles, coasters or wall decor. So, how to beautifully lay tiles in the kitchen, combining several shades?
Checkerboard
Typically, the checkerboard pattern is an alternation of light and dark squares (like on a chessboard). But you can go a little further and dilute two contrasting colors with halftones and/or change the angle of the pattern by laying the tiles diagonally.
Note: if you choose a contrasting pattern of two opposite shades, then the kitchen set and surrounding design should be neutral, otherwise the kitchen will turn out to be overloaded.
Geometric tile patterns
Tiles with a geometric pattern (ornament) will undoubtedly bring contrast and dynamics, but you will have to work hard with the choice of pattern.
These can be original zigzags, diamonds, squares, triangles, stripes in any direction - believe me, your apron will not be boring. You can choose contrasting shades or, conversely, from the same palette, similar in color - there are no restrictions, the main thing is that all shades fit into your interior.
Chaotic pattern (scattered)
If strict lines and a monochrome palette are not for you, pay attention to the combination of multi-colored tiles laid out randomly. The shape can be any - from strict rectilinear to hexagonal and trapezoidal.
When choosing shades, adhere to the same rule - they should all be present in the surrounding details. Take advantage of our tips on how to beautifully lay tiles in the kitchen (photo below).
Tiles with a pattern and/or relief
One of the most interesting options, of course, is to use ready-made tiles with an applied ornament or relief. Flowers, geometry, stripes, monograms - choose any that fits into the overall concept of the kitchen space.
Please note: it is better not to place relief tiles in the area of the stove - subsequently it will be difficult to clean off soot and grease from its surface.
Panel on the kitchen apron
A panel of tiles laid on a kitchen backsplash helps decorate the kitchen and save a decent amount of money (it’s cheaper than laying out the entire backsplash with such tiles). As a rule, such an insert is decorated with a frieze and placed above the stove or sink.
You can use absolutely any tile for the panel, as long as it matches the overall style of the kitchen. These can be geometric patterns made from different colored tiles or inserts using the patchwork technique.
Creative ideas
A simple and affordable way to make the design of a room interesting is to use printed tiles. It will give the interior individuality and emphasize the style direction. The pattern should be used in moderation, otherwise it will deprive the design of lightness or make it completely tasteless and motley.
In the color of wood Source www.shirokoi.org
Three-dimensional tiles look elegant and weightless. There is a wide range of textures on sale. To decorate the work area, you need to choose models that are easy to clean, since the apron is constantly exposed to moisture, steam and grease. It is advisable to lay out the lower part of the zone with glazed tiles, and the upper part in three-dimensional tiles.
“Chopped” tiles Source www.panoramica3d.ru
Unusual tiles in bright colors will add bold accents to your kitchen interior design and attract attention to detail. Spectacular ornaments, rich colors, bold color combinations will give the room a unique flavor.
Geometric pattern Source www.apartmenttherapy.com
Mosaic is an elegant way to decorate a kitchen space. Be sure to properly seal the seams and choose the right shade of finishing material. Mosaic tiles can also be used to decorate other kitchen work surfaces (countertops, shelves, window sills).
Ceramics with the effect of laying pebbles Source znatprovse.ru
Matte ceramics will look great in the interior of large kitchens. The main thing is that it is not porous (it is difficult to clean such tiles). A good idea for a small room would be an apron with mirror inserts. Gloss and glass inserts visually expand the boundaries of the room, making it more spacious and brighter.
Mosaic tiles on the apron Source dizainall.com
Ceramics with a honeycomb imitation will help hide boxes and protruding corners of furniture. It does not affect the visual perception of the room, but it looks very interesting and unusual due to the abundance of broken lines. Honeycombs are available in different sizes (from small square tiles of 6 by 6 cm to large fragments of 48 by 48 cm).
Honeycomb tiles for the kitchen Source www.pinterest.com
Tools and materials for work
The process of laying tiles on the floor begins with the preparation of materials and equipment.
Here is a list of the main tools:
- A tape measure, as well as a ruler and a simple pencil.
- Building level.
- Construction mixer for mixing glue.
- Tile cutter
- File.
- Notched, as well as rubber spatula, trowel.
- Large bucket, sponge, rag.
- Special gloves to protect your hands.
Materials you will need:
- Tile adhesive.
- Tile.
- Crosses for tiles.
- Grout of a suitable color (it is better to choose transparent).
- Primer.
Photo selection of the best aprons
Glass tiles have a spectacular, weightless appearance. The range includes matte and glossy, as well as colored and transparent tiles. The symbiosis of glass and ceramics and various decorative inclusions inside a transparent slab looks magical.
Stained glass effect on the backsplash Source perfectspace.pl
For a red kitchen set, matte or glossy gray tiles are suitable. It will create the necessary contrast, slightly softening the bright design of the furniture. For the same purpose, turquoise or emerald ceramics are selected for a white kitchen. Beige furniture will be enlivened by lime-colored tiles. For a beige kitchen, you can also buy contrasting tiles with a coffee bean print. And colored mosaics can refresh any kitchen.
Gray apron in a red kitchen Source dizainkyhni.com
The elements of mosaic tiles are used to create rich ornaments, interesting panels, and photographs. In this design, the kitchen apron becomes an independent design element that takes all the attention. The rest of the interior should be calm, background.
Panels for the kitchen apron Source stroy-podskazka.ru
A kitchen backsplash made of black tiles will fit well into the interior of a spacious kitchen. It can narrow a miniature room even further. The material looks elegant and stylish, and requires much less washing.
Black kitchen tiles Source dizayndoma.net
Material in the form of fish scales can decorate almost any kitchen. To decorate the work area, they prefer plain ceramics with contrasting grout. A gradient or composition of several related shades will look impressive.
Fish scales on an apron Source www.decorpad.com
Another way to decorate your work area is to purchase two shades of geometric tiles. You can arrange the triangular fragments randomly or in a certain sequence.
Stylish geometry in the kitchen Source remontkit.ru
For a rustic-style apron, imitation stone or artificially aged clay tiles with a rough surface are suitable. You can combine such a base with a mosaic of small fragments in warm natural shades, ceramic panels or “antique” painting.
For the Art Nouveau style, glazed plain tiles are used, as well as tiles with a stylized pattern, mosaics or photoceramics. A good idea for a modern kitchen interior is imitation 10x10 tiles in light colors or medium format ceramics with a monochrome photo.
An Art Deco kitchen harmonizes well with textured tiles in the work area, imitating rough brickwork or a stone wall. In combination with high ceilings and industrial furniture, this design of the apron will look brutal and modern.
Ceramic tiles for kitchen backsplash
Ceramic tiles are one of the most popular and classic solutions. It is very durable, impressive and resistant to the harsh conditions that prevail in the kitchen. You will find mosaics of interesting combinations, as well as glass plates or those that imitate stone, concrete, wood or metal.
Ceramic tiles are the most classic way to decorate a kitchen countertop, and they are still very popular. By choosing this traditional cladding, you can get an unusual look for your kitchen splashback.
Not just ceramic tiles
In addition to ceramic tiles, tiles made from natural stone, a mass resembling natural concrete, brick or metal, are increasingly being chosen. The material gives a very original effect, and at the same time is quite practical. Metal tiles are a good alternative to sheet metal because they look more decorative and are easy to install. The result is suitable for both modern and industrial kitchens, combining beautiful looks with modern trends.
Products made from natural stone or its imitation go well with natural and ethnic interiors. You can get them in the form of slabs and panels, as well as interesting stone mosaics. Although marble slabs do not require much impregnation, models made of travertine or other porous materials must be thoroughly impregnated (preferably before grouting), because they are subject to destruction in kitchen conditions. However, despite this, they are willingly chosen for the apron because they look really impressive and fit many styles.
If you want your kitchen decoration to have an extraordinary appearance, then you should choose nice wooden or plastic panels, a very stylish, interesting design, texture and decor. But such material is quite demanding when it comes to impregnation, cleaning and maintenance. In addition, not everyone is suitable for the area above the stove. Plastic panels often have limited heat resistance, while wooden panels require durable impregnation.
Remember that cleaning wood paneling and tiles can be cumbersome, requiring careful sealing and frequent maintenance. However, despite the need for many maintenance procedures, the natural charm of wood is irreplaceable, which is why it is often used even on a kitchen apron. More and more people want to have wood paneling in their kitchen because it allows them to create a modern and idyllic mood.
What are the benefits of floor tiles?
Today, those carrying out finishing work face a difficult choice. It is important not only to know how to properly lay tiles on the floor in the kitchen, but also to decide on the type of coating.
Manufacturers offer such a wide range of materials that choosing the best one is not always easy.
To decorate premises for various purposes, it is necessary to choose different materials that must withstand certain types of influences.
What nuances need to be taken into account when choosing cladding for the kitchen:
- When cooking, increased steam formation and temperature changes become frequent phenomena;
- the risk of water leaks on the floor is high;
- The kitchen is one of the most frequently visited areas in an apartment or house.
In this regard, the finishing material for the floor should be:
- moisture resistant;
- unaffected by temperatures and sunlight;
- resistant to wear and shock loads.
Tile is the most common flooring option for the kitchen.
In addition, like the finishing of other objects, the finishing of the kitchen floor should be attractive, suitable in style to the design of the entire interior and durable, since no one will like to frequently carry out labor-intensive and financially expensive finishing work. The environmental safety of the material is also an important aspect that needs to be paid attention to when decorating premises.
Expert opinion
Afanasyev E.V.
Chief editor of the pol-exp.com project Engineer.
If previously the most popular material for flooring was linoleum, today tiles are increasingly used in kitchens. It is inert to climatic and mechanical influences, serves for a long time, and is perfectly combined with other types of finishes. Cleaning the floor is not difficult, so tiles have no competitors in terms of hygiene. It is possible to choose the appropriate option depending on material capabilities and aesthetic preferences. The use of exclusively natural ingredients in the technological process ensures the safety of the material for the environment, people and animals.
What is good news is that all stages of work to obtain a high-quality and durable tile coating can be carried out with your own hands, which allows you to significantly minimize repair costs.
Using tiles of different textures, it is possible to zone the kitchen space. This is especially true when the kitchen is combined with the dining room. In this case, you can separate the dining area from the work area.
Separation of zones using tiles and parquet
A few aspects that not everyone likes about tiles:
- In order for the coating to have soundproofing characteristics, it is recommended to lay an additional layer of sound insulation between it and the concrete screed.
- It's not always pleasant to walk on a cold floor at home, especially barefoot. And tiled flooring (most types) is a cold material. Before laying tiles , to improve living comfort, it is recommended to install a “warm floor” system.
It is recommended to install underfloor heating under the tiles
Offset brickwork
To add variety to the interior, some owners use a scheme that replicates the brickwork of the walls. It got its name because the elements of each next row are shifted relative to the previous one.
The amount of displacement can be different, by half a tile, by a third or even by a quarter. The latter is called “deck” due to its similarity to the covering of ship decks. The choice depends on the taste of the apartment owners.
Note that this type of installation is suitable for rectangular tiles. With its help you can create a beautiful “parquet” tile pattern. It is especially good if the ceramic surface imitates natural wood.
Stylists do not recommend using tiles of 2 contrasting colors in this method.
Note that offset installation can be done either with a parallel installation method or with a diagonal installation method.
In order for the floor surface in a kitchen with this type of coating to be smooth, the master must strictly maintain the same distance between the masonry elements.
Laying the floor step by step
It should not only lie flat, but also fit well into the design. For inexperienced craftsmen, a video on how to lay tiles on a kitchen floor with your own hands can help. Strict adherence to the instructions, accuracy and speed of reaction will help to complete the repair efficiently and in a short time.
To align the rows, it is recommended to use construction crosses at the site of future seams.
Preparation of surfaces and materials
The final result largely depends on surface preparation. First you need to remove the old coating. For this purpose, you can use a spatula or trowel. Particularly durable areas of the coating can be crushed using a drill.
Leveling the surface takes longer, but this step cannot be skipped. It depends on him how neatly the tiles will lie and how many years they will last.
You need to remove the old coating from the wall and seal all holes and cracks with putty, then cover it with a layer of primer.
Determining the quantity of floor tiles
Laying floor tiles in the kitchen requires precise calculations. If you calculate the quantity incorrectly, you may not be able to find material of the same color and texture in the future. First of all, calculate the area of the room (multiply the length by the width) and divide it by the size of the tiles.
In this way, it is calculated how many tiles will be required to lay one row.
Add 10-15% to the resulting number, since there is always a risk of spoiling some of the materials. Finding similar ones will be problematic if you do not purchase them in advance. When calculating the number of tiles, it is worth taking into account the type of masonry and the desired pattern, as well as the presence of decorative elements.
Preparing tools
Materials should be prepared in advance. You will need a spacious bucket for diluting glue, as well as a construction mixer. Tools should always be at hand so that they can be used at any time. Before use, rinse everything thoroughly to ensure that there are no residual glue or other materials on the instruments.
Using a tile cutter, you can pre-cut the tiles to the desired size.
Preparing the subfloor for tiles
The main task of the master when carrying out repair work of this type is to properly prepare the base for installation. It must be as dry and clean as possible so that the glue will adhere firmly and hold it securely in place.
Separately, you need to prepare the tiles to ensure better adhesion to the glue. On the reverse side it must be treated with sandpaper or a sanding machine, and then remove dust and crumbs using a sanding machine.
Apply another layer of primer on top and leave to dry for 2-3 hours.
Marking
How even the rows of tiles will turn out depends on the correct marking. For marking, it is better to use a pencil, tape measure and ruler.
Features of floor markings for installation:
- The marking should take into account that the trimmed pieces should not be placed in a visible place.
- The minimum amount of trimming should be used. Ideally, you should cut it by a third or half.
- The first line is drawn from the threshold to the opposite wall. To make the line straight, you should use a cord or laser level to make adjustments.
- The first row of tiles is laid along the drawn line. The rest should be laid along the first row. It is worth placing tile crosses at the seams so that the rows are as even as possible.
Preparation of glue
Since the glue dries quickly, it should be diluted in small quantities so that it does not have time to lose its properties. When diluting glue, it is important to observe the proportions indicated on the package and follow the instructions.
It is better to stir the glue using a construction mixer or a drill with a special whisk attachment.
The consistency of the finished glue should resemble thick sour cream. Leave it to infuse for 10-15 minutes, stir again before applying.
Laying process
- The adhesive solution is applied. It is better to spread it with a spatula in different directions to improve adhesion.
- You should start laying from the middle, leaving trimmings at the edges.
- The first row should be laid as described above. Lay the second and subsequent rows according to the same principle.
- To ensure that it lies flat, you should control its height using a level. Special crosses are inserted at the seams.
- Carefully place the tile against the markings. Remove any remaining glue using a damp sponge or cloth. While the glue has not dried, the position can be adjusted.
- If laying out the slabs is impeded by pipes, you should make small cuts on them using a grinder.
- After a day, you should clean the seams with a spatula.
Grout
Grouting is the final stage of installation. To make the flooring look natural, you should choose a grout that matches the color or is completely transparent. First you need to moisten the tile with water using a sponge or spray bottle. Apply grout using a spatula.
Pay special attention to the seams, but do not press the grout into them too much. The spatula should move along the seams. Leave the tiles to dry for 20-30 minutes. Use grout to finish the entire tile, avoiding the area near the walls.
We also recommend looking at - Grout Litokol: colors, application features
Finishing
As soon as the grout dries, you will need to remove its excess with a damp sponge or cloth. Allow the floor to dry for about a day, only then bring furniture and decorative items into the room. Otherwise, there is a risk of damaging the surface.
If in some places the tiles are uneven, the area will have to be carefully cleaned with a drill and spatula and the tiles re-laid.
Classical traditions
Gluing tiles in the traditional (classical) way is the simplest and most reliable option for creating flooring. The tiles should be laid in even rows parallel to one of the walls, without moving the rectangles relative to each other.
For this finishing method, you can use both square and rectangular ceramic plates. In addition to a monochromatic pattern, they use a “chessboard” or ceramics with a ready-made large-format pattern, which is made up of small elements.
The advantages of this type of installation include simplicity and ease of gluing elements, speed of work and a small amount of waste.
And to keep the percentage of surplus even smaller, experienced craftsmen advise calculating the number of tiles before starting work. To do this, you can determine the area of the kitchen and the area of the tiles. Then divide them by each other, and round the resulting result to a larger integer. This will be the required amount of tiles for the kitchen floor.
Professional builders advise starting such masonry not from the corner, but from the middle of the wall. Thanks to this approach, the pattern will be uniform, without whole tiles on one side and cut tiles on the other. And even if you have to cut the tile, there will be a half on each side. And this will significantly reduce consumption and eliminate a large amount of waste.
In addition, before starting work, you need to make sure that the wall along which the first row of tiles will lie is level. If it has flaws, it is better to start installation immediately from the second row, aligning it with the cord. And next to the wall, glue the tiles in the second place, trimming the edges and aligning them according to the existing standard.