A high-quality, beautiful floor that creates comfort in an apartment is the key to a pleasant stay. A good coating will save the owner from many problems, including health problems, if the choice is made in favor of an environmentally friendly material. However, of all existing finishing materials, only wood can boast of absolute safety. And a wooden floor in an apartment is the perfect combination of comfort, coziness, environmental friendliness and beauty. How to make it yourself? This will be discussed in the article.
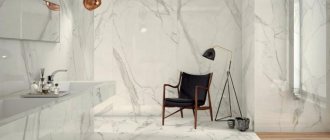
Wooden floor in the apartment
Wooden floor in the apartment
Despite the abundance of offers on the construction market and the mass of various options for finishing floors, many are still of the opinion that nothing can be better than a wooden floor. Especially in an apartment or private house. Many positive reviews about this finishing method can be heard from those who are seriously worried about their health. Indeed, we are surrounded by synthetics and artificially created materials, and we would like to at least feel somewhat safe at home, and it is doubly pleasant to relax in environmentally friendly rooms.
Advantages of a wooden floor
Also, a wooden floor is not only safe for humans in terms of health, but also practically a standard of quality. The wear rate of a board base is very high - on average, wooden floors can last for decades without repairs or replacement of floorboards, of course, provided they are installed correctly. They are distinguished by high strength and other physical characteristics. For example, a wooden floor retains heat well, making it very pleasant to walk on – you won’t feel like it’s cold in the apartment. Even covered with paint, it is pleasant to the touch and looks great.
Wooden floor in apartment design
On a note! Wooden floors can be varnished to preserve the color and texture. This option is chosen by those who prefer to decorate their apartment in eco-style.
However, wooden floors fit perfectly not only into eco-style. It can be installed to implement almost any design idea. Except that it may not suit a high-tech or other modern style. But even here there is a way out of the situation, if you really want to make wooden floors in your apartment - they can be painted in any color.
Another advantage of a wooden floor is the ability to lay it yourself and, if necessary, repair it. Of course, recommendations from experienced specialists will not hurt in this matter, but anyone can still figure out how to carry out the work if they have the right desire.
A wooden floor may not be the final covering option - it may well become the basis for laying any other material, with the exception of self-leveling floors, when the wooden base is completely dismantled. In general, linoleum, laminate, tiles, etc. can be laid on a wooden floor. Also, due to the installation features, various communications can be laid under a wooden floor; it can be additionally insulated or waterproofed.
DIY wooden floor
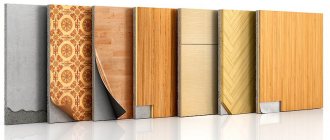
Which board is best to use for the floor: choice of material
The floorboard can be used in both residential and non-residential premises. The most popular and suitable material for finishing the floors of living rooms in a private house is oak wood. Less commonly used are ash, alder, and aspen. These rocks are characterized by high wear resistance, durability, look expensive and attractive (especially if the coating is treated with varnish rather than paint).
There is a wide variety of tree species from which floor boards are made, differing in durability and quality
For finishing the floor, it is better to choose tongue-and-groove boards that have good cohesion: a non-groove wooden board is susceptible to drying out, which can cause large gaps to form in the floor.
Hard wood species are distinguished by a fairly high price. A more affordable option would be boards and pine and larch. Pine is pleasant to the touch and has a beautiful milky tint. This material is quite soft, so it is best to choose it for finishing floors in bedrooms. Larch is suitable for finishing other rooms. It is resistant to mechanical stress and has high strength. It is highly undesirable to use poplar and linden boards for flooring.
Choosing wood for coating
Among all interior elements, the floor is most susceptible to various negative influences; it wears out faster than other parts of the finish. However, proper care and the right choice of material from which it will be made will allow you to keep it beautiful for a long time.
Solid board - larch
The main criteria when choosing floorboards are as follows:
- resistance to various types of mechanical stress;
- ability to resist moisture;
- the ability to resist the processes of rotting and destruction, resistance to colonization by various bacteria and parasites.
Various types of wood can be used to create floor boards, ranging from ordinary birch or pine to oak. These can be both coniferous and deciduous trees. A dendrological certificate will help you understand which wood boards are best to buy.
Table. Information about different tree species.
| Wood species | Characteristics from a construction point of view | Physical indicators |
| Larch | Most common in Russia. To harvest and create building materials from it, the Daurian variety is most often used, which grows in Siberia and the Far East, as well as the Siberian and European varieties. The color of the wood is pleasant, brownish-reddish, with clearly visible stripes of growth rings. It has a minimal number of knots, is durable, dense, and not prone to rotting. The main disadvantage of such wood is its tendency to crack when drying out and the difficulty of processing. | Density - 665 kg/m3, wear resistance 0.14-0.17 mm, resistance to rotting - 9.1, bending strength - 109 MPa. |
| Spruce | The trees most often harvested are Norway spruce or Siberian spruce. The wood is light yellow, delicate in color, up to white, with clearly visible rings. Durable, strong, resistant to rot, but its performance is slightly worse than that of pine. Difficult to process due to the large number of hard knots. | Density - 445 kg/m3, wear resistance 0.24 mm, rot resistance - 3.6, bending strength - 79 MPa. |
| Pine | The second most common coniferous crop in Russia. Most often, the ordinary variety is used for harvesting. The wood has a pleasant reddish-yellow hue, rich color, the texture is very beautiful due to the pronounced growth rings. It has good strength properties, is not prone to rotting, and is easy to process. | Density - 505 kg/m3, wear resistance 0.28-0.31 mm, resistance to rotting - 4.6, bending strength - 85 MPa. |
| Fir | Its characteristics resemble spruce, but does not have resin passages. The most durable types of fir are European and Caucasian. Others are used extremely rarely. | Density - 375 kg/m3, wear resistance 0.26-0.3 mm, resistance to rotting - 3.8, bending strength - 68 MPa. |
| Ash | The wood is similar in appearance to oak, bends well and does not crack. It looks very beautiful and expensive. | Density - 680 kg/m3, wear resistance 0.14-0.17 mm, rot resistance - 4.9, bending strength - 118 MPa. |
| Oak | The most famous type of noble wood. Color – brown, brown-yellow, with clearly visible textures. A durable, rot-resistant type of wood with excellent flexibility. It is not afraid of moisture, as it absorbs it quite slowly and releases it just as slowly. | Density - 690 kg/m3, rot resistance - 5.2, bending strength - 103 MPa. |
| Beech | The color is reddish or yellowish white, with distinct textures and an interesting mottled pattern. Durable, reliable, flexible option. | Density - 680 kg/m3, wear resistance 0.14-0.17 mm, rot resistance - 3.3, bending strength - 104 MPa. |
On a note! Interestingly, cedar also belongs to the genus Pine, but it is not used for making floor coverings due to its rather soft wood.
Larch deck board
Undoubtedly, the best option in terms of strength and beauty is oak, but it is very expensive and not everyone can afford to buy such a board. It may well be replaced by ash, but it is unfairly rarely used. Beech is prone to deformation due to its tendency to absorb moisture - it reacts sharply to changes in its indicator in the room.
Oak solid board
Only larch can boast of an optimal price-quality ratio, which can easily compete with oak in almost all respects, with the exception of strength.
On a note! The cycle track in Moscow's Krylatskoye, built before the 1980 Olympics, was completely covered with larch. At one time, this cycle track was considered the fastest in the world. Also, the buildings of Venice stand on larch stilts. And, as you know, there is enough water in it. Larch in water does not begin to rot - on the contrary, it “petrifies” and its strength characteristics increase.
Pine is also often used to create floors, due to its availability - this species grows almost everywhere, and therefore is not expensive at all. It is also easy to use, as it can be processed without much effort.
Edged pine boards
How to choose the right board size
The generally accepted and erroneous opinion of beginners is that to create a floor, the ideal option is to use the widest board. But this is far from true - on the contrary, using this type of material, you can encounter a lot of problems. It is the wide boards that most quickly begin to deform and bend, reacting to any changes in the microclimate in the room. In the future, large gaps may appear between the floorboards. Also, the boards are quite difficult to work with due to their heavy weight. When making wood flooring in your home, it is highly recommended to use medium-sized boards.
In the photo - pine boards
As for the length of the board, everything is limited only by the possibilities of transportation and ease of working with the material. Floorboards of any length are suitable for flooring. Moreover, if necessary, long boards can be easily shortened by simply sawing them.
Technical board: main advantages
The two-layer technical board for floor finishing is characterized by high wear resistance and durability. Such performance indicators are achieved due to the fact that the proverb consists of two layers: a top wood layer and a bottom layer, represented by plywood. The wood layer is most often made from durable hardwood (oak, ash, walnut).
In addition, the main advantages of the technical board include:
- This coating does not require maintaining special temperature conditions and a certain level of humidity.
- Laminated, two-layer timber is less susceptible to deformation than completely natural wood.
- A technical board floor can be repeatedly sanded, polished and varnished.
- Laying technical boards does not require the organization of plywood flooring or underlay.
- Higher level of sound insulation than when using a regular board.
Related article: Preparing walls for gluing non-woven wallpaper
Technical boards are great for warehouses
Caring for engineered (technical) boards is quite simple: most models have a smooth coating without pores (which easily get clogged with dirt and dust). The disadvantages of the coating include its high cost, compared to an ordinary wooden board. But repairs to such a floor will not be needed soon.
"Warm" and wooden floor
Wooden floors in an apartment may well be combined with a heating system. The most convenient way is to install the system itself on joists and lay boards on top. Heating can be modular or rack-mounted. For example, in the first case, a special structure is made from chipboard with grooves into which the heating pipes are laid.
Also, a wooden floor can serve as the basis for creating a heating system. To do this, pipes or heating modules are installed on its surface, and then any other type of finishing material is laid on top.
Heated plank floors
We make the wooden floor in the apartment ourselves
Installation of a wooden floor can be done in different ways depending on the desired final result, the type of subfloor and other factors. Let's take a look at the three possible types of wood flooring installation.
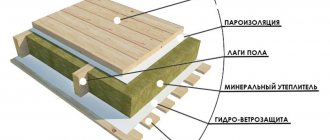
Floor installation on joists
Wooden floor with joists
This method is often used if there is at least some kind of rough foundation - for example, a concrete floor. In this case, the wood covering will be laid on so-called logs - long bars fixed to the base and serving as a kind of support for the floor. The logs can be installed on small concrete columns or bricks.
This type of structure can withstand significant loads, but it is important to remember that the step between individual bars should be small, otherwise the floor will sag. The main thing is that the logs themselves are quite strong and do not bend when walking on the floor. They are also installed strictly horizontally, and the board is laid perpendicular to them.
Wooden floor construction when laid on joists
Wooden floor on beams
Sometimes a wooden floor can be mounted not on concrete floors and joists, but on wooden floor beams - this option also has a place, since it is simple and at the same time very reliable due to the wide cross-section of the beams. The system can also be supplemented with lags.
The beams themselves, up to 4-12 m long, are installed directly on the foundation and secured. Since they have a very large weight, it is recommended to involve outsiders to help in the construction. Logs are mounted on top of the beams, and then floor boards are laid.
Wooden floors on floor beams
Wooden floor on concrete
This is the “apartment” option, since it is the simplest and most convenient to implement in an apartment. In this case, the wooden floor is simply laid on a concrete base - the main thing is that it is fairly level. Otherwise, it may need to be leveled using other materials. Logs can also be used here.
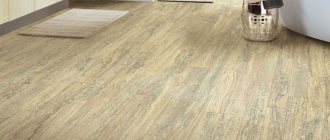
Plank floor
Wooden floor boards: tips for selection and installation
When choosing boards for finishing the floor, you should take into account many other factors, which include the operating conditions of the floor and the type of finish.
Related article: How to change a chandelier yourself
So, in order for the floor to last a long time, look stylish and attractive, you must follow these recommendations:
- The finishing should be done with a tongue and groove board: due to the treated side surfaces, it is easier to install such a board.
- For finishing indoors, choose Eurofloor or dry boards, the humidity of which is no more than 10%.
- For laying subfloors, grade B wood is good, with a moisture content of no more than 15%.
- Before laying the boards, you should adapt the lumber to the microclimate (keep it in the room for two weeks). Damp boards, after laying, can change their dimensions, which will lead to the formation of cracks and crevices in the coating.
- Before purchasing lumber, you need to calculate the quantity and boards for a specific size (you can do this yourself using an online calculator).
- It is recommended to lay the boards along the line of light: this way the longitudinal ties will not be noticeable.
- To avoid shadows between the boards (which will visually reduce the space and disrupt the geometry of the floor), installation should begin from sources of natural light or diagonally (from one corner to another).
You need to choose floorboards depending on the type of room and its purpose.
In addition, the boards for installation must be dry, free from knots, cracks and other defects that can affect not only the appearance of the floor, but also its performance characteristics.
Basic recommendations for laying wooden floors in an apartment
Installation of a wooden floor in an apartment must be carried out according to certain rules. Only this will ensure high quality work. Recommendations for laying wooden floors:
- work is usually carried out closer to spring, when the winter cold begins to recede;
- there should not be high humidity in the room;
- the base must be well prepared if we are talking about laying the floor on concrete;
- it is necessary to install waterproofing, especially if the apartment is on the ground floor;
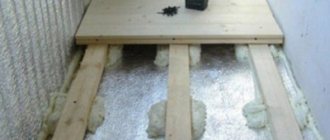
- if insulation is installed, it should lie without gaps;
- the boards are laid along the long wall of the room, perpendicular to the wall with the window.
Terrace board
Floorboard thickness
The quality and durability of the coating depends on the thickness of the board. Thus, thick boards will be less susceptible to moisture and temperature, will last longer without losing their attractive appearance and characteristics. Don’t forget about the ratio of the thickness to the width of the board: too wide, too thin a board will be subject to deformation.
The thickness of the floorboard determines its service life and strength.
The choice of wood for finishing the floor thickness is determined by the loads that the coating will experience.
What thickness should I choose for finishing the floor? Today, lumber sellers offer boards with a thickness of 2 to 7 cm. For bedrooms, it is better to use a board with a thickness of 3.5-4 cm. For rooms with high traffic (for example, corridors, hallways, living rooms), lumber with a greater thickness is needed .
The minimum thickness of floorboards in residential premises should not be less than 2.2 cm. Permissible deviations from the nominal dimensions of elements are determined by state standard 8242-88.
When choosing board thickness, you should also take into account the distance between the base joists. If the distance between the elements is 0.6 m, then for a high-quality coating a thickness of about 3-3.5 cm will be sufficient. If the distance between the logs exceeds 0.6 m, then it is recommended to use boards with a width of 4-4.5 cm.
When choosing boards by thickness, you should take into account that the larger this indicator, the higher the cost of lumber.
Therefore, the choice of boards based on thickness should be appropriate. You should not buy thick materials for finishing dressing rooms, storerooms, etc. The thickness of the boards will not have any effect on the service life of the wooden floor in these rooms, and from the financial side, such finishing will hit your pocket.
Related article: What is cabinet furniture, its types and photos
Laying a wooden floor
Before you begin installing a wooden floor, you should prepare all the tools and materials that you may need. These include:
- board;
- insulation;
- timber 50x50 mm;
- waterproofing roll material;
- jigsaw or saw;
- perforator;
- screwdriver;
- self-tapping screws;
- building level.
Floor boards
The instructions for installing a wooden floor look something like this.
Step 1. The logs are installed on the concrete floor that has been prepared and cleared of debris. The logs are set at the same level at a distance of about 40-50 cm from each other. Installation starts from the highest point of the floor.
Logs are installed
Logs are set according to level
Step 2. You can secure the logs to the concrete base using metal corners and dowels. To do this, holes are drilled in the floor and joists according to marks made with a pencil through the holes in the corners.
How the joists are attached
Step 3. The joists and the entire base are completely covered with waterproofing material. For this, thick polyethylene film can be used.
Laying waterproofing
Step 4. Dense insulation is laid between the joists - for example, mineral wool.
Laying insulation between joists
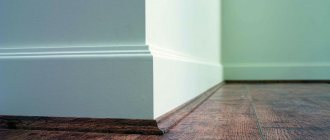
Step 5. After this, the floor boards can be laid. The whole process begins from the wall farthest from the exit of the room. The board is not laid close to the wall, but with a small compensation gap taken into account so that the floors do not become deformed in the future. The gap will later be closed with a plinth.
Laying boards
Step 6. The boards are screwed to the joists with self-tapping screws. In this case, the fasteners are screwed in at an angle of 45 degrees. Approximately 2 screws are required per mounting point.
The boards are screwed to the joists with self-tapping screws
Step 7. The entire floor is covered in this way. If a tongue and groove board is used, it is important to ensure that the tenon on the next board fits into the groove of the previous one. The boards are knocked together with a hammer if necessary. The main thing is not to damage the end of the board.
Finished wood floor
Video - Laying boards on the floor
How to protect a wooden floor
Unfortunately, if the finished wooden floor is not treated with anything, it will quickly lose its attractive appearance. Therefore, it must be coated with varnish or paint. Before applying these compounds, the floor is cleaned of dust and debris. Then you can apply varnish and dry it well, sand the finished surface and again apply a couple of layers of glossy varnish.
Attention! You can move on such a floor only a day after the work is carried out, and interior items are placed only after 7-10 days.
Wooden floor is varnished
In order for the wooden floor to please the owner of the apartment, it is important to pay attention to all the work carried out and the choice of material. The success of the event will depend on this. A properly laid and protected floor will last for many years and will not let you down.