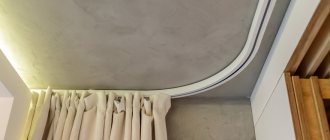
A niche for curtains in a suspended ceiling is an excellent option to beautifully decorate the window space and an opportunity to hide the not very aesthetic cornice mounting systems from view. You can create such a recess when you plan to update the ceiling using plasterboard or a suspended ceiling. There are several ways to install a hidden curtain niche.
Hidden curtain rod in the living room
Pros and cons of a stretch ceiling with a niche for curtains
Before you start installing a suspended ceiling and a niche under the cornice, you should weigh the pros and cons. Like any other structure, a suspended ceiling with a niche for curtains has a number of its own features that you need to know about.
Obvious advantages of the design:
- a hidden cornice in a suspended ceiling can be mounted in any room - in the kitchen, bedroom or living room;
- a hidden recess covers less aesthetic parts of curtains and curtains (fastening brackets, rings, clips, hooks, electric drive device, drapery tape);
- Any type of tension fabric (film or fabric), various types of curtain profiles and fasteners can be used as a material for the structure;
- ceiling or wall cornices can be used for the structure;
- with the help of a stretch ceiling with a recess for curtains, the room becomes much lighter, the space visually increases in height, especially if a canvas with a glossy or mirror surface is used;
- if the design uses a diode strip as lighting, then an original and unusual effect of a “floating” ceiling is created in the room;
- when changing the overall design of the room, you do not need to re-select the cornice; after repairs, you can simply replace the curtain fabric.
Design options for a recess under a hidden cornice A
stretch ceiling with a recess under a cornice has virtually no disadvantages, except for the fact that the installation of the upper level and the arrangement of the window space for curtains must be carried out simultaneously.
After installation and final finishing of the ceiling with PVC film or plasterboard, it will be almost impossible to make a recess under the cornice without dismantling the entire structure.
Features of suspended ceilings with a hidden niche under the cornice
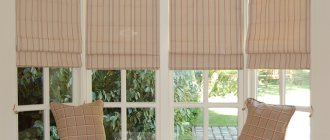
A niche for curtains on suspended ceilings has distinctive features in terms of the method of location, type of installation (structure, material), length, height (depth) and level of design complexity. This type of hanging is suitable for vertical curtains (roller, Roman), Japanese panels, as well as for ceiling or wall mounting.
Main features of installing a ceiling recess for curtains:
- The entire wall. The niche can match the length of the wall. In this case, the window visually looks wider and higher. In addition, such a structure is much easier to install.
- For a niche along the length of the window opening, indentations are made on each side (minimum 500 mm) so that there is additional space for the curtains to be pulled back, and when closed, the sun's rays do not enter the room.
- The height of the recess under the cornice. For an aesthetically pleasing window, the hooks of the ceiling cornice rail must be completely hidden from view. For this purpose, the height (depth) of the niche is made no less than the length of the cornice hangers and the width of the curtain drapery tape. The depth of the niche should be no more than 35-40 cm, otherwise it complicates the task.
Important! When calculating the width of the recess under the cornice, the removal of the window sill and the heating radiator must be taken into account - for the correct vertical position of the falling curtain.
Dimensions of a niche for curtains in a suspended ceiling
When creating a design plan for the recess under the cornice, it is important to take correct measurements and take into account all the features of the window space. The curtain should move smoothly in the niche without touching the window sill and the heating radiator, and for this, at the very beginning of installation, you must take into account the amount of their distance from the wall.
Calculation of the size of the structure by width:
- First you need to measure the amount of offset of the window sill and the heating radiator (the “p” value according to the diagram below). As a rule, the offset is no more than 15.0 cm.
- Then 10.0-14.0 cm should be added to this value as a correction value for assembling the curtains (value “a” + “b”).
- Finally, measure the distance between the cornice runners (the “k” value). If the curtain rod is three-row, then you need to take the total amount of values between the guides.
- The desired value of the niche width (“W”) is obtained from the addition of all parameters and is ideal for specific conditions.
Scheme for calculating the optimal width of the recess for the cornice
To calculate the height (depth) of a niche, it is enough to add up three main components - the height of the cornice itself, the width of the drapery tape on the curtain and the amount of correction of the viewing angle. It looks like this:
(1.5-2.0 cm)+(3.0-12.0 cm)+(8.0-10.0 cm)=(12.5-24.0) cm.
The most optimal niche is considered to be 20.0 cm deep.
Depth of niche for hidden cornice
The length of the recess under the cornice “from wall to wall” corresponds to the length of the wall itself and does not require additional calculations. When determining the length of a niche along a window opening, take into account the following:
- Window opening width.
- The length (and offset) of the window sill, if it protrudes beyond the window opening. In this case, take the length of the window sill from one edge to the other.
- The correction factor for curtain assembly is from 10.0 to 50.0 cm (the value depends on the type of cornice and the type of curtain).
Layout of the recess for the curtain along the length of the window opening.
The parameters for the width, depth and length of the niche depend on the type of cornice, the type of curtains and the characteristics of the specific installation location of the structure. For example, for a wall-mounted cornice, the niche should be made wider and deeper, but for a string-type ceiling cornice, on the contrary, the width and height of the niche should be minimal.
Installation of hidden cornice
- First, measurements are taken - the length of the cornice, the projection of the window sill, radiators, pipes, and other structures, and the width and length of the future niche are calculated.
- According to the calculated dimensions, a line is drawn on the ceiling parallel to the wall - this is the boundary between the niche and the rest of the ceiling of the room.
- The structure and profiles are installed based on the chosen type of niche formation.
- If the option with an open niche is chosen, then all its surfaces are puttied and painted.
- The ceiling in the room is stretched.
- Cornices for attaching curtains are fixed into the niche. If the length of the niche is longer than the standard profile length of 250 cm, neat joints are made to allow curtain fasteners to slide freely into them. As a rule, curtain rods are fixed in the center of the width of the niche, but there may be other solutions, depending on the type of curtains and curtain rods.
The advantage of this type of design is that installation and dismantling in case of breakdown is not difficult.
Preparing to create a niche for curtains in a suspended ceiling
Preparation for installation of the recess under the cornice can be divided into several stages, each of which is important in its own way and requires attention and time:
- The choice of design for finishing the upper limit, the possibility of installing a recess under the cornice and ways to implement the idea. From the very beginning, you should decide whether this design needs a niche and, if so, how it will fit in with the overall style of the room design. One of the most important points is the choice of the method of installing the recess for the curtains and the material for the main area of the ceiling - the type of tension fabric, gypsum board or a combination of them.
- Taking measurements on site, determining the amount of materials needed. In order to make the correct calculation of the structure and recess, it is necessary to take into account all the protruding elements of the room and near the window space - the removal of the heating radiator, the window sill (and its length), the arrangement of heating water pipes. Next, you should make markings and preliminary calculations of the amount of material required.
- Preparation of all materials and tools for work. If you plan to entrust the installation of the ceiling to a team, then the specialists themselves will provide the material and the necessary tools. If the finishing is done independently, then before starting work you should prepare the entire set of consumables and fastening materials, and working tools.
To install a stretch ceiling with a recess under the cornice you will need:
| Wooden beam |
| Aluminum corner |
| Profile |
| Wall profile |
| Platform under the cornice |
| Aluminum suspension |
| PVC fabric |
Required tool:
- Screwdriver.
- Hammer.
- Building level.
- Self-tapping screws, dowel-nails.
- Scissors and hacksaw for metal.
- Painting knife.
- The spatula is wide and narrow.
- Construction tape.
Next, the installation of the stretch ceiling itself is carried out. But before that, its surface should be prepared - clean the place where the profile will be attached and, if necessary, putty it.
Marking and installation of the niche structure
How to make a hidden cornice in a suspended ceiling
A recess under a hidden cornice in a suspended ceiling can be made using a special profile in several ways. The choice of technical solution to the problem depends on the design project of the premises, finishing materials and components, as well as the cost of such an update. Next, we will present popular methods for installing a recess under a cornice, which you can do yourself.
How to make a suspended ceiling with a hidden cornice using a plasterboard box
A gypsum plasterboard box can be wide (from 35.0 to 60.0 cm) or narrow (at least 8.0 cm) and have a height from 10.0 to 20.0 cm, depending on the height of the main level. There are ways to hang a gypsum board ceiling without a protruding box - with a solid sheet. This option for installing a niche is simpler and more cost-effective, since it does not require additional time and material for setting up the end vertical walls.
Installation of a stretch ceiling with a recess under the cornice with gypsum plasterboard:
- Mark the width of the recess and its height on the ceiling and walls.
- Draw control lines through the designated points, which will be the outer contours of the future niche.
- Secure the guide profiles along the marked lines using dowel nails.
- Then, using the PP aluminum profile and guides, assemble the edge structure. To do this, attach several vertical short jumpers to the main guides, the length of which should correspond to the depth of the niche with a correction factor for the thickness of the drywall.
- Fix the lower edge level to the side guides and the ends of the vertical jumpers strictly horizontally. Both bottom edge lines should also be at the same level.
- After the metal structure is made, the ceiling and the recess under the cornice can be covered with plasterboard. Cut the sheet to the dimensions of the profile structure, and then secure it piece by piece with special self-tapping screws with fine pitch.
- After covering the structure with plasterboard, all seams between the joints are glued with Serpyanka reinforcing tape, and then treated with gypsum board putty.
- Next, cover the plasterboard surface with a primer, and after it dries, the ceiling is ready for finishing and painting.
Important! Before you start working with gypsum boards, you need to conduct electrical wiring to all lamps. In the wide edge of the box, spotlights are most often installed. If LED lighting is planned in a niche, then at this stage it is necessary to provide a power supply to it.
Option for installing a niche for plasterboard curtains
How to make a hidden cornice under a suspended ceiling using a timber embedment
This option for installing a niche has its advantages - it is simple and relatively cheap, but it also has its disadvantages. The fact is that wooden beams, as a natural organic material, are afraid of high humidity and too dry microclimate of the room. As a result, the wooden material can change its geometry, and the design of the ceiling recess can “lead.” Therefore, for installation, timber with a certain humidity and mandatory protective impregnation should be used.
Features of installation using wooden beams:
- The tension fabric should be located 50.0-70.0 cm from the ceiling slab, therefore, to install a recess for curtains, you should take a beam of smaller dimensions (the thickness of the wall molding is taken into account).
- The wooden beam is attached to a cleaned ceiling without critical differences in slabs, chips, fresh signs of leakage and mold. For this purpose, at the upper level, where the beam is to be attached, you need to prepare a dry and level area.
- The distance of fastening the timber from the window wall is calculated from the width of the eaves rail, plus 40-70 mm. The recess should be sufficient so that the curtains move freely and do not cling to the radiator or window sill.
- The beam must be fixed firmly and tightly to the base ceiling, since it is the basis for installing the profile or the cornice itself. To install timber on a concrete ceiling, use powerful dowel-nails with a distance of 20.0-30.0 cm between them. This will allow the structure to withstand the stress from the weight of the profile and the tensioned web.
Installation of a niche with an embedded wooden beam with a ceiling cornice-tire
Installation of a niche with wooden beams and wall cornice
Scheme for installing a niche using a wooden beam and a ceiling rail with a baguette
Comment! If a recess for curtains is required along the length of the window opening, then the embedment from a wooden beam is made in a U-shape according to a similar pattern.
How to make a cornice in a niche under a suspended ceiling using a Nisha Plus baguette
The “Niche Plus” profile has a special design - 2 grooves for the tension web harpoon, as well as a bumper located at an angle to the central shelf of the device. Steel corners are used to install the baguette.
Features of installing a recess under the cornice using the Nisha Plus baguette:
- To begin with, a wall profile under the suspended ceiling is mounted in the very top corner of the window wall.
- Then the “Niche Plus” profile is fixed to the steel corners on the window side. This step is very important, since when fastening it is necessary to calculate the height of the profile so that the canvas between the window and the cornice hangs strictly horizontally when tensioned.
- Next, the “Niche Plus” profile is secured from the side of the room using reinforced corners. It is attached to the concrete floor with dowel-nails, and on the profile the fasteners are made with self-tapping screws with fine pitch. The corners are placed against the wall (no more than 8.0 cm) and along the entire length of the profile (at intervals of no more than 70.0 cm).
- After the baguette is secured on both sides along the entire perimeter of the room, wall profiles are installed. The height reference is the position of the end of the bump stop.
Stretch ceiling with a niche mounted using the “Niche plus” profile
After installing the entire metal structure from the profiles, the fabric of the main part of the room and a narrow strip in the recess near the window are tensioned. The final stage of the work is the installation of the curtains in the niche of the stretch ceiling.
How to make a niche in a suspended ceiling using curtain profile PK-5
The unique PK-5 profile was created specifically for constructing a recess for a hidden cornice. This is a new model of component parts, which provides for the installation of a conventional ceiling cornice-rail and a fastening profile for PVC film.
Installation diagram for a niche with PK-5 profile
Compared to standard profiles for making niches, the new PC-5 has a number of undoubted advantages:
- The PK-5 profile is made of high-strength non-toxic aluminum, painted white. Thanks to this, this design can withstand even the heaviest curtains, tulle curtains and lambrequins. When suspended, the profile remains practically invisible, and when the curtains are open it has a very aesthetic and neat appearance.
- The innovative profile has several fastening systems - a harpoon for holding the stretch ceiling sheet, the cornice itself with guide runners and a special shelf for gluing the LED strip.
- Using the PK-5 profile, original visual effects are created - “floating” curtains (the illusion of a curtain hanging in the air), as well as the optical sensation of a raised ceiling (relevant for low floor slabs).
Niche mounted using PK-5 profile
Installation of a stretch ceiling with a niche using the PK-5 profile:
- At the very beginning of the work, you should mark the level of the stretch ceiling along the entire perimeter of the room, taking into account the width of the profile itself, which is 5.5 cm. For this purpose, it is best to use a laser construction level.
- Next, the PK-5 profile should be fixed to the concrete floor at the required distance from the window and height. Then file (angles at 45 degrees), adjust and secure the wall profiles, precisely joining them with the eaves bumper. It is important that the wall profiles and the groove for fastening the harpoon in the eaves are at the same level.
- Then install and secure the main ceiling canvas. To do this, first fix the film in all corners, and then carefully wrap it around the PK-5 profile bumper and secure it with a harpoon.
- Distribute the rest of the film evenly and fix it in the wall profile in the spaces between the corners. Fix an additional narrow panel between the profile and the window wall.
Important! Before finally installing the profile, you need to insert curtain hooks into the runners of the curtain rod profile and place plastic plugs on both sides.
Assembling the frame of a narrow box
With this option for arranging a niche for curtains, a single-plane frame is constructed. Drywall is attached to both sides of the profile, forming a narrow box:
- Guides are installed on the walls and ceiling.
- A thread is pulled, showing the lower border of the box.
- The bottom guide is screwed on.
- Using the thread as a guide, install vertical jumpers.
USEFUL INFORMATION: Installing a gypsum board ceiling: which plasterboard is best to use for the ceiling
How to make a hidden cornice in a stretch ceiling with lighting
The modern interior of the room involves a wide variety of lighting fixtures and zonal lighting. An excellent interior solution was the eaves lighting of the stretch ceiling, as well as zone lighting of curtains inside the ceiling niches using LED strips. Of course, such an original design technique will not replace the full lighting of the room, but it will certainly help create a unique decorative effect. In addition, the backlight has a number of advantages:
- used as additional and decorative lighting with a hidden light source;
- creates diffused, muted light in any color spectrum (can be used for zoning space or as a night light);
- creates an original “floating” ceiling effect.
Hidden cornice with LED lighting
The lighting system can be made on a suspended or suspended ceiling made of gypsum plasterboard. A prerequisite for this is the presence of a second or third level and a ceiling recess under the cornice.
The RGB tape can be mounted directly to the concrete floor, the side of the niche box or to the mounting profile. The backlight system consists of several elements - a board with LEDs, a power supply, extension network wires and a color changing controller. Most brands of LED strips have an adhesive layer to facilitate installation, but if this is not available, regular double-sided tape is used.
The easiest way to make lighting in a suspended ceiling is to use the PK-5 profile, which has a special shelf for gluing LED strips. Installation should be carried out after completing the installation of the recess under the cornice and before hanging the curtains.
LED strip located on the main ceiling
LED strip located on the profile at an angle
LED strip located on the side of the profile
What is a hidden cornice
A modern hidden cornice is a structure for attaching curtains and tulle above a window or any openings or niches, which is hidden from view. In this case, we are talking about cornices hidden in suspended ceilings.
In addition to the traditional mounting of curtain rods, another original option is available - a hidden curtain.
This is done using a created niche in which a regular cornice for curtains and tulle will be hidden.
Today there are several types of curtain rods known by material that are suitable for such an installation:
- Wooden.
- Steel, for very heavy curtains.
- Plastic.
- Aluminum.
- Combined, often plastic + aluminum.
Each of the materials has its own pros and cons, and the choice must be made together with the master, based on the characteristics of the curtains and the design of the ceilings.
A pre-planned visual solution is a strict necessity, since it determines how the installation work will proceed.
Note! Curtain rods can also be electrically driven; such designs are commercially available.
In modern interiors, niches can also be wall-mounted. Such design decisions are made not to install cornices and curtains, but to design a secret light source around the perimeter of the room, including along the cornices.
Photo of a niche under the cornice in a suspended ceiling
Photo of hidden ceiling cornices and curtains in a niche of suspended ceilings.
Combined two-level ceiling with recesses for cornices the length of the window
Niche for a hidden cornice on a bay window
Two-level ceiling with recess for cornice and spotlights
Bedroom with a wall-to-wall niche
Niche for a hidden cornice along the entire length of the wall and LED strip
Combined suspended ceiling with a recess along the entire length of the wall
Niche with polyurethane baguette and curtain lighting
Niche for curtains on a corner bay window
Recess for a hidden cornice on the entire wall with LED lighting
A niche the length of a window opening on a two-level stretch ceiling
Niche with eaves lighting
Finishing a niche with polyurethane cornice in the living room
Recess under the cornice along the entire length of the wall and behind the cornice lighting
Niche for a balcony block in the bedroom
Recess for hidden cornice with LED strip
Frameless ceiling LumFer from profile BP01
The Lumfer frameless ceiling is a suspended ceiling fastening system using the Lumfer BP01 profile, painted black. Along the perimeter of the room, between the profile and the wall, a special self-expanding black foam is mounted, which hides all the irregularities between the wall and the profile. Thanks to this, a gap of 2.5-3 cm is formed around the perimeter of the ceiling along the wall. Foam rubber is installed to prevent insects from entering the under-ceiling space. The design is attached to the ceiling and provides the possibility of using lighting around the perimeter of the ceiling.
The backlight is installed in the profile groove and covered with a special translucent diffuser.
The profile can be located along the entire perimeter of the room or along its individual walls. When installing a frameless ceiling, the distance from the base ceiling to the suspended ceiling is 7.5 cm. Internal corners in the room must be more than 80 degrees. Along the walls where there are heating pipes, a frameless ceiling is not installed. Installation along mirror surfaces is not advisable, as the inside of the profile will be visible. The Lumfer frameless ceiling does not fit into the structure of a two-level ceiling.