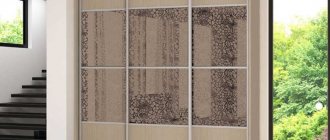
How to properly mark, drill holes and install furniture handles? — 5 photos
This article is an attempt to provide detailed instructions for those who decide to independently drill holes for handles and then install them on a furniture façade.
Chief technologist of furniture production Timur Denisov will tell you step by step how to drill and install handles on a swing door and on the front of a drawer yourself.
Marking, drilling and installing furniture handles on a swing facade
1 Marking the facade for furniture handles
Required tools:
- metal ruler;
- construction tape;
- square;
- a simple soft pencil or marker.
Marking stages:
- place the façade on a flat surface;
- mark from the edge 50 mm parallel to the future location of the handle;
- using a square we draw a straight line;
- mark again 50 mm from the top of the facade;
- draw a straight line perpendicular to the previous one;
- From the resulting point (at which both lines intersect) we measure a distance equal to the center-to-center size of the furniture handle.
Important! Before marking the place for drilling holes on the facade, measure the center distance on the handle itself. Most common distance: 64; 96; 128 mm.
2 Drilling holes
Where the lines intersect, carefully drill through holes for handles.
Please note that the drill must be sharp and the drilling itself must be done slowly so as not to tear out particles of the laminate.
This is how it should look - the markings and drilled holes are clearly visible in the photo.
3 Installing a furniture handle on a swing facade
Even a novice amateur can handle this. Insert the screws into the prepared holes, place a furniture handle on them and screw them on.
If after these steps the handle dangles, it means the screw is longer than necessary. In this case, it is advisable to replace the screw or place a special seal under its head.
Marking, drilling and installing the handle on the front of the drawer
The principle of marking and drilling remains the same as in the considered instructions for swing facades.
The main nuance is the difference in installing (screwing) the furniture handle to the retractable facade.
The design of a drawer assumes the presence of two walls through which the screw of the furniture handle must pass.
When deciding to install handles on your furniture yourself, make sure you have long screws in advance. Ideally, their size should be equal to two thicknesses of chipboard plus 4...5 mm.
That's all!
As you can see, it’s not so scary and absolutely not difficult to mark, drill and screw furniture handles to the facades. The main thing is to be attentive and strictly follow the instructions.
Always yours, Timur Denisov
See also: Custom kitchens
FURNITURE CATALOG: All cabinet furniture in Moscow and the Moscow region > Select category
If you liked this article, please like it! The author will be pleased :-)
mebeljurnal.ru
Setting dimensions and drilling the façade
Let's start by installing handles on the doors of the kitchen unit.
- The door is placed on a flat surface, let it be a table.
- In the corner where it is necessary to install the handle itself, a distance of 5 cm is set aside from one and the second edges.
- Two mutually perpendicular lines are drawn through the points. Their intersection point is the place of the first fastener. In order for the lines to turn out to be mutually perpendicular, it is necessary to use a square to draw them, applying it to the edges of the door.
- Now you need to accurately measure the distance between the mounting holes on the handle itself.
- This value is transferred to the door from the point of intersection of the two lines. If the fitting element will be installed vertically, then the displacement must be carried out downwards, if horizontally, then to the side. The second location for fastening the fittings is indicated. In this way, the exact location of the handles on the facades is determined.
- Now we need to drill. This operation is performed from the front side of the facade. The thing is that when the drill comes out of the material, it may delaminate and chips may appear along the edges. And although they will be closed with the fittings themselves, there is always the possibility of a large chip or crack appearing. Of course, this all depends on the quality of the material used and the sharpness of the drill used. Therefore, when drilling, be careful and carry out this operation carefully.
- So, two mounting holes are drilled, now you need to insert two mounting screws from the back side. Install the handle on the front side and attach it to the facade, screwing in the screws with a screwdriver. If it is not pressed tightly against the door and is loose, then you will have to remove it, put washers under the heads of the screws, and put the fastening back on.
Before screwing on the handles, it is necessary to clean all surfaces from dust and particles of the material from which the facades were made. So, the handles are installed, you can hang the facades on the hinges.
Handles for kitchen facades (40 photos)
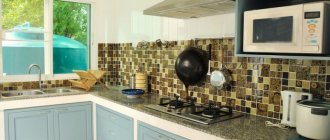
Decorative handles for furniture perform both aesthetic and practical functions. The design of these elements emphasizes the style and overall appearance of the kitchen set and gives the interior integrity and completeness. In addition, handles for kitchen facades should be easy to use, durable and securely fastened to the surface, because the doors of most kitchen cabinets and cabinets are used intensively.
Oblong silver handles look perfect on kitchen furniture
Handles on kitchen facades of ready-made units are installed or supplied by the manufacturer, but when making a kitchen according to an individual drawing, you will have to choose the fittings yourself. The appearance of this element can completely transform the design of the kitchen, so replacing handles is often done in the process of updating a boring interior.
Design and shape of handles for integrated and conventional kitchen fronts
Manufacturers of furniture fittings offer a huge range of products of this type. There are thousands of products on the market that differ in design, material of manufacture, shape and method of fastening. To understand all the variety and choose beautiful, durable and functional handles for your kitchen set, you should first familiarize yourself with the main varieties and features of this type of furniture.
Kitchen handles are made from the following materials:
- Alloys of various metals. An alloy of zinc and aluminum is often used, which allows the product to be given the most intricate shape while maintaining high strength. Bronze, copper, brass and other materials are used to make expensive products. The surface coating can be matte, shiny, gold or silver, or patinated. Plastic. Inexpensive material that does not have high strength and durability characteristics.
- Wooden handles for furniture. A natural, visually pleasing material that has all the necessary performance characteristics and harmonizes with wooden facades.
- Ceramic handles for furniture. They look original, but products made from quality materials are relatively expensive.
- Glass. Edges that refract light can give the kitchen an interesting look.
- A combination of different materials (metal with wood, ceramic or plastic inserts, wood with glass and other options).
Galvanic coating, used by serious manufacturers, significantly extends the service life of metal handles and protects the surface from scratches and abrasions. When purchasing, you should ask the seller if such processing is available.
Copper handles with patterns are well suited for walnut furniture
Depending on the shape, furniture handles are divided into the following types:
- In the shape of a ring. They are made of metal, in harmony with wooden facades.
- Drop-shaped. A classic, inexpensive option, often used with plastic facades. From a practicality point of view, it is not the most convenient option, since the streamlined “drop” easily slips out of wet fingers.
- Sinks. The shape follows the downward-facing shell of the shell.
- Buttons. Compact products are made from all available materials, which allows you to choose the right option for any facade.
- Staples. The most practical and common option, providing a comfortable grip. Produced mainly from metal alloys.
- Railing handles for the kitchen are a smooth or matte tube of various sections, mounted on two supports. The distance between supports ranges from 96 to 800 mm. Ideal for interiors designed in modern or high-tech style.
You can ensure convenient and comfortable opening of doors not only with the help of furniture handles. The popular Push-to-Open system allows you to open or close the door with a light press; in other models, milling is used to create grooves - such recesses are not inferior in functionality to handles, and the facade remains smooth, without protruding elements.
Rules for selecting profile options, McMart, invisible built-in models
When choosing handles for kitchen facades, you should pay attention to the following points:
- Material of manufacture. Kitchen fittings must have increased strength, resistance to abrasion and temperature changes, moisture resistance and durability. Such characteristics are fully inherent in products made of metal and wood.
- Design. Kitchen handles should be in harmony not only with the furniture set, but also with other furnishings.
- Mounting method. Kitchen furniture handles, which have one attachment point, can turn and become loose during use, gradually widening the mounting hole. Fastening at two points is more practical; in this case, the handles for kitchen cabinets are securely fixed in one position.
- Ease of use. The shape should be easy to grip both from above and below (or from the right and left for vertically positioned products) and not slip out of wet or greasy fingers. The surface should be easy to clean, since in the kitchen you often have to open doors with dirty hands.
Classic silver handles look perfect with the lilac tone of the kitchen
Self-installation: does size matter for horizontal and vertical installation?
To install kitchen handles on your own, you will need a set of tools that every skilled owner has: a drill with a drill of the required diameter, a screwdriver, a tape measure and a pencil. Installation is performed as follows:
- The placement height is determined and markings are made. The choice of height should be approached from the point of view of convenience for all family members and taking into account the height of each person living. Opening the door of a hanging cabinet should not require the use of a stand, and the door of a cabinet should not require squatting or bending too low. If the door has a panel installed, markings for the holes are made on the side frame.
- Having determined the optimal height, a template is made from cardboard so as not to make the same measurements for each individual door. It is worth paying attention to the symmetrical arrangement of products on drawers.
- Installation is carried out on unattached doors placed on a flat surface. Two wooden blocks of equal height are placed under the façade.
- Holes are drilled according to the markings.
- An overhead washer is installed on the reverse side and a mounting bolt is screwed in.
WATCH THE VIDEO
Choose only high-quality pens!
obzorkuhni.ru
Marking for loop
An important part of the correct installation of any furniture hinges is, of course, the most accurate markings. If it is done poorly, it will certainly affect the functionality of the door. The correct markings for furniture hinges will help you find the right center to make the recesses.
You need to “move away” 7-12 centimeters from the edge. The number of hinges is standard two, but it can vary depending on the type of furniture. It is necessary to maintain a specific distance between the loops. It is equal to fifty centimeters. The door parameters depend specifically on the number of canopies.
When you have finally decided on the quantity and all the necessary dimensions of furniture hinges have been installed, you can mark the central holes in relation to the width of the door. The distance from the side should be approximately two centimeters. It is also impossible not to take into account that the fastening should not be placed where the shelves in the closet or cabinet should be.
After taking all the necessary measurements, make notes. Remembering to respect the width spacing, mark the placement point. At the intersection of these marks, you need to make a “hole” with a nail or a self-tapping screw. If the facade is higher than a meter, make notes every half meter.
For more accurate markings, you can use a special template called a jig for furniture hinges.
Handles for kitchen furniture, advantages and disadvantages of options
In the interior of a kitchen space, everything should be interconnected. Not only the colors of the furniture and the decoration of the walls and floors should be combined, but also the decorative elements, without which the kitchen looks dull. Handles for kitchen furniture will help you create a unique image of your kitchen space, regardless of the style: modern or classic.
Kinds
The shapes of the handles are:
- rings;
- shells;
- buttons;
- drops;
- staples;
- railing;
- built-in (mortise):
- profile (molding).
Rings
Rings have been known since the Middle Ages. In the beginning, they were made rough, mainly from wrought iron, and when the Baroque style appeared in the world, which became famous for its grace, it was reflected in the handles. They began to be plated with gold and various details were added in the form of petals, flowers and engravings. Now you can find not only modern metal handles - rings that have a perfectly smooth surface, but also antique ones, for example, in a “bronze” color. When using these accessories, you need to be extremely careful.
If opened incorrectly often, the handles can simply ruin the façade of the kitchen.
Sinks
Sinks eliminate the need to use a lot of energy to open cabinets. Their fairly simple shape allows you to touch the handle only from the inside, while leaving the outside always clean, without fingerprints. Depending on the method of execution, you can find a large number of different options. They will look impressive if the kitchen is in a classic style.
Buttons
Button handle for kitchen furniture, ideal for small areas and sections with light fronts. They are usually made of wood, metal, plastic and porcelain. The inconvenience is that with the small size of the product, it is not convenient to open the high sections, built-in refrigerators and built-in dishwasher, you will have to put in a lot of effort, the handle can simply break out, ruining the lining material. The fastening looks very unreliable, which gives the product a short service life.
Drops
Handles for furniture in the form of a drop also have many different designs for their appearance. They are more suitable for decorating places that are often not used. If you open it frequently, this option will quickly get boring.
Staples
Furniture handles, in the form of kitchen staples, make up the majority of manufactured goods in this direction. The wide inner part allows you to grasp the entire surface of your palm and not experience discomfort. Thanks to the streamlined shape, it is impossible to get caught or hit, so their use is preferable in a house where there are small children. To suit any kitchen look, you can choose overhead brackets that really match the rest of the elements. Bronze-colored brackets will look very impressive with a classic kitchen.
Railings
Handles - rails are usually used for straight facades. It is recommended to choose long models both for convenience and for the most expressive appearance. As a rule, such handles are used for kitchen towels.
Furniture handles for kitchens and rails should be positioned horizontally, firstly, for convenience, and secondly, for the effect of completeness of the composition. On facades with a very large or, conversely, very small area, they can be installed vertically, but then you will have to create symmetry with respect to them.
Built-in (mortise)
Mortise furniture handles are the safest of all types. When there are small children in the house, it is impossible to leave bruises and bumps only with these children. Installation is only possible in straight, even and non-bent facades. But, some types of handles can also be installed in framed facades, if they are of a modern style. It is very difficult to perform this technology independently and without special equipment. It is better, in order not to make mistakes, to invite a master who will not spoil anything.
Profile
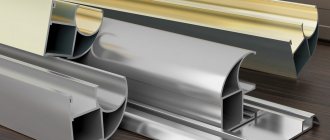
When you don’t want to touch the facades and drill them for handles, you can use an aluminum profile that will be located under the tabletop. The opening, in this case, occurs behind the façade itself. In this case, it is not recommended to choose a kitchen of dark color and glossy material, as fingerprints will be visible on it. It is intended only for lower sections and for vertical columns, such as a built-in refrigerator. It is also possible to leave the upper sections without external handles, while using hidden handles - pushers, which are activated by pressing the facade.
They have the disadvantage that they have a limited service life and quickly break down.
Manufacturing materials
When choosing, you should consider the material from which the hand is made.
| Type of material | Advantages | Flaws |
| Metal (steel) | It is not afraid of moisture, low and high temperatures, and is not susceptible to fungus and rust. Suitable for almost any kitchen with the right choice of accessories. | Glossy surfaces leave fingerprints. Matte surfaces are difficult to clean, only with the help of a special product. |
| Copper | They clean well and look expensive. | They suit a very small number of kitchen style options. |
| Glass | Custom look, easy to clean. | Careful and careful use is necessary, as glass is a fragile material. |
| Ceramics | High strength, noble appearance of the product. Retains its original appearance for a long time and is easy to clean. It can be combined with many materials, but it looks especially beautiful with the color bronze. | Not resistant to mechanical damage. |
| Plastic | Not high cost, at the same time, it is possible to change handles frequently, light weight, easy to clean, and the ability to make an original shape. | Not durable, can be deformed when exposed to high temperatures. |
| Tree | Ecological natural material. | Does not tolerate high temperatures, does not have a very long service life, wears out quickly and loses its original appearance. |
The most common material for manufacturing is steel. It can have a matte or glossy texture. Italian manufacturers are highly valued in the construction market. A country like Italy has always had a favorable price-quality ratio. They also provide a good warranty on their products.
Selection according to furniture style
For a neoclassical style, you can choose metal handles with a ceramic insert. Ceramics retain their original appearance for a long time. For a kitchen in Provence style, bronze is ideal, which will emphasize the elegance of the furniture. It may have porcelain inserts or decorative elements with ceramics. Bronze can be combined with many materials. For a classic style, furniture fittings in the form of a ring are suitable.
Individually designed by designers, handles with rhinestones or crystals will look good with the modern style of the kitchen set. Of the materials, enamel is perfect for this, as it tends to reflect the surrounding interior. With the right lighting, not only handles with rhinestones or crystals will shimmer in different colors, but also the facades will complement them.
When using photo printing technology on facades, it is better to use handles that do not stand out too much, or to abandon them altogether. Otherwise, the kitchen will look defiant and quickly become boring. In this case, options with crystals will not work.
When choosing a white kitchen, you can use black sink handles. This combination will highlight the accessories and add contrast.
If the kitchen has already lost its former appearance and you want to change something, then you should not order new furniture, if the old one is still functioning normally, you can only replace the handles and it will look new. Ceramic pens with crystals are especially popular.
Video
mblx.ru
Replacing kitchen fittings
Closers, door hinges, handles - all this can break and wear out faster than the sash. Changing hinges or closers on wall-mounted cabinet doors is easy, even with your own hands.
- As a rule, dish-shaped hinges with adjusting screws are installed on kitchen units. First, they try to eliminate the position of the sash or the creaking of the hinge by adjusting these two screws. If this fails, then the old loop is removed. The plate of the new hinge is inserted into the old socket on the sash and screwed with two screws. The second hinge plate is fixed at the same distance on the cabinet wall. The position of the sash is adjusted with screws.
- Often the reason why doors open is due to damage to the magnetic latch. In this case, you need to install a new magnet at the same distance from the edge and check the mating metal part.
- Closers in kitchen units usually appear in wall cabinets. The closer can be adjusted with your own hands, but it cannot be repaired: the body of the device is non-separable. So if it is damaged, you will have to replace the old closer.
- If the handle is broken, then replacing it is even easier: unscrew the holding screws, remove the old handle and attach a new one to the same place. The fittings may have a different size: you can mask the holes in the hinged door with hard wax.
In the video, replacing hinges, closers and handles is covered in more detail.
How to place handles on kitchen cabinet drawers?
The traditional location of handles on cabinets (facades) of floor-standing kitchen cabinets is strictly in the middle. However, I believe that we need to think outside the box.
When the cabinets are the same in height, then - yes, of course - in the middle. Indeed, in this case, the distances between the handles will be the same.
But what if the cabinets have different heights? After all, different sizes are a necessity. The top one is often made shallow - for knives, spoons, forks, etc. For any oversized items. And if you place the handles in the middle, then the distance between the handles will not be the same. What should you give preference to: equal distances from the handle to the edge of the drawer or equal distances between the handles?
Ill. 1 shows two options for a set of cabinets. In the first (lilac color) the top drawer is very shallow, in the second (burgundy) it is one and a half times deeper. In each of these cases of facades, in turn, there are two ways of arranging handles. The image on the right - in each pair, reflects the standard: in the middle, and the image on the left - when the handles are located at the same distance from each other. In the latter case, the arrangement is based on the two upper cabinets, in which the handles are also in the middle. And on the lower façade the handle is located at the same distance as the middle one from the top. Also here the distances from the handles to the edges of the facade are the same. Having a picture of various options, we can make a comparison and draw conclusions.
Ill.1. Options for placing handles on cabinets with different heights of facades
I think you will agree that a non-standard approach will look no worse than a traditional one. Apparently, any of the presented methods has a right to exist. - A matter of taste. But we also need to take into account the height of the cabinets in other cabinets. After all, the whole kitchen should look harmonious. The only thing is clear: only when the fronts of the cabinets on different cabinets are of unequal height, the handles in the middle - there are no options.
There is only one general conclusion. The option of arranging handles on floor kitchen cabinets can be successful not only “in the middle”. And when designing a kitchen, you need to try both, and not blindly follow existing stereotypes. The unequivocal opinion of furniture makers on this matter – “in the middle of the facade” – can be explained simply: it’s easier for them, less labor intensive.
I used a non-standard method in my kitchen. And I decided to place the handles at equal distances from each other. At the same time, the set of drawers on different cabinets is the same.
Actually, this “non-standard” approach was born at the design development stage.
Ill.2. Floor cabinet handles with non-standard arrangement
www.remotvet.ru
Adjusting the hinges
Adjusting the facades consists of aligning them in relation to each other and to the walls of the furniture.
Especially for this purpose, a gap of 3–4 mm .
Please note that alignment is only possible when the cabinet is level and both of its diagonals are equal to each other. Let me remind you that the facade must also be smooth.
Hinge adjustment steps:
1 Adjust the height of the facade
Vertical grooves on the canopy strike plate allow you to adjust the door height. Loosen the mounting screws and sweep the door in the desired direction. Tighten the screws.
2 Adjust the depth of the door
You need to adjust the depth in three cases:
- when the door does not open or close, resting against the door;
- when it is visually noticeable that the closed door protrudes too much at the place where the hinges are attached;
- if when opening the door there is a significant gap near the awnings.
The depth can be set by a screw on the strike plate, located further from the cup.
Loosen the screw on one or all hinges (as necessary) and slide the door in the desired direction. Retighten the screw.
3 Shift the façade to the sides
This adjustment option is necessary for uneven gaps between adjacent facades.
The door is moved to the right or left by rotating the screw closest to the cup on the canopy striker plate. It does not need fixation.
There are many types of hinges, so I suggest you determine the desired direction of rotation of the adjusting screw experimentally. Further setup will not be difficult.
Once you have completed adjusting the hinges, make sure that the doors do not slam loudly when closing.
Use an inexpensive option - an adhesive-based silicone shock absorber.
I hope my tips will be useful both for adjusting doors on old furniture hinges and when installing fronts on a new kitchen set.
Always yours, Timur Denisov
Share the link on social networks!
Help your friends find answers to their questions!
To install the facade we need a four-hinged hinge. This is the most common type of loop. And since we are talking about updating the kitchen set, we will consider the option of installing a hinge with a built-in closer.
There is nothing complicated about installing a furniture hinge. But immediately before installation, you need to have an idea of how this is done, so as not to spoil the new facade.
How to attach handles to furniture fronts.
When assembling cabinet furniture, the design of which includes hinged facades or pull-out shelves, it is often necessary to install furniture handles. Today, the market offers a huge variety of pens in size, shape, design, color and material. But all the variety of handles has one thing in common - the type of attachment to the facade. The main applications are handles with one- and two-point fastening. Such handles are attached to the facade using screws installed in drilled holes on the facade. There are also handles that are attached to the end of the facade, and even built-in (mortise) handles. To attach this type of handles, grooves on the facades must be milled.
Let's talk about the simplest handles with one- and two-point fastening that are accessible to home craftsmen. Handles with single-point fastening can be different in shape and design - mushroom-shaped (or so-called button handles) or so-called earring handles. Mostly such handles can be found on old furniture. Handles with two-point fastening, also often called a handle-bracket, also have a huge variety. Installation of these types of handles requires one thing - drilling holes on the facade. This means that installation errors like those of a sapper are deplorable))). It’s very disappointing to see a crookedly installed handle on a brand new façade. And if the facades are arranged in a row, then a crookedly screwed handle will look like a “White Crow” and spoil the whole look. Reinstalling such a handle means drilling a new hole.
So before drilling a hole for the handle, you need to quite accurately mark the center of the holes. When installing handle brackets, it is also important not to forget about the center-to-center distance. It’s understandable when professional furniture makers, who manufacture furniture on a regular basis, have special conductors or, in general, everything is done on CNC machines.
But at home, when handles are not installed every day, making devices is not entirely advisable. I will tell you about my method of how to quickly but efficiently mark the center of the holes. A simpler method can be used, but in my case the difficulty was due to the fact that the markings were carried out on painted facades that had rounded edges on all sides. You can’t easily apply a ruler to such edges))). To do this, we need a ruler of sufficient length, a corner, a T-shaped ruler (or another corner), a tape measure and a pencil. And also two drills with drills - centering and main. Two drills are generally for convenience, so as not to rearrange the drills every time, so you can get by with one.
Let's start with mathematics. We measure the total width of the facade with a tape measure. We measure if we do not know the center-to-center distance of the furniture handle. In general, this is a simple formula:
A=(LM)/2,
where A is the distance from the edge of the facade to the center of the hole for the handle;
L is the width of the façade;
M is the center-to-center distance of the furniture handle.
Let's start marking. To begin with, using a square scale, we measure the distance of the horizontal marking line from the edge of the facade.
Next, apply a T-shaped ruler and set it on the square scale to the required distance.
Then we apply a simple ruler, basing it along the crossbar of the T-shaped ruler (since the edges of the facades have radii) and measure the distance “A”, calculated by the formula (see above).
This way we mark the center of the first hole. We measure the second hole in the same way, only on the other side. Instead of a T-shaped and simple ruler, it was possible to get by with a second square of sufficient length. But I didn’t have a second one, so I had to get out of it this way). If you need to prepare several identical facades for drilling, then (in my case) I marked the distance “A” with a pencil and for further marking I used only a square and a T-shaped ruler.
But we are not in a hurry to drill, first, as the old saying goes: “Measure 7 times and cut once,” apply a pen and make sure that the resulting markings exactly match the holes in the pen.
Once convinced, we begin to drill. For precise drilling, pre-drill centering holes.
Next, we drill the holes completely with a large drill.
Yes, I would like to point out the following:
- It is better not to neglect the centering drill; it will allow you to more accurately direct a drill of larger diameter in the desired direction;
- Also, the centering hole, making it easier for a large drill to enter, reduces the likelihood of chips and cracks. Moreover, in my case, the facades are painted MDF and the paint layer is very fragile and is afraid of sharp impacts. The last photo shows that the holes turned out smooth and “clean”;
- when drilling, it is better to use a sharp (well-sharpened or new) drill;
- Choose a drill with a diameter slightly larger than the diameter of the mounting screw so that the screw fits freely into the hole. Otherwise, if the screw fits tightly into the hole, you risk “lifting” the edges of the hole with the thread of the screw. Secondly, a small gap will allow you to select the error in the spatial location of the drilled holes (I’m talking about fractions of a millimeter, not perceptible to the eye, but sometimes perceptible during installation). But the drill should not be too large in diameter so that the handle fits into place as accurately as possible.
- To avoid chipping on the reverse side, at the exit of the drill, you need to drill on the substrate, pressing the façade tightly against it;
- In order to eliminate the appearance of defects, it is better to start drilling from the outside of the facade.
- In one of the photos you can see that there is tape wrapped around the drill. The adhesive tape serves as a beacon so as not to drill through the facade and the substrate and not spoil the floor))). I do not recommend using a drill stop washer, because... When drilling, you run the risk of hitting the washer against the facade and leaving round scratches around the hole on the facade for a long memory.
Good luck!
masterim-doma.ru
Marking facades for handles
I've almost finished assembling the kitchen, there are still little things left to do, for example, marking and drilling holes in the facades for handles. The handles are attached to two screws, I suspect that if you miss the distance between them by a millimeter, it will be problematic to screw the handle, because it is not flexible at all and it will be impossible to adjust the distance by compressing or stretching it. Are there any generally accepted rules for placing handles? Technical issues - avoid chipping, etc.? Is there a useful article on the topic? I would like to do it carefully and, preferably, the first time
As a rule, the size of the screw is smaller than the size of the adjacent part of the handle, so you will have +/- 1 mm. And of course, accurate markings are the key to success. PS: Post a photo of the pens, if it’s not difficult.
Chips can be avoided if, when drilling, you place a wooden block under the facade on the reverse side.
2maxsa If you screw sharpened screws into one of the handles (sharpening outward), you will get a template that can greatly simplify marking.
Make yourself a template (even from thick cardboard and use it to mark the drilling places on the facades. Apply it to the corner and it will already show you the places to mark. The step of the handles is usually 32 mm. That is, 32; 64; 96; 128 etc. The most common is -96.
The position of the handles is a matter of preference. As a rule, we used to choose the standard 40*40 or 50*50 from the corner for the first hole, but this is for swing doors. In general, it's a matter of taste.
IMHO it is better to drill from the side on which you need to maintain the required size. I don’t remember the diameter of the drill, either 4.5 or 5, but I sharpened it even sharper than for iron, not to mention wood. For what? So that it doesn’t bite into the material too much. This was especially noticeable on pine facades where ordinary drills flew like a bullet. And the fact that on the back side of the facade in the place of drilling is to put a board - this has already been correctly said here. It holds the drill at the exit from the facade and there are fewer chips. Sometimes it’s practically not there if you press the board tightly.
satrap wrote: I don’t remember the diameter of the drill, either 4.5 or 5,
Drill for handles 4 mm.
Chepik Well, 4mm. This is probably “Lilliputian love!” Everything is tight!”
satrap wrote: 4mm. This is probably “Lilliputian love!”
There are thin-walled legs on the handles, the slightest mistake is fraught, but here at least something can be corrected. Accuracy is the key to success!
the template is cut out of cardboard, and holes for screws are pierced in it with an awl. Apply the template to the facade and also mark it with a needle for the holes. I saw ready-made plexiglass templates at IKEA
ssolovov wrote: If you screw sharpened screws into one of the handles (sharpening outwards), you will get a template that can greatly simplify marking
and how to mark it on the facade? you can sharpen everything there
and if you just drill with a nail. I didn’t drill the facades, but that remains to be done. It's still just chipboard, so the hole will be perfect, smooth and unbroken.
Amstel wrote: how to mark it on the facade? you can sharpen everything there
The distance between the holes is important to you. Therefore, you first roughly mark with a ruler, then carefully place the template and gently press so that marks remain, like from an awl. Then you drill along these marks.
Dunno_ wrote: what if you just drill with a nail.
Just like that, the drill bits go to the landfill.
Installation of facades and handles in kitchens
The technician will arrive within 60 minutes.
Many kitchen fronts are delivered to the customer without holes for handles. For handles, the marking and drilling of holes for them must be done by the craftsman on site, based on the customer’s requirements. Assembly of furniture to order.
- the carpenter arrives at the place of call - within 1 hour - guarantee for all types of work - 90 days - a set of tools available for any type - craftsmen - all Muscovites - we provide free consultations
— For a wooden kitchen facade or MDF facade, use sharp step or core drills with a diameter of 4mm or 5mm. A drill with a diameter of 5 mm is used in the case when the shape of the handle during installation can block the hole, this gives more accurate positioning of the handle, the bolt can be slightly shifted in the hole. But there are forms of handles that do not cover the hole; in this case, it is better to use a 4mm or 3.5mm diameter. — If the hole in the facade for attaching the handle is quite deep that it is impossible to tighten the handle, pour sawdust into this hole so that the handle can be tightened. — In order to make holes in the glass, special diamond-coated drills are used. You can also make holes in the glass using molten tin, this will help prevent accidental cracks from appearing on the glass. This method requires tin used for soldering and sand. Markings are made on the glass and sand is poured. Make a funnel of the required diameter in the sand and pour molten tin into this funnel. After a few seconds, when the solder has cooled, it can be removed along with the sand and glass tube. — Also, do not forget that when installing handles on glass facades, it is necessary to install an additional washer on the bolt side. The washer will protect the glass from cracking and prevent the fastening from becoming loose.
Currently, such a service as installing facades and handles in kitchens, which our company is happy to offer, is quite popular.
Features of installing facades and handles in kitchens
Handles are installed, they can be classically located in the corner of the facade, which are opposite to the hinges. They can also be installed perpendicular or parallel to the kitchen floor. They can be shifted to the center of the doors or at the edge of the facade. Using coal, the holes are marked. Initially, the handle that will be installed is leaned against the facade, and its optimal position is visually selected. After that, it is necessary to optimize the position relative to other facades (they may have glass or inserts), which do not make it possible to install handles in the required place. This must be taken into account, that is, the handle must be checked on all facades. After that, the position of the fasteners under the handle is transferred to the square. Then all openings are marked on the facades according to these marks. Drilling is carried out on the front side of the facade using a 4 or 4.5 millimeter drill.
1. If the handles are positioned horizontally, it is necessary to measure the width of the facade itself, subtract the interaxle distance from this width, and divide the remaining value by two. For example, a façade with a width of 600mm and a handle with a center distance of 128mm. We get: 600-128 = 472/2 = 236mm. It is necessary to leave 236mm on both sides to the center distances of the handle. At the bottom you can leave a distance equal to the width of the ruler, this is approximately 20mm - 30mm, depending on the type of square. To do this, you need to align the outer edge of the ruler flush with the horizontal edge of the facade. 2. If the handles are positioned vertically, you can also use the width of the ruler. Place the outer edge of the ruler flush with the vertical edge of the façade. In this case, you can immediately use a ruler to measure the distance from the horizontal edge of the facade, for example, 20mm. If you install handle rails vertically on facades, consider the distance from the horizontal edge of the facade to the edge of the handle, and not to the first mounting hole, as with the handle bracket.
Our company offers you all types of carpentry, electrical, and plumbing work. Our company employs only highly qualified craftsmen who can easily complete any job. In addition, all services we provide come with a mandatory one-year warranty. You can always use an emergency call from our technician, and the technician will arrive within an hour after you contact us. We have the most affordable prices for all services provided, and the quality is always at its best.
www.mosmasters.ru
There are many handles, but there is only one facade
Handle selection
Large kitchen front handles
Kitchen fronts with comfortable large handles
- We should not forget that handles for kitchen facades are not so much a decorative thing as they are functional, and the condition of the kitchen facade itself may also depend on its choice. This can be confirmed by any housewife who has to open and close cabinet doors many times a day.
- In order to frequently open the cabinet, the handle must not only be comfortable - it must be a single whole with the facade so as not to come off it (the price of the handle in this case does not matter at all).
Kitchen handle decor
Classic kitchens with brace arms
And if the façade panel is made of glass, then a poorly held handle can cause the door to crack and even cause injury (glass cuts).
This facade handle is very convenient
Advice. As has already been noted, functionality comes first for kitchen handles, so when choosing them, it is better to abandon decorative small devices that are held on by a single screw. The advantage of large handles, such as in the photo above, for kitchen fronts is that they are fixed to the panel in several places.
Kitchen handles in modern design
Modern orange kitchen with comfortable handles
Installation of handles
- Making templates for marking . When installing handles on kitchen facades with your own hands, it would be nice to make templates for marking. Keep in mind that there are a lot of doors and cabinets, and you will need to maintain symmetry during installation, otherwise, even if the handles are very beautiful, all your work will look clumsy.
When you have a template, you can install handles on all facades at once, even before hanging them. In addition, using a template, hinges are also installed on the doors, where every millimeter of distance is extremely important.
- Take a piece of plywood or OSB . Of course, it is not necessary to make a template with a ruler and a rod; you can simply use a piece of plywood or OSB with 90⁰ angles and make holes there in the right places. In the future, you will simply need to attach this template to the edge of the facade and drill it without preliminary marking.
- We adjust the puck . For wooden kitchen facades, you need to adjust a washer under the bolt on the back side so that it does not push through the array and the handle does not become loose. Also, a washer is required for glass panels so that the load from the fastening is distributed over a larger area, which will reduce the risk of cracking.
Accessories for kitchen facades in the Art Nouveau style
Advice. Installing handles on kitchen fronts involves drilling the panel, and if it is made of solid natural wood or MDF, the back side can break off, especially if you need to make a hole of a large diameter. To prevent this from happening, you can use a step or core drill, or make the sharpening angle of the conical drill sharper and drill without much pressure.
If we use some type of cutting drills to install handles on kitchen facades made of natural wood or MDF, and everything is clear here, then what about glass? No instructions will help you with this, because any glass is a fragile material under a certain degree of physical stress (some more, some less).
- We use special drills . For glass panels of a kitchen facade, you can use special drills with diamond coating on the working part, that is, on the tip. When drilling a hole, it is very important to place the glass on a level base and sand is best for this purpose.
- We do burning with liquid tin . There is another way to make a hole in a glass panel for a handle, this is burning with liquid tin. The method is fail-safe, with a 100% guarantee that the glass will not crack. To do this you will need regular sifted sand and soldering tin.
- Mark the facade panel and pour 20-30g of sand in the place where you need to make a hole. Then, using some kind of rod (pencil, wire), make a funnel of the required diameter in the sand at the drilling point and pour molten tin into it. After a few seconds, the solder will cool down, and you can shake off the sand and remove the frozen mass along with the glass stopper - the hole is ready.
And here is the result
Installing furniture fronts on drawers - a little trick
Hello, friends!
We have already discussed with you how modules with drawers are designed and how to correctly calculate their position in the boxes.
But, in my opinion, there is another serious question on this topic - how to properly hang facades on them.
I have come across guides on this issue on the “net” more than once, and each time I was slightly surprised, to say the least.
Some teach that in order to do this, you need to screw self-tapping screws into the front side of the box.
Then, placing the façade against the frame, cover it with these self-tapping screws.
This will be the marking.
Regarding this method, you can give a lot of arguments “against”, but I will give two - the fronts need to be attached to the boxes only when the box itself is set diagonally (accordingly, it already has a back wall).
But, if the back wall is packed onto the box, then it will not be possible to push the drawer so that it hits the facade with self-tapping screws.
Even if the module has a stiffening rib instead of a back wall, there will also be a certain inconvenience - you need to clearly fix the facade in the desired position.
At the slightest shift, the procedure will need to be repeated.
And in this case, it will be quite difficult to determine which of the tiny dents left by the screws is working...
The second, fairly common “option” is when everyone does this using double-sided tape.
Here the problem is approximately the same as in the first case.
In a word, all these methods are not successful.
Installation and adjustment of fasteners
Sometimes situations occur when the owner, through careless actions, damages the loop, causing it to leave its place or move. In this case, he must correct everything and adjust the fastening.
The most common type of malfunction is associated with a phenomenon in which the hinges “pull” the door. It is worth saying that this can happen with piano hinges. Here it is important to install the hinge very accurately , doing everything without haste.
To install the fittings, you should prepare a number of tools:
- accessories that need to be installed;
- drill bit with end tip;
- mounting plate;
- fasteners.
Adjustment for horizontal divergence of furniture doors
The main task here is to install the door in such a way that there is a gap on the fastening side, and when closing the door, the reverse side extends beyond the boundaries of the cabinet walls. If the furniture has two doors, they should cling to each other.
The adjustment process itself comes down to manipulating a special adjustment screw, which is found on furniture hinges. Finding it is quite simple: its usual location is the hinge arm, located closest to the door, in contrast to the mounting screws and the additional adjustment screw. If this screw is screwed even tighter, this will lead to an increase in the gap between the end of the door and the cabinet wall. By doing the opposite, that is, by loosening the screw, we reduce the distance between the designated elements.
Door frame assembly
So, you have purchased an interior door in a set that includes a door frame, leaf, and fittings, including hinges, handles, a lock or latch. Once you are satisfied that your order is complete, installation of the kitchen door can begin.
Place vertical posts (jambs) on the floor. In this case, the selected quarter should be directed upward. Place the door leaf between the vertical posts with a gap of 2 mm. To ensure the safety of the gaps, use coins or matches, which must be fixed between the jambs and the canvas.
Related article: Folding accordion doors in the kitchen
On the stand and the canvas on one side, apply an adjacent mark corresponding to the location of the hinges. On the opposite side, mark the location for installing a lock or latch.
Place the lintel beam on top. Mark the junction points with the risers. Then trim the quarters.
Place the loops in the places you marked earlier. Outline them. After this, use a chisel or milling machine to make a recess corresponding to the thickness of the loops. Reattach the hinges and mark the location of the fasteners. Using a drill, make a hole with a diameter approximately 1 mm smaller than the diameter of the screw. This will make it easier to tighten the screws and at the same time provide the required level of reliability. Secure the hinges with self-tapping screws.
Next, install the lock or latch.
Attach the lintel. Drill holes in the joints. Fasten the parts with self-tapping screws.
Place the fabric on the hinges of the door frame. Trim the vertical posts, leaving 2-3 cm below the edge of the door. In this case, you should also take into account the correction for the floor level that you measured before installing the door in the kitchen.