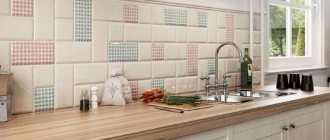
Tiling walls and floors is the most reliable and time-tested way to decorate your home, while protecting it from moisture and facilitating the cleaning process.
This is why most owners choose tiled flooring for bathroom and kitchen renovations. The only disadvantage of this type of repair work is its high cost, which includes both the price of the tile itself and the additional costs of a tile laying specialist, which will amount to 100% of the cost of the materials.
A smart way to spend half as much is to lay the tiles yourself.
The technology of laying tiles, the history of which dates back to antiquity, has undergone changes over time and has been simplified in many ways, thanks to which everyone can easily master it. You just need to be patient and knowledgeable, purchase the necessary materials and prepare all the tools that may be needed.
What you will need. List of required materials and tools
The key to successful installation is not only the meticulous alignment of the tile fragments relative to each other. Of course, a lot also depends on the quality of preparation of the wall base. Therefore, we have also included in the recommended list of all necessary tools and materials those items that will help you achieve the ideal surface.
Tools
- chisel;
- sponge;
- brush;
- chisel;
- level;
- construction mixer with whisk;
- glue container;
- Master OK;
- tile cutter;
- spatula (notched);
- hammer (rubber);
- ceramic tile;
- crosses.
Materials
- primer;
- plaster or putty;
- tile adhesive;
- fugue.
Required tools and materials
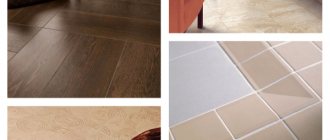
First you need to choose the right ceramic tiles at a hardware store. When purchasing, you need to pay attention to the product’s resistance to the influence of humidity (materials of class 1 or 2 are suitable for the bathroom). The strength of the tiles also matters; in this case, the most durable products of class 5 are needed. The calculation of tiles is carried out based on the area of the walls or floor plus 10-20% for reserve.
Before carrying out repair work with your own hands, you need to prepare the following materials and construction tools:
- ceramic tiles for the toilet of the selected color and texture;
- plastic crosses to maintain the same size of seams;
- tile adhesive;
- plastic film or mastic for waterproofing the floor;
- mixture for preliminary leveling of the base;
- rule;
- building level;
- sheets of moisture-resistant plasterboard;
- metal profile and screws;
- screwdriver;
- putty for final leveling of walls;
- primer;
- tile cutter;
- Bulgarian;
- electric drill;
- rubber hammer;
- metal beacons;
- instruments for measurement and control (plumb line, tape measure, level).
After preparing all the necessary building materials and tools, mix the adhesive mixture and begin the main work.
Surface preparation
Any surface preparation for the subsequent application of ceramic tiles traditionally includes 3 main stages:
- removal of old finishes;
- leveling walls;
- padding.
No matter how tedious it may be at times to get rid of old material, doing so is your sacred duty. If you are dealing with wallpaper, carefully scrape off all the fragments, trying to end up with a perfectly clean wall. Try not to damage the concrete base - the pieces scraped out of it will need to be compensated for later with plaster, otherwise it will not be possible to achieve a flat surface. After the last fragment of the old finish is safely in the waste bin, pay attention to the wall surface itself:
- are there any cracks, fungus or mold;
- what defects are present;
- Are there any irregularities?
If any of the above comes into your field of vision, you will have to deal with it (read about how to get rid of fungus on the walls in an apartment).
With cracks
- make their diameter larger by driving a chisel with a hammer;
- treat them with a deep penetration primer;
- seal with plaster;
- re-prime.
With fungus and mold
- treatment with a special chemical agent or one of the well-known “folk” ones (hydrogen peroxide, vinegar, borax, etc.);
- thoroughly dry the wall;
- primer treatment with antiseptic components.
With unevenness
- if irregularities of more than 1 centimeter
,
plaster
the entire wall surface, and on top - reinforcement with a metal mesh to improve the adhesion of the tiles to the wall; - if irregularities of less than 1 centimeter
,
priming is required
, and tile adhesive, due to the difference in layers, will help correct minor defects.
After successfully overcoming all the problems with the base, all that remains is to mix the glue. It is best to use a construction mixer with a whisk attachment for this. Then you will be able to prepare a mixture of ideal consistency.
Preparatory work
Laying tiles on a bathroom floor, like on a wall, requires a lot of preparatory work. There is a whole range of technological operations performed regardless of whether it is a Khrushchev or a wooden house:
- the bathroom is freed from old plumbing (in a new building without finishing this type of work is not possible);
- the walls are leveled (a detailed story about the technology for leveling walls can be read in the materials “How to level walls in a bathroom” and “How and with what to plaster a bathroom”);
Important: you should once again pay attention to the fact that the gypsum board under the tile is attached only to the sheathing. Moisture-resistant sheets of plasterboard and gypsum board glued to the wall will not withstand the weight of the ceramics and will fall off.
- The base of the floor is being prepared. Technological operations such as pouring a new screed and waterproofing work are carried out. A step-by-step algorithm of work is described in the articles “Preparing the floor for pouring screed” and “Waterproofing the floor in the bathroom”;
- the surface of the walls and floors are treated with a primer.
The last operation is mandatory. It helps to increase the adhesion of ceramics to the base of the floor and walls. The primer must be rubbed into the base until white foam appears - a sign that the primed surface is saturated with moisture.
It is better to apply the first layer in the evening so that the walls are completely dry by morning (you can find out how long the primer takes to dry from the instructions on the package).
The second layer of primer does not need to dry completely - it is better to lay the tiles on a slightly damp surface.
Tile inspection
Of course, if laying tiles on a wall is new to you, there are some things you may want to skip. One of the most common mistakes made by beginners is ignoring the inspection of the tiles. Therefore, carefully read the recommendations below and learn better from the mistakes of others, saving time, money and your nerves:
- make sure that the front part has a flat surface
- according to state standards, a deviation to the side of no more than 3 mm is allowed, but it will be very difficult for a person who has not previously dealt with tiles to cope with such a discrepancy; - check whether the corners are even
- if the tiles are as close to the perfect 90 degrees as the Moon, then it is best to look for alternative options - even experienced tilers do not accept such discrepancies, since the end result is very blurry, with clearly visible defects; - determine whether the tile fragments have the same thickness, height and length
- most often, in order for all these parameters to match, you just need to purchase tiles from one batch; information about it can be found on the box or inquired at the store where you purchase the material.
Options for wall tiling
It is important to choose the right place to start work. Wooden slats are usually used as a reliable support for the tiles. The placement of the tiles must be carefully planned and the end tiles must be trimmed precisely. The final operation is filling the joints. Ceramic tiles can be laid on the wall in several ways: “seam to seam”, “interlinked” and “diagonally”
Features of wall cladding using the seam-to-seam method
Tiling walls using the seam-to-seam method
When facing seam to seam in horizontal rows, the tiles are placed one after another without displacement relative to the tiles of the previous rows. The seams along the entire coated surface form single horizontal and vertical lines extending from the beginning to the end of the cladding
An excellent option for lovers of strict symmetry. However, “symmetrical” does not mean “boring”, and seam-to-seam facing is not as easy as it might seem. The seams must be absolutely straight and equal in thickness. Any deviation from the ideal will immediately be evident. The key to success when tiling seam to seam is the following: first, careful sorting of tiles by size, second, accuracy and precision in work.
Features of wall cladding using the staggered method
Tiling walls using the staggered method
When facing staggered, the tiles of the subsequent row are offset from the tiles of the previous row. The offset is chosen to be the same: half the width of the tile. The seams of even rows form their own broken line, the seams of odd rows form their own
The advantage of this method is that it eliminates the need to carefully sort tiles by size. Small deviations in the thickness of the seams will not be as noticeable as when facing seam to seam. Of course, this does not mean that when facing staggered tiles can be glued somehow, without worrying about the verticality and thickness of the seams. Plastic crosses help maintain a certain seam width. Verticality is periodically checked using a plumb line.
Features of diagonal wall cladding
Diagonal wall cladding
With diagonal cladding, the tile joints form a grid of mutually perpendicular lines that intersect the horizontal axis at an angle of 45°
When marking, the base is divided in such a way that a whole number of triangular tiles (that is, tiles cut in half diagonally) fit vertically and horizontally.
A mooring cord is pulled along the seam line and rows of tiles are laid along it between the triangular tiles and the wall along the entire perimeter. Then triangular tiles are laid out. Fragments of incomplete tiles of the required size are attached to the corners.
Finally, the base tiles are laid. Four cords are attached to the pins: two groups of two parallel cords. The cords are pulled at an angle of 45°. Row tiles are laid along these berths. During work, the rows are periodically checked using a level rule.
Scheme of diagonal laying of tiles: 1 – pins, 2 – mooring cords, 3 – rows of tiles along the perimeter, 4 – rows of triangular tiles.
How and with what to cut tiles
No matter how hard you try, you still can’t do without trimming elements. The number of manipulations associated with trimming can be minimized by selecting ceramic tiles of a certain size for the room in which tiling is planned. For example, if your wall is exactly 3 meters long, then a tile with a length of 50 centimeters will fit perfectly. Of course, it is not always possible to find tiles on sale that meet all the parameters; in this case, you can always use tools for cutting tiles. Perhaps the best of them is a manual tile cutter
.
As for other ways to cut the desired fragment, neither a grinder nor a glass cutter with wire cutters will give you the required evenness. There is still an electric option for a manual glass cutter, but its cost often exceeds the cost of your repair. Do you need this?
Important note: you should not cut the tiles in advance, but only during the laying process, because even the slightest miscalculations in millimeters may later prevent you from fitting an already recklessly prepared piece into an area on the wall.Diagonal laying
Diagonal laying, for which square tiles are used, is also often used. Depending on the size of the tile, the external effect can be very different. As a rule, tiling diagonally looks more attractive, especially on floor coverings. You can diversify this installation by inserting tiles of a different color (“checkerboard”) or an even frame, which will give the room optical completeness.
Laying process
The installation technology itself, if you look at it this way, is extremely simple. However, for the first time, some points may seem ambiguous, and slight excitement and responsibility for the result may prevent you from completing the task adequately.
in this case it is necessary. It should reflect the complete layout of the tiles, taking into account the trimming of all elements. All that remains to be done is to carefully transfer the plan onto the wall. Many specialty tile stores will complete these projects on site based on the size of your space. At the same time, designers take into account the wishes of clients regarding the placement of decorative elements.
- apply the prepared mixture to the wall, about 2 rows from the bottom;
- level the layer with a notched trowel;
- take the tile and lean it against the wall, pressing lightly;
- lay one row - and immediately check with a level whether the tiles lie evenly, whether they stick out or are too recessed in some areas;
- please note: it is not the last row from the floor that needs to be laid, but the second - the last, the lowest one, will be laid at the end of the work;
- in order to maintain even seams between the tiles, use crosses of a given width, but do not forget to remove them after gluing;
- if the tile sticks out, tap it with a rubber hammer so that it goes deeper into the adhesive layer;
- If the tile is too recessed, then it is best to remove the fragment and re-glue it.
Place the trimmed fragments on the wall at the last moment - this way you can avoid mistakes in trimming
, which we talked about a little higher. Finally, the tiles should be laid on the last row from the floor. This sequence is due to the fact that this way you hide the trimming, achieving a better visual effect.
If the room is large, then laying tiles on the wall will take quite a long time, up to several days.
Video that will help.
Methods for laying tiles
Ceramic tiles are used in the bathroom for wall cladding and flooring. This type of finishing material does not absorb moisture, is easy to clean, does not burn, and does not conduct electricity. Produced by thousands of companies whose tiles have different sizes and a huge selection of colors and patterns. This allows you to get an abundance of design solutions that do not repeat each other.
Various methods of laying ceramics, which visually transform the room, can also contribute to the design of the bathroom interior. You can lay tiles in different ways both on the floor and on the walls.
Today, tiles can be laid in the following ways:
- basic - ceramics are laid in even rows. This is the simplest and most popular method, and at the same time the most economical - you need less material and the least labor-intensive, because few trims (always laid at an angle of 90° with respect to the wall);
- “staggered” (brickwork) - imitates classic brickwork. Here, each next row is shifted by ½ the length of the tile. For example, if the first row began to be laid with a whole tile, then all odd rows should start with a whole tile, but the second and all even rows should start with half a tile;
Staggered laying.
- diagonally - the tiles are laid in a diamond shape in relation to the wall (on the floor) or the floor (on the wall). The method is complex and requires a lot of trimming. If you plan to use several colors, it is advisable to first draw up a laying scheme, as it is easy to get confused;
Diagonal method.
- “herringbone” is a combination of two methods: “staggered” and diagonal. An even more complex method;
"Christmas tree."
- checkerboard - used for two tile colors. It is based on a basic laying method, where colors alternate both horizontally and vertically;
Chess method.
- artistic (also called the “koleidoscope” method) - a complex geometric pattern is laid from tiles based on the basic or diagonal method. A laying diagram is also needed here. A variety of artistic method can be an ornament and a carpet;
- modular - an interesting geometric pattern is created using three or more sizes of tiles of the same model. A chaotic layout is also possible - it looks fresh and original. Used for finishing walls and floors;
- with shift - applied only to the floor. The method involves the use of tiles of different sizes, where the difference in size can reach 4, 6, 8, 10, 12, 16 and 24 times.
Kaleidoscope.
Ornament.
Modular way.
Installation of tiles with a shift.
You can see in the photo how to lay large and small tiles according to this pattern.
Not all of the considered options for laying tiles in the bathroom can be done by a beginner. In case of difficult installation, it is better to entrust the work to professionals.
Rubbing seams
Once the tiles are laid, it's time to do the post-operations. So, after the tiles have dried well, the seams should be treated with a fugue. It is also called grout
. This procedure is very dirty and causes discomfort, but is required:
- protects seams from moisture;
- highlights the beauty of ceramic tiles.
Nowadays, there are enough grouts in a variety of shades and various decorative effects - you can match them to the tone of your tiles and significantly enhance the impression of installation. At the same time, it would be useful to know some secrets of successful jointing:
- do not rush to dilute the entire package of grout at once - the mixture hardens much faster than you can successfully handle the seams, and it is unlikely that you will be able to use already hardened lumps;
- In order to carry out the jointing process correctly, use a spatula - use it to apply the jointer into the seams, and the jointing should be done with a piece of cable.
We also recommend that you read the article for instructions on drilling tiles on a wall.
Important Note:
for wet rooms, use grout
with a water-repellent effect
.
Not every fugue can boast of the corresponding components in its composition, so pay attention to the specifications indicated on the packaging. Ceresit
brand have proven themselves to be excellent in various conditions . Take a look at the color palette this class=”aligncenter” width=”559″ height=”800″|fcw3qayjh5a| src=»https://stenaprofi.ru/uploads/posts/2018-01/medium/1516016170_1443607206-1418230607-13854516712-100008474.jpg» class=»aligncenter» width=»800″ height=»800″|fcw3qay jh5a| src=»https://stenaprofi.ru/uploads/posts/2018-01/medium/1516016172_c3d83d9b370c354c74572e353838fb406.jpg» class=»aligncenter» width=»800″ height=»800″|fcw3qayjh5a| src=»https://stenaprofi.ru/uploads/posts/2018-01/medium/1516016253_771146-851007.jpg» class=»aligncenter» width=»800″ height=»600″[/img]
Step-by-step installation instructions
The instructions on how to lay tiles on the floor in the bathroom, as well as on the walls, have several sections:
- where to start laying ceramics;
- how to make markings;
- how to lay tiles on a wall in a bathroom;
- how to lay tiles on the floor;
- how to sand seams.
Where to start
For professional builders, the order of work is not fundamental. Some people first tile the floor, then the walls, and only then install the bathtub, others start with the walls, and others with the bathtub.
For those who carry out the entire cycle of work themselves, it is best to start with laying tiles on the walls - during the work, mortar, tools, and even tiles may fly down. If the glue can be rubbed off, then the tools and tiles leave chips, which the author has observed more than once, even among professionals. In addition, with this order of work, the bottom row of wall tiles rests on the floor tiles, solving another problem: a so-called “lock” is formed for water, which tends to seep through the joint.
In this regard, on the Internet you can find many recommendations in what sequence to tidy up the bathroom. Of these, in our opinion, only one deserves attention, where professional builders advise first tiling the walls, then installing a bathtub and completing the tiling by laying the floor.
Thus, beginners will avoid several problems at once:
- If you first install a bathtub, then the first row of tiles along the wall should go along the side of the sanitary ware, which, by the way, is good. But a huge problem for non-professionals is laying the two lower rows, namely, fixing the tiles in the penultimate row on the wall;
- Recently it has become fashionable to place the bathtub not on the tiles, but on the screed, which is easy to do with the above technology;
- there is no risk of installing a bathtub with a counter-slope (installed strictly horizontally), since you can always add mortar under the legs.
Another start when installing a shower cabin:
- all communications are installed;
- an inclined rough screed is poured;
- walls are lined;
- the floor in the booth is being finished - it should have a slope towards the drain hole;
- The tiles are laid on the rest of the floor in the room.
Marking
One of the conditions for correctly laid tiles with a pattern or pattern is to apply markings to the wall or floor. To avoid mistakes and apply the correct pattern to the wall, the tiles are laid out on the floor in another room. The tiles are numbered in pencil on the reverse side. The resulting diagram is transferred to the wall.
Marking is also required for the metal profile for the first row of cladding on the wall. The work is carried out using a pencil (marker), tape measure and level, preferably a laser one. First, the lowest corner in the room is located (how to do this correctly, you can see in the work “How to check the floor level in an apartment yourself”).
Then, starting from the floor, the location of the seam between the first and second rows is determined, after which a horizontal line is drawn along the wall along the entire perimeter of the room, which will allow the ceiling profile to be attached to the walls perfectly evenly.
Marking using a laser level.
Wall covering
The peculiarity of wall cladding is that with a slight curvature of the floor, the ceramics begin to move to the sides, forming so-called steps. To avoid problems with vertical seams, you need to either allow the first row to dry completely, which takes a long time, or artificially create a perfectly flat stand for the first row.
The second option has become very popular among professionals. To do this, they screw a ceiling profile to the wall using self-tapping dowels (used when covering gypsum board walls). The tiles are placed on it. After the lower rows have dried, the profile is removed, and the wall, after laying the tiles on the floor, is tiled.
Profile on the wall for the first row.
In practice, several methods of laying ceramics are used, in which glue is applied:
- only on the back side of the tile - this method is possible with smooth walls;
- on tiles and walls - used when there is significant curvature of the wall, since a thick layer of glue levels out differences in height of the wall surface;
- only on the wall - used by craftsmen with extensive experience.
Before starting work, the tiles and walls are sprayed with water so that they do not draw out the water necessary for the adhesive solution - due to a lack of moisture, the hydration process of the cement solution may be disrupted (wetting of the walls is not carried out under epoxy adhesive).
After gluing several tiles, they are brought into one plane using a level and a mallet. Innovative tile leveling systems (TIS) will help simplify the process. The principle of their operation is shown in the photo below.
Leveling the tile plane using SVP.
Leveling tiles with the Rubi Tile Level system.
The installation technique is simple:
- glue is applied to the wall or tile with the smooth side of the spatula;
- using the teeth of a spatula, ridges are created (without them it is impossible to adjust the plane of the tiles - the glue will constantly protrude between the seams);
- apply the facing element to the wall and immediately place plastic crosses or SVP elements;
Laying the first row.
- using a mallet, level and devices (crosses or SVP) bring the tiles into the same plane with the already laid cladding;
- in the corners of adjacent walls, the tiles should overlap each other and not touch with their edges, which is clearly visible in the figure.
Options for tile joints in corners.
Holes are also drilled into the tiles using special crowns or drills for existing holes in the wall for various pipes and cables. These operations are carried out before laying the tiles.
Installation of ceramic floor
Floor covering work begins with applying silicone sealant to the joints of the floor and walls (an additional degree of protection against moisture penetration down to the neighbors). The first tile is laid in the far left corner, the last one is at the threshold. Otherwise, the installation technique is identical to working on the wall.
After the glue has dried, a sheathing of wooden slats or a metal profile for the screen is mounted on the floor, on the outside of the bathtub. Moisture-resistant drywall is attached to the sheathing with self-tapping screws. Along the edges, near the walls, hatches are installed to provide access to communications. They are attached to the sheathing using magnets (removable with suction cups). The tiles are glued to the gypsum board.
Hatch for servicing communications.
You can watch a video on how to lay tiles in a bathroom.
Final work
Among the final works are two operations:
- sealing the joint between the bathtub and the wall;
- grouting joints.
The joints between the tiles and the side of the bathtub are sealed with silicone sealant. But the tiles cut in narrow strips, laid along the entire perimeter at an angle of 45°, look more beautiful. It effectively hides the seam while preventing water from seeping down the wall under the bathtub.
Grouting of joints with a fugue is started after the glue has completely dried - at least after two days. The consistency of the grout should resemble rich sour cream with a spoon in it. If the solution is thin, it will float off the seams. Thick materials cannot be rubbed evenly into the seams.
Grouting joints.
Rubbing the fugue between the tiles is done with a rubber spatula. After filling the seam with the solution, the surface is grouted at an angle of 25-30°. In one pass, about 3 m2 of area is processed - it depends on the skill of the finisher and the size of the tiles.
Traces of paste on the tiles are immediately removed with a dry cloth (a wet cloth will leave stains that will take a long time to wash away). After 3-4 hours, the seams can be corrected with your fingers - rub the solution in places where there were gaps or the fugue failed. After this, the seams are sanded with a foam sponge.
What should you get?
Layout methods
In addition to the options described above, there are other ways to place tiles.
Basic option
A simple and popular method is the classic layout without offsets. This styling technique looks best with large elements.
45 degree diamond layout
The corner method is in second place in popularity. This layout is much more original than the first, but the complexity with this method increases. It requires marking the center of the room at the preliminary stage and a lot of trimmings. The consumption when laying in a diamond pattern is approximately the same (15 percent). The first 4 canvases are laid in accordance with the intersection axes.
Laying "in a run"
If the tiles are rectangular in shape, the principle of brickwork applies. The method can also be used with square canvases. If you have no experience, this method is optimal because it allows you to hide uneven joints. To complete the design, the canvases are laid from the central part of the room, placing 3 elements in a triangle.
Chess layout
Another layout option is chess. Highlighting is achieved by alternately laying two types of contrasting colors, for example, black and white. This method is also acceptable when laying in a diamond pattern. Installation "running" at an angle is not carried out, as the floor will look crooked.
Lines
A universal layout method, where instead of edging, trimmings of the main tiles are used to highlight sections of the walls.
Most often, the division is carried out in the horizontal plane. The vertical layout looks illogical and after arranging the bathroom, the effect is lost. In the case of “runaway” installation, this method of layout is unacceptable, as can be seen in the photo.
Linen carpet
This pattern is applicable for large surfaces and areas of premises that are in plain sight. Areas of the room are highlighted by using squares of elements of other shades. Thus, any necessary part of the room is highlighted. The dimensions of the inserts depend on the area of the room.
Ornament
A variant of this layout is similar to the previous method. Visual stretching of the picture is used. By enlarging the pattern of the center of the floor, the layout will look nicer. The main elements are usually chosen in light shades, and dark canvases look like long borders.
Kaleidoscope
By using a variety of colors of canvases and their placement, you can end up with an original effect. The colors must match. Minimum 2 shades are used. The patterns can be radial, horizontal or completely chaotic. The central part is filled with dark shades, and the edges with light shades. This layout involves the use of small tiles.
How to lay tiles
The consumption of materials depends on the chosen design of the bathroom, its shape and area. It is advisable to calculate the entire finishing area and increase the amount of material by 5-7%. The qualifications of the performer and the chosen method of carrying out the work also affect the final result.
There are several styling options!
Direct is the simplest approach. Here you need to lay them horizontally or vertically in a row. The seams of each subsequent row must clearly coincide with the seams of the previous one. This method is most suitable for rectangular rooms; it is easy for a novice master to handle.
Diagonal - its use is advisable if you have chosen a square tile and lay it diagonally. This method allows you to visually level out unevenness, but requires more skill in execution.
Checkerboard – used in square-shaped bathrooms and requires laying tiles of two colors in a checkerboard pattern.
With offset. It is necessary to purchase rectangular tiles with an aspect ratio of 2 to 1. Laying is done by shifting each subsequent row to the side relative to the previous one.
Mosaic installation of individual small ceramic elements.