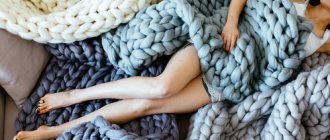
About the material
The raw materials are wood and cellulose fibers. Under the action of the press, a soft product is formed from the woven web, ideally permeable to moisture.
By using exclusively natural ingredients, the resulting product is environmentally friendly. Products are classified by:
- Shape - square, rectangular, with many corners, round.
- Structure - 1, 2, 3-layer.
- Decoration - white, colored, one tone, patterned.
- Surfaces are smooth and textured.
- Size – the following are considered standard: 10x10, 24x24, 33x33, 41x41 cm.
Kinds
Absolutely all napkins can be used for crafts. Their difference from stationery or craft paper is their delicate structure, pliability and airiness. They clump easily. The process of creativity with such raw materials is relaxing and calming. Mastering the process is not difficult at any age.
Crafts made from paper napkins are very diverse, but in order to achieve the desired result and acquire the appropriate skills, you should start with simpler tasks, gradually moving on to intricate themes. The following classes are distinguished:
- Economy - the most affordable, consisting of 1 layer, size 24x24 cm.
- Premium - higher quality raw materials are used.
- Luxury - 2- and 3-layer, common dimensions - 33x33 and 41x41 cm.
Simple napkin patterns for beginners
So, we have everything prepared. Now it remains to decide on the scheme. We denote rapport by *…*, as is customary in the descriptions. For all napkins we will need mercerized cotton and a No. 2 hook.
"Snowflake"
We cast on 8 air loops (VP), close the circle with a connecting loop (SP).
1st row: 5 ch, *1 double crochet (dc), 2 ch*, sp in the third stitch (in the pattern, the connecting stitch will always be tied into the third chain stitch, otherwise the rows will go astray).
2nd row: starting from it, each time we first make 3 VP lifting, then follow the pattern, 2 more VP, * 3 VP, 3 SN in 1 SN of the previous row (prev. row) *, SP.
3rd: 2 dc in the previous column. r., *4 VP, 5 CH (2 CH in the extreme CH and 1 CH in the middle)*, SP.
4th: 6 dc (2 dc in each dc in the outer dc of the front row and 1 dc in the middle), * 4 ch, 7 dc (we work as in the third row - adding 1 dc in each free dc middle)*, SP.
5th: 8 dc (same as row 4), * 5 ch, 9 dc (same as row 4) *, sp.
6th: 10 dc, *6 ch, 11 dc*, sp in the third ch and make another sp.
7th: 8 CH (leave one column of the previous row free), * 8 VP, 9 CH * (keep one column free on both sides), as a result, a rhombus should be formed, SP in the third VP + 1 SP.
8th: 6 dc, *13 ch, 7 dc*, sp in third ch + 1 sp.
9th: 4 dc, *6 ch, (1 sc, 6 ch, 1 sc) – in the middle of the arch, 6 ch, 5 dc*, sp in the third ch + 1 sp.
10th: 2 CH, *6 VP, in the arch 6 CH, 6 VP, 3 CH*, SP in the third VP + 1 SP.
11th: 1 dc, [7 ch, in each of the four middle scs before. R. we knit - *2 dc with a common vertex (A), connecting them 3 ch* 4 times, 7 ch, 2 dc], sp into the third ch.
12th: don’t forget about the rise, do 4 VP, picot, [3 VP, into arches from VP before. R. do *2 dc with A, 2 ch, picot, 2 ch, 2 dc with A* 3 times, 3 ch, picot, 4 ch, 1 dc], sp in the third ch.
In the description of the last rows in [...] a large rapport is taken, and in *...* - a small one located inside it.
ATTENTION! The picot is knitted like this: 4 ch and 1 sc in the first ch. This is a popular way to decorate a harness, so we remember and use it.
"Pineapples"
The motif is so popular that it needs to be studied immediately. It is used to create openwork on dresses, skirts and blouses. It is used to make balloon shawls and scarves. The scheme is complicated only at first glance.
IMPORTANT! Each row begins with three chain stitches and ends with a connecting stitch.
We start with six air loops connected into a ring with a connecting post. Then we knit three chain stitches for lifting and 19 double crochets.
The base is ready, let's go through the rows. For convenience, they are numbered. It is better to knit stitches into an arch in the middle, not in a loop. This way you won't get any extra holes.
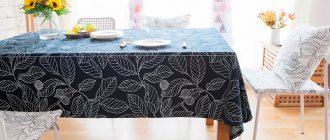
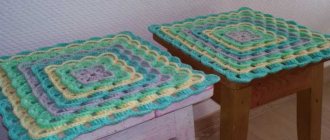
For table setting
Napkins mainly serve for hygienic purposes during meals. However, you can not just place them in a glass, but, with skill, set the table attractively. The most famous ideas for crafts made from napkins:
- In the shape of an accordion - to obtain the desired shape when assembling.
- Packaging for cutlery - rolls into a triangle to form a small bag in which it is convenient to place a fork, knife and spoon.
- Complex configurations - tinted napkins are laid out on the table so that they form a large flower, from which a petal can be pulled out if necessary.
There are a huge number of variations for placement on the table. Wanting to show ingenuity, the hostess can always decorate the dining room meal, showing non-standard solutions, creativity and her own approach.
Where to start knitting napkins
Today we will look at simple diagrams with descriptions, and more. First we decide on the threads. Many needlewomen prefer mercerized cotton. Special processing makes the yarn look like silk. It becomes strong and has a pleasant shine.
Openwork classics are well knitted with a thin thread:
- "Snowflake";
- "Rose";
- "Aster";
- "Pelican";
- the incredibly popular "Iris".
Thicker options are great for voluminous patterns:
- "Anna 16";
- "Lily";
- "Lacy pekhorka."
“Iris” produces a huge assortment of all shades of the palette, and “Snowflake” comes only in white. The thinnest to the touch is “Snowflake”, then “Iris” and “Rose”. If you knit the same pattern, the difference in the diameter of the finished product is noticeable. This effect is related to thickness. The thicker the thread, the larger the napkin. The most voluminous of those listed is “Rose”.
REFERENCE. Potholders are knitted from wool and wool mixtures. It is not customary to use them for napkin making.
The selection of a hook is based on the thickness of the threads and personal preferences. No. 2 is most often used. The result should be a moderately dense product without loose sagging posts and loops.
To begin with, take the most popular number. If things go well, the craftswoman stocks up with a set of hooks for the most accurate selection.
flower composition
Crafts made from napkins – flowers – are the most common option. The color scheme is completely different. When creating, it helps that they can be painted in any tone that seems most preferable.
Simple but lush flowers are used to decorate a dinner party, dinner or gift. Normal working set:
- Scissors.
- Glue.
- Threads.
- A tube for the stem if you intend to make a bouquet.
Do-it-yourself paper napkin crafts step by step help you acquire the required skills and get the desired result.
Stages of work
- The accordion folds to 1 cm. For greater accuracy, it is better to resort to markings.
- Without turning it, it is placed on a smooth surface and rolled up to determine the middle. It is attached to it with a thread.
- It should be rounded with scissors.
- At the end of the work, the flower must be made lush to obtain the most advantageous relief.
For variety, you can try using flowers of a different size. This terry option will beautifully decorate: a box, a photo frame or a bouquet with an improvised stem in the form of a tube.
For a gift box, a square napkin is folded into a triangle, and then the top is rounded off with scissors. Blanks of 8 petals, of which several need to be made, are glued together, and the petals, having changed, form a flower.
How to read diagrams correctly
When learning to knit, it is the patterns that will help you do everything correctly from the very beginning. Moreover, they are also used by experienced craftswomen. There are several basic rules when reading diagrams:
- They must be studied from bottom to top and from the center in a circle.
- Front or odd rows are read from right to left.
- Purl or even lines look from left to right.
- The circular series is studied counterclockwise.
Rapport is that part of the pattern that repeats; on the diagram or in the description it looks like this: “*...*”. Each knitting begins and ends with loops. A rapport can be located between them, which is repeated the required number of times.
Some of the symbols on the diagrams can be confusing. However, everything is simple here too, if you remember the basic signs:
- the air loop is designated by the abbreviation - VP;
- single crochet - sc or sc;
- double crochet - double crochet;
- half-loop – PP;
- half column - PS.
- С2Н, С3Н, С4Н are columns with two, three and four crochets, respectively.
It’s not so difficult to learn how to crochet tablecloths and napkins. In this case, the result may be unexpectedly pleasant. The house will always be cozy with warmth, and friends will certainly rejoice at the gift from the bottom of their hearts.
Roses
Another DIY craft made from napkins is the most favorite for many craftswomen. It is made like this:
- The square shape is cut into 4 equal parts.
- One square needs to be folded to make 2 equal in size, wrapped around the cylinder, leaving some space. The bottom of the rose needs to be strengthened with wire.
- Other squares are cut diagonally. The resulting triangle is wound around the core with the hypotenuse so that the vertex of the right angle is turned to the side, forming a petal. The quantity depends on the volume of the product.
- The part at the bottom is wrapped with green paper tape; it is appropriate to glue a miniature cup.
- For the stem, choose a wire made of copper or aluminum, which is covered with a ribbon cut from a napkin.
The rose is unusual in itself and in the bouquet. You can go the other way - a wide strip is cut out, which is folded more than once and then rounded at the top. The edge turns out wavy.
Note!
- Quilling crafts: features of the working technique, step-by-step instructions and clear diagrams for beginners + ideas for creative crafts (150 photos)
- Crafts made from corrugated paper: 100 photos of creative solutions for crafts + step-by-step diagrams and instructions for making your own
- Crafts from foamiran: ideas for creating crafts and interesting patterns for making flowers
The product is formed by twisting it in a spiral. The edges are folded to the side. The bottom is decorated by analogy with the previous example.
The nuances of knitting an openwork tablecloth
Crocheted openwork napkins and tablecloths will be a great source of pride for a beginning craftswoman. There are various techniques. The tablecloth can be knitted entirely or combined from several fragments.
The Bruges technique originated in Belgium, in the city of Bruges. There, various knitted items have been popular since the sixteenth century. This technique uses a method that imitates bobbin ligature. A special feature is the combination of various weaves into ornaments.
If you want to see roses blooming on the tablecloth, then it is better to use the fillet knitting technique. It is based on a mosaic pattern, that is, the principle of “empty cell - filled cell.” They differ from each other in the way they are knitted. A filled cell is obtained from three Sts. In this case, each row begins with four VP lifts and ends with one StSN. An empty square is knitted using one DC and two VP.
A tablecloth using the fillet knitting technique will look great. The materials you can use are cotton or linen. For this technique, you need to take a hook one size smaller in relation to the thread, and start knitting a chain of loops. Then continue manufacturing a new product according to the chosen scheme.
Before knitting a tablecloth, you need to decide on its shape and size. Much depends on the table itself. The tablecloth can be round, square, rectangular or oval. In order to find out the size of the tablecloth, you need to measure the length and width of the table. Don't forget about the hanging edge. It is recommended to add 20-40 cm for each side.
Knitting pattern for a square-shaped product:
- You need to start from the middle. Knit 409 chain stitches (VP), then turn.
- In each row, replace the first double crochet with three VPs.
- Finish each trim strip separately.
- Once the first half is knitted, you need to turn the tablecloth over.
- The second part must be started from the second row.
- Shape the tablecloth.
The size of the finished product will be approximately 120 x 100 cm. You need to work with a crochet hook number 1.5. The knitting density will be 140 cells per 141 rows. A square tablecloth will look beautiful on a round table.
Square model
Scheme Rectangular tablecloth Scheme
Progress
Dandelion
Yellow napkins are purchased. The order is:
- The napkin is folded to a square of 5-7 cm.
- The center is connected with staples using a stapler.
- The layers are cut at the bend.
- A circle is made from squares.
- Incisions are made along the entire perimeter for fluffing.
The flower is fixed on a wire stem. As an alternative, instead of a stem, a “lawn” or a three-dimensional clearing is arranged.
Chamomile
It is best to attach such flowers to large paintings. Made from white and yellow napkins. In order not to cut out a circle with a diameter of 5-8 cm, you can buy ready-made ones. The workpiece is divided into 20-25 identical parts, carefully cut. The petals need to be rounded at the top.
The middle is formed yellow. In the first case, the process is similar to that of a dandelion with a diameter of 3 cm. Alternatively, it is possible to assemble it from crumpled balls of 5-6 mm each. The flower is glued onto cardboard.
Note!
Crafts made from polymer clay | Step-by-step master class on creating beautiful craftsDIY epoxy resin crafts - options for original crafts, step-by-step instructions for pouring and making them yourself
Lego crafts: step-by-step master class on creating simple DIY crafts + original versions of Lego products (photo + video)
Unusual doll
Your child will definitely like this doll made from napkins. It can be used both as a toy and as a decoration for a children's room.
You will need:
- white and yellow paper napkins,
- napkins with a pattern,
- bright ribbon,
- white threads.
Step-by-step master class:
- We twist two thick tubes from white napkins - the torso and arms.
- We make hair: we twist yellow napkins into two loose tubes, place them crosswise on the body, after which we bend the body.
- We separate the head with threads.
- We wrap the tube for the arms with threads perpendicular to the body just below the head.
- We make a dress from a napkin with a pattern and tie it to the doll with a ribbon near the belt.
Applications and paintings
DIY paper napkin crafts are a reason for inexhaustible and limitless ingenuity. They can be easily crushed into tiny balls, so this property is used in a specific technique. For the picture, multi-colored napkins are cut into squares and crumpled until dense balls are formed.
The brightness of the canvas depends on the abundance of colors. A drawing is applied to the cardboard. It is not forbidden to do it using carbon paper. The balls are attached one by one exactly according to the image. Dimensions can be changed by increasing the size of the elements.
When quilling, napkins are divided into strips of 10 - 12 mm, spirally wound onto a rod, after which an applique is made. You can give it different shapes - round, oval or in the form of a drop, by crumpling the spiral with your fingers. Often, strands twisted from strips are used for paintings.
Stages of work taking into account the type of napkin
There are many knitted napkins and their patterns, but it is recommended to start with simple options. First you need to decide how exactly the product will be used. You can knit a napkin for cups and glasses, a stand for your favorite vase or any other product. After clarifying all the details, choose the drawing you like and start working.
On the table
At first glance, insignificant details can imbue a home with joy and well-being. A set table with small napkins under a plate or glass will fill the evening with home comfort, and such a dinner will be significantly different from quick snacks at work. Knitted products can be of completely different shapes: round, oval, square and rectangular. As for threads, it is recommended to use plain, light, well-twisted versions without thickening.
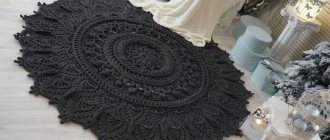
Round
The most popular among needlewomen is a round napkin. The incredible variety of patterns available will amaze everyone, from people who are just starting to take their first steps in knitting to those who have been knitting for many years. The crochet napkin described below is called “Tenderness”. The finished result will measure 36 cm. To make it you need mercerized cotton and a No. 2 hook.
First you need to cast on eight loops and close the circle. Each subsequent row must begin with three air loops (VP), which replace 1 double crochet (Dc), and end with a connecting stitch (CST). Then from the first to the eighth row you need to knit according to the following plan:
- 2 StSN, 2 VP. Repeat this eight times.
- Knit 2 dc, 2 ch into each dc of the previous row. Also repeat eight times.
- Knit 2 double crochets (dc) in one loop, then 1 dc in two. Repeat the described combination until the end of the row.
Starting from the fourth to the seventh row after 2 dc in one loop, knit 1 dc in four, six, eight and ten loops. After this, you need to repeat everything that was in the third paragraph. From the eighth to the twenty-second row you need to knit according to the pattern.
Rectangular
A rectangular crocheted napkin will look great on a table, chest of drawers or shelf and complement the interior of an apartment or house. The scheme is simple, so the work will not take much time. To make a crocheted napkin you will need a tool numbered 1.5 and white cotton yarn. The size of the finished product will be 35 x 51 cm.
This napkin is knitted using a fillet pattern. It can be decorated with trim around the edge. The work flow is as follows:
- First you need to knit 112 air loops (VP) and plus 3 lifting VP. Then continue working using the fillet pattern.
- The border is knitted in a circular pattern around the entire perimeter of the napkin. It starts with one VP and ends with one connecting column (CCT).
It is recommended to sprinkle the finished product with water and starch.
Option 1 Scheme of the main pattern Scheme of the border
Option 2
Pattern diagram
Border
Flower shaped
For beginners in knitting, a floral pattern is an ideal choice. The design of the product is quite simple. A crocheted napkin with flowers will look great in the home of any housewife. The diameter of the finished product will be 15 cm. For production, hook No. 2 is used.
First you need to knit a chain of eight loops. After this, form a ring and follow the diagram in which the point of the plan corresponds to the row:
- Knit one chain stitch (VP), sixteen double crochets (Dc) and one connecting stitch (SST).
- One half double crochet (PStSN), five VP. Repeat eight times.
- Five VP knitting under arches. After which one SST, five StSN, two VP. Repeat eight times and add CST.
- Two Sts, three Sts, two Sts. Next add two VPs. Same as in the previous row, repeat eight times, then add SST.
- Five dcs with one base, skip the second and sixth stitches. Add three VPs, under two VPs – one StSN, two VPs and one StSN. Repeat eight times, then SST.
- Under all the arches from VP, tie one StS, two VP, one StS, three VP and add SST again.
- Knit a dc under the arch, then knit one dc, three ch, one dc, three ch. After this, skip one arch and repeat the steps of this row again. Finally, add one VP and one PStSN.
- One single crochet is worked under the arch and five double crochets under the next arch. The series of SSTs ends.
Volumetric
At first glance, a crocheted voluminous napkin may seem very difficult to knit. However, it is not. If you follow the pattern, then fabulously beautiful crocheted napkins will become a wonderful decoration for your home. All parts of the flower are separated from each other by a mesh or relief columns. Volumetric napkin diagram:
- To begin with, 4 leaves are knitted. For one, a chain of seven air loops (VP) and one VP for lifting are collected.
- From the second loop, knit six single crochets (dc), in the next five dc and again six dc. After this, turn the work around.
- One VP. The hook is inserted behind the back wall of the loop of the second column. Seven StBN.
- Then knit three sc from one loop and seven sc. Rotate the work.
- The third and fourth paragraphs are repeated eleven times. After this, knitting the leaf ends on one stbn.
- Work on a three-dimensional flower begins with a closed chain of six VPs.
- Three VP lifts. Three VPs are knitted five times and a dc is closed in a ring. Three VPs and a connecting post (CCT) are added to the third lifting loop.
- To make the flower voluminous, you need to knit several rows of petals. For the first, one sc, two dc, one double crochet (dc2h), two dc, one dc. You need to tie six such petals and close the SST.
- For the second row, 7 chain stitches are worked for each petal and connected to the previous DC.
- One StBN, two StSN, three St2N, two StSN, one StBN.
- Repeat the same steps for the third row of petals, only replace three C2H with five St2H.
- The last step for knitting a voluminous napkin will be connecting the flower and leaves.
Despite the scheme, you can always get creative and add your own elements. This will make the voluminous napkin more individual. At the same time, it is important to know how to work so as not to spoil the whole picture.
We knit a chain We knit a ring 5 double crochets
Forming petals
Making six petals
We knit a connecting post
We begin to knit the second row We tie each petal Done You can make several layers and decorate the product
Under the glass
In order not to simply place glasses on the table, you can use purchased coasters. But it’s much better to knit special small napkins that will look great. You can also give this set to one of your friends, they will definitely appreciate it. Napkins for glasses do not have to be white; you can use any color you like. The product can be made round, square or unusual shape. The diameter of such a napkin will be 6-8 cm.
The napkin is knitted according to the pattern:
- Two double crochets (dc) and one chain stitch (VP), repeat the combination 8 times.
- Two dcs and one VP are added to each loop.
- Two dc and two VP, but you must skip the VP of the previous row.
- One dc in a loop where there are two dc. Three DCs are knitted into each arch.
- In the first loop, knit three VPs and two DCs. Then skip one row. Add sc and skip again. The next step is five dc and skip a stitch, add a dc. Knit like this until the end of the row.
- At the very end - two dc in the first loop.
You can also knit small napkins for glasses using several colors of yarn. For example, a combination of brown and blue or white and pink will look great. The napkin is knitted according to the following pattern:
- The base consists of 24 double crochets (dc) and an arch of five, seven and nine air loops (VP).
- Then a second color is added. The number of VPs corresponds to the previous row, but they pass alternately from above and below.
- The edge of the product is knitted with long drawn or solomon loops.
This pattern is suitable not only for glasses. You can crochet a napkin to fit saucers and plates, but in a slightly larger size. The resulting set can be given as a gift to friends and family.
Served hot
There is also a wide variety of napkins for hot drinks. They come in round, oval or square. It all depends on the imagination and skills of the needlewoman. They knit very quickly, without requiring any special skills.
The size of the finished product will be 16 x 16 cm. It will be especially beautiful if you combine several colors of yarn. You will need a hook number 2.5-3.
Scheme:
- First you need to knit a chain of thirty-seven air loops (VP).
- Add three more VP lifts.
- Start with the loops before the repeat, knit the repeating part of the pattern 11 times, turn the product.
- Repeat rows 3 and 4 constantly. You also need to introduce a blue thread into the work, passing it around a single crochet (SC).
To get neat edges of the napkin, the loops of the finished product should be at the top.
For the kitchen, you can knit not only coasters for dishes, but also potholders. They come in round, square, flower or animal shapes. For the next pattern you will need yarn of several colors. You can use orange, purple, pink or any other combination.
Knitting pattern for potholders in the shape of a flower:
- Cast on nine air loops (VP) and close them in a ring.
- Knit eighteen single crochets (dc).
- For one petal you need to cast on twenty-three VPs and close the knitting.
- Knit one sc. Tie a new petal and subsequent ones, there should be nine of them in total. Tie each element with twenty-five stbn.
- For all petals - 12 stbn. From the central loop of each element, 3 sc and 12 single crochets.
- Change the thread color in the sixth row, and then in the eighth and ninth rows, continue working.
- Connect the petals, tying the entire product in a circle.
- Turn the flower over and start knitting in the opposite direction. There should be fifteen stbn on each petal.
- A small loop will complete the tying.
Making a ring of 9 air loops
We knit the first petal
You need to make 9 petals
We tie the petals in each new row with 25 single crochets
Knit row 5
We change the thread and continue knitting with a different color. We turn the work over and knit in the opposite direction. We tie the entire work in a circle. We fasten the loop. Ready
Numerical and alphabetic designations
DIY crafts made from napkins in the form of three-dimensional digital or letter values in 3D format look especially relevant. They are widely used as an indispensable attribute of a celebration or festive event. They often indicate the date of birth.
Note!
Christmas crafts - how to make them yourself? 150 photos of the best themed craftsCrafts made from stones: creative options for crafts made from stones + step-by-step instructions for making your own, methods and schemes of work
- Crafts from disks: a step-by-step master class on how to create them yourself, creative ideas for crafts of varying complexity + simple patterns for beginners
The base of the number is made of durable cardboard, after which flowers are placed on it, symbolizing the special solemnity of the situation. It is necessary that all space is occupied - in front, behind and on the sides. A golden cardboard crown is attached to the top.
Smesharik Krosha
Favorite hero for kids. The instructions assume the following sequence:
- A spherical object is crumpled from the newspaper.
- The newspaper base is covered with balls.
- Ears, eyes and paws are cut out of paper of different colors.
- The nose and teeth are prepared from napkins.
- Apply napkin lumps to the paws.
- The paws are attached to the ball - the body.
- The hands serve as 2 balls.
- To complete the image, body parts are attached - ears, nose, mouth and eyes.
Decorating cans and bottles
Ordinary household items will serve as an attractive and elegant container for placing flowers. These DIY paper napkin crafts look truly exquisite. For the spring ornament you will need the following ingredients:
- Can.
- Napkins with an openwork pattern.
- Glue.
- Putty.
- Acrylic paint.
The container is shaped using putty followed by paint. A napkin of the selected tone is glued over the entire surface. From those with embossing, a pattern is cut out. Putty is used to create the top of the vase and a relief image on the walls. Patterns from napkins are glued on.
The protruding elements are covered with a golden hue with a sponge. Finally, they are varnished. The volume is increased by placing the jars one on top of the other. It should be noted that crafts made from openwork napkins look much more expressive.
Required materials and tools
When faced with knitting openwork napkins for the first time, it is better to choose thicker threads. The hook is selected according to their size. The thread must fit exactly into the notch, leaving no empty space. For those who are just starting to crochet openwork napkins, it is better to choose a tool measuring 2-2.5 mm. Gradually improving the technique, you can switch to thinner threads and a 0.5-1 mm hook - then the product will be soft and airy.
When crocheting napkins, beginners should choose wool blend or acrylic yarn. More experienced craftswomen prefer cotton threads. The most popular yarn is Iris. The color of the thread depends on the vision of the final result. Most often, women choose white; it is a kind of classic of needlework and knitting. A large number of crochet napkin patterns with descriptions in Russian can be found on the Internet, books or magazines.
Scenery
DIY crafts made from napkins add solemnity to the atmosphere and create style. Moreover, they do not require prior preparation or training. On New Year's Eve, you can make a wonderful, wonderfully beautiful garland of napkins folded into an accordion.
Using a few bright colors can greatly enhance the look. The product attached to a tape, fishing line, cord or wire is pulled across the room or placed in a zigzag pattern on the wall. Such DIY New Year's crafts made from napkins will highlight the individuality of the room and the ingenuity of the owners.
A good example
A decoration made from napkins in the form of a monogram with the first letter of a person’s name looks quite elegant and modern. This design solution is suitable for children and adults.
It can be located on one of the walls of the room in which the feast will take place or in the room for games and competitions. In order to begin work on creating a source of good mood, you need to prepare material and tools:
- Cardboard sheet.
- Pencil for marking.
- PVA.
- Stationery scissors.
- A piece of rope.
The letter of the name and the numbers of the date of birth must be applied as a sketch to the base. Any method of cellular scaling is used for enlargement. Having experience in working with computer programs, you can use them.
The resulting template is cut out on cardboard with a knife or scissors; each person must choose the most convenient method for themselves. Use a pencil to mark the areas for gluing napkin balls and small components of the structure.
You need to decorate the monogram carefully. Securely secure all elements with glue and adhere to the marked marks. Color solutions are thought out in advance in order to correctly and successfully select the required shade and their combinations.
When choosing, it is better to rely on your personal taste; you can remember the favorite colors of the person for whom the surprise is being prepared and apply them in the design.
A three-dimensional figure for the New Year can include symbols or four-digit numbers in the image; the idea of using all the colors of the rainbow has proven itself to be excellent.
Various geometric shapes fit harmoniously into the overall picture and add variety to the composition. The back side of the structure is equipped with fastening loops, to which a piece of rope will be attached.
It is better to treat such details with special care so that the holiday is not spoiled by the fall of decorations at the most inopportune moment.
Pompoms
You can create a festive atmosphere with fans. An accordion of 3 napkins bends in the center. Adjacent edges are fastened with a stapler. It is necessary to make 3 such blanks with a rounded top.
The parts fit together in the shape of a sun. The edge parts are attached, and the accordions at the top are stretched to form a circle. Several crafts made from paper napkins of various shades are mounted on the wall, changing the living space beyond recognition.
Christmas tree
To beautifully and originally decorate your home for the New Year holidays, it is not at all necessary to go shopping in search of souvenirs. You can make a beautiful and original Christmas tree for the New Year, which can become the highlight of your holiday table, at home.
You will need:
- A3 paper,
- napkins of green and light green colors,
- scissors, glue, pencil,
- ruler, stapler.
Step-by-step master class:
- We make a cone out of paper, glue it together, and level the bottom.
- We cut the napkins folded 4 times at the fold: you get two blanks per napkin.
- We fasten the resulting squares in the center with a stapler.
- Gently crumple the napkin towards the center, starting from the top layer.
- We straighten the resulting flower (in total you will need to make about 50 flowers).
- Glue the flowers to the cone in a circle, starting from the bottom. We glue alternately: green flower - light green, etc. There should be no space left between the flowers.
- Decorate the top to your liking.
Butterfly
This craft made from napkins will attract the eye, regardless of the style of the interior. It is made from 2 pieces of different lengths folded like an accordion. In the center, the parts are tied with thread, and wings are cut out at the edges. The accordions are fastened with a stapler. The upper parts are moved apart. Brown stripes are wound around a fixed toothpick, completing the figure with wire tendrils. The wings are decorated with circles.
Balls
An option for DIY crafts made from napkins are balls of different sizes. The base is a ball made of polystyrene foam, foam rubber or rubber. For decoration purposes, it is covered with flowers made from flagella twisted from strips.
Accordions are used as a variety. For them, wide strips are prepared from napkins, folded longitudinally into an accordion. In the center it is tied with wire, and the halves are connected and fluffed up.
With skill and creativity, you can make amazing things from paper napkins that will decorate your table or room. They will serve as an excellent gift for any occasion and will definitely delight loved ones and acquaintances!