0
22539
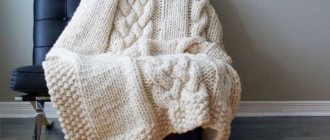
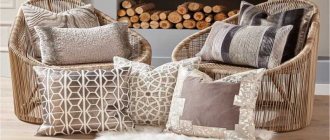
Knitting enthusiasts create unique things, and interior items are no exception. For example, furniture covers help refresh it and maintain its original appearance, and they can be made from any durable yarn. Crocheting covers for chairs and stools is easy, especially when using a step-by-step master class. Using your favorite colors and unique patterns will make the cape unique, and you can choose the pattern to suit your skill level.
How to crochet a seat on a chair
Crocheting a seat is a simple, quick and interesting job. Any thread will do, preferably not very thin, of course, such as Caucasian yarn, acrylic, acrylic with cotton or wool.
Approximate consumption is about 200 - 250 grams.
Usually the seats are made double-sided - the upper part is knitted according to the main pattern, and the lower part - with some simple pattern. The two finished parts are crocheted together.
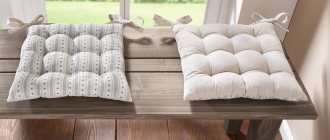
You can knit a single-layer one, and to prevent the cape from slipping off the chair, tie a small side to it and insert an elastic band or braid into it.
In general, you can decorate the edge of the seat with anything you want - tassels, bows, pompoms and even peacock eyes. See examples below.
Tips for beginners
In order for a knitted product to serve for many years and delight its owners, you should take care of the yarn. For work, it is better to choose synthetic yarn, for example, acrylic or cotton with the addition of synthetic fibers. For the crocheting process, it is recommended to use thicker threads. This is necessary to ensure that the rug fabric is dense and warm. Accordingly, you need to choose a larger hook. Before starting work, you need to knit a sample, a small square, wash and iron it. This technique will help with determining the size of the finished product. When the sample has dried, you need to measure it and, using a simple arithmetic proportion, calculate the number of loops that are needed to obtain a rug of the required size.
You can choose any knitting pattern. The main criterion is its attractiveness. You can even use a diagram for a napkin, or any other one you like, as well as use the diagrams and descriptions presented below.
Small scraps of yarn of different colors will make a rather attractive and interesting rug. This technique will allow you to use the accumulated remnants of threads that are a pity to throw away, but you won’t be able to knit anything from them. But it is worth remembering that the thickness of the thread should be the same over the entire surface of the product.
Related article: Crochet. Small shoulder bag
In order for the product to serve longer and maintain its appearance, you need to make a base for the future rug from dense fabric. If the rug is of insufficient size, the situation can be quite easily corrected with the help of a border. The rug must be tied around the perimeter with the required number of additional rows.
In order not to have to unravel the knitted rug and redo part of it, you need to carefully follow the icons in the diagram.
Square crochet seats using weaving technique
Square rugs are suitable for chairs and stools with square-shaped seats. The simplest seats are most often knitted using a granny square.
But today we have original ideas.
There is no need for a pattern here; you need to tie several strips together with regular posts of any width, with a length equal to the width of the stool, and then weave them together using the darning method. I already told you that I once tried to weave a seat like this, but in the end it turned out to be a bag)).
See how you can decorate your interior with different things using this weaving technique.
Stages of manufacturing various models
The process of crocheting covers for chairs and stools usually consists of several stages. The simplest are round and square-shaped seats, and products for decorating the backrest. One-piece models require more skill and attention.
Square for stool
Square capes are attractive, easy to use and easy to make. To work you will need black, gray, blue yarn (2 skeins of 100 g each), hook No. 3.5, scissors. The manufacturing process consists of several stages:
- Knitting begins with blue threads, in accordance with the pattern.
- The third row starts with a gray color; the square element is not knitted completely, but only on both sides.
- Rows 5–9 are performed with black yarn using the same technique. Colors and stripes alternate according to the scheme.
- On rows 23–24, you need to switch to blue yarn for knitting the sides.
- The edges of the capes are tied with arches consisting of air loops in 2 rows.
Tips for making and decorating chairs from plywood with your own hands.
The finished cover is decorated with tassels of blue thread. To do this, you need to cut small pieces of equal length from the skein. In the same way, you can make a cape on any surface; you just need to calculate the optimal number of loops.
Knitting pattern
Knitting begins with blue threads, in accordance with the pattern
The third row starts with a gray color; the square element should not be knitted completely, but only on both sides
Work rows 5–9 with black yarn using the same technique, alternating colors and stripes according to the pattern
On rows 23–24 you should switch to blue yarn for knitting borders
Tie the edges of the capes with arches consisting of air loops in 2 rows, and decorate the finished cover with tassels of blue threads
Round seat cover with sides
A round cape made using the popcorn technique will be the perfect complement to a stool of the same shape. The soft surface is easy to use, and to create it you will need white, black, green yarn, or a combination of other 3 shades is possible. The work is carried out using hook No. 3, 3.5, using step-by-step instructions:
- Cast on 5 chain stitches and connect them with a ring.
- Next, 2 lifting loops are cast on, and 7 single crochets are knitted in the ring.
- Above each column you need to crochet 1 blind loop. Between the stripes an arch is made from a pair of air loops.
- On the next row, 2 half-columns are knitted in each arch, 5 chain stitches are cast on, then a yarn over is made and a long loop is pulled through.
- The remaining stripes are created in the same way, the number of rows depends on the diameter of the stool. To create a border, you need to knit single crochets in each half-column, and 2 stitches in each arch.
- Knitting continues until the length of the sides reaches 10 cm.
To make round stool covers practical and comfortable, an elastic band is threaded into the edge of the sides. With its help, the product will fit perfectly on the furniture. If desired, the edge can be decorated with the main pattern, then the model will acquire volume and an unusual appearance.
The diameter of the cape should be 1 cm less than the seat.
Chair back cover
For work you will need threads with medium thickness, hook No. 3. Bright colors are preferred. Diagrams and descriptions will help you go through all the stages correctly:
- Cast on 56 chain stitches.
- The second row consists of 6 half-columns, 2 air loops, as well as a pair of half-columns with one base.
- The third row includes 2 chain loops, 2 half-columns with one base, again 2 chain stitches.
- In the fourth row, knit a stitch, a chain stitch, another stitch, a chain stitch, then 11 stitches and repeat the pattern.
- The next five strips are knitted in the same way, but with each repetition the number of half-columns is reduced by 1.
- After this, the columns begin to increase, the drawing is performed in a mirror image.
- Two heights are knitted, the product is connected along the side seams.
Review of Ikea ladder stool varieties, product functionality
A knitted cape can consist of a simple fabric or a flower-shaped pattern. The edges of the product are decorated with lace, in accordance with the diagram.
Base diagram
Flower diagram
Lace pattern
One-piece chair cover with backrest
A beautiful chair cover made in dark blue will become a universal interior decoration. To work you will need yarn, hook No. 3. The work is carried out according to the instructions:
- Initially, it is worth clarifying the parameters of the back and seat. In the presented model these dimensions will be the same.
- Cast on the number of chain stitches that corresponds to the width of the chair.
- According to the pattern, simple double crochets are knitted.
- Knit the length from the hem along the seat, then through the back. The finished cape will completely cover the entire chair.
- Separately, cast on air loops in accordance with the width of the hem, knit three rows according to the same pattern.
The resulting element is sewn on the sides and back. The base of a knitted chair cover consists of a couple of parts and one long seam. For decoration, you can use any pattern you like.
Knitting pattern
Ornament
Ready product
Interesting seat with peacock eyes
The lower part of the seat is crocheted with single crochets, and the upper part is again crocheted with popcorns.
Peacock eyes are knitted simultaneously with knitting the last row of the top part: over every third popcorn you need to knit 7 VPs, in the last loop - new popcorn, then two rows of double crochets in it and return to the main knitting along a chain of air connecting stitches.
Red stool cover with embroidery
Size: Ø28cm.
We will need:
- yarn, 100% cotton, 100g per 392m, red melange – 100g;
- the same, red – 20g;
- some white and orange yarn;
- hook No.3.
Description
We begin to knit a cover for a stool by crocheting a chain of 2 VPs using melange yarn. We close them in a circle SSt. Next we knit:
- 1st row: 1 single rise, 5 sc in the resulting ring. Finish the row using conn. Art.;
- 2p.: 1 VP lifting, 1 RLS in VP lifting, * 2 SC in the next row. RLS previous R. from hook* – from * to* repeat 4 times, 6 times in total. Finish the row using conn. Art.;
- from 3rd r. on the 28th row: perform RLS, evenly increasing their number in each row. on 6 columns. Every r. finish SS. Cut the thread;
- RUR 29: connect red yarn, 1 st. lifting point, 1 sc in the previous sc. R. from the hook. Finish the row using conn. Art.;
- 30r.: 1 c. p. rise, 1 sc in the sc of the previous row. from the hook, SST;
- 31r.: 3 c. p. rise, 1 sc in the sc of the previous row. from the hook, SST;
- 32r.: 3 c. p. rise, 1 sc in the sc of the previous row. from the hook, SST.
Assembly and finishing
We carry out embroidery according to the pattern using a stem stitch. Thread the elastic band through the double crochet row 32.
Beautiful seats on chairs with a relief flower
Many people have probably already seen this pattern - we have an idea for a knitted blanket with such large squares with a diagram, detailed description and video master class.
You can also tie square chair seats to the bedspread.
Crocheted stool cover with pompoms
A simple square knitted with single crochets will be decorated with a border of pompoms. They can be made in three ways: twisted and cut from yarn, crocheted pompoms, and also crocheted ordinary cones - popcorns, as suggested by the diagram.
Brown stool cover
Size: Ø28cm.
We will need:
- yarn, 100% cotton, 100g per 392m, brown melange – 100g;
- the same, gray – 20g;
- some white, red and orange yarn;
- hook No.3.
Description
We begin to knit a cover for a stool, like the previous knitted covers, by crocheting a chain of 2 VPs with melange yarn. We close them in a circle SSt. Next we knit:
- 1st row: 1 single rise, 5 sc in the resulting ring. Finish the row using conn. Art.;
- 2p.: 1 VP lift, 1 StBN in VP lift, * 2 StBN in the next. StBN previous R. from kr-chka* – from * to* repeat 4 times, 6 times in total. Finish the row using conn. Art.;
- from 3rd r. on the 28th row: perform RLS, evenly increasing their number in each row. on 6 columns. Every r. finish SS. Cut the thread;
- RUR 29: connect red yarn, 1 st. lifting point, 1 sc in the previous sc. R. from the hook. Finish the row using conn. Art.;
- 30r.: 1 c. p. rise, 1 stbn in sc of the previous row. from kr-chka, SST;
- 31r.: 3 c. p. rise, 1 stbn in sc of the previous row. from kr-chka, SST;
- 32r.: 3 c. p. rise, 1 stbn in sc of the previous row. from kr-chka, SST.
Assembly and finishing
We carry out embroidery according to the pattern using a stem stitch. Thread the elastic band through the double crochet row 32.
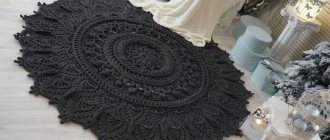
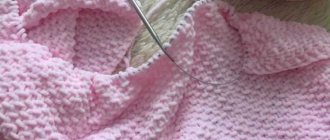
Knitting a round seat with a spikelet pattern
Round seats can be used on both round and square stools, and a variety of patterns will allow you to choose a model to your liking.
This simple round crochet seat is decorated with voluminous spikelets.
The diagram is in front of you.
We have already discussed how to knit this pattern in the article about round pillows, there is also a video there.
Vivid examples of design
Here are some striking examples of interior design with ottomans.
Hand-made interior items most often become the main decoration of the room.
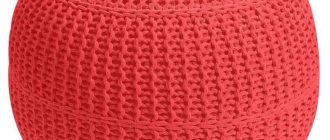
Before you start knitting a pouf, you need to decide on its intended purpose, shape and size.
A pouf is more than a pillow, it is a universal piece of furniture that can be round, cubic or cylindrical.
It is very easy to knit with your own hands. To do this, you can use a crochet hook or knitting needles. It all depends on your desire. And if you don’t know how to knit, just take an old sweater. A few light movements - and the bright decor is ready. A knitted pouf will add warmth and comfort to the interior. And this is so necessary for modern style.
Knitting patterns for volumetric seats
Very beautiful three-dimensional patterns are obtained using the diagrams below.
Well, color – color always plays a decisive role.