Design: optimal dimensions for a steam room
Like any building, the steam room must first be designed. There are several rules for creating a building plan:
- Think about how many people will be in the steam room at the same time. Its size will directly depend on this. Minimum requirements - 0.7 m2 per person.
- The ceiling height in the steam room must be chosen correctly. If you make it too high, then a lot of extra energy will be spent on its firebox. If the steam room has a low ceiling, then, being on the top shelf, a person will rest his head against it in a sitting position, and this is very inconvenient. To correctly calculate this parameter, you need to add 20 cm to the height of the tallest guest in the steam room. The optimal height from ceiling to floor is considered to be from 2.2 to 2.4 m.
- The size of the steam room also depends on the position in which you are going to spend time there: sitting or lying down. In the first case, the steam room will be more compact. In the second, it needs to be made 20 cm wider.
- It is not recommended to make windows in the steam room, but if you really want to, then let it be very small (maximum 50x50 cm). Insulate all cracks well so as not to lose heat.
- The ventilation system must be very well thought out, otherwise constant moisture may shorten the service life of the steam room or cause fungus and pathogenic bacteria to appear. Remember that your health depends on it.
The size of the bathhouse depends on the number of people who will visit it.
Remember that the stove must be located at a distance of at least 26 cm from wooden structures, even if the walls have been pre-treated with special means that protect them from burning.
Table: steam room sizes depending on attendance
| Room | When seated, pers. | When placed lying and sitting, pers. | |||||
| 1 | 2 | 2 | 2 – 3 | 3 | 3 – 4 | 4 | |
| Steam room: dimensions, mm area, m2 | 850X1150 0.98 | 1150X1150 1.32 | 1150X1800 2.07 | 1300X1800 2.34 | 1400X1800 2.52 | 1500X1800 2.7 | 1500X2000 3.0 |
| Washing room: dimensions, mm area, m2 | 1150X1300 1.49 | 1150X1450 1.67 | 1800X1800 3.24 | 1800X1800 3.24 | 1800X2000 3.6 | 1800X2100 3.78 | 2000X2100 4.2 |
| Dressing room: dimensions, mm area, m2 | 1000X2150 2.15 | 1000X2600 2.6 | 1200X2950 3.54 | 1300X3100 4.03 | 1400X3400 4.76 | 1500X3600 5.4 | 1800X3600 6.48 |
| Sauna as a whole: dimensions, mm area, m2 | 2150X2150 4.62 | 2150X2600 5.59 | 2950X3000 8.85 | 3100X3100 9.61 | 3200X3400 10.88 | 3300X3600 11.88 | 3600X3800 13.68 |
Table: which stove is better to choose for a regular steam room
| Metal oven | Brick heater | Electric heater | |||
| + | – | + | – | + | – |
| High power | The metal gets very hot and you can get burned if you accidentally touch the stove | Keeps warm for a long time | Big size | Heats up quickly | Both its purchase and use are financially expensive |
| Heats up quickly | There will be no serious burns due to accidental contact | Takes a long time to heat up | Compact | ||
| Compact | Powerful | ||||
Photo gallery: stoves for Russian baths
A metal sauna stove has many advantages
An electric sauna stove requires significant financial investment
A brick sauna heater will take too long to heat up
Vapor barrier and finishing of walls and ceilings
Vapor barrier serves to protect against premature wear and aging of walls, floor beams, and insulation material.
If you use foil insulation, then it does not need a vapor barrier, like polystyrene foam boards. The industry produces special membrane materials with high vapor barrier properties.
It is undesirable to use glassine, roofing felt or plastic film in a steam room, since when heated they release harmful substances.
The vapor barrier is placed on top of the insulation before finishing, which inside the steam room is most often made of wood - cedar, larch, linden or oak.
First the ceiling is sheathed. The lining is installed in a tongue and groove, secured using clamps into which staples or nails are driven.
Using a marker and level, mark the surface of the wall. Plan where the shelves will be located. Cladding boards are being installed and seats are being installed.
The lining is installed on the sheathing. Skirting boards for the floor and ceiling are done last at the final stage.
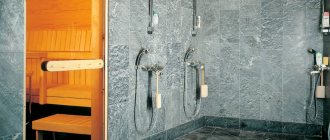
Floor installation instructions
The floors in the bathhouse are made of wood or concrete, on which tiles are then laid. Naturally, the second option will be better, since the wood can become deformed from moisture. However, before choosing, it is still better to compare both of these options.
Wood flooring: linden, alder
To install this type of floor, carry out the work in the following order:
- Install support joists on the foundation.
- Screw planed boards 50 mm thick to them. The distance between them should be 5–10 mm.
- There should be a distance of 50 cm from the ground to the planed boards. This is necessary to ensure natural ventilation.
The wooden floor in the bath allows installation very quickly
Concrete floor
Concrete floors have a number of advantages, although their installation is more labor-intensive:
- To drain the water, dig a hole in the steam room 10–15 cm deep. Secure its walls with concrete or tiles. Place a metal grate on top. The water will go into the sewer through a pipe, which also needs to be installed in the drainage hole.
- Carefully level the area under the future floor.
- Make sand and crushed stone cushions, each layer should be 30–40 cm thick. Moisten with water and compact. The floor should not be placed at right angles to the walls. It must be sloped to allow drainage.
- Fill the concrete with a layer of 5 cm. Let it dry.
- Lay waterproofing, for example, roofing felt.
- Lay thermal insulation material 50 cm thick.
- Make a reinforcing network.
- Pour another 10 cm layer of concrete. Level it, not forgetting about the slope towards the sewer.
- Lay tile or stone. You can put wooden grates on it to prevent it from being slippery. The floor is ready.
For convenience and stability, it is recommended to place wooden gratings on a concrete floor covered with tiles.
Video: what material will the floor in the bathhouse be ideal from?
Types of floors in a steam room
This parameter also influences decision making; it should be kept in mind and compared with the type of foundations, the physical characteristics of the soil and the climatic zones where the structure is located.
Wooden floor of leaking type - water does not linger on the surface
Table. Types of floors in a steam room.
| Types of floors in the steam room | Brief description of architectural features and operational characteristics |
| Leaking | The simplest and cheapest design, all ancient baths had such floors in steam rooms. Gaps approximately 5 mm wide are left between the boards; a slope of the flooring is not required. Water flows onto the ground and is absorbed into it. There is no need to be afraid that streams will appear near the bathhouse; in the steam room they do not wash, but steam. Accordingly, little water is consumed. The disadvantage of leaking floors is the low surface temperature. But this problem is not critical for several reasons. Firstly, you don’t have to stand on such a floor for a long time; you just need to get to the shelf installed on a hill. Secondly, staying on a cold surface for a short time does not cause a cold, but hardens the body and improves the functioning of the immune system. Thirdly, if the soles of the feet are very sensitive to low temperatures, then you can make wooden grates and walk on them. |
| Leak-proof | The boards are tightly pulled together with social devices, the side surfaces can be flat or have a tongue/groove connection. Such floors must have a slope in one direction and a drain. The slope is small, about a centimeter per linear meter. The drain is given underground with further discharge beyond the perimeter of the steam room. These are more complex floor designs in a steam room, but their performance characteristics are superior to those that leak. |
| Tiled | Used only in exclusive expensive baths. The base is a cement-sand mixture or concrete, there is no underground. It is necessary to install a separate drain and finish with ceramic tiles or porcelain tiles. Professional builders strongly do not recommend installing such floors in a steam room with high air temperatures. The fact is that tiles have high thermal conductivity, a hot floor quickly releases heat, and your feet may be too hot. In terms of cost and complexity of production, they occupy a leading position among all flooring options in a steam room. |
Leaky wooden floor
Diagram of a leaky floor with drain
Non-leaking floor scheme
For traditional wooden baths, it is better to make floors from planks. Larch is considered the best species; it is not afraid of moisture, and its strength increases with direct contact with water. The disadvantage of larch is its high cost. In this regard, most developers are recommended to make floors in the steam room from softwood.
Siberian larch
Step-by-step instructions for installing a wooden ceiling in a small building
Ceiling insulation is a very important and responsible stage of work. The air from the furnace rises upward, so the task of the ceiling is to prevent it from “escaping” too quickly. Insulation work is carried out in the following order:
- Attach a water vapor barrier material to the roof beams, for example, foil, the density of which is at least 100 microns. Use a staple gun and 8-12mm staples. Do this very carefully to avoid gaps in protection. Glue the strips with an overlap of 20 cm, glue the joints with aluminum tape and place the edges of the thermal insulation on the walls of the steam room by 15 cm.
- Attach wooden slats (50x25 mm) to the ceiling level at a distance of no more than 70 cm from each other.
- Cover the ceiling with clapboard. For this it is better to use linden or alder. Aspen lining is also suitable. Start working from the far wall towards the door. Use galvanized nails to secure the paneling.
- Make grooves in the beams on the attic side for the chimney mounts and cut a hole for it.
- On the ceiling between the cross beams, lay insulation 150–200 mm thick.
- Using a furniture stapler, secure the wind and vapor barrier membrane laid on top.
- Make an attic floor out of planks.
The ceiling structure consists of several mandatory layers
Preparation of tools and materials
The construction of any type of steam room requires the preparation of a special opening for supply and exhaust ventilation. The ventilation duct is equipped with flexible aluminum corrugation.
To build a steam room in a bathhouse with your own hands, you should prepare the necessary tools and materials:
- Bars measuring 5x5 cm;
- Insulation (mineral wool, ecological wool, basalt);
- Waterproofing material;
- Vapor barrier material;
- Sealant, silicone;
- Aluminum tape;
- Level, construction stapler with staples;
- Hammer, nails with wide heads.
How to make and properly insulate the walls of a steam room with your own hands
A bathhouse built from foam blocks or using frame technology requires mandatory additional insulation of the steam room. This will retain heat and save fuel. For insulation:
- Make an opening for the stove in the wall between the steam room and the washing room.
- Attach wind and vapor barrier film to the walls of the structure.
- At a distance equal to the area of the insulation boards, screw wooden beams (50x40 mm).
- Place non-combustible insulation between the bars.
- Installation of hydro- and vapor barrier.
- Using galvanized self-tapping screws, attach 25x30/50 mm slats to the beams, 70 cm apart. This will be the sheathing. Use a laser level to check that they are level.
- Cover the walls with clapboard.
- At the last stage, make holes for ventilation, mask them with dampers and mount a fan if necessary.
By following the step-by-step instructions, you can insulate the walls yourself
If the bathhouse is made of logs, then such careful thermal insulation is not required. In this case, a layer of foil is sufficient, then lathing. After this, you can cover everything with clapboard.
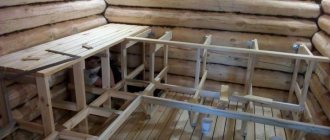
Internal arrangement of shelves: how to calculate the height
Their number directly depends on the size of the room, and the height is made as convenient as possible for the owner. Standard is the presence of three levels, each 35 cm high. Depending on your plan, construct a frame from hardwood (remember that conifers exude resin). When sheathing, do not lay the boards close together, leave gaps of about 1 cm.
You can check the quality of the wood yourself. You just need to knock on it. If you hear a ringing sound, then what lies in front of you is not rotten wood.
Installation of oven and shelves
The next stage of arranging a steam room is installing a firebox. The stove in the steam room is mounted or built in the nearest corner from the front door. Subject to fire safety regulations, the optimal distance between the firebox and the walls should be at least 33 cm.
Bake
Modern steam rooms use various types of stoves - metal, brick, soapstone and electric. Each type has its own advantages and disadvantages.
- Metal stoves heat up and cool down quickly, and also require a protective casing.
- Brick heaters take longer to heat up, but cool down more slowly, as a result of which they accumulate heat more efficiently and produce clean steam.
- Soapstone (soapstone) is a modern type of heater, the distinctive characteristic of which is high wear resistance and cost-effectiveness of the material. They warm the room slowly and evenly, releasing soft and comfortable heat.
- Electric stoves do not require a chimney and are easy and accessible to control from a distance.
If metal and electric heaters can be purchased at any specialized store, then brick and stone fireboxes will have to be made with your own hands.
shelves
To steam in a bathhouse with comfort and convenience, you need to make the shelves correctly. It is recommended to use high-quality dry lumber that does not release resins and is resistant to heat.
To make boards, you can choose wooden slats made from aspen or oak. The slats are securely connected to each other with a small gap for the air duct and water outlet. The number and size of shelves are determined by the dimensions of the steam room, as well as the number of visitors for which it is designed.
The optimal size of the shelves is 65x180 cm. In order to save space, it is recommended to mount the shelves against the wall on horizontal bars fixed to the sheathing. In addition, under the shelves you can install related bath accessories - ladles, buckets, watering cans, etc.
How to install the stove correctly
Its efficiency depends on the correct installation of the stove, including how much firewood will be consumed at one time, as well as the feasibility of using a steam room.
Experts advise:
- prepare the base for the stove in advance;
- cover it with bricks on all sides;
- install a metal passage into the roof opening to install the chimney;
- install a pipe or damper on the stove, attach a tank and remove the chimney through the hole, while insulating it with non-combustible material;
- Also make a hole in the roof of the roof, to which you attach a sheet of metal and run a pipe into it.
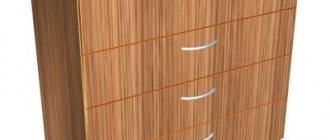
Selection of materials for finishing a Russian bath
Selection of materials for finishing a Russian bath
Pay due attention to the choice of finishing materials. The traditional material for finishing a Russian steam room is wood.
The most budget option is pine. However, if possible, you should avoid using material that is too cheap. During the operation of the steam room, low-quality pine releases too many resins, which makes visiting the bathhouse too difficult.
Selection of materials for finishing a Russian bath
The best option for interior decoration of the steam room is linden-based materials. This wood does not overheat, so visiting the bathhouse will be absolutely safe. In addition, the material tolerates high temperatures well and retains its original external properties for a long time.
You can also use birch, poplar and other durable species to decorate the steam room. Larch dries well, which helps create the most favorable microclimate in the steam room.
Types of wood for finishing
It is strictly not recommended to use cheap wood boards for finishing the steam room. Your choice is lining or solid wood. You should refrain from chipboard, MDF and similar solutions, because... These are toxic and flammable materials. They do not tolerate contact with moisture and very quickly lose their external qualities.
For the rest, be guided by your personal preferences and available budget.
How to calculate a door and install it
At the last stage, the door is installed. The best material for it would be tempered glass or solid wood. The most important thing is that it should close tightly without letting out heat. The work takes place in several stages:
- Assemble a box from timber (100x150 mm). Adjust the door to fit it.
- A little smaller than the groove located on the box, you need to cut a tenon at the end of the beam.
- Place the threshold first and then the sides of the box.
- Set the top of the “pipe” 3–5 cm below the opening to allow free movement of the beams during shrinkage.
- Do not screw the casing to the beam. Caulk well the gaps between it and the wall.
- Hang the doors and nail the trims with regular nails.
You can install the door in another way: cut grooves in the opening, install wooden beams in it. Their edge should not reach the very top of the opening; it is necessary to leave a gap of 5–10 cm. Attach the box to the beams.
Insulation of walls and ceilings
In order to insulate the walls of a steam room, the industry produces:
- Kraft foil reinforced with polyethylene or thick paper.
- Foil fabric.
- Folar - with a layer of fiberglass between layers of foil.
- Folgoizolon is foamed foil polyethylene.
- Mineral or basalt wool, foil-coated on one side.
- Expanded polystyrene with a metallized layer.
The material is used to cover the walls in the steam room and the ceiling before finishing with clapboard. The joints are overlapped. It is necessary to insulate if the thermal conductivity of the walls is insufficient.
Ventilation
The ventilation system is a very important point. Its absence or incorrect installation entails the following consequences:
- the appearance of various types of bacteria and fungi;
- rapid consumption of energy and heat, wasteful use of fuel;
- There is no oxygen supply to a closed, unventilated room; as a result of being in it, you will eventually begin to breathe carbon dioxide, which can lead to loss of consciousness.
Natural ventilation can be done. To do this, there must be a small window and a vent in the oven. Air will enter through the first and exit through the second. A mechanical system of two fans works in the same way. One of them brings in fresh air, and the other removes carbon dioxide.
Your well-being depends on the correct design of the ventilation system.
A proper ventilation system is:
- arrangement of air in layers: below it is colder, rising to the ceiling, the temperature rises;
- the general temperature does not go astray;
- CO2 and other impurities are replaced by oxygen.
To achieve this effect, two rules must be followed.
- The hole where oxygen will enter should be at the very bottom. Ideally, near the stove. This will ensure a flow of cold air to the floor. Near the stove it will mix with the hot one, which means the temperature balance will not be disturbed.
- The second rule concerns the exhaust vent. It needs to be done exactly the opposite: away from the stove and higher.
Install dampers in ventilation openings to regulate air circulation.
Shelf arrangement
Before the structure of the bath benches in the steam room is presented, the instructions should reflect the optimal dimensions of the structure. The minimum acceptable length of the shelves can be considered a distance of 1.5 meters (read also the article “Do-it-yourself bathhouse shelves: subtleties of manufacturing”).
The top step is made more spacious - approximately 90 cm, and the rest - from 40 to 60 cm.
Basic dimensions of bath shelves.
- The first step is to make a wooden frame, which will act as a support system. In most cases, the frame consists of support posts in the form of bench legs connected by boards. However, sometimes the load-bearing part is made on the basis of a stringer for stairs.
- After the erection of the racks and crossbars, the boardwalk is installed. Carefully polished planks made of linden or aspen are used for the work. They are fixed to the support system using a hidden fastening method so that no heating elements remain on the surface.
The construction of a wooden frame for shelves is demonstrated.
Addition! After making the shelves, you can create additional elements that are designed to increase the level of comfort. These include headrests, backrests, and so on.
Video: how to equip a brick oven in the country
The construction of a steam room cannot be called too difficult a job. Diligence and following certain instructions will help with this. If everything is done according to the rules, then you will get a wonderful place to rest your soul and body, where you can also receive treatment.
- Author: Olga Morozova
Hello. My name is Olga. I am 27 years old. A journalist by training. Rate this article:
- 5
- 4
- 3
- 2
- 1
(0 votes, average: 0 out of 5)
Share with your friends!
Making benches and shelves
Making regiments
The interior design of the steam room should be made taking into account your personal tastes and preferences. It should always be remembered that for the manufacture of shelves and benches it is necessary to use well-dried wood boards that do not have traces of resin secretions (ordinary aspen is best suited for these purposes).
In order to save space, it will be possible to provide for mounting benches and shelves not on the floor, but on the walls of the paired room. In this case, the choice of their installation location should be made taking into account the safe removal of the seats from the steam source (special glow stones placed on the base of the furnace).
The main factor determining the quality of the arrangement of benches and shelves for a steam room in a bathhouse is the maximum level of comfort they provide when taking health procedures. That is why the final finishing of the surfaces of these products must be done with special care, using manual wood processing methods for these purposes.
Installation of a steam room door
Installation of a steam room door
When the steam room is almost ready, all that remains is to install the doors. When installing doors in a bathhouse, take into account one important feature - the door frame should be specially low, and the threshold should be high. This solution allows you to reduce the amount of heat escaping through the door and prevent drafts. The optimal threshold height is about 30 cm.
The door must be installed so that people entering cannot get burned on the heated material. Wood conducts heat quite well, so it is recommended to cover both sides of the door with foil and special insulation. These protective materials can be covered, for example, with moisture-resistant lining, cut to the size of the door.
Wooden doors for baths
To avoid all the listed inconveniences and additional work, you can simply buy glass doors. Such a product will have a presentable appearance and will withstand all the conditions created in the bathhouse.
Glass door
Now you know how to make a steam room with your own hands. Pay special attention to the issue of arranging a bathhouse, do not spare effort and money on this. The reward for your efforts will be a high-quality, attractive, safe and reliable steam room that will delight you with its warmth for many years.
Glass door
Good luck!
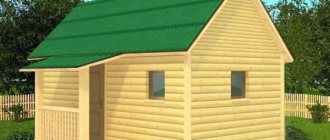
Choosing a place to build a bathhouse on a summer cottage
Before starting construction itself, two important tasks must be completed. The first is to choose a location, and the second is the size and material for the bath.
The choice of sizes depends entirely on the place where you want to place it. Agree, if your area for a bathhouse is, say, 2x2, and you want to “cut off” a larger one (for example, 6x6), then nothing will come of it. Therefore, first of all, we choose a place.
Here you need to be guided not only by your preferences, but also by the legal requirements for the placement of certain buildings.
The first thing to consider is the location relative to the residential building. There are two options here: the bathhouse is located separately from it or adjacent to it so that the entrance to it is directly from the house.
The best option is to install a bathhouse separately from the house in the backyard of the site.
If you have your own well or other water intake on your site, then it should be located no further than 20 meters from it.
And, of course, the location of the bathhouse should be such that it does not disturb the comfort of not only yourself, but also your neighbors.
Also, it should not be located in a low-lying area or in a place that is often flooded. This is understandable, your bathhouse will be damp all the time.
In addition, it is worth considering that the bathhouse should be within walking distance from the house if the plot is huge. There is electricity and water supply nearby.
Bathhouse in the country, building codes
If we talk about the law, then there are rules SNiP 30-02-97, which regulate the construction of various structures both in populated areas and in summer cottages.
= The norms for the construction of a bathhouse to the neighboring site take into account: to the beginning of the neighboring site (fence, boundary) - more than 1 m; to a wooden building on a neighboring plot - at least 15 m.
= Construction standards on your site determine the permissible distances to objects on the same territory: to a residential building - more than 8 m; to the “red line” (street, roadway) – more than 5 m; from any buildings made of non-combustible materials - 6-11 m; from wooden buildings with non-combustible cladding - 8-12 m; to wooden outbuildings – 11-15 m.
= Construction of a bathhouse on the site: rules and regulations regarding natural, protected and plant areas provide for minimum distances to the following objects: forest area - 15 m; natural reservoir – 5 m; vegetation: tall trees – 4 m, medium-height trees – 3 m, bushes – 1 m; well with drinking water – 12 m.
In addition to the topography of the area for the bathhouse, it is necessary to take into account the nature of the soil. Because you have to make a foundation.
So, we have decided on the location, what next? Would you like to run to the store for building materials? It’s too early, because without knowing the size of the bathhouse, you don’t know how much or what to buy.