Handmade things are always treated with special love. After all, the soul is invested in them, individual design ideas are embodied. Often such things become the main attraction of the house.
Nowadays, DIY enthusiasts often use used car tires as a starting material. In summer cottages, you can see flower beds, swings, washbasins, garden decorations, and, of course, furniture made from this material. All these products fit perfectly into the country landscape, are very economical, but, most importantly, they are made by hand.
This does not require special skill, materials or tools. All you need is ingenuity, invention and non-standard solutions. Therefore, making furniture from tires is an inexhaustible source of creativity for every craftsman.
What materials and tools will be required
To make an ottoman from a car tire, you need the following tools:
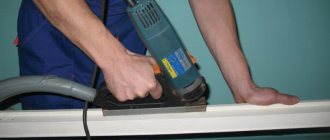
- electric jigsaw;
- screwdriver;
- furniture stapler;
- glue gun;
- scissors;
- pencil;
- brush.
Materials you will need:
- plywood 10-12mm thick or chipboard;
- furniture wheels or legs;
- foam;
- fabric or leatherette;
- thick rope;
- self-tapping screws;
- colorless varnish.
We will divide the ottoman production process into three parts:
- Making the lower part.
- Making a seat.
- Work with the side part.
Attention! Before you start working on the tire, it must be thoroughly washed and dried.
Initially, you need to determine the place where the ottoman will stand. If this is an open country area, then there is no need to install additional elements on the lower part. It is quite stable and is not affected by climatic precipitation. If you plan to use the ottoman on the veranda, in a gazebo or country house, then you need to make a bottom. To do this, you need to draw a circle on plywood or chipboard, the diameter of which is equal to the outer diameter of the tire, and cut it out with a jigsaw.
Attention! In order for the bottom to be more durable and not exposed to moisture, it must be painted in two layers with furniture varnish or oil paint.
Then, using a screwdriver, legs or furniture wheels are attached to the bottom. The bottom of the tire is secured with self-tapping screws. The presence of a lower part also allows you to store things inside this furniture.
To make a seat, you need to draw a circle on plywood or chipboard, the diameter of which is two centimeters larger than the inner diameter of the tire, and cut it out with a jigsaw. Then place this blank on the foam rubber and draw a line along the edge of the circle with a pencil. Use a knife to cut the foam along the line.
Lay out a cloth on the table onto which cut out circles of foam rubber and plywood are laid. The fabric is stretched and secured around the perimeter to the plywood with a furniture stapler. Once completed, excess fabric is trimmed with scissors.
Attention! If the ottoman will not stand under a canopy, it is better to use raincoat fabric so that it does not get wet.
Side part works are the most creative. Their task is to give the ottoman a unique designer look.
- The easiest option is to paint it. It can be a solid color, pattern or ornament.
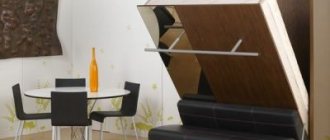
- You can also use fabric or leatherette for finishing. A piece of such material is placed on the side and the location of its connection is marked. Then a seam is made using a sewing machine along the mark to create a cylinder. The resulting blank is put on the tire and tucked under the bottom and seat.
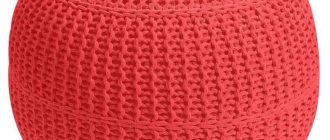
- A very interesting type of ottoman is obtained when finishing with a thick rope. To do this, glue is applied to the tire around the perimeter of the seat, with which the rope is secured. It is applied in dense layers over the entire surface. For strength, the rope is coated with colorless varnish.
If an ottoman made from one tire is not very convenient in height, then you can use two or three blanks, which are fastened together using self-tapping screws or bolts.
This article contains instructions for making an ottoman from a car tire and some design solutions that will help everyone independently make similar furniture for their garden and unleash their creative potential.
Today, not only a summer cottage or a country house needs decoration and arrangement, but also a garden gazebo or even a garage. These structures can be decorated with various interior items made from scrap materials that can be found at any dacha. For example, you can make an original ottoman from a tire with your own hands. By the way, you can find car tires from any car enthusiast or at a tire repair service station. Just remember how in the past you could find a beautiful flower bed made of tires at almost every entrance. Today we will look at a step-by-step master class that describes how to turn an unnecessary item into beautiful furniture.
Third way
If you don’t want to bother with the rope, no problem. To quickly make a seat, you can simply place an old cushion inside the wheel. In this case, also prepare:
- foam;
- fabric/mesh;
- lace or fringe;
- thick threads for sewing;
- self-tapping screws
If you want the pouf to be as tall as a chair, use two wheels. Connect them together with self-tapping screws. Cut a rectangle of foam rubber large enough to wrap around the wheel. Sew its edges. Thanks to this, the frame will become soft and beautiful.
Cover the top of the frame with thick fabric, and place a circle of foam rubber on top. Then cover the seat with one piece of upholstery material, and the side part with the other. Use strong thread. The product can be decorated with lace, fringe or other decorative elements. Look at photos of such products and borrow an idea.
And one more thing: so that the furniture can be easily moved around the room, you can attach handles to it. An old belt will do for this. Make loops out of it and attach it to the frame with screws. Thus, you have learned how to make beautiful poufs from tires in three ways.
I decided to present to your attention a master class on making an ottoman from car tires. This wonderful pouf is suitable both for the home and for the balcony, open terrace, gazebo. This ottoman is not afraid of the vagaries of the weather!!! Let's take a closer look at this interesting master class together!
For work you will need: Car tire (or even better, a complete wheel) Hemp or jute rope - 100-250 m (depending on thickness) Board for legs - 24-36 mm (or ready-made legs) Plywood - 6-8 mm Waterproof glue Hot-melt gun Screwdriver Drill Jigsaw Wood screws Stain Furniture corners Varnish Wide brush Paint
First you need to take a wheel of the desired size and wash it thoroughly and dry it.
Then cut out of plywood, using a jigsaw, according to the diameter of the wheel. But here the author clarifies that the lower circle should lie flush with the side surface, and the diameter of the upper circle should fit tightly into the wheel rim, i.e. be slightly smaller.
To make legs, you can take old legs as a template, trace them with a pencil and cut them out using a jigsaw, you can buy ready-made ones, or if you have a good imagination, come up with your own unique design for the legs.
Then you need to make markings on a larger diameter plywood circle for the legs. After the glue and stain have dried, you need to turn the workpiece over and apply universal glue around the perimeter of the plywood, and place the wheel on the workpiece. Also glue the upper blank to the wheel, applying glue along the rim of the disk. And finally, the most interesting part is the finishing of the ottoman (at least for me, as a woman!). The legs of the ottoman can be painted in bright colors; universal enamel is suitable for this. And at the final stage, we open the ottoman completely with varnish.
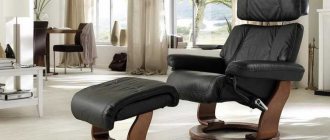
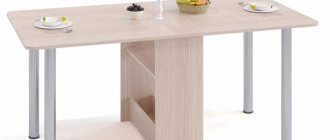
Such a masterpiece can be used not only as an ottoman, but also as a table.
Tires take on a new life when their original purpose has more than been exhausted. Thus, from tires you can make amazing furniture for your home, living room, cottage, and garden. Below we present 10 photos of models of a do-it-yourself tire ottoman.
Here is an original ottoman, covered with fabric, the frame of which is a tire.
Here the creation of an ottoman is presented in stages, step by step.
The next example is an original tire cover, an ottoman for everyone.
An ottoman made using chipboard, a glue gun, and twine.
This ottoman is even equipped with a backrest, the ideal solution for relaxation.
This ottoman is a modern delight, it even has legs, it is beautiful.
A set of ottomans and a round table made of tires.
A very extraordinary approach to creating furniture from scrap materials, the result is amazing.
Four ottomans, all ornamented, form a set, all with the same tire base.
And this is the embodiment of an ottoman in the style of creating a shabby-chic interior.
Making an ottoman from tires for beginners
Such an item will become a truly exclusive and original decoration that can be used when arranging a gazebo or garage. You need to apply your own imagination to the work and show creative skills. If you make a pouf from a tire with your own hands, you will get a stylish and original design.
Required tools and materials:
- Old car tire.
- Twine.
- Self-tapping screws.
- Plywood.
- Glue gun.
- Drill.
Follow these steps in this order:
- Cut two circles from a sheet of plywood to the size of the tire.
- Place plywood on top and bottom of the tire. Attach it to the tire using self-tapping screws.
- Using a glue gun, glue the twine to the plywood. Rotate the twine in a circle, making turns sequentially, pressing them tightly together. Lay down the twine until the ends of the tire are completely covered.
Important! It is better to start gluing from the center, using the snail principle.
- Coat the glued rope with varnish to protect it from the adverse effects of sunlight or weather conditions.
The result is a wonderful design solution.
Important! The ottoman will be beautiful and economical. You can place it in a gazebo, garage or veranda.
Second way
There is another method - using a rope. You will need:
- jigsaw;
- screwdriver or screwdriver;
- scissors;
- glue gun;
- self-tapping screws;
- thick twine or hemp rope;
- upholstery fabric;
- brush.
In this case, we cut out two circles from a sheet of chipboard and attach them with self-tapping screws on both sides of the tire.
Then you can start decorating the future pouf. To do this we use a coil of rope. You need to start from the center of the top circle. Using a glue gun, the rope is secured in a spiral.
When the cover is ready, we proceed to the sides of the wheel. We wind the rope in a spiral in the same way. You need to work carefully, tightly pressing the new turn to the previous one. Leave the bottom as is.
When the twine sets, that is, the glue dries well, coat the ottoman made from a tire with colorless varnish.
For reliability, it is better to apply several layers. This will protect it from moisture and dirt, which will make further care of the product easier.
This DIY seat made from tires looks beautiful in an eco-style room.
Original do-it-yourself ottoman made from wheels
Here's another good idea on how to make an ottoman from a wheel with your own hands. The first step is to properly prepare the tires.
Important! If you previously used them for a car, then first wash them with water using washing powder and a brush to remove any remaining clay and dust.
Prepare the following materials from the list:
- Old tires from a car.
- Thick fabric or mesh.
- Foam rubber.
- Lace or fringe.
- Finishing fabric.
- Needles, strong threads.
- Self-tapping screws.
- Sewing machine.
You need to do the following:
- To make an ottoman the same height as a regular stool, place two tires on top of each other, then use electrical tape to connect them.
- Screw the tires onto the inner surface with self-tapping screws.
Important! Check that the wheels are firmly connected to ensure a strong and secure frame.
- Measure the diameter of the wheel hole and cut a circle of the same diameter from foam rubber. Cover the sides of the frame with foam rubber to make the ottoman soft and streamlined in shape.
- Cut a rectangle out of foam rubber so that one side coincides with the height of the frame of the future product, and the second corresponds to the length of its circumference. Wrap the frame with foam rubber and secure its ends with strong thread.
- Cover the hole with foam rubber. But first, sew up the upper and lower holes with a special mesh or durable fabric, and attach foam rubber on top of it.
- It is better to use high-quality furniture fabric for upholstery. Cut a rectangle out of it so that its short side matches the height of the walls of the future ottoman plus 10 cm on each side of the turn. The long side should be equal to the outer diameter of the tire plus a stitch of 1 cm. Sew the two short sides of the upholstery and pull it over the wheels on top.
Important! It is better to do this on a sewing machine with a double seam.
- Now you need to finish and fasten the upper and lower parts of the product together. Using a strong thread and needle, fasten the structure along the inside. Thread the thread from the top edge, then pull it inside, pull it out from the bottom edge.
- After complete covering, place a soft pad on top. Decorate it with applique, fringe, lace or embroidery.
When decorating an ottoman, use available materials, your creativity and imagination.
Second manufacturing method
It is not necessary to cover the outside of the ottoman - just place an old pillow inside.
Materials and tools:
- used car tires;
- foam;
- dense fabric or mesh;
- finishing fabric;
- fringe, lace;
- strong threads, needles;
- sewing machine;
- self-tapping screws
We make an ottoman with our own hands. First you need to prepare the tires. If the tires were previously used for a car, you must first wash them with water and remove any remaining dust and clay using a brush and washing powder.
Nadi make an ottoman that has the height of a regular stool. To do this, you need to put 2 tires (one on top of the other) and connect them using electrical tape.
You can screw the tires to one another using self-tapping screws along their inner surface. The wheels must be firmly connected to each other, thus creating a fairly strong frame for the product.
We perform a seat. It is necessary to measure the diameter of the tire hole and cut a circle of the same diameter from foam rubber. The sides of the frame of the future product must be lined with foam rubber, then the ottoman will become soft and have a streamlined shape.
To do this, you need to cut a rectangle out of foam rubber. One side of the rectangle is equal to the height of the product frame, the second side is equal to the circumference of the frame. You need to wrap the frame with foam rubber and sew its ends with strong thread.
Then cover the hole with foam rubber. To do this, you first need to sew up the upper and lower holes with a strong fabric or a special mesh, then attach the foam rubber on top of it.
The final stage is creating the upholstery. For this, it is better to use thick furniture fabric. Cut a rectangle from this fabric. Its short side is equal to the height of the ottoman walls plus a turning width of 10 cm on each side.
The long side of the ottoman is equal to the outer diameter of the wheel plus one cm per line. Sew the 2 short sides of the fabric upholstery and stretch it over the wheels. The stitching is best done on a sewing machine. It is better to make a double seam.
The frame of the product is covered with fabric. Now you need to finish and fasten the upper and lower parts of the model together. Using strong thread and a needle, we fasten the structure along the inside of the wheels. To do this, thread the thread from the top edge, then pull it inside and pull it out from the bottom edge.
The fabric is stretched. After complete stitching, you can put a soft pad on top. The decoration can be complemented with fringe, applique, embroidery, and lace. When creating a model design, use all your imagination and creativity.
Welcome to the website of crafts and needlework. Today we will describe how to create a creative pouf with your own hands from a car tire, thick rope and plywood.
The idea is very simple, but at the same time very useful and versatile: it is comfortable to sit on, and the ottoman can be used as a coffee table.
We have already written how you can use car tires: creating flower beds in your dacha, and in this case we will use car tires more practically. A pouf made in this way can be useful not only in a summer cottage, but also in a city apartment, in a cafe, or on a picnic.
To make a pouf from a tire you need:
- car tire,
- thick rope,
- 2 round pieces of plywood 55 mm,
- Upholstery fabric,
- glue gun,
- scissors,
- self-tapping screws
Tools: drill, screwdriver or screwdriver, jigsaw.
Leather ottoman for the cottage
If you are a lover of unusual and original things, then try making a leather ottoman from tires with your own hands. The master class given in this section will help you realize your dream of truly decorating your home or summer cottage.
You will need the following materials:
- Three car tires.
- Foam rubber.
- Epoxy resin.
- Natural or synthetic leather.
- Plywood or the lid of a large paint bucket.
- Powerful stapler.
Make an unusual ottoman according to these instructions:
- Wash your tires thoroughly to remove accumulated dirt. Apply glue to the highest point where they will touch.
- Place the tires on top of each other. You can adjust the height yourself. Wait a day for the glue to dry completely.
- Measure the diameter and height of the tire. Add 2-3 cm to the resulting numbers for the seams. Cut out a rectangle from the leather. Then cut a circle slightly smaller than the diameter of the tire for the bottom cover. Wrap the rectangle of the tire, wrong side up.
- Secure the pipe shape with pins to make it a little tight. Carefully remove the pipe and stitch it. Fold the piece in half widthwise and make marks to divide the pipe into 4 equal parts. Fold the circle in half, make marks again to divide it into 4 parts. At the marks, connect the circle and the pipe.
- Distribute the fabric evenly, fasten the parts with pins, and sew a circle to the pipe. Turn out the resulting cylinder and put it on the tires.
Important! Stretch the fabric tightly and attach it to the rubber with a stapler.
In the interior - something useful, beautiful and functional. It makes it much more convenient to put on shoes when leaving the apartment, it can be used as an additional seat, children can jump and play on it.
Ottomans are also often used as decorative elements.
. They are distinguished by bright colors, interesting shapes and a variety of designs. Making a pouf out of tires with your own hands is quite possible even for a beginner - the main thing is not to be afraid and to show creative ingenuity!
Handmade furniture always looks original and aesthetically pleasing. She is able to fill the house with a special atmosphere of warmth and comfort. The main advantages of making your own ottoman from old tires include
:
This ottoman will be comfortable and comfortable to sit on.
. Since the tires themselves are different:
- firmness and elasticity;
- resistance to mechanical damage;
- ability to withstand heavy loads.
Important
: the only drawback of car tires is that when heated, they emit harmful substances. But for home furniture, this does not matter, since the ottomans will not heat up in the sun.
Master class on making
There are several different options for making ottomans from tires.
Without side trim
Using this pattern, a low pouf is made from one tire. If you want to make the product taller, you need to connect two tires together
. To make such a piece of furniture you will need the following tools:
The materials you will need to prepare are:
- two tires;
- foam;
- upholstery fabric;
- belt;
- plywood It is better to take lumber with a thickness of at least 3-5 mm.
The process of manufacturing and assembling the product will look like this:
:
As for decorative finishing, tires can be painted in any color.
How to make it with twine?
To make it you will need the following tools:
The process of making a pouf from tires will be carried out in the following sequence
:
The final touch is to coat the twine with colorless varnish.
Advice
: varnish is applied to the product only after the glue has completely hardened. It is better to apply the varnish in two or three layers. This will make the process of using and maintaining the furniture easier.
This option for making an ottoman from tires will look great in eco-style rooms
.
Soft
This option for making a pouf is simple and convenient. To make it you will need:
The pouf is made as follows:
:
- We take two wheels and connect them together with self-tapping screws.
- Two rectangles are cut out of foam rubber. Their size should be such that it is convenient for you to wrap the wheels with them. The edges of the foam are sewn together. This will make the frame of the product soft and comfortable to use.
- A thick fabric is stretched over the top of the product, and a pre-cut circle of foam rubber is placed on top. The top is lined with upholstery material.
- After that, we move on to decorating the sides. They are covered with fabric using strong thread.
You can decorate the product with lace or any other decorative elements.
.
Idea
: To make a piece of furniture easily move around the room, you can make handles for it from an old belt. To do this, two loops are made from the belt and screwed on the sides with screws. You can also screw wheels to the bottom of a piece of furniture.
First way
You can make a pouf from one wheel, but it will be a little low for an adult. Therefore, we suggest trying to connect two tires together. To work you will need the following tools:
- jigsaw;
- screwdriver;
- file;
- construction stapler;
- scissors and knife;
- pencil or marker;
- screws.
The materials you will need are two tires, plywood, foam rubber for laying, fabric for covering, a belt or hose. We wash the tires thoroughly to keep them clean. On the one that will be the top, we cut out four small holes for further fastening the seat.
The wheels can be connected to each other using screws.
The seat is made of plywood. Draw a circle on a sheet of paper - the same diameter as the tire. Then cut it out with a jigsaw and file the edges.
Make a round pad from foam rubber.
Cover the seat with fabric, securing it to the plywood with a stapler on the back side.
Use a belt or hose to secure the seat.
Attach it to the top wheel with screws.
The rubber part can be painted in your favorite color. This is one of the options for making an ottoman from a tire. As you can see in the photo, it looks quite original.
What can be made from tires.
Border.
A classic of the genre, traditionally old tires are used to separate the area from the path to the flowerbed or lawn. Cut the tire in half and bury the cut part in the ground. Such borders can be painted in any shade if desired, or if you use a creative approach, you can draw flowers, cars, etc.
Newspaper girl.
By cutting the tire in half and installing it on metal legs, you can get a rather interesting newspaper or magazine holder (whichever is closer to you).
Fence.
An excellent idea for a fence is tires stacked on top of each other, sprinkled with earth and planted with climbing plants.
Swing.
Children will be indescribably delighted with such a wonderful swing. A horse made from a tire looks especially impressive (see photo below).
Rocking chair.
By cutting the tire in half and nailing a flat piece of wood to the cut piece, you can end up with an excellent outdoor rocking chair for a child. But you can also paint it in your child’s favorite shade, and then he will spend a lot of time on it.
Flowerbed.
The next way to use tires, just like a border, is considered a “classic”; you must agree, flower beds made from old tires catch your eye everywhere - in small towns, residential areas, villages, kindergartens, playgrounds, etc. Below you can explore various flower bed options.
Bird feeders.
A wheel on a rope tied to a tree branch filled with food will serve as an excellent bird feeder.
Armchair.
But you can make a magnificent chair from tires; various variations of chairs can be studied in the photographs below.
Chandelier.
The imagination of designers is truly limitless - you can even make a ceiling chandelier from tires.
Bicycle rack.
Tires cut in half and placed in a row about 8cm apart make an excellent bike rack.
Place for a dog.
A round pillow placed inside the tire will serve as an ideal sleeping place for your pet - cat or dog.
Trash can.
The simplest idea to implement is three or four tires stacked on top of each other, a large garbage bag inside, and in the end an excellent garbage can. Painted wheels will look more interesting and neat.
Wall flower bed.
Tires screwed to a wooden wall with a screwdriver will serve as excellent wall flower beds.
Palm.
First you need to flatten the tire by cutting it with a jigsaw, then using a pencil to draw the outlines of palm leaves, which are again cut out using a jigsaw and painted green. The resulting leaves are nailed to the trunks of trees that have outlived their useful life.
Sandbox.
The simplest idea to implement is creating a sandbox. Fill a large tire with sand to the top and place a beach umbrella in the center. At night, remove the umbrella and cover the sandbox with an awning, and so that it does not fly away when the wind blows, screw screws into the edges of the tire, and create loops on the awning itself.
Hanging flowerbed.
Look how chic the hanging flowerbed in the shape of a parrot looks. The tire is cut with a jigsaw and painted with façade paint according to the preliminary marks.
Umbrella stand.
Holes are cut out in the tire to fit the width of the folded umbrella; you can try taking large curtain eyelets and securing them to the tire. To prevent the tire from rolling around the room, attach wooden legs to it.
Pond.
A great idea for creating a garden pond. A hole is dug to the size of the tire, the latter is covered with a thick film, and a hose with water is lowered inside. The edges of the tire are masked with all sorts of flat stones, and moisture-loving plants are planted. Finally, the pond is filled with water. The entire process of creating such a pond can be studied in the photo below.
Ottoman.
A tire ottoman decorated with rope looks very stylish. Plywood the size of the tire itself is nailed to the surface of the tire, then a rope is taken and glued to the sides and top of the future ottoman using glue. The entire process of creating an ottoman is shown in the photo below.
Wash basin.
How do you like this washbasin? It’s very original, isn’t it?
Garden steps.
Sometimes the site is not on a flat surface, but goes downhill, so in order not to bother with concreting, you can use unnecessary tires, burying them along a steep slope, forming steps.
Table.
The miniature table turns out to be very beautiful. You can find out how to make it yourself by studying the photo below.
Decorations for flower beds.
Craftsmen make really chic garden decorations from old tires, including swans, ladybugs, cows, frogs, tea mugs, etc.
How to make a fountain from a tire:
How to make a swan from a tire:
How to make an ottoman from a tire:
Today we showed you a lot of ideas on what can be made from tires. For the garden, it is difficult to find a more practical and pliable material, but what magnificent garden elements are obtained - a sight for sore eyes! The conclusion is simple: if you have a summer cottage, you shouldn’t throw away worn-out tires!
Friends, we remind you that on our website “” you can subscribe to receive notifications about the release of the latest reviews; the subscription form is located in the sidebar.
Good afternoon, dear subscribers of the construction portal site. With this lesson we continue the step-by-step guides aimed at improving the summer cottage, as well as its design. Today we will look at how to make an ottoman out of tires with your own hands.
Step-by-step instruction
- First of all, we cut a sheet of our plywood based on the contour of our tire and make a round sheet, after that we drill holes in the tire and plywood to secure and connect the tire and plywood.
- Next, use self-tapping screws or bolts, but keep in mind that when fastening elements with bolts, you will need to make holes for the bolt heads so that they do not stick out from under the plywood cover. We attach the plywood sheet to the tire.
By the way, please note that the plywood sheet is attached on both sides, because... We will attach roller legs to the bottom of our ottoman, which will move our ottoman on wheels.
- We begin to glue our twine to the tire, we need to start from the middle and lay the twine in the shape of a snail, which contributes to a rather beautiful pattern.
- You need to glue with strong glue, we recommend using glue in a special gun, but if you don’t have such a tool, then “Moment” glue will do, but note that it must be very sticky!
- Next, when the lid of our ottoman is covered with twine, we begin to glue the twine directly onto the tire itself.
- To make the rope fit better on the tire, we need to turn the tire from top to bottom, which will make it easier to attach the rope.
- Next, we cover the tires completely, and cut off the excess twine and glue it to the lid.
- Next, we glue the lid and cover our ottoman with varnish. Coating the ottoman with varnish is necessary so that the rope with which our ottoman is covered does not get wet under the influence of rain.
A tire ottoman is ready. By the way, as a decoration, you can screw legs or wheels to it, then it will become the object of adoration for your children. That's all, subscribe and join our group, DIY builders!.