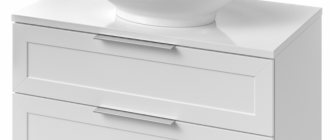
Good day to all! Installing wall cabinets correctly in the kitchen is very important. Otherwise, they may be positioned unevenly relative to each other, creating a not-so-pleasant visual effect, and interfering with normal operation. An adjustable canopy for a closet can be very helpful in this regard.
A similar canopy or suspension can be purchased by visiting almost any furniture store that sells fittings. At the same time, the fastener is rightly positioned as universal and practical.
When choosing, follow the key rule. It states that all internal elements must be made of high quality metal. Otherwise, you won't be able to get the full benefits of an adjustable awning.
What does the canopy look like?
A hanger for kitchen cabinets is a small plastic (metal) box that has several holes:
- Two through ones for fixing the canopy with self-tapping screws to the side of the cabinet.
- Two adjusters with large bolts. Screwing in and out of these bolts allows you to lower and raise and press and move the cabinet away from the wall.
There is also a metal paw that clings to the mounting rail, fixed to the wall through a dowel and self-tapping screws.
In the photo you can see what the structure looks like as a whole and separately.
Universal (on both sides) plastic canopies and metal guide
Sectional view of the canopy: as you can see, one bolt attracts the paw, the second “fetters” its movements
Adjustment on plane
This type of customization of the front part of the furniture provides the ability to change the location of the facade on a common plane. This adjustment option is necessary only if you notice a weak level of pressing of the shutters to the body or if, when opening and closing, the doors move in different directions, interfering with opening and closing.
The steps for performing the action are as follows:
- If the cabinet door is pressed weakly or if it bounces, turn the second adjustment bolt (it is located where the hinge itself is located).
- We tighten the existing bolts a couple of millimeters. It is important to twist in “your” direction.
- Pay attention to the fact that there are gaps between the doors and the overall body of the furniture.
- If necessary, you can continue to adjust the hinges on a flat surface.
To make the work more comfortable, use a Phillips screwdriver and do it slowly and carefully to avoid stripping the bolt threads.
There are ways to adjust the doors of kitchen cabinets with closers. With its help, you can perfectly accurately adjust the façade.
Advantage of fastening
- Possibility to install cabinets without assistants. All work is carried out in two stages: installing a metal strip on the wall and hanging the module on it. You don't have to feel around for screws in the wall to get the loop onto the head.
- Possibility to adjust any position of the cabinet, an error of 15 mm is allowed on each side. In this case, you do not need to support or remove the module; the entire adjustment process is carried out overhead.
It all depends on the reliable fastening of the guide; the plastic adjustable canopy can withstand a load of up to 30 kg
- The hanging cabinet for the kitchen becomes more reliable. The fastening allows you to fix a single fastening strip on the wall, so that even if 2-3 screws become loose, the rest will hold the structure.
- The hanging kitchen cabinet can be installed directly on the wall on the kitchen apron. This is possible due to the retractable mounting bracket, which allows you to hang the module at a distance of 2-2.5 cm from the wall.
Note! Even an inexperienced specialist can do all the work with his own hands in a few hours.
The only disadvantage can be called the price, which is slightly, but higher than the usual metal plates. But, in fact, it is worth forgetting about saving when there are so many advantages.
Mobile protection from rain and sun
An adjustable universal canopy can be found today on almost any equipped summer cottage. It is a movable structure that is mounted on the wall of the house (usually at the entrance or above the terrace). (See also the article Country canopies: features.)
Roller canopy over the terrace
As a rule, the main elements of such a product are:
- Roller shutter, inside of which the roofing sheet is placed . Most models are equipped with canvas or polymer fabric: the main thing is that the material is waterproof.
Note! If possible, choose tarpaulins or models of jute fiber with moisture-proof impregnation. In terms of water resistance, they are not inferior to polymer ones, but in hot weather they heat up much less. The only drawback of such varieties is the fairly high price.
- Sliding frame, which is a steel or plastic frame on hinges . When folded, the frame is pressed against the top of the wall, and when unfolded, it forms the basis for a tensioned fabric that automatically unwinds from the roller shutter.
- Some models are also equipped with support posts . These pillars support the far edge of the frame, which protects the hinges from breaking under the weight of the structure, and the canvas from sagging.
How the design works The
advantages of such products include compact size, ease of use and fairly easy installation. The instructions usually assume wall fixation with 4 to 8 anchors.
As for the disadvantages, these include the high cost of high-quality models. In principle, you can try to make such a product with your own hands, but the parts (roller shutters, hinges, fabric) will not be cheap, so you are unlikely to save money.
However, even though the cost is not the lowest, designs of this type are popular.
Installation work
In order to eradicate all doubts about the merits of installing wall cabinets on adjustable mounts, we suggest you study this section. It will include four stages, which are described sequentially.
Purchasing a tool
- Drill or hammer drill. It all depends on what kind of wall you have.
- Screwdriver or screwdriver. It is better to use a power tool that will speed up the work process.
- Hacksaw for metal.
- Building level.
- Roulette.
For your information! A screwdriver can easily be replaced with a drill with a Phillips head, but it is better to have a screwdriver with you so that you can use it to adjust the awnings. High speeds can break the adjusting bolt, and the canopy will be unusable.
Preparatory work
Before hanging the kitchen cabinet, the following work must be done:
- If you have just completed a renovation and are installing a kitchen, then the most important thing is to make sure the walls are strong. This is perhaps the most important thing. If you have plasterboard walls, then you should definitely secure a wooden beam under the front surface. Otherwise, use as many butterfly dowels as possible.
- There is no particular need for leveling; it is better to pay special attention to the corner of the kitchen (if the kitchen is corner). It should be laid out thoroughly so that the corner cabinet hangs without unnecessary gaps.
- Also prepare all the wiring in advance so that you don’t have to remove the module twice later.
Advice! For cabinets with a built-in kitchen hood or just a separate hood, run the outlet to the ceiling. This is more practical and safer, no extra wires above the work surface.
Installation of awnings
Hanging kitchen cabinets is installed quite easily, without any tricks or special features.
The process can be carried out in two ways:
- If the back wall is DVPO, then in the upper corners it is necessary to cut small holes into which the mounting tabs will go. Then, pressing the suspension to the top shelf of the cabinet, screw it with two self-tapping screws to the side.
Study this drawing and everything will immediately become clear to you.
- If the back wall is laminated chipboard, then it is necessary to make a cutout directly under the canopy, thereby fixing it flush with the laminate.
Note! But since wall-hung kitchen cabinets with laminated chipboard back walls are rare, the second method is practically not used.
Metal guide fastener
To do this you need to make the following calculations:
- Add together the height of the lower cabinets, the distance between the wall and floor kitchen cabinets and the height of the upper module. For example, 920 mm base + 600 mm apron + 600 mm top module.
- Now from the resulting amount we subtract 45 mm for the shrinkage of the canopy and get the size that needs to be marked on the wall.
- Draw a line along the level and attach a metal strip. There are holes in it every 1.5-2 cm, you don’t need to drill that much, just place the screws in the corners of the wall cabinets.
This is what the guide installed on the wall looks like
Important! Just before hanging the kitchen cabinets, you need to loosen the fastening tab so that it can move up and down freely. This will allow you to make adjustments more easily.
Adjust vertically
This is the very first and main element of setting up furniture fittings. This method is necessary if the front of the cabinets is positioned crookedly and incorrectly, which makes it stand out from the background of the entire structure, or if there are two cabinet doors and one is higher than the other.
Using this adjustment option, we do everything step by step, dividing the total into 4 actions:
- Open the doors and, if necessary, remove the caps on the hinges.
- We tighten the screws on two hinges; they are located along the edges of the side walls and doors. It is these parts of the overall system that position the sashes vertically. First, you need to place two bolts at the same level, which will allow for high-quality adjustment of wall or floor cabinets.
- After this, we close the doors and inspect the furniture to notice other irregularities. In the case when the slope goes to the right side, tighten the bolt of the upper hinge, and loosen the lower one a little. Well, accordingly, on the contrary. If there is a slope to the left side, twist the lower part.
- We repeat points 2 and 3 until the front part reaches its normal position. Only after completing this can you move on to the next steps.
Door height
To adjust the height of kitchen cabinet doors, look at the screws. They are installed on two so-called “ears” of an elongated shape. A loop passes through this addition, which provides the level of height of the facade. Adjusting the doors with this option is also done step by step:
- First, loosen the screws that hold the adjusting structure.
- If it is difficult, we raise or lower the doors and tighten them again.
You must tighten it carefully, until it stops, but so as not to strip the thread.
It is important, when starting to adjust the height, prepare self-tapping screws with fine threads in advance. It is the correctly selected elements that will help in setting up and securing the desired position.
Installing a circuit breaker is easy
Circuit breaker installation can be divided into three parts:
- DIN rail fastening;
- Installation of a circuit breaker;
- Connecting the circuit breaker.
DIN rail mounting
In a new electrical panel or electrical box, the DIN rail is attached to ready-made places using self-tapping screws or bolts.
To install a DIN rail in an old floor panel, you need:
- Drill two holes in the metal platform of the shield;
- Cut threads into them;
- Secure the DIN rail with two bolts.
There are usually so many holes drilled into the metal shield platform that you can usually avoid drilling new holes.
In the new floor panels, special perforated racks are already installed for fastening DIN rails, and fastening the DIN rails is not difficult.
Circuit breaker installation
After installing the DIN rail, we proceed to installing the circuit breaker.
- Prepare the circuit breaker and a long screwdriver;
- Pull the latches down and slide the circuit breaker onto the DIN rail;
- Release the latch. It should catch on the DIN rail.
A three-phase circuit breaker is installed in a similar way.
Circuit breaker connection
- To connect the circuit breaker, unscrew the screws of the upper and lower terminals;
- Insert pre-protected wires into the clamps;
- Tighten the clamps firmly, but not too enthusiastically.
When installing rows of machines to connect the upper contacts (input contacts), it is better to use special buses, which the pros call “combs”.
As you can see, installing a circuit breaker is very simple.
Source: ehto.ru
Errors during selection and installation
When choosing a rail based on material and size, the type and weight of the devices to be installed on it are often not taken into account.
The main mistake when installing a DIN rail is neglecting the installation of plugs. Due to vibrations, equipment on DIN rails can gradually move. If the plugs are not included in the kit, you can secure the device with pliers - just straighten the jaws of the rack.
Also, during installation, the width of the device being fixed is often not taken into account, which leads to a lack of free space for fixing other devices.
Manufacturing materials and load characteristics
The material from which a particular DIN rail is made must be suitable for its purpose. This means that it is necessary to take into account the expected loads, depending on which steel or aluminum products are selected. The first of these samples are more durable in their structure and can withstand extreme loads with a minimum strip thickness of only 1 mm.
By critical or extreme loads we mean the situation when large devices such as frequency converters, powerful magnetic starters or three-phase power circuit breakers are mounted on the rail.
Aluminum slats are capable of “holding” maximum stresses of mechanical deformation only with a thickness of 1.5 mm. Accordingly, the range of power and protective equipment placed on them will be significantly limited.
Load characteristics
Because a typical DIN rail is manufactured as a profile product, it can withstand greater deformation loads than a metal plate of the same size. Typical load characteristics of DIN rails are standardized by current standards for a number of characteristics, including the type of metal. Aluminum strips are available in the following versions:
- 1 mm thick slats designed for installation of single modular devices: circuit breakers, RCD units, power modules;
- 1.1 mm strips, designed for installation of single devices placed in several rows;
- the same products, but with an indicator of 1.4 mm, designed for modular equipment of any class and weight.
All these products are cut into pieces of the required length before installation.
The kit may include steel slats with a thickness of 1.0 mm, the load capacity of which is similar to an aluminum rail with a thickness of 1.5 mm. They can withstand maximum loads without restrictions on weight and number of seats within the permissible size. In addition, manufacturers of switchboard equipment often equip distribution cabinets with non-standard profile rails.
What is attached to the din rail?
To secure modular electrical appliances, no third-party fasteners are required. All devices are mounted on a standard DIN rail.
The protrusions located on the edges of the slats serve to hold the devices installed on it, which can move relatively freely along it. To prevent such movements, special locking plugs are installed along the edges of the slats.
However, in switchboards when installing modular devices, they are fixed using existing or additionally made external holes in the cover in accordance with the established number of switching equipment. For these purposes, the windows for the instrument elements located outside do not open fully; some of them are covered with retractable curtains.
Tip No. 2: If there is less equipment than can be installed, the remaining free part of the window is covered with plugs.
All modular-type machines, RCDs or switches have latches. They are installed by hooking the groove of the device onto one edge, while the lower part is clamped onto the rail with a little force until it clicks. To remove the part, you will need to use a flat-head screwdriver to move the latch downwards and remove it from the groove. Some devices are locked in the open latch position.
In addition to protective devices, other devices are mounted on the DIN rail:
- relay;
- electricity meters;
- automation devices;
- terminals;
- control and signaling devices;
- zero tires.
Many chain elements have double fastening units, allowing them to be mounted both on a rail and on ordinary surfaces.
All necessary electrical appliances and protective devices can be attached to the DIN rails in the panels