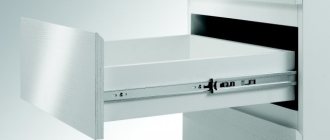
When assembling furniture, craftsmen often have to deal with the need to select and secure the guides along which the drawers move. At first glance, this process is not the most complicated and requires attentiveness and accuracy, since the durability of the structure and the ease of its operation depend on the quality of the parts and the installation performed.
Installing drawer guides
How to attach fronts to drawers
A kitchen set assembled with your own hands, and this is not so difficult to do, requires the installation of handles on the kitchen facades. It would seem that there is nothing complicated here, drill holes and screw the fittings onto the screws.
But, as practice shows, very often screwed handles begin to interfere with the full opening of furniture doors, this is especially noticeable on corner facades, or blocking of neighboring cabinets or cabinets occurs.
Therefore, before installing the handles, you need to try them on.
By the way, it should be noted that handles in the form of rails or brackets can be positioned in different ways: all horizontally, all vertically, or combine the installation. So, if you are ready to install handles yourself, then prepare the following tools:
- Drill with a drill 4 or 5 mm in diameter.
- Pencil and ruler (wooden or metal).
- Square.
- Screwdriver.
Calculation of markings for handles
It will be very convenient if you first make a template from cardboard with precisely drilled holes for fastening. That is, by applying it to the facades of the kitchen set, you can avoid long operations associated with setting the fit dimensions of each handle.
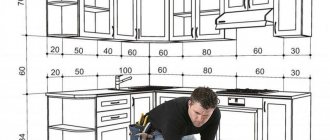
Setting dimensions and drilling the façade
Let's start by installing handles on the doors of the kitchen unit.
- The door is placed on a flat surface, let it be a table.
- In the corner where it is necessary to install the handle itself, a distance of 5 cm is set aside from one and the second edges.
- Two mutually perpendicular lines are drawn through the points. Their intersection point is the place of the first fastener. In order for the lines to turn out to be mutually perpendicular, it is necessary to use a square to draw them, applying it to the edges of the door.
- Now you need to accurately measure the distance between the mounting holes on the handle itself.
- This value is transferred to the door from the point of intersection of the two lines. If the fitting element will be installed vertically, then the displacement must be carried out downwards, if horizontally, then to the side. The second location for fastening the fittings is indicated. In this way, the exact location of the handles on the facades is determined.
- Now we need to drill. This operation is performed from the front side of the facade. The thing is that when the drill comes out of the material, it may delaminate and chips may appear along the edges. And although they will be closed with the fittings themselves, there is always the possibility of a large chip or crack appearing. Of course, this all depends on the quality of the material used and the sharpness of the drill used. Therefore, when drilling, be careful and carry out this operation carefully.
- So, two mounting holes are drilled, now you need to insert two mounting screws from the back side. Install the handle on the front side and attach it to the facade, screwing in the screws with a screwdriver. If it is not pressed tightly against the door and is loose, then you will have to remove it, put washers under the heads of the screws, and put the fastening back on.
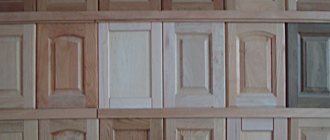
Material selection
I think each of you will decide for yourself which design to choose. Everyone has their own tastes and preferences, which, as you know, are not disputed.
Therefore, we will focus on technical aspects. And let's start with choosing the material for the facade. Do not confuse it with the usual gluing of special films on old facades. This is a completely different procedure, which will cost even less.
From the materials, several common and relevant options can be distinguished.
See also:
How to make a bookshelf with your own hands: photos, examples of work
- Chipboard. Perhaps the most common option that can be found on the market. Such new facades are affordable and suitable for those who cannot and are not ready to invest a lot of money in repairs. Suitable for budget repairs, but you shouldn’t count on many years of service;
- MDF. The next most popular is the MDF facade. Durability is much higher. This is a more affordable analogue of natural wood that does not deform under external influences. High-quality MDF is not afraid of water, mold and mildew. A smart investment for the long term;
- Glass. Here I advise you to choose plexiglass. It looks great, is highly durable, and gives the kitchen a special charm. Easily washed off from any dirt. Can act as an independent element or be combined with other materials;
- Metal. These are mainly metal profiles. Durable but lightweight, last for decades;
- Plastic and acrylic. High quality, durable, but requires careful maintenance;
- Natural wood. The most expensive option, but irreplaceable for certain cases. Wood requires special treatment against moisture and increased attention when caring. Beautiful, but not very practical. Wood looks great on facades with an integrated handle and in classic-style kitchens.
Based on the presented options, their characteristics and features, you can make the final decision yourself.
When choosing the material of the facades, take into account their location near the sink and stove. Not all materials will withstand high humidity or temperature changes.
Whether the replacement is carried out independently or with the help of specialists also depends on many factors. Do not take risks if you are not confident in your abilities, but rather find professional craftsmen with a high level of qualifications. In any case, you will save significantly compared to buying new furniture.
Installation and adjustment of drawer fronts
So, the first thing we will do is insert our drawers without fronts inside the cabinet. And now a very interesting and quite responsible part of the work begins. We need to align and evenly secure the fronts on the drawers. In general, when calculating facades, I always make the distances between them 2mm.
This is enough to, as they say, “get to size”, and “in case something happens” there is a small margin for maneuver.
Another convenient point when installing facades between which there is a 2mm gap is that you can simply put a 2mm thick PVC edge between the upper and lower facades and be sure that the gap is “caught”.
However, life is an unpredictable thing, and the life of a furniture maker is generally unpredictable chaos, depending on many external factors. Well, let's say you calculated all the gaps between the facades at the rate of 2 mm. And the sawyer Vasya took it, and missed a bit, and made your facades 1mm lower. As a result, at each joint you have a 1mm lack of façade height. Well, your lower façade may not end up looking particularly beautiful.
Therefore, no matter what, before you start installing the facades, you need to carefully measure everything and make sure that at the time of installing the facades you have a gap of 2 mm - this is exactly the gap that you need. If the sawyer Vasya did “take down” 1mm, then, probably, you need to make a gap between the facades of 3mm or take a baseball bat and go to Vasily’s house, well, invite him to play baseball or somehow otherwise agree with him that he remade the facades. Although, as for me, 3mm is not critical. The main thing is that everything is beautiful, uniform and organic.
So, you have measured everything and determined that your distance between the facades will be 2.7 mm. How to do it? Yes, very simple. We measure the internal space for the facades. Ours is 500mm. Then we measure the height of all facades. In our case, the total height of all facades is: 164mm*3=492mm. We have a difference: 8mm. We have three junctions. It turns out that each joint accounts for 2.7 mm. It turns out that simply adding a 2mm edge won’t work, but we can still take it as a guide.
How to attach fronts to drawers
Now we need to set (adjust) the facades. But first, we need to figure out how exactly we will attach these facades to the drawer. The most popular and widespread method of fastening facades is to fix them with 3-4 screws measuring 3.5x30mm. Or as furniture makers say: “Put it in the thirties.” Which in translation means: “Fix with screws 30mm long.”
Why exactly “thirty”? Well, everything is simple here too. Our chipboard thickness is 16mm. “Thirty” goes right through the front wall - this is already 16mm for us and crashes into the facade, which has the same thickness, and stops 2mm from its front side. As a result, we have a rigid fixation of the facade, as well as an aesthetic appearance of the product. However, I want to warn you that facades are different.
For example, facades made of milled MDF panels are not 16mm thick over their entire area. Here you need to carefully calculate the places where the facades are attached and make sure that it is in these places that your screw will not get into the thin area of the facade and will not come out from its front side. Well, if your drawer fronts have a uniform thickness over the entire area, then don’t bother too much with calculating where to fix the front.
Because no matter where you screw them, you still have no risk of ruining the facade by screwing it through with a screw.
In general, having decided on the places to drill holes for the “thirty”, we take a drill in our hands, load a drill with a diameter of 2 mm into it and drill through holes for 3.5x30 mm screws in the front wall of the drawer. Then we take a screwdriver and screw in the screws so that their tips do not stick out from behind the front wall and do not interfere with further installation of the drawer fronts.
Let's start installing drawer fronts
There are many ways to install drawer fronts. Furniture makers came up with them not because they have nothing else to do, but because there are situations when something is not available in production, and then they have to be sophisticated in solving this or that problem. After all, the work still needs to be done. I will tell you about the simplest and most convenient way to install a drawer front. After all, you have nowhere to rush, and if you don’t have something in stock, you can always safely go to the market or hardware store and buy it. After all, the main thing for us is quality. Right?
Preparing for installation
In terms of popularity of use, four-hinge hinges for furniture facades, codenamed “frog,” are by far the leader. Durable, easy to install, they have a lot of varieties for all types of facades, and most importantly, they make it possible to adjust the installed door horizontally and vertically in order to achieve the ideal result.
The first step is to determine the number and size of hinges that will be used for each door. Depending on the height of the facade, the following calculation is recommended:
- up to 100 cm – 2 pcs.;
- 100-150 cm – 3 pcs.;
- 150-200 cm – 4 pcs.;
- 200-250 cm – 5 pcs.
Furniture hinges have a so-called cup; for its installation, a blind recess is cut into the thickness of the door. The standard cup diameter is 35 mm (the most popular), 40 mm (for heavy structures), 26 mm (if there is not enough space for the standard). Therefore, when choosing fittings, it is important to take into account the exact dimensions of the furniture for which it is selected.
How to attach facades – Installing furniture facades on drawers – a little trick
Hello, friends!
We have already discussed with you how modules with drawers are designed and how to correctly calculate their position in the boxes.
But, in my opinion, there is another serious question on this topic - how to properly hang facades on them.
I have come across guides on this issue on the “net” more than once, and each time I was slightly surprised, to say the least.
Some teach that in order to do this, you need to screw self-tapping screws into the front side of the box.
Then, placing the façade against the frame, cover it with these self-tapping screws.
This will be the marking.
Regarding this method, you can give a lot of arguments “against”, but I will give two - the fronts need to be attached to the boxes only when the box itself is set diagonally (accordingly, it already has a back wall).
But, if the back wall is packed onto the box, then it will not be possible to push the drawer so that it hits the facade with self-tapping screws.
Even if the module has a stiffening rib instead of a back wall, there will also be a certain inconvenience - you need to clearly fix the facade in the desired position.
At the slightest shift, the procedure will need to be repeated.
And in this case, it will be quite difficult to determine which of the tiny dents left by the screws is working...
The second, fairly common “option” is when everyone does this using double-sided tape.
Here the problem is approximately the same as in the first case.
In a word, all these methods are not successful.
I'll show you how all this can be done as accurately and quite quickly as possible.
But first, the following conditions must be met:
- The box must be aligned diagonally (must be geometrically correct).
- The drawer located in it must also have the correct geometry.
Along the front edge, holes are drilled in it.
Their number depends on the size and weight of the facades being installed.
If they are small, then there can be three holes, and if they are large, then four (do not forget that if a handle is planned on the facade, then it will also serve as a fastener).
We measure the position of one of the holes made on the box relative to the entire module (with the necessary indents), and transfer these coordinates to the docking side of the facade, marking them with an awl.
The point is that we need to align everything with respect to one self-tapping screw, and then tighten all the others.
The coordinates of the hole for the second facade are measured relative to the first, and so on.
When installing, the main thing is to maintain the verticals along their side edges (sometimes this is done even due to the fact that there is a slight distortion along the horizontals, since nothing is perfect, and boxes, no matter how you assemble or display them, sometimes still turn out slightly skewed (sometimes this is even facilitated by the curvature of the slab from which they are made).
And finally, install the handles:
This is not a complicated scheme, so use it.
It is also worth adding that the method in question is good in the case when there is no access to the inside of the drawer from the outside, or when the box has an upper horizon.
In the case where there are body strips on top of the box, all this can be done even easier.
It lies on the back wall, the fronts are laid out and exposed on it, and simply secured from the inside one by one.
You can read about the nuances when installing frame MDF here, and if you are still interested in interesting options, look here.
That's all.
See you.
www.sdmeb.ru
how to make, instructions with photos
Today I will tell you about one modification of the method of attaching fronts to drawers. I was recently refinishing a kitchenette for a good old lady (it was necessary to install drawers in an unused niche for a washing machine). And then a misfortune happened - I didn’t take countersunk head screws for installation, which are recessed flush with the back surface of the facade and do not interfere with attracting it to the front part of the drawer. In general, I had to figure out how I did it and how my story will go.
So, traditionally, all the boxes were marked, seated and installed first. The drawers sit on simple ball guides.
Considering that the facades had to be mounted vertically (I didn’t have the opportunity to put the box “on my back”), as usual, I used double-sided foam tape. We glue it into strips 3-4 centimeters long and cut it with a stationery knife.
On each box you get two strips of tape - this is quite enough. We drill mounting holes in the front of the drawer (for mounting the fronts). With this method, a pair is enough, since two more screws will be replaced with screws from the handle itself.
We proceed directly to the marking of the facades themselves. Using a tape measure, we find the center of each facade and mark it with a simple pencil.
To simplify the markings, I used the conductor of the Cheron company. It is applied to a given risk. After that, with a pencil we simply mark a couple of points according to the center-to-center distance of your handles.
A couple more marking points appear on the façade.
We lay the facades on a rigid substrate and use a 4 (or 5) millimeter drill to drill through holes. Here it is quite important to keep the drill as perpendicular to the surface of the part as possible. At this point, the work with the facades can be considered complete. We proceed directly to their installation.
Peel off the protective layer from the tape.
We align and glue the first facade onto this tape.
After that, in the holes drilled for the handles, using the same drill, we drill through holes in the front part of the drawer itself.
From the inside, these holes are expanded with a 10 mm drill - under the head of the mounting screw. To a depth of 10-12 mm. It is very important to use a drill stop at this stage. Otherwise, it is very easy to fall deeper than necessary.
Then we put screws in the resulting holes, check that they protrude 3 millimeters from the outside of the facade, and screw the handle with them.
Facade care
Expert opinion
Smirnova Ekaterina Anatolevna
7 years of experience in interior design, professional architect
When the replacement has been successfully carried out, the period during which the façade will be in good condition should be tried to be extended as much as possible. Here are some general tips on how to care for it once the renovation is complete:
- Do not use abrasives or powders when cleaning kitchen elements. Also exclude brushes and other hard materials.
- Chipboard and MDF are very undemanding to care for, so it is enough to wipe them with a regular sponge coated with a cleaning agent.
- The glass is wiped with non-streaking agents, such as window cleaning sprays.
- If the surface is varnished or laminated, then wipe it with suede or other soft cloth.
Facades are a simple option for making renovations so that your kitchen looks like in the photo, but without spending a lot of money. So, if you need to update the interior (especially with your own hands), this method will come in handy.
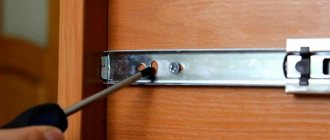
Installation of roller elements
When the markings have been made, they move on to attaching the guides.
Work begins with the box. Apply the strip to the marked line so that the roller is located at the back wall. Attach it to the bottom using self-tapping screws. It is advisable to pre-drill the holes for them: if you tighten the fasteners right away, the chipboard or wood may split. Then screw the second pair of planks to the furniture body, aligning their position along the marking line.
When assembling furniture, you must ensure that both rollers simultaneously enter the track.
Drawer height.
Now you need to correctly calculate the height of the box. Let's look at an example for Tandem:
Let's say we have a standard kitchen cabinet (cabinet), 720 mm high, made of 18mm chipboard.
Then the internal height of the case will be = 720 - 36 = 684 mm. We want to make 4 drawers in this building. Then the height of the box = (684 - 32.5*4)/4 = 138.5 mm, rounded to 138 mm. You can make the task more difficult.
We want the boxes to be different heights. For example, so that all but the bottom one are 100 mm high. The total height of the walls of the boxes = 138 * 4 = 552 mm. Three drawers 100 mm high are 300 mm. Then the lower one will be 552 - 300 = 252 mm high. I hope the idea is clear!
Adjusting the hinges
After we have installed the hinges and hung the facades, we need to adjust the gaps so that the doors do not cling to each other.
The design of the hinges with a closer allows for horizontal, height and depth adjustments.
First, you need to visually determine the unevenness of the facade in relation to the body and whether the gap is even in relation to the adjacent door.
"Vertical adjustment"
We loosen the hinge screws, align the door and tighten it again. (Fig.1)
"Depth adjustment"
That is, we adjust the gap between the body and the facade. We loosen the eccentric on the hinge arm and adjust it back and forth, then tighten it back. (Fig.2)
"Horizontal adjustment"
If the door is skewed, then using the adjusting screw we can adjust the position of the sash by turning it in different directions. (Fig.3)
To adjust, you will need a little patience, and you will achieve smooth and smooth closing and opening of your facades.